환경
- terraform 1.0.9
- tfswitch 0.12.1168
- AWS Vault 6.3.1-Homebrew
aws 계정 생성과 cli의 인스톨은 미리 되어 있어야 합니다.
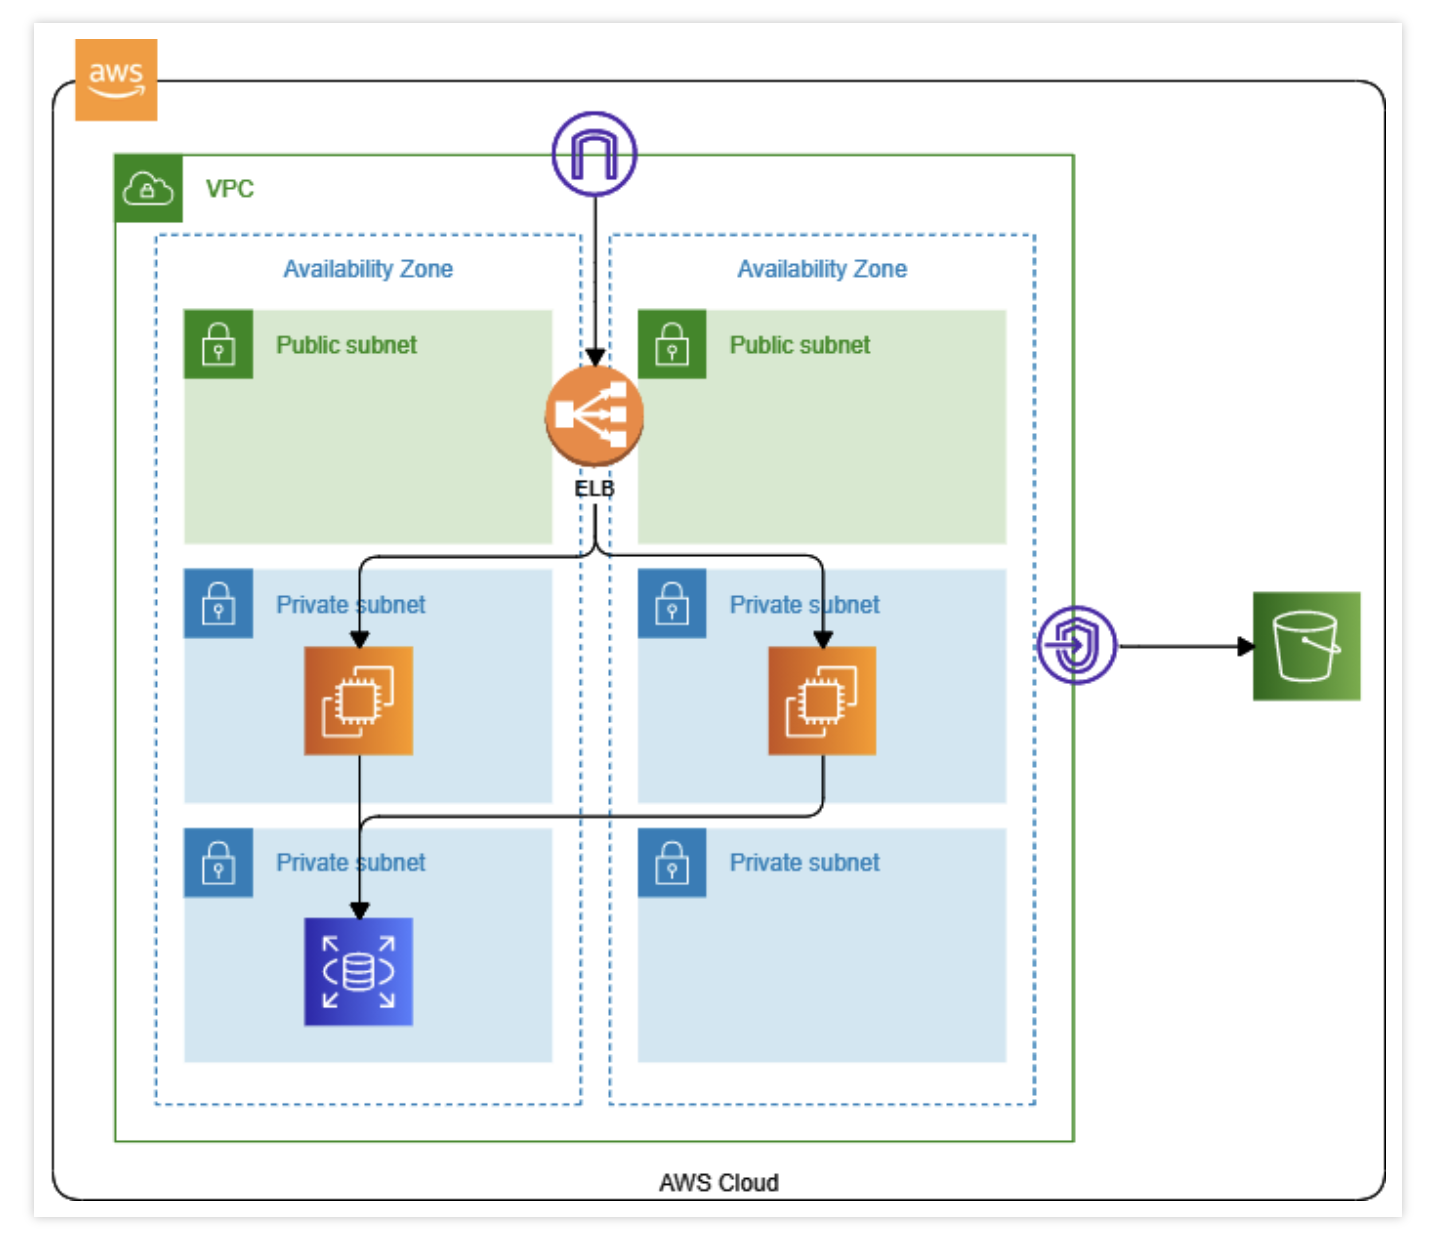
다음 구성을 테라폼으로 작성해보도록 하겠습니다.
주요 리소스
- network
- vpc
- subnet(public X 2, private X 4)
- vpc endpoint
- security group X 2 - EC2 X 2
- ALB X 1 - RDS
작성하기
1. 프로바이더 설정
사용할 테라폼의 버전과 aws 의 버전을 지정해줍니다.
# mail.tf
terraform {
  required_version = "1.0.9"

  required_providers {
    aws = "~> 3.0"
  }
}

provider "aws" {
  region = "ap-northeast-1"
}
이후 해당 디렉토리에서 tfswitch를 해주시면 tfswitch가 버전에 맞춰 테라폼을 지정해줍니다.
$ tfswitch
Reading required version from terraform file
Reading required version from constraint: 1.0.9
Matched version: 1.0.9
Switched terraform to version "1.0.9"
1.0.9 버전이 설치되어 있지 않다면 설치 후 버전이 변경됩니다.
현재 aws vault를 쓰고 있기 때문에 provider 블록에는 region만 설정되어 있습니다.
이 내용도 환경 변수로 지정하면 없어도 될 내용이지만 어떠한 내용이 설정되는지 표시하기 위해 설정하였습니다.
2. 네트워크 리소스 작성
VPC, Subnet, VPC endpoint, Internet Gateway, Security Group, Route table 등을 작성합니다.
# VPC
resource "aws_vpc" "test" {
  cidr_block = "159.0.0.0/16"
  tags = {
    "Name" = "terraform-test-vpc"
  }
}

# VPC Endpoint
resource "aws_vpc_endpoint" "s3" {
  vpc_id = aws_vpc.test.id
  service_name = "com.amazonaws.ap-northeast-1.s3"
}

# Subnets
## public subnet
resource "aws_subnet" "publicSubnet1" {
  vpc_id = aws_vpc.test.id
  cidr_block = "159.0.0.0/24"
  availability_zone = "ap-northeast-1a"
  tags = {
    "Name" = "test-public-subnet-01"
  }
}

resource "aws_subnet" "publicSubnet2" {
  vpc_id = aws_vpc.test.id
  cidr_block = "159.0.1.0/24"
  availability_zone = "ap-northeast-1c"
  tags = {
    "Name" = "test-public-subnet-02"
  }
}

## private ec2 subnet
resource "aws_subnet" "privateEC2Subnet1" {
  vpc_id = aws_vpc.test.id
  cidr_block = "159.0.2.0/24"
  availability_zone = "ap-northeast-1a"
  tags = {
    "Name" = "test-private-ec2-subnet-01"
  }
}

resource "aws_subnet" "privateEC2Subnet2" {
  vpc_id = aws_vpc.test.id
  cidr_block = "159.0.3.0/24"
  availability_zone = "ap-northeast-1c"
  tags = {
    "Name" = "test-private-ec2-subnet-02"
  }
}

## private rds subnet
resource "aws_subnet" "privateRDSSubnet1" {
  vpc_id = aws_vpc.test.id
  cidr_block = "159.0.4.0/24"
  availability_zone = "ap-northeast-1a"
  tags = {
    "Name" = "test-private-rds-subnet-01"
  }
}

resource "aws_subnet" "privateRDSSubnet2" {
  vpc_id = aws_vpc.test.id
  cidr_block = "159.0.5.0/24"
  availability_zone = "ap-northeast-1c"
  tags = {
    "Name" = "test-private-rds-subnet-02"
  }
}

# IGW
resource "aws_internet_gateway" "testIGW" {
  vpc_id = aws_vpc.test.id
  tags = {
    "Name" = "testIGW"
  }
}

# Route Table
resource "aws_route_table" "testPublicRTb" {
  vpc_id = aws_vpc.test.id


  route {
    cidr_block = "0.0.0.0/0"
    gateway_id = aws_internet_gateway.testIGW.id
  }

  tags = {
    "Name" = "test-public-rtb"
  }
}

resource "aws_route_table" "testPrivateRTb" {
  vpc_id = aws_vpc.test.id
  tags = {
    "Name" = "test-private-rtb"
  }
}

## route
### vpc endpoint associate
resource "aws_vpc_endpoint_route_table_association" "publicRTbEndpoint" {
  route_table_id = aws_route_table.testPublicRTb.id
  vpc_endpoint_id = aws_vpc_endpoint.s3.id
}

resource "aws_vpc_endpoint_route_table_association" "privateRTbEndpoint" {
  route_table_id = aws_route_table.testPrivateRTb.id
  vpc_endpoint_id = aws_vpc_endpoint.s3.id
}

### subnet associate
resource "aws_route_table_association" "publicRTbAssociation01" {
  subnet_id = aws_subnet.publicSubnet1.id
  route_table_id = aws_route_table.testPublicRTb.id
}

resource "aws_route_table_association" "publicRTbAssociation02" {
  subnet_id = aws_subnet.publicSubnet2.id
  route_table_id = aws_route_table.testPublicRTb.id
}

resource "aws_route_table_association" "privateRTbAssociation01" {
  subnet_id = aws_subnet.privateEC2Subnet1.id
  route_table_id = aws_route_table.testPrivateRTb.id
}

resource "aws_route_table_association" "privateRTbAssociation02" {
  subnet_id = aws_subnet.privateEC2Subnet2.id
  route_table_id = aws_route_table.testPrivateRTb.id
}

resource "aws_route_table_association" "privateRTbAssociation03" {
  subnet_id = aws_subnet.privateRDSSubnet1.id
  route_table_id = aws_route_table.testPrivateRTb.id
}

resource "aws_route_table_association" "privateRTbAssociation04" {
  subnet_id = aws_subnet.privateRDSSubnet2.id
  route_table_id = aws_route_table.testPrivateRTb.id
}
소스가 길어보이지만 내용 자체는 반복이 많습니다.
반복되는 내용은 많은데 소스가 길어지는 것은 아무래도 한눈에 봐도 이해가 되지 않고 비효율적입니다.
이어서 security group을 작성합니다.
# Security Group
## public Seucurity Group
resource "aws_security_group" "publicSG01" {
  name = "public-SG-01"
  description = "Allow all HTTP"
  vpc_id = aws_vpc.test.id
  ingress {
    cidr_blocks = [ "0.0.0.0/0" ]
    from_port = 80
    protocol = "tcp"
    to_port = 80
  }

  egress {
    cidr_blocks = [ "0.0.0.0/0" ]
    from_port = 0
    protocol = "-1"
    to_port = 0
  }
}

## private Security Group
resource "aws_security_group" "privateEC2SG01" {
  name = "private-ec2-sg-01"
  description = "Allow HTTP from ALB"
  vpc_id = aws_vpc.test.id
  ingress = [ {
    cidr_blocks = null
    description = null
    from_port = 80
    ipv6_cidr_blocks = null
    prefix_list_ids = null
    protocol = "tcp"
    security_groups = [ aws_security_group.publicSG01.id ]
    self = false
    to_port = 80
  } ]

  egress = [ {
    cidr_blocks = [ "0.0.0.0/0" ]
    description = null
    from_port = 0
    ipv6_cidr_blocks = null
    prefix_list_ids = null
    protocol = "-1"
    security_groups = null
    self = false
    to_port = 0
  } ]
}
ALB용 public security group과 ec2용 security group 을 만들어 줍니다.
3. EC2 리소스 작성
2 개의 EC2 인스턴스를 작성합니다.
# ec2.tf
data "aws_ami" "amazonLinux" {
  most_recent = true
  owners = [ "amazon" ]

  filter {
    name = "name"
    values = [ "amzn2-ami-hvm-2.0.*" ]
  }

  filter {
    name = "virtualization-type"
    values = [ "hvm" ]
  }

  filter {
    name = "architecture"
    values = [ "x86_64" ]
  }
}

resource "aws_instance" "testEC201" {
  ami = data.aws_ami.amazonLinux.id
  instance_type = "t3.medium"
  vpc_security_group_ids = [
    aws_security_group.privateEC2SG01.id
   ]
  subnet_id = aws_subnet.privateEC2Subnet1.id
  key_name = "publicTestKey"

  root_block_device {
    volume_size = 50
    volume_type = "gp3"
    tags = {
      "Name" = "test-private-ec2-01-vloume-1"
    }
  }

  tags = {
    "Name" = "test-private-ec2-01"
  }
}

resource "aws_instance" "testEC202" {
  ami = data.aws_ami.amazonLinux.id
  instance_type = "t3.medium"
  vpc_security_group_ids = [
    aws_security_group.privateEC2SG01.id
   ]
  subnet_id = aws_subnet.privateEC2Subnet2.id
  key_name = "publicTestKey"

  root_block_device {
    volume_size = 50
    volume_type = "gp3"
    tags = {
      "Name" = "test-private-ec2-02-vloume-1"
    }
  }

  tags = {
    "Name" = "test-private-ec2-02"
  }
}
EC2의 ami 인수에 직접 AMI ID 를 기입해도 되지만 데이터 소스를 활용하여 좀 더 능동적인 값이 설정되도록 하였습니다.
데이터 소스란 테라폼 외부에서 정의된 값을 편하게 사용할 수 있도록 해주는 블록입니다.
키 페어는 새로 생성하지 않고 기존에 있던 키 페어를 그대로 사용하였습니다.
네트워크 환경과 EC2가 작성되었으니 이어서 로드 밸런서를 작성합니다.
# alb.tf
resource "aws_alb" "test" {
  name = "test-alb"
  internal = false
  load_balancer_type = "application"
  security_groups = [ aws_security_group.publicSG01.id ]
  subnets = [ aws_subnet.publicSubnet1.id , aws_subnet.publicSubnet2.id ]
  enable_cross_zone_load_balancing = true
}


resource "aws_alb_target_group" "test" {
  name = "tset-alb-tg"
  port = 80
  protocol = "HTTP"
  vpc_id = aws_vpc.test.id
}

resource "aws_alb_target_group_attachment" "privateInstance01" {
  target_group_arn = aws_alb_target_group.test.arn
  target_id = aws_instance.testEC201.id
  port = 80
}

resource "aws_alb_target_group_attachment" "privateInstance02" {
  target_group_arn = aws_alb_target_group.test.arn
  target_id = aws_instance.testEC202.id
  port = 80
}

resource "aws_alb_listener" "test" {
  load_balancer_arn = aws_alb.test.arn
  port = 80
  protocol = "HTTP"

  default_action {
    type = "forward"
    target_group_arn = aws_alb_target_group.test.arn
  }
}
콘솔에서 작업하듯이 로드 밸런서를 생성하고 타겟 그룹과 리스너를 작성 후 로드 밸런서에 연결합니다.
HTTP의 80 포트만 포워딩하는 단순한 구성이라 내용이 길지 않지만 HTTPS나 내부 로드 밸런싱 등의 설정도 가능합니다.
4. RDS 리소스 작성
mariaDB를 이용하는 RDS를 작성합니다.
# rds.tf
resource "aws_db_subnet_group" "testSubnetGroup" {
  name = "test"
  subnet_ids = [
    aws_subnet.privateRDSSubnet1.id,
    aws_subnet.privateRDSSubnet2.id
  ]

  tags = {
    "Name" = "test-subnet-group"
  }

}

resource "aws_db_instance" "testDB" {
  allocated_storage = 20
  max_allocated_storage = 50
  availability_zone = "ap-northeast-1a"
  db_subnet_group_name = aws_db_subnet_group.testSubnetGroup.name
  engine = "mariadb"
  engine_version = "10.5"
  instance_class = "db.t3.small"
  skip_final_snapshot = true
  identifier = "test-maridb"
  username = "root"
  password = var.db_password
  name = "testDB"
  port = "3306"
}
password에 문자열 값이 아닌 변수를 활용하였습니다.
변수를 사용하기 위해선 변수 파일의 작성이 필요합니다.
# variable.tf
variable "db_password" {
  description = "RDS root user password"
  type        = string
  sensitive   = true
}
이렇게 변수 파일을 만듦으로써 plan이나 apply를 할 때 대화형 콘솔에서 직접 값을 타이핑 할 수 있습니다.
$ aws-vault exec sujae-tes -- terraform plan
Enter token for arn:aws:iam::+++++:mfa/-----:
var.db_password
  RDS root user password

  Enter a value: testtest
5. S3 리소스 작성
마지막으로 S3를 작성합니다.
resource "aws_s3_bucket" "testS3" {
  bucket = "sujate-terraform-test-bucket"
  acl    = "private"

  versioning {
      enabled = true
  }

  lifecycle_rule {
    prefix = "image/"
    enabled = true

    noncurrent_version_expiration {
      days = 180
    }
  }

  tags = {
    "Name" = "sujae-test-bucket"
  }
}
간단하게 버전 기록과 수명 주기를 설정한 버킷입니다.
image/test.jpg 등과 같이 이름 접두사가 겹치는 파일 중 최신 버전이 아닌 파일은 180일 이후에 삭제되도록 설정하였습니다.
작성 마무리
여기까지 완성하였다면 apply를 하여 결과를 확인합니다.
$ aws-vault exec test -- terraform apply
전부 잘 되었다면 작성 완료입니다!
이제 인스턴스에 접속하여 서버를 설정합니다.
해당 리소스를 사용하지 않는 다면 destroy로 생성한 리소스를 삭제합니다.
$ aws-vault exec test -- terraform destroy