비효율적 이미지 사용 분석
-
업로드 되는 이미지가 고화질인 경우가 많아 서버 통신 시간이 오래 걸린다.
-
admin 웹에서 list, detail, 앱에선 list, detail로 사용하는 중
-
admin
- list : 최대 85 x 85
- detail : 최대 320 x 320
-
lounge app
- list : 최대 150 x 150- detail 최대 430 x 430 (iphone14 pro max 기준)
-
딱 맞춘 크기보다는 2배 정도 되는 사이즈를 사용하는 것이 적합해 보인다.
목표
- small, large 두가지로 나누고 관리하면 좋겠다 싶지만 서버쪽 수정이 이루어 져야 하므로 하나로 관리.
- 큰 이미지의 경우 1200x1200으로 리사이징 후 업로드하여 이미지를 사용.(그것보다 작은 경우는 그대로 사용.)
- 파일의 시간을 줄여 서버 통신 시간을 줄여 유저 체감을 높일 수 있음.
설정
- 기존은 File[]로 이미지를 쓰고있었음.
- 같은 형태로 리턴하는 resize 함수 만들기
const resizeImage = (file: File, maxWidth: number, maxHeight: number): Promise<File> => {
  return new Promise((resolve, reject) => {
    // 새로운 이미지 html element를 만든다.
    const img = new Image();
    // 그래픽을 사용할때 쓰는 canvas태그를 만든다.
    const canvas = document.createElement('canvas');
    // 2d render
    const ctx = canvas.getContext('2d');
    // blob 주소 생성
    img.src = URL.createObjectURL(file);
    // img 요소가 준비된 후 리사이징 실행.
    img.onload = () => {
      // 기존 이미지의 width, height
      let width = img.width;
      let height = img.height;
	  // 최대 width 값보다 크다면 줄여야 하는 비율 만큼 height를 줄이고 width에 maxWidth를 할당.
      if (width > maxWidth) {
        height *= maxWidth / width;
        width = maxWidth;
      }
	  // 최대 height 값보다 크다면 줄여야 하는 비율 만큼 width를 줄이고 height에 maxHeight를 할당.
      if (height > maxHeight) {
        width *= maxHeight / height;
        height = maxHeight;
      }
      // 조절한 width, height를 canvas에
      canvas.width = width;
      canvas.height = height;
	 // canvas에 이미지를 그린다.
      ctx?.drawImage(img, 0, 0, width, height);
	 // canvas가 포함한 이미지를 Blob 객체로 만든다.
      canvas.toBlob((resizedImage: Blob | null) => {
        if (resizedImage) {
          const resizedFile = new File([resizedImage], file.name, { type: file.type });

          resolve(resizedFile);
        } else {
          reject(new Error('Failed to resize image'));
        }
      })
	  // 에러의 경우
      img.onerror = () => {
        reject(new Error('Failed to resize image'));
      };
    };
  });
};- 이 함수를 파일의 배열을 받아 그 수만큼 반복하는 함수를 만들어서 멀티 이미지들에 사용함.
const resizeMultipleImages = async (files: File[], maxWidth: number, maxHeight: number) => {
  const resizedImages = [];

  for (const file of files) {
    const resizedImage = await resizeImage(file, maxWidth, maxHeight);
    resizedImages.push(resizedImage);
  }

  return resizedImages;
};
결과
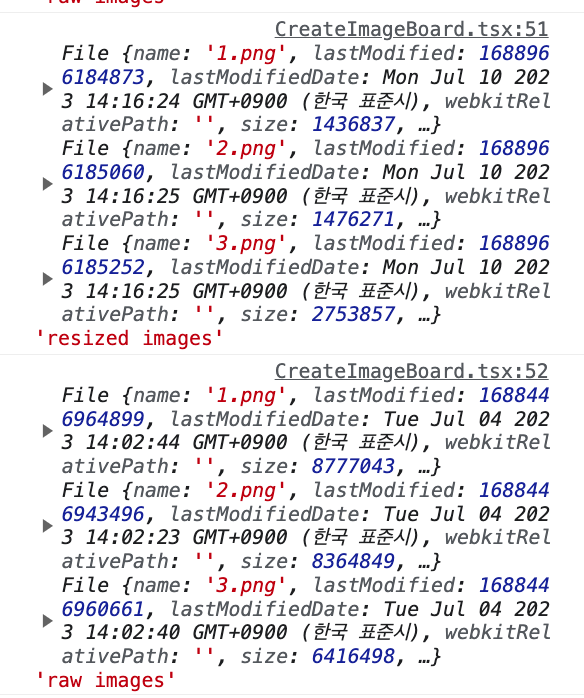
- 2000 * 3000 사진을 리사이징 했을때 용량이 줄어드는게 확연히 보임.
간단하게 사이즈 용량을 줄이는 정도로 최적화를 해봤음.

FE 입니다.