오늘 뇌 터질거 같아서 일단 실습내용 토대로 전부 적었다 🫥
1. app urls 분할 및 연결
- app name : articles
# articles/urls.py

from django.urls import path
from . import views

app_name = 'articles'
urlpatterns = [


]
# pjt/urls

from django.contrib import admin
from django.urls.import path, include

urlpatterns = [
	path('admin/',admin.site.urls),
    path('articles/', include('articles.urls)),

]
2. index 페이지 작성해보기 & 전체 게시글 조회
- models.py 모델 이름 : Todo
# articles/urls.py

from django.urls import path
from . import views

app_name = 'articles'
urlpatterns = [
	path('', views.index, name='index),
]
# articles/views.py

def index(request):
	articles = Todo.objects.all()

    context = {
    	'articles':articles,
      }
	return render(request, 'articles/index.html', context)
<!-- index.html -->

<h1> index </h1>

{% for article in articles %}
      <p>글 번호:{{ articles.pk }}</p>
      <p>글 제목:{{ articles.title }}</p>
      <p>글 내용:{{ articles.content }}</p>
      <hr>
    {% endfor %}
- for 사용하기

3. 단일 게시글 조회
- detail 페이지 만들기
# articles/urls.py

urllatterts = [

    path('<int:pk>/', views.detail, name='detail'),
 ]
# articles/views.py
def detail(request, pk)
article = Article.objects.get(pk=pk)
context = {
'article' : article,
}
return render(request, 'article/detail.html' context)<h2> Detail </h2>
<h3> {{ article.pk }} </h3>
<hr>
<p>제목:{{article.title}}</p>
<p>내용:{{article.content}}</p>
<p>작성시간:{{article.created_at}}</p>
<p>수정시간:{{article.updated_at}}</p>
<hr>
<a href=" {% url 'articles:index' %}">back</a>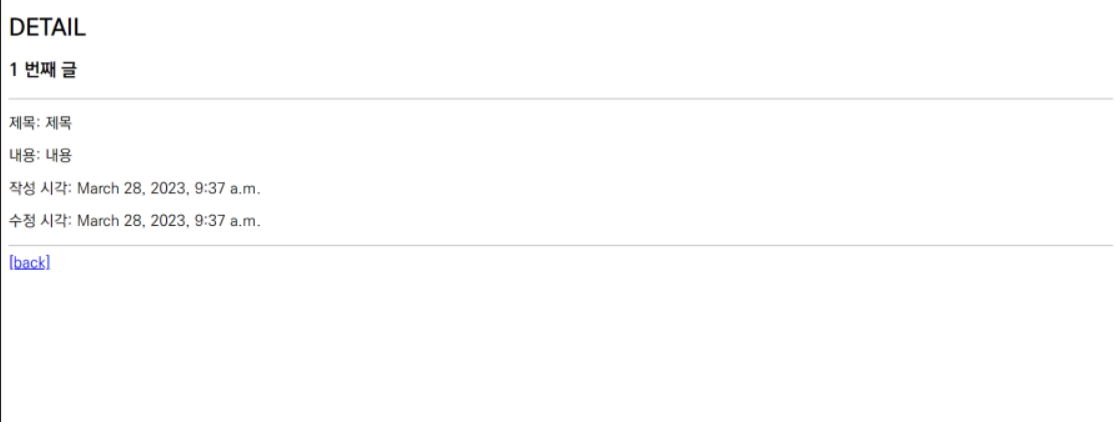
- 상세페이지로 이동하는 index.html
 <h1>Articles</h1>
 <a href="{% url 'articles:new' %}">new</a>
 {% for article in articles %}
    <p>글 번호:{{ article.pk }}</p>

   	<a href=" {% url 'articles:detail' article.pk %}">
    <p>글 제목:{{ article.title }}</p></a>

      <p>글 내용:
        {{ article.content }}</p>
      <hr>
    {% endfor %}
4. Create 로직을 구현하기 위해서 필요한 >> new 페이지 만들기
#articles/urls.py

from django.urls import path
from . import views

app_name = 'articles'
urlpatterns = [
    path('new/',views.new, name='new'),
]
# articles/views.py

def new(request):
    return render(request,'articles/new.html')
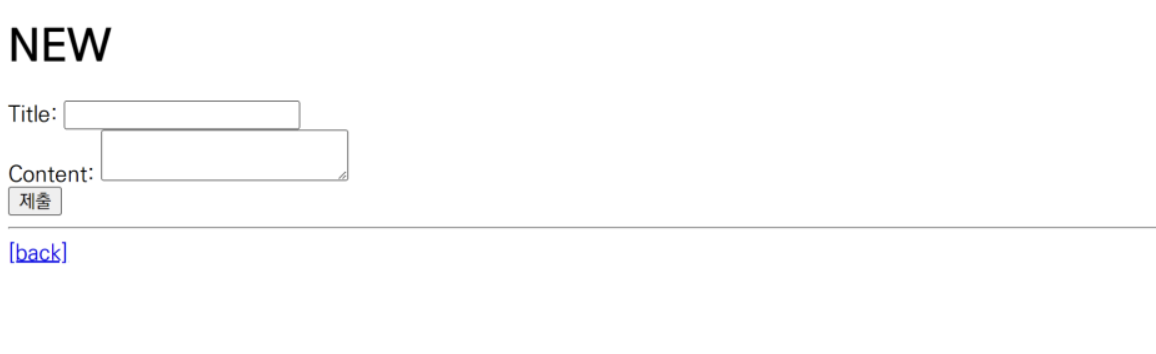
<!-- articles/new.html -->
<form action="{% url 'articles:create' %}"method="GET">
      <div>
        <label for="title">Title:</label>
        <input type="text" name='title' id='title'>
      </div>
      <div>
        <label for="content">Content:</label>
        <textarea name="content" id="content"></textarea>
      </div>
      <input type="submit">
    </form>
    <hr>
    <a href="{% url 'articles:index' %}">[back]</a>
- form 형식 , method !
- name 지정 잊지말기 !
- url은 create 만들고 지정하는게 좋다 잊지말고 지정할것 !
5. create 페이지 만들기
#articles/urls.py

from django.urls import path
from . import views

app_name = 'articles'
urlpatterns = [
   path('create/',views.create, name='create'),
]
# articles/views.py

def create(request):
    title = request.GET.get('title')
    content = request.GET.get('content')

    article = Article(title=title, content=content)
    article.save()

    return render(request,'articles/create.html')
= request.GET.get('') 형식 잊지 말 것
- save() 꼭 괄호까지 반드시 할것 !!!
<h1>게시글이 문제없이 작성되었습니다.</h1>
6. new 페이지에 작성해보고 db파일에서 작성이 잘 저장이 되는지 반 드 시 확인해볼것 !!!!!!!!
- input< type= 'number'> : 숫자 위아래
- input< type = 'date'> : 달력