1. Node 서버에서 React 열기
파일 구조
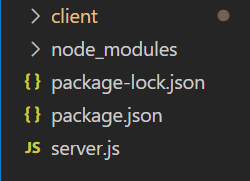
- client - CRA로 만든 react 프로젝트가 담긴 폴더
- server.js - node 서버
사전 작업
- Node.js 설치
- client 폴더 안에 react 프로젝트(CRA) 작성 후 'npm run build'
- root 폴더에서 'nodemon','express'설치
- root 폴더에 server.js 파일 생성
root/package.json
dependencies": {
    "express": "^4.18.2",
    "nodemon": "^2.0.20"
  }
1) Node 서버 설정 (server.js)
A. github 저장소에 연결되지 않은 react
const express =require('express');
const app =express();
const path =require("path");
const port = 8000;

app.use(express.static(path.join(__dirname, 'client/build')));

app.get('/', function (req, res) {
  res.sendFile(path.join(__dirname, '/client/build/index.html'));
});
// 8000 포트에서 서버가 열림
app.listen(port, ()=>{
  console.log("open server", port)
})
app.use(express.static(path.join(__dirname, 'client/build')))
url의 기본값이 '/'으로 서버가 열리면, build된 react 프로젝트의 내용이 담긴 client/build 폴더를 사용할 수 있다.
path.join(__dirname, '경로')
- __dirname : 파일 명을 제외한 절대경로
- path.join([...paths]): 인자들을 하나의 경로로 합쳐 반환함
app.get('/', function (req, res) {res.sendFile(path.join(__dirname,'/client/build/index.html'))
서버가 열리고, 상대경로가 '/'일때 즉, localhost:8000 일때 build/index.html 파일을 프론트엔드에 전달한다.
index.html이 프론트엔드에서 열리면서 index.html은 client/build에서 필요한 js,css등을 불어온다.
B. github 저장소에 연결된 react
만약 react 프로젝트와 gitbhub 저장소를 연결 했다면 app.use와 app.get의 경로를 다르게 설정해주어야 한다. A 와 같이 경로를 설정한다면 404 에러가 발생한다.
👩💻 React와 Node.js 연동시 404 error 글 보러가기
저장소에 연결되지 않은 경우 client/build/index.html
<!-- ..... -->
<link rel="manifest" href="/manifest.json"/>
<title>React App</title>
<script defer="defer" src="/static/js/main.29dc12ff.js"></script>
<link href="/static/css/main.073c9b0a.css" rel="stylesheet">
<!-- ..... -->
저장소에 연결 된 경우 client/build/index.html
<!-- ..... -->
<link rel="manifest" href="/저장소이름/manifest.json"/>
<title>React App</title>
<script defer="defer" src="/저장소이름/static/js/main.29dc12ff.js"></script>
<link href="/저장소이름/static/css/main.073c9b0a.css" rel="stylesheet">
<!-- ..... -->
⚠️ github 저장소와 연결된 react 프로젝트를 build하면, 그렇지 않은 경우와 달리 manifest.json과 css, js 파일의 경로 앞에는 저장소의 이름이 추가로 붙게 된다.
그렇기 때문에 app.use와 app.get의 경로를 다음과 같이 수정해주어야한다.
app.use('/저장소이름',express.static(path.join(__dirname, 'client/build')));

app.get('/저장소 이름' ,function (req, res) {
  res.sendFile(path.join(__dirname, '/client/build/index.html'));
})
그리고 서버를 실핼 시킨 후에 localhost:8000/저장소이름 으로 들어가면, react 프로젝트가 잘 작동하는 것을 볼 수 있다.
2) node 서버 실행
server.js로 작성한 node 서버를 실행시키려면 nodemon server.js 를 명령어를 사용하면 된다.
nodemone은 지정된 파일의 변화가 있을 시에 node를 다시 실행 시켜주는 모듈로, 다른 js나 css 파일의 변화도 감지하고 싶다면 nodemon -e js, html server.js 를 명령어로 사용하면 되고, package.json의 scripts에 해당 명령어를 추가해 보다 간편하게 사용할 수 있다.
- root/package.json
 "scripts": {
   "dev": "nodemon -e js, html server.js"
 }
2. Node 서버 React로 데이터 보내기
1) get 요청
- root/server.js
app.get('/', (req, res)=>{
  res.send("data")
  // res.json("data")
})- root/client/src/App.js
//...
async function getData (){
const data = await (await fetch('/', {
method:"GET"
})).json()
...}

//...
⚠️ 서버로 부터 받은 데이터가 Promise 일 경우
try{
	const data =await fetch('/', {
	method:"GET"
	}).json();
  ....
  }catch(error){
  ....
  }
위와 같이 data를 받아온다면 data는 Promise 상태가 된다.
이를 해결하기 위해서는 await fetch() 를 await로 다시 한번 더 감싸주어야한다. 그러면 fetch가 완료 후에 json 함수가 진행된다.
const data =await (await fetch('/', {
	method:"GET"
	}
)
).json()
2) post 요청
만약, 서버로 특정한 데이터를 보내서 해당 데이터를 활용해 리소스를 만들어야하는 경우( ex : 외부에서 데이터를 가져오는 경우)라면 post 요청을 활용하면 된다.
프론트 엔드 requset의 body를 사용하기 위해서는 body-parser라는 모듈을 설치해야한다.
예제 : 프론트엔드에서 보낸 데이터를 활용해 외부에서 데이터를 가져와 이를 프론트엔드에 넘기는 작업
-
사전 작업 : npm i axios
외부에서 데이터를 가져오기 위해서 axios 모듈을 설치해야한다.
fetch는 웹브라우저에서 지원하는 API이기 때문에 백엔드인 node.js에서는 사용할 수 없다.
-
/src/App.js
const reqBody ={ apiUrl:url }; try{ const data =await (await fetch('/', { method:"POST" , headers:{ //json 형태로 받아옴 (option ) 'Content-Type':'application/json' }, body:JSON.stringify(reqBody) })).json(); .... }catch(error){ .... } -
/server.js
  //....
const axios =require('axios');
const bodyParser = require('body-parser');
app.use(bodyParser.json());
app.use(bodyParser.urlencoded({extended:false}));
  //....
app.post ('/', async(req, res)=>{
 const url = req.body.url;
  try {
    const result = await axios.get(url);
    const response = result.data;
    res.send(data);
  } catch (error) {
    const e =`[Error]:${error}`;
    res.json({message:e});
  }
})
[정리]
- get 요청은 get을 받고, post 요청은 post로 받는다.
- 프론트의 requset의 body를 사용하고 싶다면 body-parser 모듈을 사용한다.
- node 에서는 fetch를 사용할 수 없고, axios를 사용해 외부에서 데이터들 받아올 수 있다.
참고 자료