- 프록시 팩토리
- 포인트컷, 어드바이스, 어드바이저
- 프록시 팩토리
1. 프록시 팩토리
1-1. 소개
동적 프록시를 사용할 때 문제점을 다시 확인해보자.
문제점
- 인터페이스가 있는 경우에는 JDK 동적 프록시를 적용하고, 그렇지 않은 경우에는 CGLIB를 적용하려면 어떻게 해야할까?
- 두 기술을 함께 사용할 때 부가 기능을 제공하기 위해 JDK 동적 프록시가 제공하는
InvocationHandler와 CGLIB가 제공하는MethodInterceptor를 각각 중복으로 만들어서 관리해야 할까?
스프링 지원 프록시
- 스프링은 동적 프록시를 통합해서 편리하게 만들어주는 프록시 팩토리(
ProxyFactory)라는 기능을 제공한다. - 이전에는 상황에 따라서 JDK 동적 프록시를 사용하거나 CGLIB를 사용해야 했다면, 이제는 이 프록시 팩토리 하나로 편리하게 동적 프록시를 생성할 수 있다.

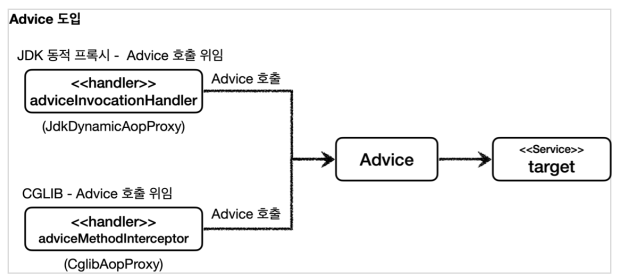
Advice
- 개발자는
InvocationHandler나MethodInterceptor를 신경쓰지 않고,Advice만 만들면 된다. 결과적으로InvocationHandler나MethodInterceptor는Advice를 호출하게 된다. - 프록시 팩토리를 사용하면
Advice를 호출하는 전용InvocationHandler,MethodInterceptor를 내부에서 사용한다.
1-2. 예제 코드1
Advice 만들기
Advice는 프록시에 적용하는 부가 기능 로직이다.- JDK 동적 프록시가 제공하는
InvocationHandler와 CGLIB가 제공하는MethodInterceptor의 개념과 유사한다. 둘을 개념적으로 추상화 한 것이다.
MethodInterceptor
public interface MethodInterceptor extends Interceptor {
    Object invoke(MethodInvocation invocation) throws Throwable;
}
MethodInvocation invocation- 내부에는 다음 메서드를 호출하는 방법, 현재 프록시 객체 인스턴스,
args, 메서드 정보 등이 포함되어 있다. 기존에 파라미터로 제공되는 부분들이 이 안으로 모두 들어갔다고 생각하면 된다.
- 내부에는 다음 메서드를 호출하는 방법, 현재 프록시 객체 인스턴스,
MethodInterceptor는Interceptor를 상속하고Interceptor는Advice인터페이스를 상속한다.
TimeAdvice
package hello.proxy.common.advice;

import lombok.extern.slf4j.Slf4j;
import org.aopalliance.intercept.MethodInterceptor;
import org.aopalliance.intercept.MethodInvocation;


@Slf4j
public class TimeAdvice implements MethodInterceptor {

    @Override
    public Object invoke(MethodInvocation invocation) throws Throwable {
        log.info("TimeProxy 실행");
        long startTime = System.currentTimeMillis();

        Object result = invocation.proceed();

        long endTime = System.currentTimeMillis();
        long resultTime = endTime - startTime;
        log.info("TimeProxy 종료 resultTime={}", resultTime);

        return result;
    }
}
MethodInterceptor인터페이스를 구현Object result = invocation.proceed()invocation.proceed()를 호출하면target클래스를 호출하고 그 결과를 받는다.target클래스의 정보는MethodInvocation invocation안에 모두 포함되어 있다.
ProxyFactoryTest
package hello.proxy.proxyfactory;

import hello.proxy.common.advice.TimeAdvice;
import hello.proxy.common.service.ServiceImpl;
import hello.proxy.common.service.ServiceInterface;
import lombok.extern.slf4j.Slf4j;
import org.junit.jupiter.api.DisplayName;
import org.junit.jupiter.api.Test;
import org.springframework.aop.framework.ProxyFactory;

@Slf4j
public class ProxyFactoryTest {

    @Test
    @DisplayName("인터페이스가 있으면 JDK 동적 프록시 사용")
    void interfaceProxy(){
        ServiceInterface target = new ServiceImpl();
        ProxyFactory proxyFactory = new ProxyFactory(target);
        proxyFactory.addAdvice(new TimeAdvice());
        ServiceInterface proxy = (ServiceInterface) proxyFactory.getProxy();
        log.info("targetClass={}", target.getClass());
        log.info("proxyClass={}", proxy.getClass());

        proxy.save();
    }
}
new ProxyFactory(target): 프록시 팩토리를 생성할 때, 생성자에 프록시의 호출 대상을 함께 넘겨준다. 만약 인스턴스에 인터페이스가 있다면 JDK 동적 프록시 사용, 없고 구체 클래스만 있다면 CGLIB를 통해서 동적 프록시를 생성한다.proxyFactory.addAdvice(new TimeAdvice()): 프록시 팩토리를 통해서 만든 프록시가 사용할 부가 기능 로직을 설정
프록시 팩토리를 통한 프록시 적용 확인
AopUtils.isAopProxy(proxy): 프록시 팩토리를 통해서 프록시가 생성되면 JDK 동적 프록시나, CGLIB 모두 참이다.AopUtils.isJdkDynamicProxy(proxy): 프록시 팩토리를 통해서 프록시가 생성되고, JDK 동적 프록시인 경우 참AopUtils.isCglibProxy(proxy): 프록시 팩토리를 통해서 프록시가 생성되고, CGLIB 동적 프록시인 경우 경우 참
1-3. 예제 코드2
ProxyFactoryTest - concreteProxy 추가
    @Test
    @DisplayName("구체 클래스만 있으면 CGLIB 사용")
    void concreteProxy(){
        ConcreteService target = new ConcreteService();
        ProxyFactory proxyFactory = new ProxyFactory(target);
        proxyFactory.addAdvice(new TimeAdvice());
        ConcreteService proxy = (ConcreteService) proxyFactory.getProxy();
        log.info("targetClass={}", target.getClass());
        log.info("proxyClass={}", proxy.getClass());

        proxy.call();

        // AopUtils 프록시 팩토리를 통해서 만든 프록시만 사용 가능
        assertThat(AopUtils.isAopProxy(proxy)).isTrue();
        assertThat(AopUtils.isJdkDynamicProxy(proxy)).isFalse();
        assertThat(AopUtils.isCglibProxy(proxy)).isTrue();
    }
CGLIB 프록시가 적용된 것도 확인할 수 있다.
ProxyFactoryTest - proxyTargetClass 추가
    @Test
    @DisplayName("ProxyTargetClass 옵션을 사용하면 인터페이스가 있어도 CGLIB를 사용하고, 클래스 기반 프록시 사용")
    void proxyTargetClass(){
        ServiceInterface target = new ServiceImpl();
        ProxyFactory proxyFactory = new ProxyFactory(target);
        // 추가
        proxyFactory.setProxyTargetClass(true);
        proxyFactory.addAdvice(new TimeAdvice());
        ServiceInterface proxy = (ServiceInterface) proxyFactory.getProxy();
        log.info("targetClass={}", target.getClass());
        log.info("proxyClass={}", proxy.getClass());

        proxy.save();

        // AopUtils 프록시 팩토리를 통해서 만든 프록시만 사용 가능
        assertThat(AopUtils.isAopProxy(proxy)).isTrue();
        assertThat(AopUtils.isJdkDynamicProxy(proxy)).isFalse();
        assertThat(AopUtils.isCglibProxy(proxy)).isTrue();
    }
- 프록시 팩토리는
proxyTargetClass라는 옵션을 제공하는데, 이 옵션에true값을 넣으면 인터페이스가있어도 강제로 CGLIB를 사용한다.
프록시 팩토리의 기술 선택 방법
- 대상에 인터페이스가 있으면: JDK 동적 프록시, 인터페이스 기반 프록시
- 대상에 인터페이스가 없으면: CGLIB, 구체 클래스 기반 프록시
proxyTargetClass=true: CGLIB, 구체 클래스 기반 프록시, 인터페이스 여부와 상관없음
스프링 부트는 AOP를 적용할 때 기본적으로
proxyTargetClass=true로 설정해서 사용한다.
따라서 인터페이스가 있어도 항상 CGLIB를 사용해서 구체 클래스를 기반으로 프록시를 생성한다.
2. 포인트컷, 어드바이스, 어드바이저
2-1. 소개
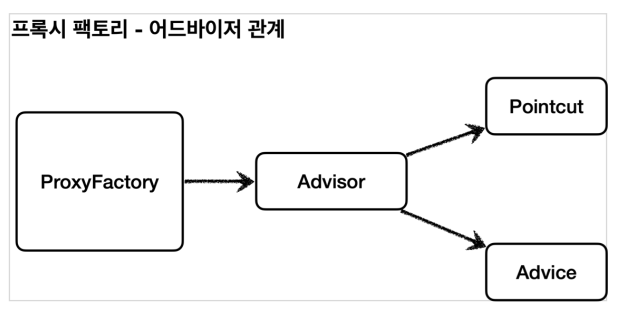
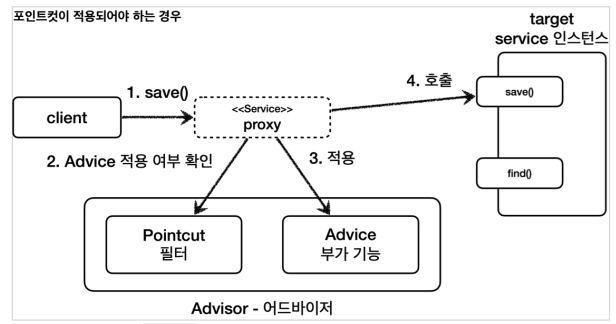
- 포인트컷(PointCut): 어디에 부가 기능을 적용할지, 어디에 부가 기능을 적용하지 않을 지 판단하는 필터링 로직, 주로 클래스와 메서드 이름으로 필터링 한다.
- 어드바이스(Advice): 프록시가 호출하는 부가 기능
- 어드바이저(Advisor): 하나의 포인트컷과 하나의 어드바이스를 가지고 있는 것
조언(Advice)을 어디(Pointcut)에 할 것인가?
조언자(Advisor)는 어디(Pointcut)에 조언(Advice)을 해야할지 알고 있다.
2-2. 어드바이저
하나의 포인트컷과 하나의 어드바이스를 가지고 있다.
AdvisorTest
package hello.proxy.advisor;

import hello.proxy.common.advice.TimeAdvice;
import hello.proxy.common.service.ServiceImpl;
import hello.proxy.common.service.ServiceInterface;
import org.junit.jupiter.api.Test;
import org.springframework.aop.Pointcut;
import org.springframework.aop.framework.ProxyFactory;
import org.springframework.aop.support.DefaultPointcutAdvisor;

public class AdvisorTest {

    @Test
    void advisortest1(){
        ServiceInterface target = new ServiceImpl();
        ProxyFactory proxyFactory = new ProxyFactory(target);
        // 포인트 컷
        DefaultPointcutAdvisor advisor = new DefaultPointcutAdvisor(Pointcut.TRUE, new TimeAdvice());
        // 어드바이저 지정
        proxyFactory.addAdvisor(advisor);
        ServiceInterface proxy = (ServiceInterface) proxyFactory.getProxy();

        proxy.save();
        proxy.find();
    }
}
new DefaultPointcutAdvisor: Advisor 인터페이스의 가장 일반적인 구현체이다. 하나의 포인트 컷과 하나의 어드바이스를 넣어주면 된다.Pointcut.TRUE: 항상 true를 반환하는 포인트 컷proxyFactory.addAdvisor(advisor): 프록시 팩토리에 적용할 어드바이저를 지정
2-3. 직접 만든 포인트컷
save()메서드에는 어드바이스 로직을 적용하지만, find()메서드에는 어드바이스 로직을 적용하지 않도록 해보자.
Pointcut 관련 인터페이스 - 스프링 제공
public interface Pointcut {
    ClassFilter getClassFilter();
    MethodMatcher getMethodMatcher();
}
public interface ClassFilter {
    boolean matches(Class<?> clazz);
}
public interface MethodMatcher {
    boolean matches(Method method, Class<?> targetClass);
    //..
}ClassFilter와 MethodMatcher둘로 이루어진다. 이름 그대로 하나는 클래스가 맞는지, 하나는 메서드가 맞는지 확인할 때 사용한다. 둘다 true로 반환해야 어드바이스를 적용할 수 있다.
AdvisorTest - advisorTest2() 추가
   @Test
    @DisplayName("직접 만들어보는 포인트 컷")
    void advisortest2(){
        ServiceInterface target = new ServiceImpl();
        ProxyFactory proxyFactory = new ProxyFactory(target);
        // 포인트 컷
        // 직접 만든 포인트 컷 사용
        DefaultPointcutAdvisor advisor = new DefaultPointcutAdvisor(new MyPointCut(), new TimeAdvice());
        // 어드바이저 지정
        proxyFactory.addAdvisor(advisor);
        ServiceInterface proxy = (ServiceInterface) proxyFactory.getProxy();

        // save만 적용
        proxy.save();
        proxy.find();
    }

    static class MyPointCut implements Pointcut{

        @Override
        public ClassFilter getClassFilter() {
            return  ClassFilter.TRUE;
        }

        @Override
        public MethodMatcher getMethodMatcher() {
            // 변경
            return new MyMethodMatcher();
        }
    }

    static class MyMethodMatcher implements MethodMatcher{

        private String matchName = "save";

        @Override
        public boolean matches(Method method, Class<?> targetClass) {
            boolean result = method.getName().equals(matchName);
            log.info("포인트컷 호출 method={}, targetClass={}", method.getName(), targetClass.getName());
            log.info("포인트컷 결과 result={}",result);
            return result;
        }

        @Override
        public boolean isRuntime() {
            return false;
        }

        @Override
        public boolean matches(Method method, Class<?> targetClass, Object... args) {
            return false;
        }
    }
MyPointcut
- 직접 구현한 포인트 컷
- 현재 메서드 기준으로 로직을 적용하면 된다. 클래스 필터는 항상
true를 반환하도록 했고, 메서드 비교 기능은MyMethodMatcher를 사용한다.
MyMethodMatcher
matches(): 이 메서드에method,targetClass정보가 넘어온다. 이 정보로 어드바이스를 적용할지 적용하지 않을지 판단할 수 있다.
save() 호출
find()는 false를 반환하기 때문에 Advice 부가 기능이 적용되지 않는다.
2-4. 스프링이 제공하는 포인트컷
AdvisorTest - advisorTest3() 추가
    @Test
    @DisplayName("스프링이 제공하는 포인트컷")
    void advisorTest3() {
        ServiceImpl target = new ServiceImpl();
        ProxyFactory proxyFactory = new ProxyFactory(target);
        // 스프링 제공 포인트 컷
        NameMatchMethodPointcut pointcut = new NameMatchMethodPointcut();
        pointcut.setMappedNames("save");
        DefaultPointcutAdvisor advisor = new DefaultPointcutAdvisor(pointcut, new TimeAdvice());

        proxyFactory.addAdvisor(advisor);
        ServiceInterface proxy = (ServiceInterface) proxyFactory.getProxy();

        proxy.save();
        proxy.find();
    }
스프링은 무수히 많은 포인트컷을 제공한다.
가장 많이 사용
AspectJExpressionPointcut: aspectJ 표현식으로 매칭한다.
2-5. 여러 어드바이저 함께 적용
어드바이저는 하나의 포인트컷과 하나의 어드바이스를 가지고 있다.
만약 여러 어드바이저를 하나의 target에 적용하려면 어떻게 해야할까?
여러 프록시 만들기
MultiAdvisorTest
package hello.proxy.advisor;

import hello.proxy.common.service.ServiceImpl;
import hello.proxy.common.service.ServiceInterface;
import lombok.extern.slf4j.Slf4j;
import org.aopalliance.intercept.MethodInterceptor;
import org.aopalliance.intercept.MethodInvocation;
import org.junit.jupiter.api.DisplayName;
import org.junit.jupiter.api.Test;
import org.springframework.aop.Pointcut;
import org.springframework.aop.framework.ProxyFactory;
import org.springframework.aop.support.DefaultPointcutAdvisor;

public class MultiAdvisorTest {

    @Test
    @DisplayName("여러 프록시 생성")
    void multiAdvisorTest1(){
        // client -> proxy2 -> proxy1 -> target

        // proxy1 생성
        ServiceInterface target = new ServiceImpl();
        ProxyFactory proxyFactory = new ProxyFactory(target);
        DefaultPointcutAdvisor advisor = new DefaultPointcutAdvisor(Pointcut.TRUE, new Advice1());
        proxyFactory.addAdvisor(advisor);
        ServiceInterface proxy1 = (ServiceInterface) proxyFactory.getProxy();

        // proxy2 생성 ( target -> proxy1 입력)
        ProxyFactory proxyFactory1 = new ProxyFactory(proxy1);
        DefaultPointcutAdvisor advisor1 = new DefaultPointcutAdvisor(Pointcut.TRUE, new Advice2());
        proxyFactory1.addAdvisor(advisor1);
        ServiceInterface proxy2 = (ServiceInterface) proxyFactory1.getProxy();

        // 실행
        proxy2.save();
    }

    @Slf4j
    static class Advice1 implements MethodInterceptor{
        @Override
        public Object invoke(MethodInvocation invocation) throws Throwable {
            log.info("advice1 호출");
            return invocation.proceed();
        }
    }

    @Slf4j
    static class Advice2 implements MethodInterceptor{
        @Override
        public Object invoke(MethodInvocation invocation) throws Throwable {
            log.info("advice2 호출");
            return invocation.proceed();
        }
    }
}

- 이 방법이 잘못된 것은 아니지만, 프록시를 2번 생성해야 한다는 문제가 있다. 만약 적용해야 하는 어드바이저가 10개라면 10개의 프록시를 생성해야한다.
하나의 프록시, 여러 어드바이저
multiAdvisorTest2() 추가
    @Test
    @DisplayName("하나의 프록시, 여러 어드바이저")
    void multiAdvisorTest2() {
        //proxy -> advisor2 -> advisor1 -> target
        DefaultPointcutAdvisor advisor2 = new DefaultPointcutAdvisor(Pointcut.TRUE, new Advice2());
        DefaultPointcutAdvisor advisor1 = new DefaultPointcutAdvisor(Pointcut.TRUE, new Advice1());

        // 프록시 생성
        ServiceInterface target = new ServiceImpl();
        ProxyFactory proxyFactory1 = new ProxyFactory(target);

        proxyFactory1.addAdvisor(advisor2);
        proxyFactory1.addAdvisor(advisor1);
        ServiceInterface proxy = (ServiceInterface) proxyFactory1.getProxy();

        //실행
        proxy.save();
    }
하나의
target에 여러 AOP가 동시에 적용되어도, 스프링의 AOP는target마다 하나의 프록시만 생성한다. 이부분을 꼭 기억해두자.
3. 프록시 팩토리
는 v1 애플리케이션에 LogTrace기능을 프록시 팩토리를 통해서 프록시를 만들어 적용해보자.
3-1. 적용1
어드바이스 생성
LogTraceAdvice
package hello.proxy.config.v3_proxyfactory;

import hello.proxy.trace.TraceStatus;
import hello.proxy.trace.logtrace.LogTrace;
import org.aopalliance.intercept.MethodInterceptor;
import org.aopalliance.intercept.MethodInvocation;

import java.lang.reflect.Method;

public class LogTraceAdvice implements MethodInterceptor {

    private final LogTrace logTrace;

    public LogTraceAdvice(LogTrace logTrace) {
        this.logTrace = logTrace;
    }

    @Override
    public Object invoke(MethodInvocation invocation) throws Throwable {
        TraceStatus status = null;
        try {
            // 메타 정보 활용
            Method method = invocation.getMethod();
            String message = method.getDeclaringClass().getSimpleName() + "." + method.getName() + "()";
            status = logTrace.begin(message);

            //로직 호출
            Object result = invocation.proceed();

            logTrace.end(status);
            return result;
        } catch (Exception e) {
            logTrace.exception(status, e);
            throw e;
        }
    }
}
ProxyFactoryConfigV1
package hello.proxy.config.v3_proxyfactory;

import hello.proxy.app.v1.*;
import hello.proxy.config.v3_proxyfactory.advice.LogTraceAdvice;
import hello.proxy.trace.logtrace.LogTrace;
import lombok.extern.slf4j.Slf4j;
import org.springframework.aop.Advisor;
import org.springframework.aop.framework.ProxyFactory;
import org.springframework.aop.support.DefaultPointcutAdvisor;
import org.springframework.aop.support.NameMatchMethodPointcut;
import org.springframework.context.annotation.Bean;
import org.springframework.context.annotation.Configuration;

@Slf4j
@Configuration
public class ProxyFactoryConfigV1 {

    @Bean
    public OrderControllerV1 orderControllerV1(LogTrace logTrace) {
        OrderControllerV1 orderController = new OrderControllerV1Impl(orderServiceV1(logTrace));

        ProxyFactory factory = new ProxyFactory(orderController);
        factory.addAdvisor(getAdvisor(logTrace));
        OrderControllerV1 proxy = (OrderControllerV1) factory.getProxy();
        log.info("ProxyFactory proxy={}, target={}", proxy.getClass(), orderController.getClass());
        return proxy;
    }
    @Bean
    public OrderServiceV1 orderServiceV1(LogTrace logTrace) {
        OrderServiceV1 orderService = new OrderServiceV1Impl(orderRepositoryV1(logTrace));

        ProxyFactory factory = new ProxyFactory(orderService);
        factory.addAdvisor(getAdvisor(logTrace));
        OrderServiceV1 proxy = (OrderServiceV1) factory.getProxy();
        log.info("ProxyFactory proxy={}, target={}", proxy.getClass(), orderService.getClass());
        return proxy;
    }

    @Bean
    public OrderRepositoryV1 orderRepositoryV1(LogTrace logTrace){
        OrderRepositoryV1Impl orderRepository = new OrderRepositoryV1Impl();

        ProxyFactory factory = new ProxyFactory(orderRepository);
        factory.addAdvisor(getAdvisor(logTrace));
        OrderRepositoryV1 proxy = (OrderRepositoryV1) factory.getProxy();
        log.info("ProxyFactory proxy={}, target={}", proxy.getClass(), orderRepository.getClass());
        return proxy;
    }

    private Advisor getAdvisor(LogTrace logTrace) {
        // 포인트컷
        NameMatchMethodPointcut pointcut = new NameMatchMethodPointcut();
        pointcut.setMappedNames("request*", "order*", "save*");

        // 어드바이스
        LogTraceAdvice advice = new LogTraceAdvice(logTrace);
        return new DefaultPointcutAdvisor(pointcut, advice);
    }
}
- 어드바이저는 포인트컷(
NameMatchMethodPointcut), 어드바이스(LogTraceAdvice)를 가지고 있다. - 프록시 팩토리에 각각의
target과advisor를 등록해서 프록시를 생성한다. 그리고 생성된 프록시를 스프링 빈으로 등록한다.
애플리케이션에 적용하고
localhost:8080/v1/request?itemId=hello 실행시
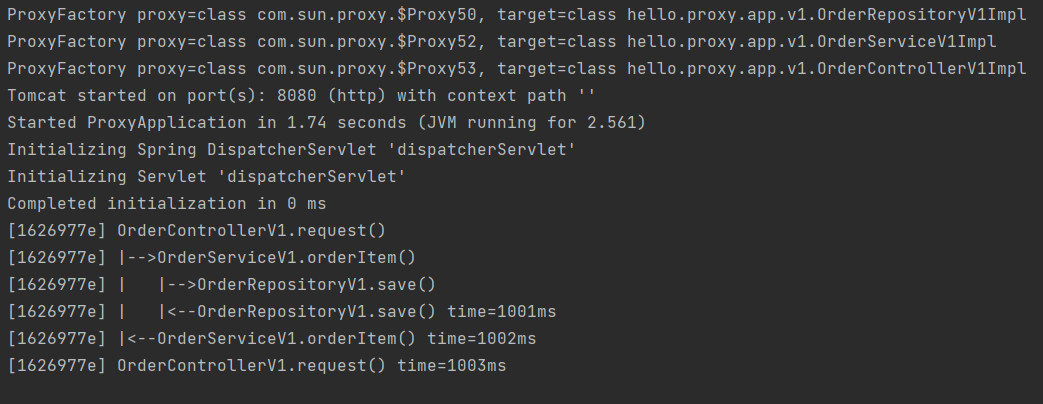
V1 애플리케이션은 인터페이스가 있기 때문에 프록시 팩토리가 JDK 동적 프록시를 적용된 것을 확인 할 수 있다.
3-2. 적용2
구체 클래스만 있는 v2 애플리케이션에 LogTrace 기능을 프록시 팩토리를 통해서 프록시를 만들어 적용해보자.
package hello.proxy.config.v3_proxyfactory;

import hello.proxy.app.v2.OrderControllerV2;
import hello.proxy.app.v2.OrderRepositoryV2;
import hello.proxy.app.v2.OrderServiceV2;
import hello.proxy.config.v3_proxyfactory.advice.LogTraceAdvice;
import hello.proxy.trace.logtrace.LogTrace;
import lombok.extern.slf4j.Slf4j;
import org.springframework.aop.Advisor;
import org.springframework.aop.framework.ProxyFactory;
import org.springframework.aop.support.DefaultPointcutAdvisor;
import org.springframework.aop.support.NameMatchMethodPointcut;
import org.springframework.context.annotation.Bean;
import org.springframework.context.annotation.Configuration;

@Slf4j
@Configuration
public class ProxyFactoryConfigV2 {
    @Bean
    public OrderControllerV2 orderControllerV2(LogTrace logTrace) {
        OrderControllerV2 orderController = new OrderControllerV2(orderServiceV2(logTrace));

        ProxyFactory factory = new ProxyFactory(orderController);
        factory.addAdvisor(getAdvisor(logTrace));
        OrderControllerV2 proxy = (OrderControllerV2) factory.getProxy();
        log.info("ProxyFactory proxy={}, target={}", proxy.getClass(), orderController.getClass());
        return proxy;
    }
    @Bean
    public OrderServiceV2 orderServiceV2(LogTrace logTrace) {
        OrderServiceV2 orderService = new OrderServiceV2(orderRepositoryV2(logTrace));

        ProxyFactory factory = new ProxyFactory(orderService);
        factory.addAdvisor(getAdvisor(logTrace));
        OrderServiceV2 proxy = (OrderServiceV2) factory.getProxy();
        log.info("ProxyFactory proxy={}, target={}", proxy.getClass(), orderService.getClass());
        return proxy;
    }
    @Bean
    public OrderRepositoryV2 orderRepositoryV2(LogTrace logTrace) {
        OrderRepositoryV2 orderRepository = new OrderRepositoryV2();

        ProxyFactory factory = new ProxyFactory(orderRepository);
        factory.addAdvisor(getAdvisor(logTrace));
        OrderRepositoryV2 proxy = (OrderRepositoryV2) factory.getProxy();
        log.info("ProxyFactory proxy={}, target={}", proxy.getClass(), orderRepository.getClass());
        return proxy;
    }
    private Advisor getAdvisor(LogTrace logTrace) {
        // 포인트컷
        NameMatchMethodPointcut pointcut = new NameMatchMethodPointcut();
        pointcut.setMappedNames("request*", "order*", "save*");

        // 어드바이스
        LogTraceAdvice advice = new LogTraceAdvice(logTrace);
        return new DefaultPointcutAdvisor(pointcut, advice);
    }
}- 사실 다른 코드가 없다. 스프링 프록시의 편리성 때문이다.
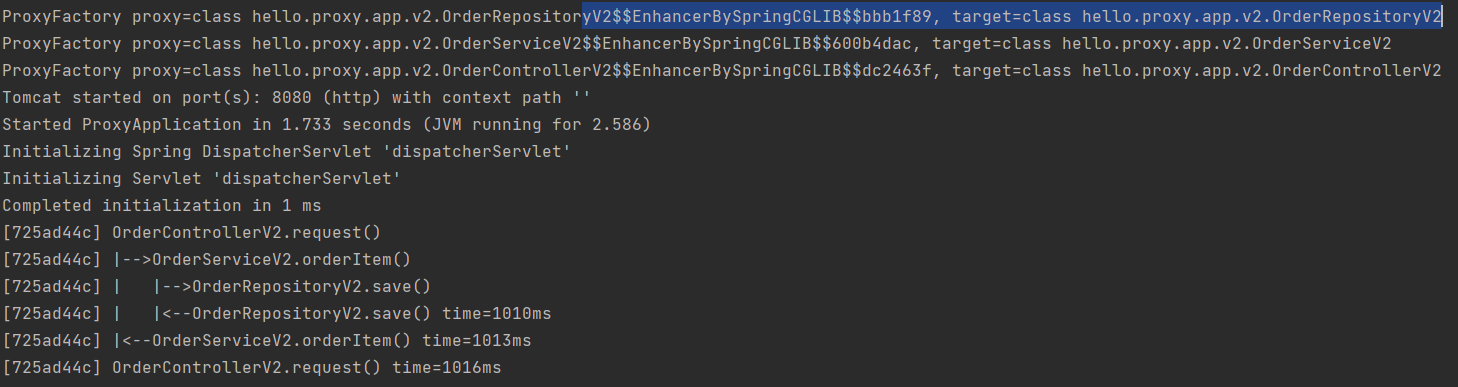
V2 애플리케이션은 인터페이스가 없고 구체 클래스만 있기 때문에 프록시 팩토리가 CGLIB을 적용한 것을 확인 할 수 있다.
참고
김영한: 스프링 핵심 원리 - 고급편(인프런)
Github - https://github.com/b2b2004/Spring_ex
