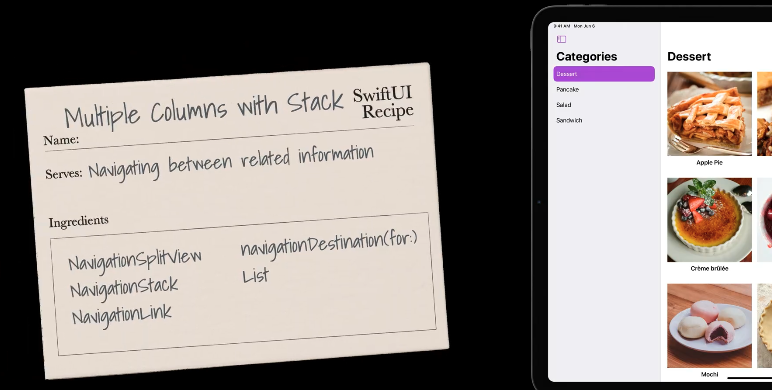
The SwiftUI cookbook for navigation
오역/의역 및 틀린 내용이 포함되어 있을 수 있으며 댓글 남겨주시면 반영하도록 하겠습니다.
- Apple TV, iPhone, Apple Watch 모두 활용가능한 API
- 새로운 API는 programmatic navigation and deep linking를 강력하게 지원하여 당신의 앱에 완벽한 구조를 구축하기 윈한 조각을 만들게 해준다.
- 관련 영상 : WWDC22 - The SwiftUI cookbook for navigation
- Resources : Bringing robust navigation structure to your SwiftUI app
들어가기 전에
Contents
- 재료 : New Navigation APIs
- Data-Driven Navigation API 라는 재료를 먼저 소개한다.
- 메인요리 & 레시피 : Recipes for navigation
- navigation control 을 충분히 활용한 쉽고 빠른 레시피를 제공한다.
- 디저트로 : Persistent state
- API 를 활용하여 navigation state를 유지하는 Tips 을 공유하겠다.
너가 이전에 SwiftUI 를 써봤다면, 새로운 API 가 어떻게 다른지 궁금할 것이다.
Diggin하기전에 기존의 API 를 먼저 살펴보겠다.
The Existing API
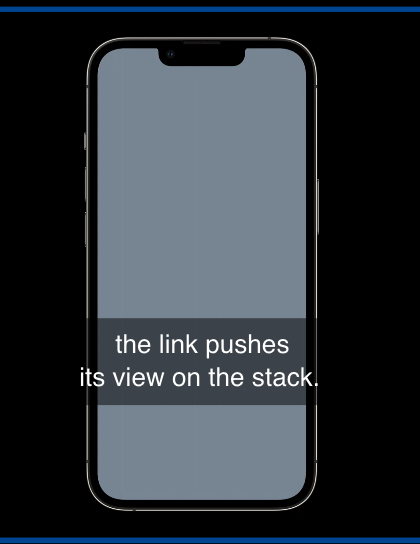
📢 The existing APIs are based on links that send views that are shown in other columns or on a stack.
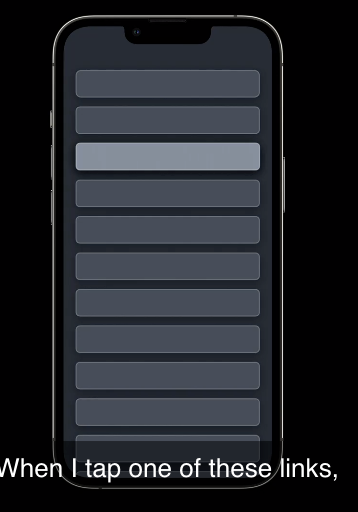
예를 들어, Root View에 Navigation link 들의 리스트가 있다. 이 Link 들 중 하나를 누르게 되면, 이 Link는 Stack 에 View를 Push 하게 된다. 이것은 기본적인 Navigation 에 잘 작동하고 이 패턴을 지속해서 사용할 수 있다.

이제 다시 Root View 로 돌아와서 설명하겠다.
기존의 Navigation API 에서는 link를 programmatically 하게 보여주기 위하여 Link 에 Binding을 추가한다.
아래의 코드/그림에서 item.showDetail 을 true 로 함으로서 link의 view를 보여줄 수 있다.
그러나, 이 코드는 각 link 가 각각의 binding을 필요로 한다.
NavigationLink(
	"Details",
	isActive: $item.showDetail
){ DetailView() }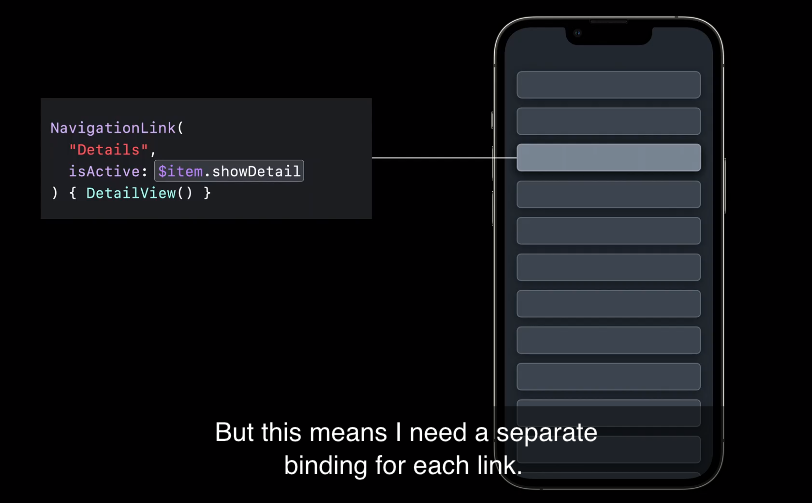
새로운 API 에서는, NavigationStack 이라는 전체 container로 모든것을 binding 할 수 있게 된다.
- Navigation Stack : https://developer.apple.com/documentation/swiftui/navigationstack
여기서는 Path가 Stack에 푸쉬된 모든 value들을 나타내는 Collection 이다. 새로운 API 에서는 path 를 mutating (변환) 하여 deep link 를 만들 수 있고 혹은 path 의 모든 아이템을 remove 하여 root view 로이동 (pop) 할 수 있다.
이번 talk 에서는 새로운 Navigation API 가 data-driven programmatic navigation 을 어떻게 가능하게 하는지 보여주겠다.
NavigationLink(
	"Details",
	isActive: $item.showDetail
){ DetailView() }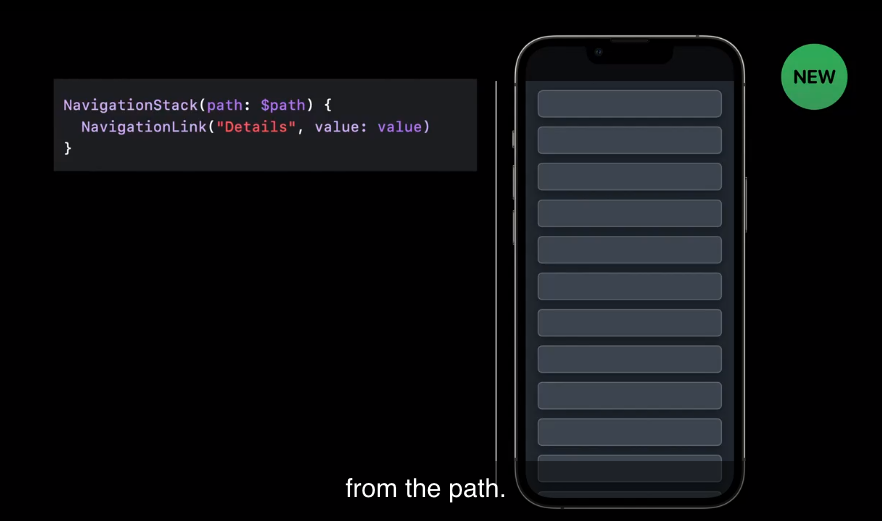
1. New Navigation APIs
새로운 Navigation API는 몇개의 새로운 Container 유형과 이와 함께 사용할 수 있는 NavigationLink 의 새로운 종류를 함께 소개한다!
A . 첫번째 container : NavigationStack
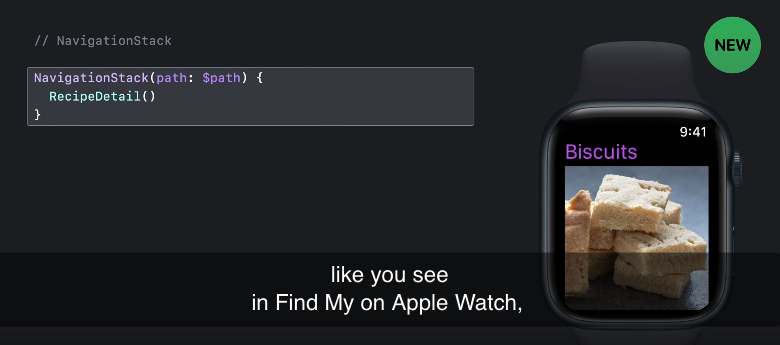
첫번째 새로운 container 는 NavigationStack이다.
NavigationStack은 Apple Watch 의 나의찾기, iPhone 설정, 새로운 mac OS 인 Ventura 의 시스템세팅 등에서 활용되는 push-pop 인터페이스를 대표한다.
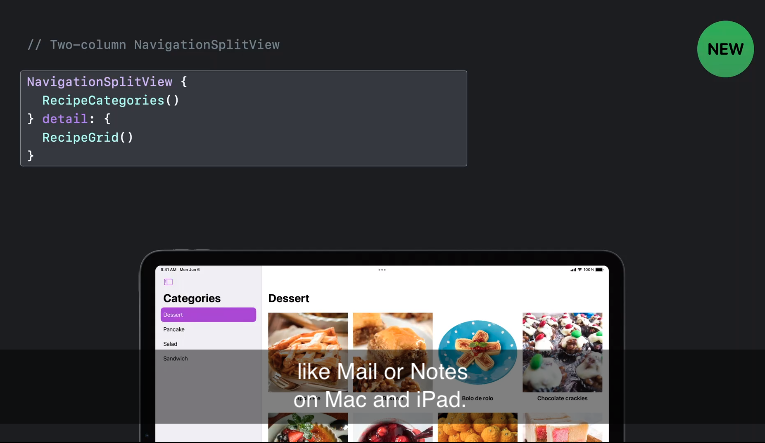
B. 두번째 container : NavigationSplitView
두번째로 새로운 containter type 은 NavigationSplitView 이다.
NavigationSplitView 는 아이패드와 맥의 메일, 노트와 같은 multicolumn 앱에 최적화되어 있다.
그리고 NavigationSplitView 는 자동적으로 iPhone에 Single-컬럼 스택으로 iPad 의 Slide Over로 심지어 Apple Watch 와 Apple TV 에도 그에 맞는 적절한 형태로 변환된다.
Configuration 에 대한 참고
- Raj's talk - SwiftUI on iPad: Organize your interface
- NavigationSplitView : https://developer.apple.com/documentation/swiftui/navigationsplitview
C. NavigationLink
이전(위)에는 NavigationLink 가 항상 title 과 나타낼 view 를 포함했다면,
새로 변경된(아래) NavigationLink 에서는 여전히 title 은 포함하지만 보여질 view 를 포함하는 것이 아닌 그 링크가 보여줄 value 를 포함한다. (value-presenting)
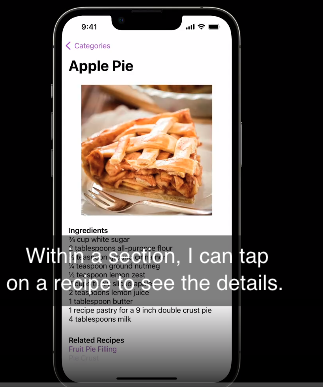
예를 들어, 위의 링크는 apple pie를 위한 레시피를 보여준다.
앞으로 이 글에서 우리가 보게될 NavigationLink는 스마트해졌다. Link 의 행동은 이것이 속해져있는/나타나는 NavigationStack나 list 에 종속된다.
2. Recipes for navigation
레시피를 들어가기전에, menu 에 뭐가 있는지 살펴보기
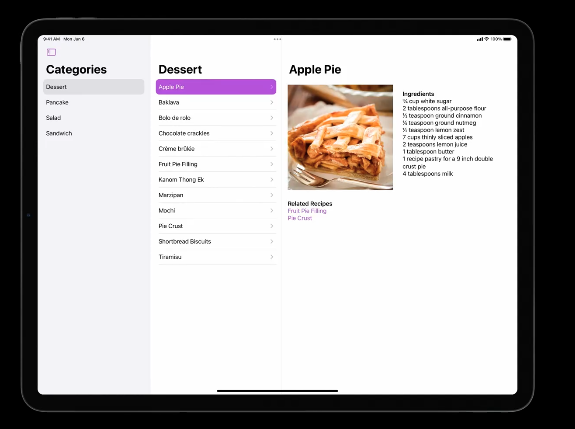
아래에 사용될 예시에서는 다음과 같이 구성된 샘플 데이터를 사용한다.
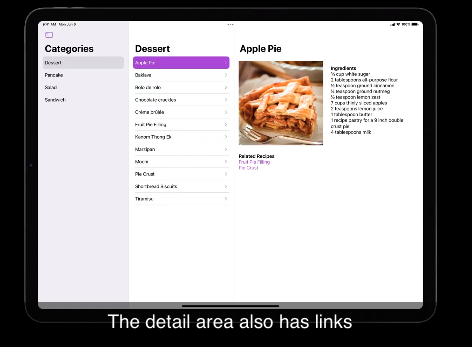
- 첫번째 칼럼은 레시피 카테고리
- 두번째 칼럼은 모아둔 레시피의 종류
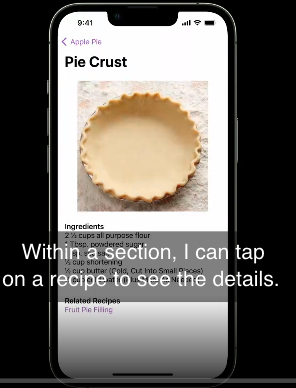
- 세번째 칼럼은 두번째 칼럼에서 레시피를 선택하면 디테일 한것이 보이는 디테일 구역
- 디테일 구역에서는 재료를 보여주고, 연관 레시피를 link 한다.
소개
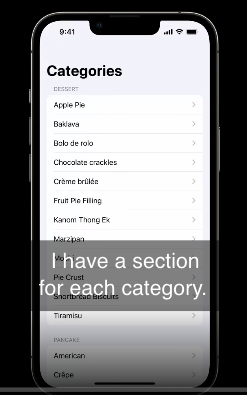
이 새로운 API 를 다음의 레시피를 통해서 살펴보자! 예시 앱(레시피)은, 애플워치의 나의찾기 혹은 아이폰의 설정과 같은 view 의 기본 stack 으로 구성된다.
각 섹션에서 recipe 를 선택하여 각 레시피의 디테일한 내용을 볼 수 있고, 디테일한 레시피에서는 Stack에 관련 레시피 중 하나를 쌓아 연관된 레시피를 볼 수 있다. 그리고 여기서 뒤로가기를 통해서, 연관된 레시피에서 오리지널레시피로 그리고 다시 카테고리 리스트로 이동할 수 있다.
이 예시에서는 NavigationStack 을 새로운 NavigationLink 와 navigation destination modifer 와 결합해서 사용하는 방법을 보여줄 것이다!
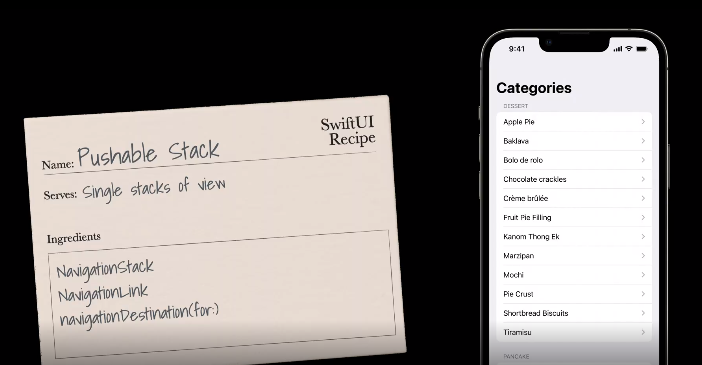
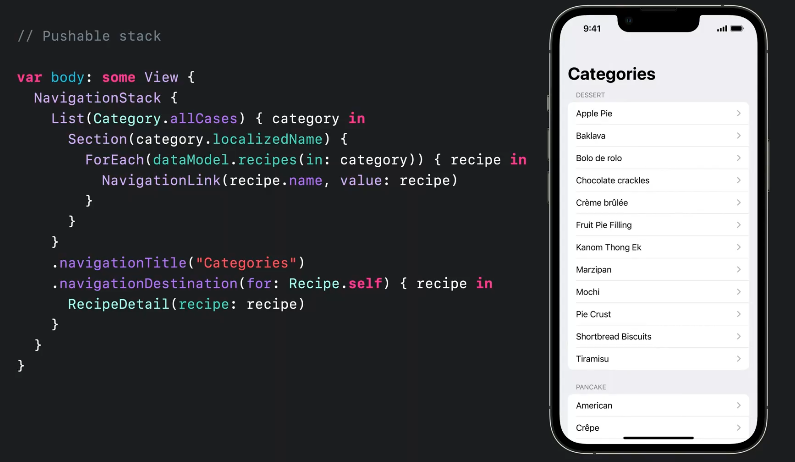
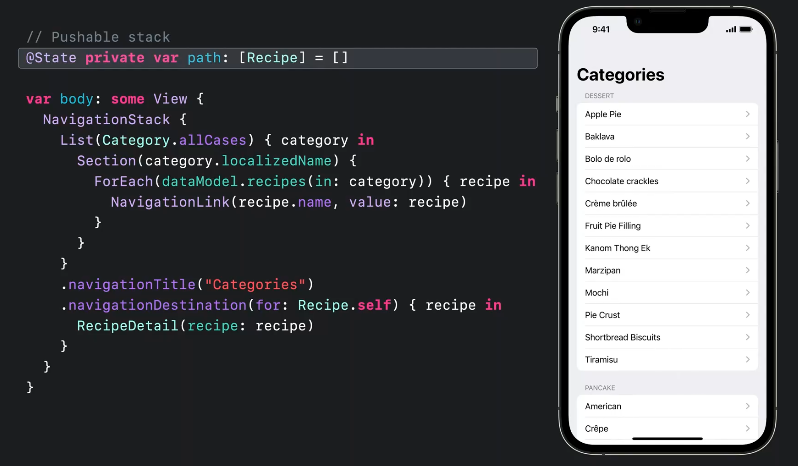
첫번째 레시피
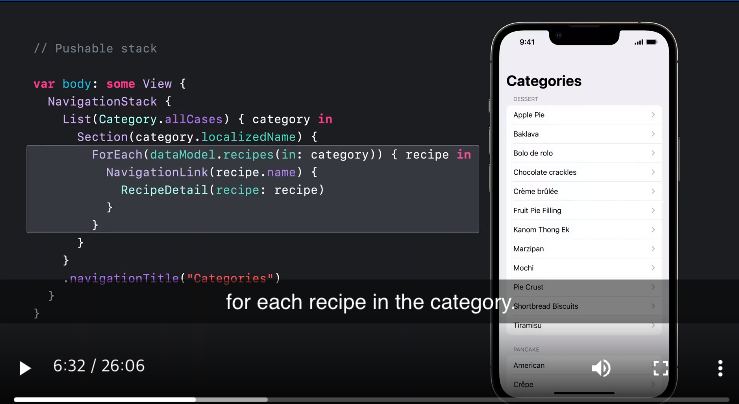
기본 NavigationStack 안에, category 전체를 도는 List 를 넣고 navigationTitle 을 추가한다.List에서는 각 카테고리별로 별개의 섹션을 갖게 된다. 그리고 각 섹션에서 category 안의 각 레시피를 위해 NavigationLink 을 추가한다. 지금까지 view destination 을 사용하는 기존의 NaviagationLink를 활용해서 RecipeDetail view를 보여주는 link를 만들었다. 지금까지는 이 네비게이션 뷰가 정상적으로 작동한다.
하지만 programmatic 한 Navigation 은 어떠한가?
programmatic 한 navigation 을 추가하기 위해서는 이 navigation link를 두 파트( 1. 보여져야하는 value와 이 2. value와 함께 가는 view ) 로 나눠야한다.
한번 알아보자.
먼저 기존의 destination view ( RecipeDetail() ) 를 빼내서, 새로운modifier 인 .navigationDestination() 로 안으로 옮겨주자.
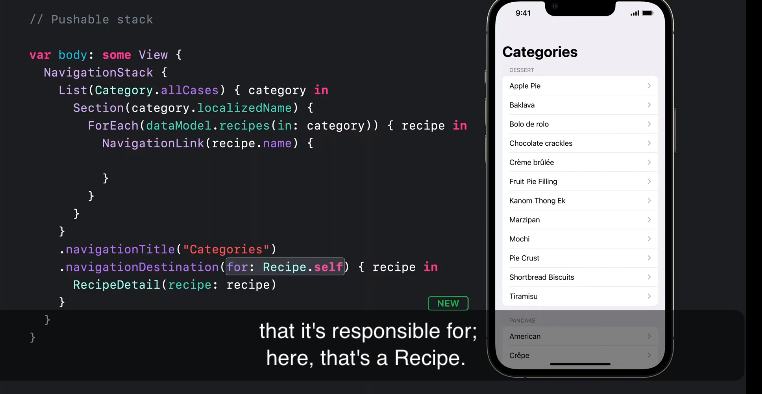
.navigationDestination(for: ) 은 이것이 보여줘야하는 책임이 있는 data의 타입을 선언해준다. ( 여기서는 Recipe 가 된다. )
이 modifier는 recipe value 가 present 될때 stack 에 어떤 view를 push 할지 설명하는 view builder를 가진다.

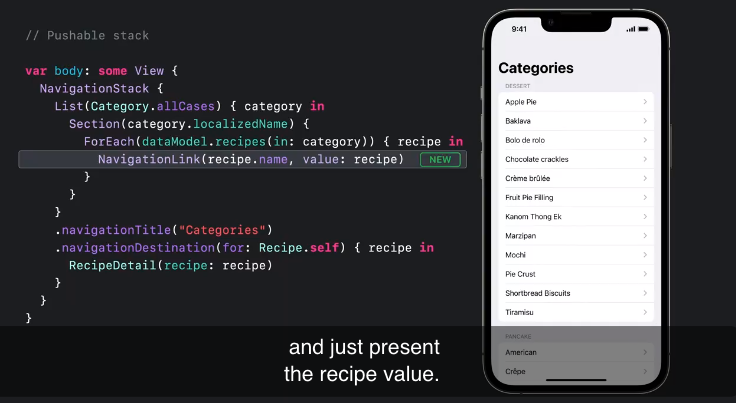
그럼, 이제 NavigationLink 중 새로나온걸 사용해서, 단순히 recipe value 를 present 하겠다.
그럼 NavigationStack이 어떻게 이 기능을 수행하는지 차근차근 살펴보도록 하자.
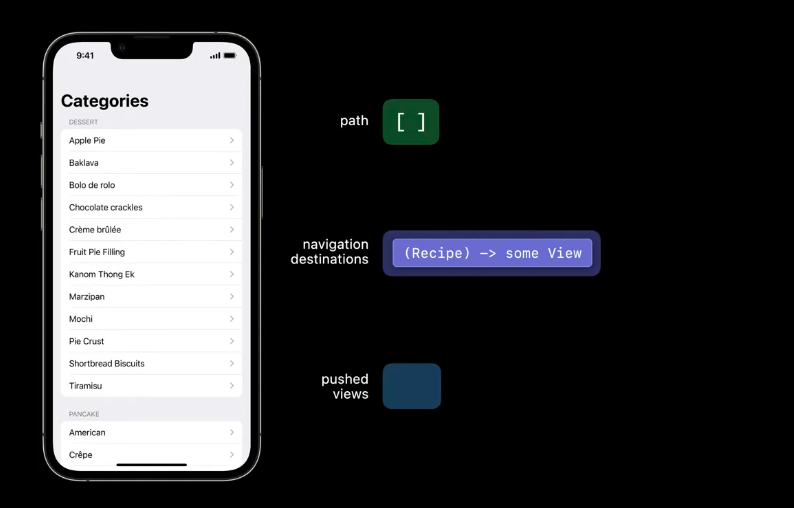
모든 Navigation Stack은 stack 이 보여주는 모든 데이터를 나타내는 path 를 계속 추적한다.
📢 Every navigation stack keeps track of a path that represents all the data that the stack is showing.
- path : Stack 이 root view를 보여줄때는 아래와 같이 path 는 비어있다.
- navigation destinations : Stack 은 또한 그 안에 선언된 모든 navigation destinations 과 stack 안에 쌓인 View 들을 추적한다. 일반적으로 이건은 set 이지만, 여기는 예시라서 하나의 destination 만 가진다. [ (Recipe) → some View ]
- pushed views : 현재 path 가 비어있기 때문에, 이것도 비어 있게 된다.
이것들이 다 합쳐지면, 쿠키와 우유같은 마법이 펼쳐진다!
Apple Pie (value-presenting link)를 클릭하게 되면, path 에 value 가 append 된다.
그리고, navigation stack은 path values 위에 destinations을 매핑하여 stack 에 어떠한 view를 매핑할지 결정하게 된다.
그리고 이 apple pie recipe 안에서, 연계레시피인 Pie Crust 를 탭하게 되면, 이 links는 path에 그 값을 append 하게 된다. NavigationStack 은 마법처럼 또다른 RecipeDetail view (RecipeDetail(Pie Crust))를 Stack 에 쌓게 된다.
path 에 내가 value를 add 할 때마다, NavigationStack 은 다른 view를 push 하게 된다.
뒤로가기 버튼을 누르면 Navigation Stack은 마지막 아이템을 path 에서와 pushed views에서 remove 한다.
그리고 NavigationStack 은 한가지 Trick (기능)을 더 제공한다. 바로 NavigationStack은 이것의 path 를 binding와 connect하는 것을 제공한다.
다시 코드로 돌아가보자
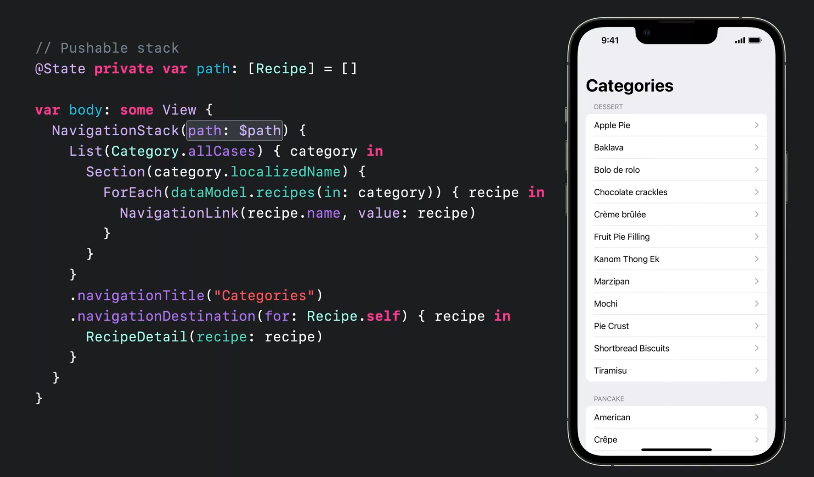
path 를 binding 하기 위해 먼저 State를 추가해보자.
예시에서는 stack에 쌓일 모든 value 가 recipe 이기 때문에 [Recipe] 배열을 사용한다.
하지만, 스택에 다양한 데이터 타입을 넣어야한다면 새로나온 type-erasing 한 NavigationPath 컬렉션을 확인하세요!

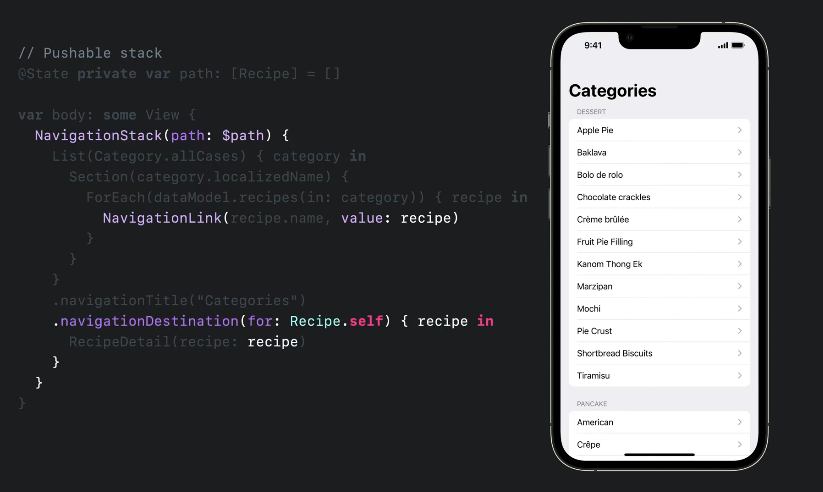
path 상태를 선언했으니, 이제 NavigationStack에 argument를 더해 path를 binding 하여 넘겨주자.
이 위치에서 나는 나의 stack 을 지글지글하게 만들 수 있다.
다음과 같이 특정한 레시피로 이동할 수 있는 method를 만들 수 있다.
혹은 stack 어디에서든, path를 reet 하여 root 로 바로 이동할 수 있게 만들 수 있다.

이것이 바로 SwiftUI 에서 새로운 NavigationStack, value-presenting NavigationLinks와 navigationDestinations를 이용하여 pushable 한 stack을 만드는 방법이다.
이 레시피는 Mac을 포함한 모든 플랫폼에서 활용가능하며, 특히 iPhone, Apple TV, and Apple Watch 에서 빛날 것이다.
- NavigationStack 의 작동 : "Build a productivity app for Apple Watch."
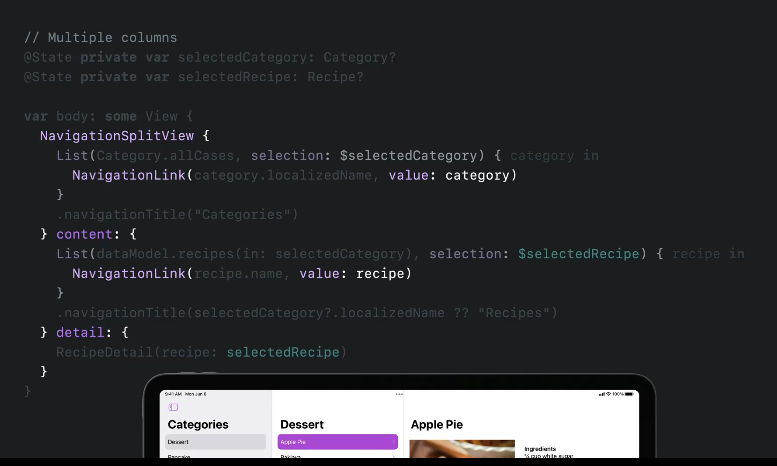
두번째 레시피
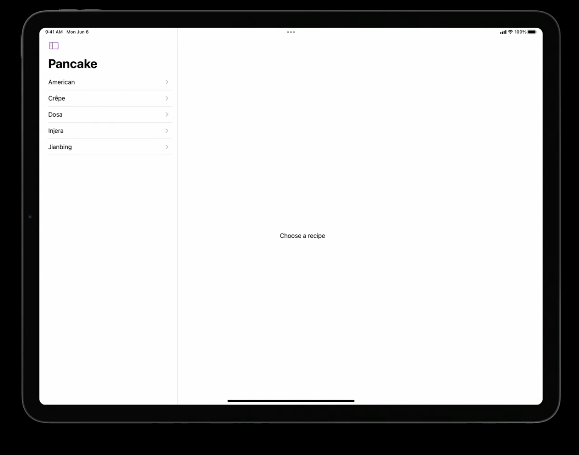
Mac 이나 IPad 의 메일에서 찾아볼 수 있는 multicolumn presentaion 을 stack 없이 구현하는 방법을 알아보겠다.
iPad 에서는 sidebar 가 초기에는 hidden 되어있고 버튼을 눌러 이를 나타나게 하고 카테고리를 선택할 수 있다. 그리고 두번째 칼럼에서 레시피를 선택하고 세번째 칼럼은 레시피 디테일을 소개한다.
이 레시피에서는 NavigationSplitView과 새로운 NavigationLink 그리고 List selection 을 이용해보겠다.
이 레시피는 큰 화면 사이즈의 디바이스에서 유용하다. (왜냐하면 modality? 를 피하게 해준다.) 하나하나 들어가서 살펴볼 필요없이 한번에 모든 정보를 확인할 수 있다.
그럼 자세히 살펴보자.
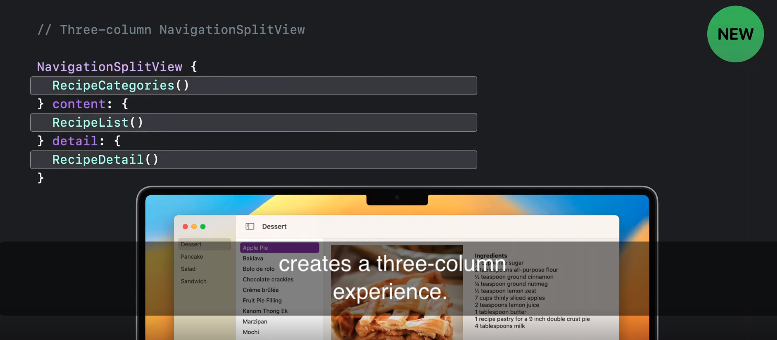
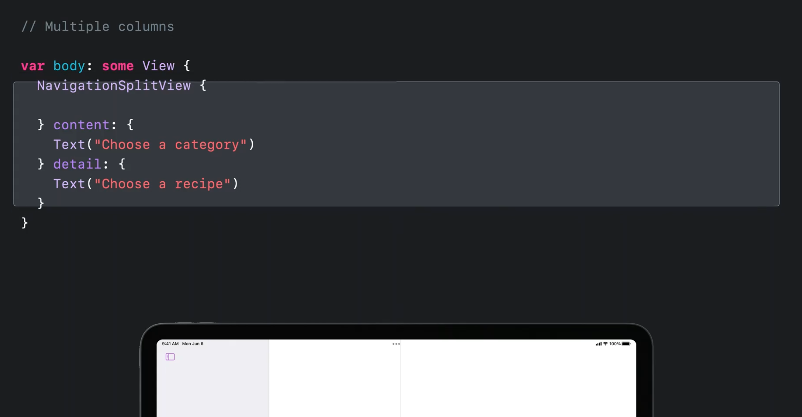
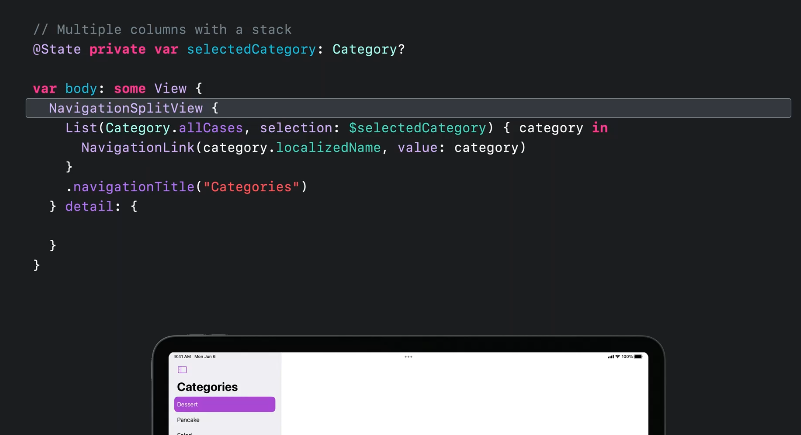
여기 content와 detail 을 위한 placeholder view 가 잇는 three-column NavigationSplitView 가 있다.
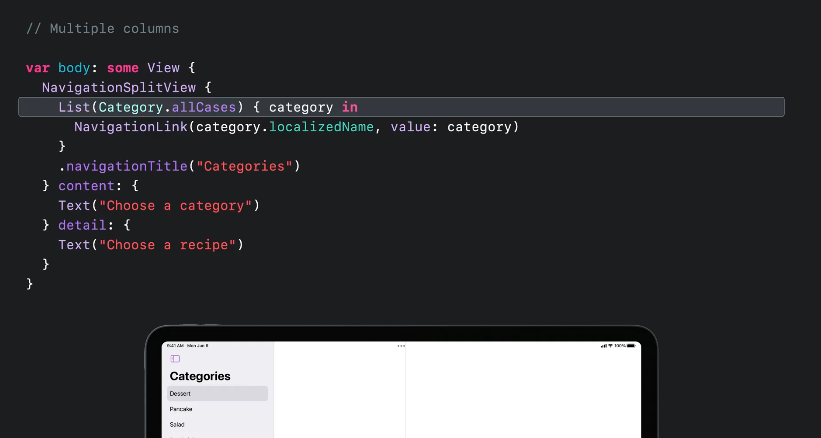
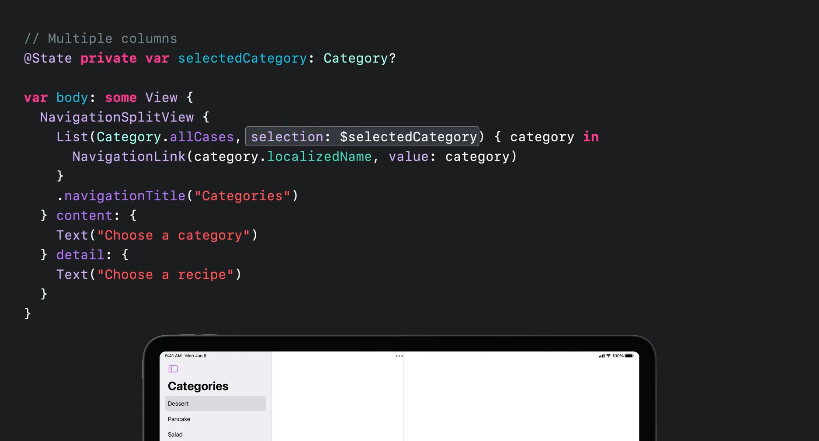
그리고 이 사이드바에 모든 카테고리를 나타내는 List와 navigationTitle 을 추가한다.
리스트 안에는 각 카테고리를 위한 NavigationLink 를 넣어준다.
그리고 어떤 카테고리가 선택되었는지 트래킹하는 @State 를 소개한다. (selectedCategory)
그리고 sidebar 안의 List를 이 selectedCategory 를 사용해서 약간 변경해본다.
우리는 selection 에 대한 binding 을 넘기게 되는 것이다. 이것은 List로 하여금 List 의 컨텐츠가 가 selection 을 다루게 해준다. 무슨말이냐 하면, 일치하는 selection 타입이 있는 list 안에 value를 보여주는 Navigation 링크를 넣게 되면 , 그 링크는 자동적으로 터치되거나 클릭되면 selection 을 자동으로 업데이트한다.
즉, 이제는 sidebar의 카테고리를 선택하게 되면 SwiftUI 는 selectedCategory 를 업데이트 해준다.
- selection 과 list 에 대한 자세한 내용이 궁금하다면 : "Organize your interface" by Raj
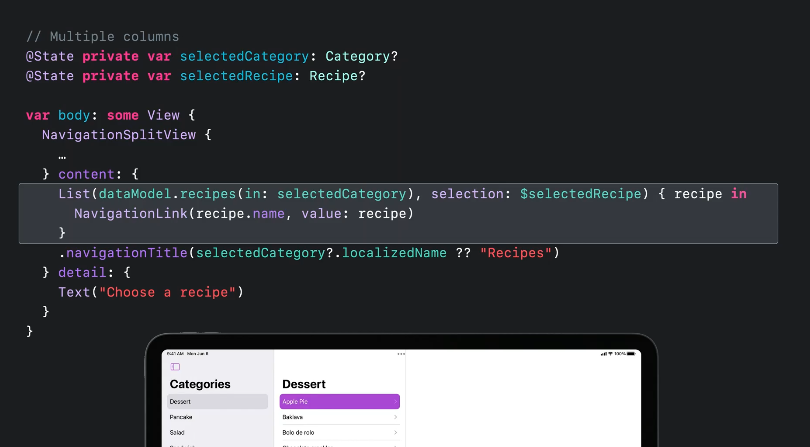
다음으로 content 컬럼의 placeholder 를 선택된 카테고리를 위한 레시피 리스트로 변경해보겠다. 그리고 이 칼럼에도 navigationTitle 을 달아준다. 선택된 카테고리 (selectedCategory) 처럼 여기에도 같은 테크닉을 이용해서 선택된 레시피를 추적해보자 ( selectedRecipe) . State 를 selectedRecipe 에 사용해주어 레시피 목록에서는 이 상태를 사용하여 각 레시피 선택을 연동해줄 수 있다.
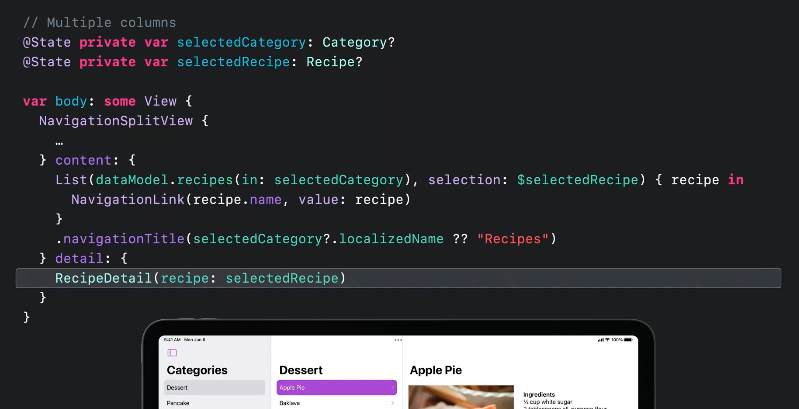
마지막으로 detail 컬럼에서 selectedRecipe 를 보여주기 위한 내용을 업데이트 해준다.
RecipeDetail(recipe: selectedRecipe)이것을 통해서 우리는 navigation에 full programmatic 한 control 을 또 한번 가능하게 한다.
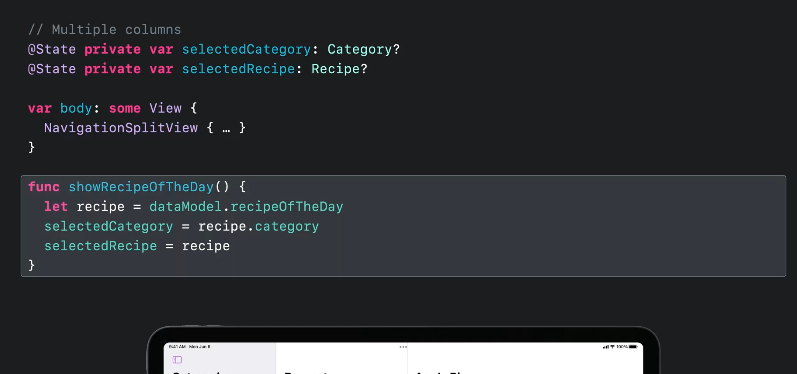
예를 들어, 오늘의 나의 레시피로 navigate 하기 위해서는 아래와 같이 단순히 selection 상태만 update 해주면 된다!
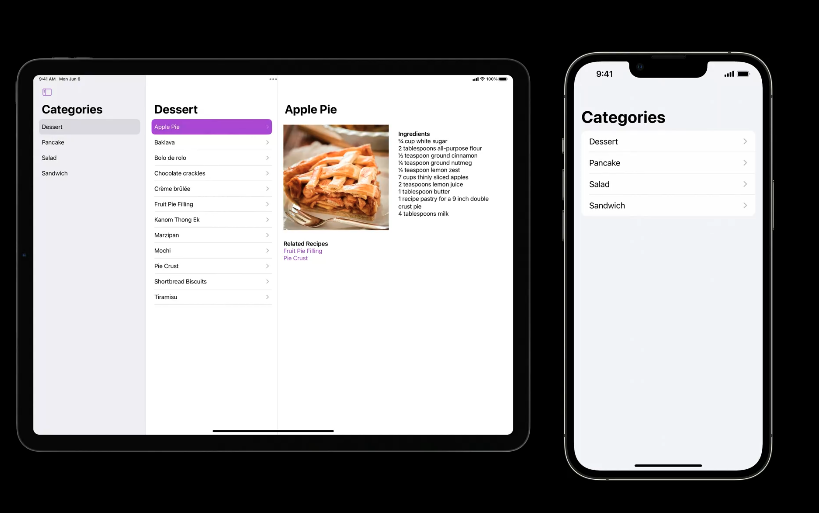
이것이 바로 SwiftUI 에서 새로운 NavigationSplitView 와 value-presenting NavigationLink 와 selection 을 포함한 List를 활용한 multi-column navigation 을 사용하는 방법이다.
또하나 엄청난 것은 SwiftUI 에서 이와같은 List selection 과 NavigationSplitView 의 조합은 자동적으로 split view를 iPhone 에서 single stack 이나 iPad 에서 Slide Over 로 적용시켜준다는 것이다. 아주 적절하게!
물론 Mac에서는 multicolumn 보기가 적절히 보일 것이며 multiple columns을 보여주지 않는 Apple TV, Apple Watch 등에서도 적절히 single stack 으로 변환되어서 잘 보여줄 것이다.
즉, SwiftUI 에서의 NavigationSplitView 은 모든 플랫폼에서 정상적으로 작동할 것이다!
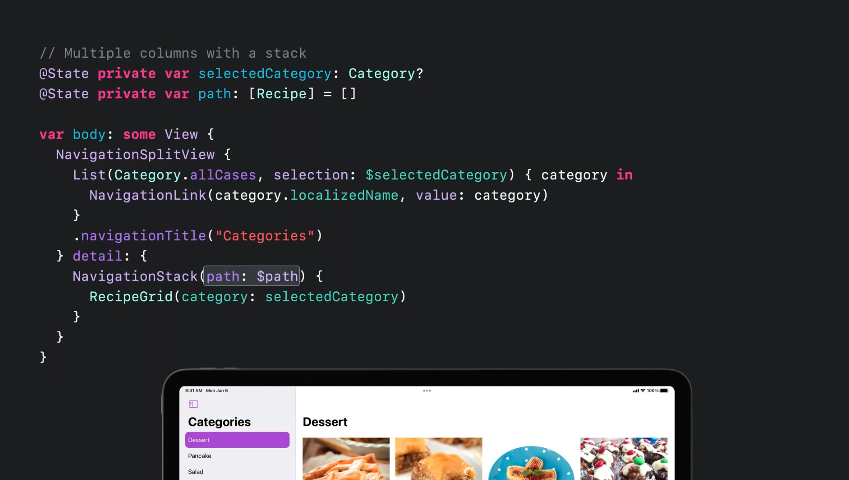
세번째 레시피
다음으로는 2개의 컬럼으로 이루어진 네비게이션을 보자 (iPad 와 Mac의 사진앱에서 볼 수 있는)
카테고리를 선택하면 각 카테고리 안의 레시피가 그리드로 정렬된다. 그리고 각 레시피를 선택하며, detail 영역에 stack 이 push 된다. 그리고 다시 back 버튼을 누르면 그리드 레시피 영역으로 넘어가게 된다.
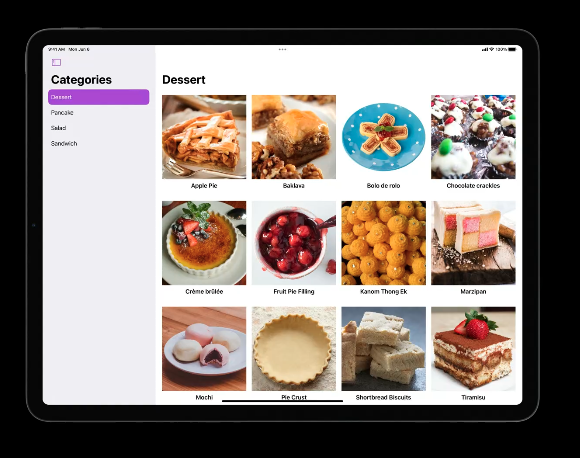

이것은 navigation split view, stack, link, destination 그리고 list 가 복합된 pièce de résistance 레시피입니다.
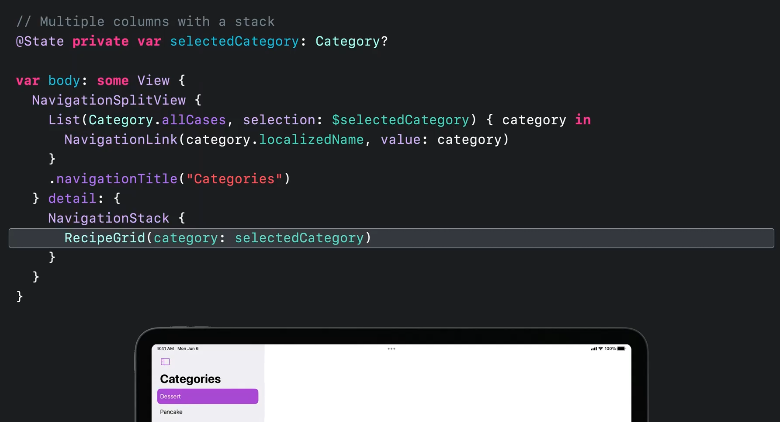
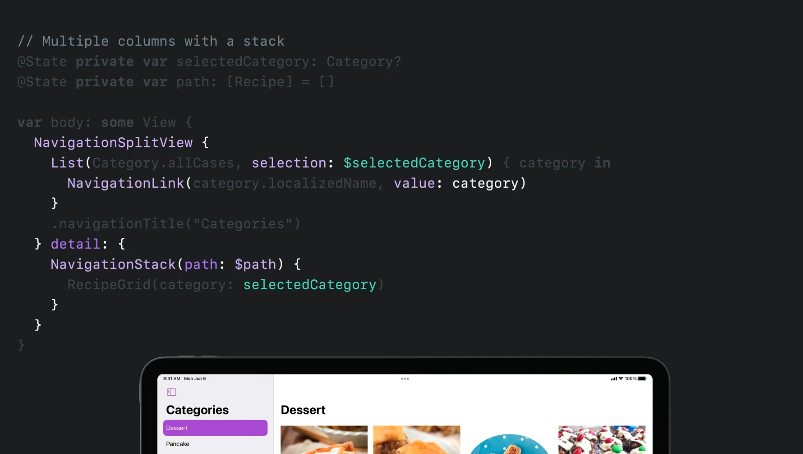
첫번째 컬럼은 2번째 예시와 동일하게 구성한다. 차이는 바로 detail 영역에서 에서 나타난다. 새로운 Navigatoin API 는 Composition 에서 큰 장점을 가진다. (자유롭게 구성할 수 있다!)
NavigationSplitView 에서 list를 넣었던것 처럼 detail 영역안에 첫번째 레시피에서 활용한 NavigationStack 을 넣을 수 있다.
이 NavigationStack의 Root View 는 RecipeGrid 이다. RecipeGrid 는 NavigationStack 안에 위치한다. 그 뜻은 stack-related modifier 을 RecipeGrid 안에 넣을 수 있다는 것이다.
RecipeGrid 의 body에서 이것에 대해 자세히 살펴보자
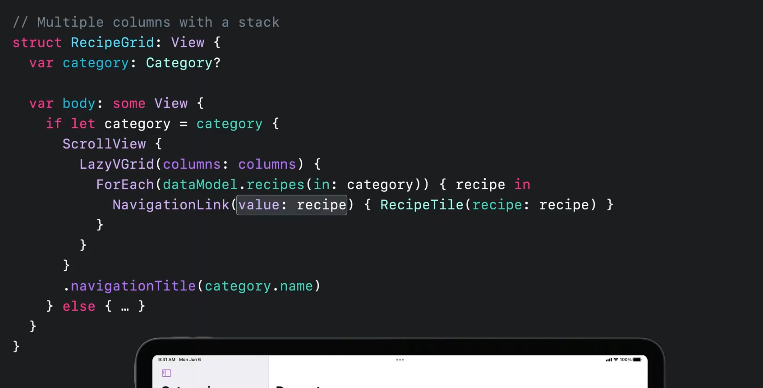
RecipeGrid 는 category 를 parameter로 가지는 view 이다. category 가 optional 이기 때문에 if-let 으로 시작을 할 것이며, else 문에서는 category 를 선택하지 않은 경우 (empty selection ) 에 대한 것을 다룰 것이다.
if 문 안에서, scroll view 와 lazy grid 를 넣는다. lazy grid 레이아웃은 view들을 연속적으로 가지는데 여기서는 ForEach 문을 통해서 recipes들을 iterate 한다. 그리고 각 recipe는 value-presenting 한 NavigationLink 를 가지게 된다. 각 링크는 recipe value를 present하는데, 여기서 link의 closure로 후행되는 label 은 thumbnail와 title을 가지는 RecipeTile이다
이 grid 를 끝내기 위해서 무엇이 남았는가? 지금까지는 NavigatonStack 이 어떻게 recipe에서 detail views 로 map하는지 이야기 하지 않았다.
첫번째 레시피 (NavigationStack 구현) 에서 언급했듯이 새로운 NavigationStack은 navigationDestination modifier 를 vlaue들을 path 를 통해 매핑해서 스택에 어떤 view를 보여줄지 정할때 사용한다.
그럼 이제 navigationDestination modifier 를 더해보자!
근데, 어디에 이 modifer를 추가해야하는가? 에 대해 고민해보자.
아래 이미지와 같이 link 에 직접적으로 modifer를 추가한다면 어떨까?
이것은 2가지 이유로 틀리다고 말할 수 있다.
- List, Table 혹은 여기에 있는 LazyVGrid 와 같은 Lazy container 들은 view를 즉각적으로 load 하지 못한다. 따라서 여기에 modifier를 넣게 된다면 destination 은 아마도 load 되지 않을 것이고 이를 둘러싼 NavigationStack 은 아마도 이것을 볼수 없을 것이다.
- 만약에 modifer를 여기에 더한다면, destination modier는 gird 안에서 모든 아이템 마다 반복할 것이다.

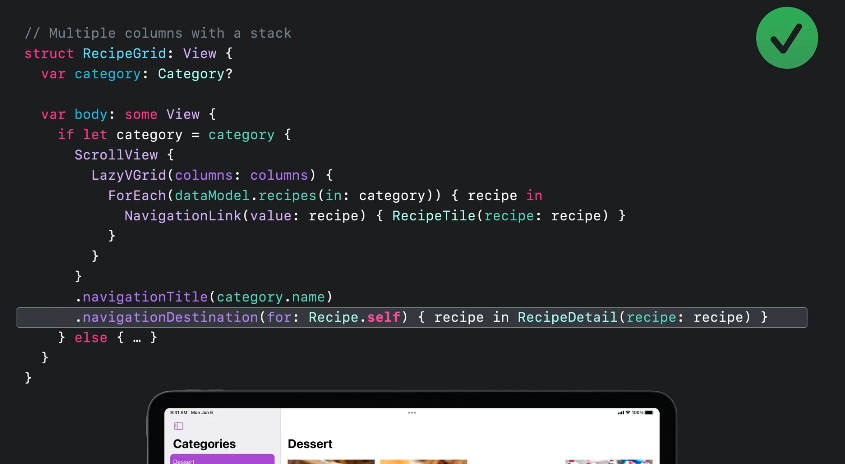
그대 신에 이렇게 ScrollView 바깥에 modifier를 넣어주어야한다. 그이유는 다음과 같다.
- ScrollView 바깥에 mofier 를 더하면, scroll position 과 상관없이 NavigatonStack은 navigationDestination 을 볼 수 있다.
- 또한 modifier를 이곳에 더하게 되더라고 이것은 여전히 이것이 target 으로 하는 link와 close 하기 때문에 좋다.
Navigation destination 은 code를 구성할때 자율성과 make sense하다고 할 수 있다.
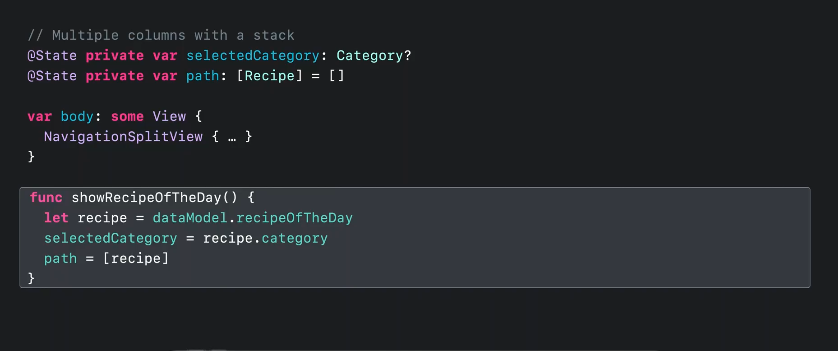
다시 NavigationSplitView 으로 돌아와서 programmatic 한 navigation 을 한번 더해보자!
먼저, navigaton path 를 주가할 필요가 있다.
@State 를 더해서 path 를 추가하고 NavigationStack 의 state 와 bind 한다.
여기서 programmatic한 navigatoin 을 이용하기 위해 다음과 같은 코드를 사용해서 showRecipeOfTheDay 와 같은 navigation 경험을 줄 수 있다.
이것이 바로 SwiftUI에서 NavigationSplitView, NavigationStack, value-presenting NavigationLinks 그리고 Lists with selection 을 사용하여 multicolumn navigation 을 사용하는 방법이다.
그리고 이전의 레시피들에서처럼 이것 역시 모든 플랫폼과 자연스럽게, 자동적으로 변환되어 사용할 수 있다.
여기까지 Navigation 관련된 새로 추가된 내용들을 통한 레시피였다. 하지만, dessert 파티 없이 navigation 에 대한 내용은 끝냈다고 할 수 없다!
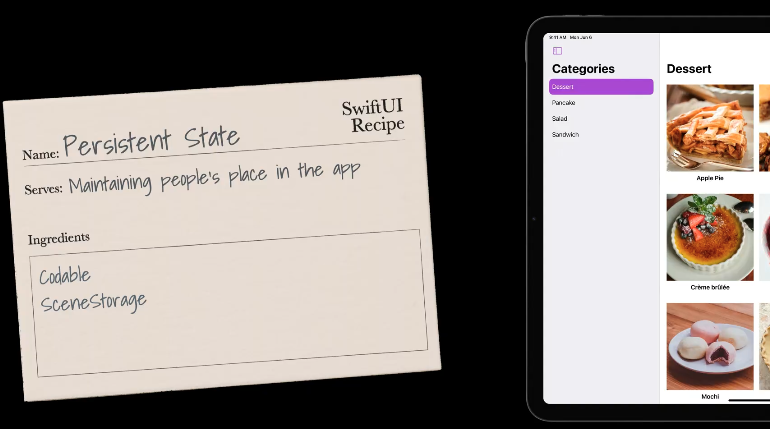
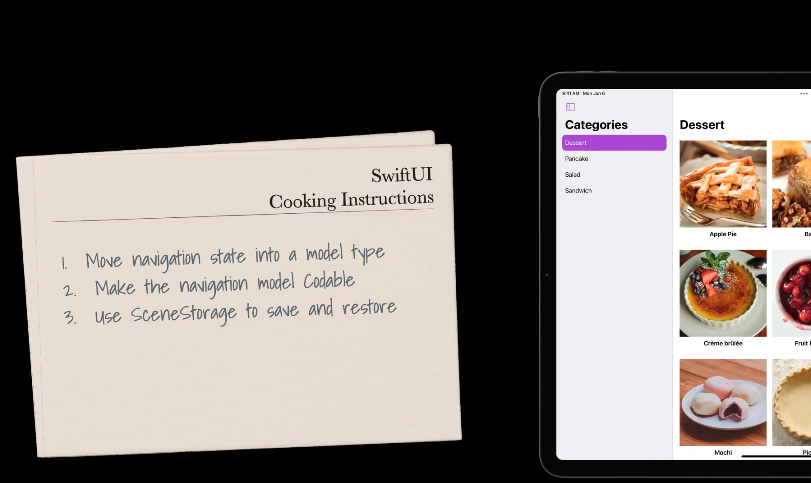
3. Persistent State

그럼 이제, navigation state를 유지(persist) 하는 법을 알아보자
navigation state 를 유지하기 위하여, Codable 과 SceneStroage 2개의 개념을 사용하겠다.
세번째 레시피는 3가지의 단계가 있다.
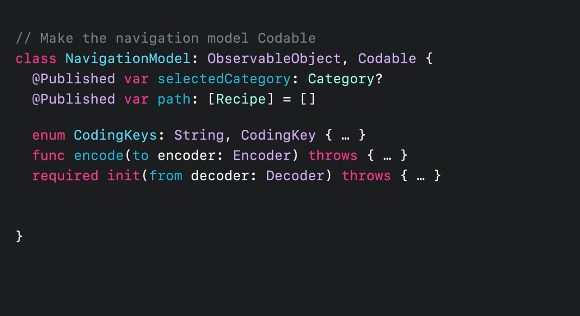
- Navigaton Model 타입으로 navigation state 를 캡슐화(encapsulate) 하겠다.
- 이것은 navigation state를 unit으로서 save 하고 restore 하여 consistent 하게 할 것이다.
- 그리고 navigation model 을 Codable 하게 만들 것이다.
- 마지막으로 SceneStorage 를 사용하여 navigation model 을 save 하고 restore 할 것이다 .
복잡해보이지만 과정은 간단하다
1단계를 살펴보자
이것은 3번째 레시피에서 작성한 코드이다.
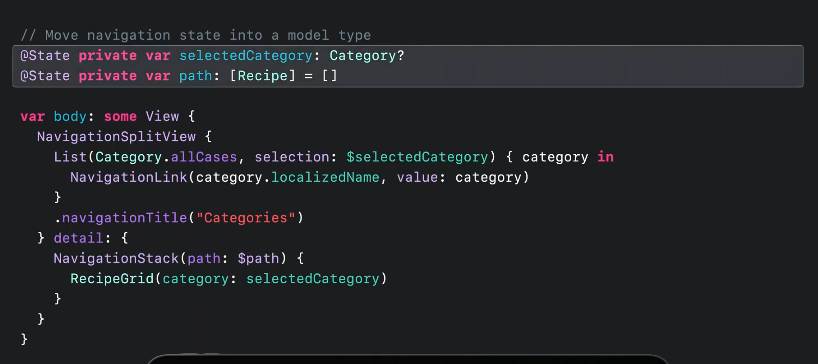
여기서 navigation state 는 selectedCategory 와 path 프로퍼티에 저장되어 있다.
( 번역 SKIP -> 추후 추가 )
Step1
Let's look at step one. Here's the code from the end of our last recipe. My navigation state is stored in the selectedCategory and path properties. The selectedCategory tracks the selection in the sidebar. The path tracks the views pushed onto the stack in the detail area.
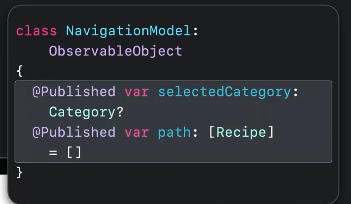
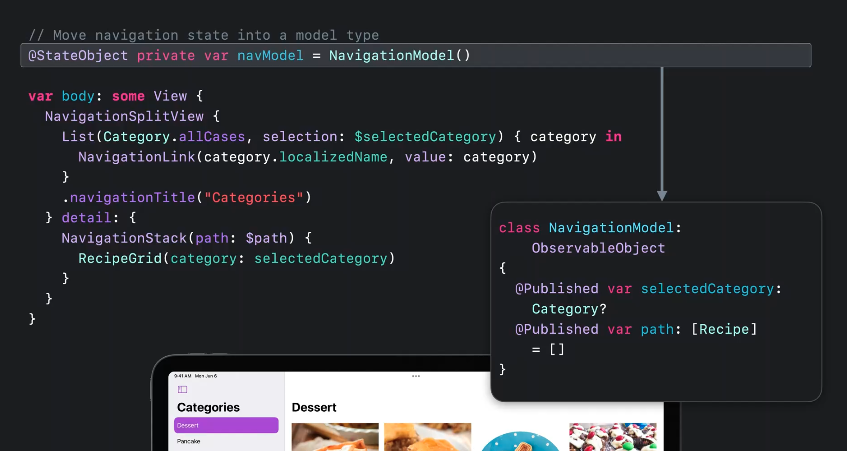
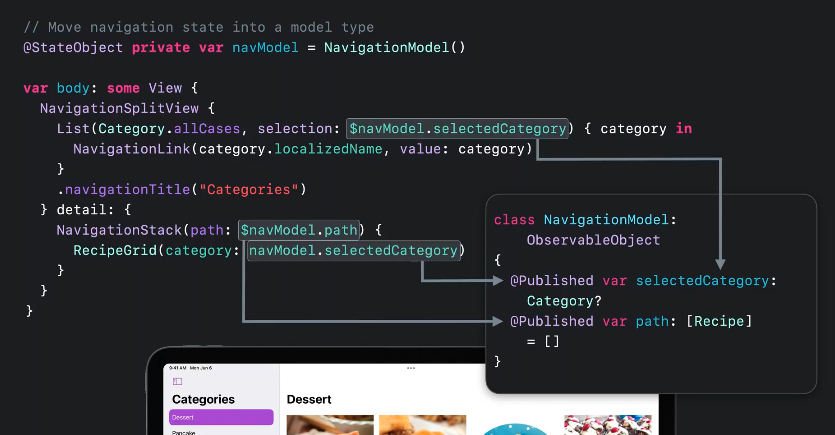

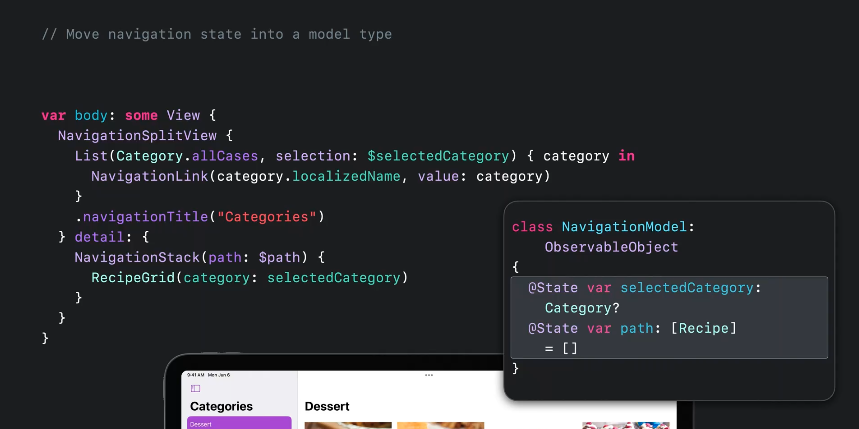
I'll introduce a new NavigationModel class and make it conform to ObservableObject. Next, I'll move my navigation state into my model object, changing the property wrappers from State to Published. Then, I'll introduce a StateObject to hold an instance of my NavigationModel and change the parameters to use the new model object.
Step2
Next, I'll make my navigation model Codable.

I'll start by adding the Codable conformance to the class. In many cases, Swift can automatically generate Codable conformance, but I want to implement my own conformance here.
The main reason is that Recipe is a model value.
- I don't want to store the entire model value for state restoration.
- There are two reasons for this.
- First, my recipe database already contains all the details for the recipe. It's not a good use of storage to repeat that information in my saved navigation state.
- Second, if my recipe database can change independently of my local navigation state -- say, because I finally get around to adding syncing -- I don't want my local navigation state to contain stale data.
For custom codability, next I'll add CodingKeys. One of the keys is just selectedCategory. But notice that I named the other "recipePathIds” I'm planning to just store the identifiers of the recipes on the path.
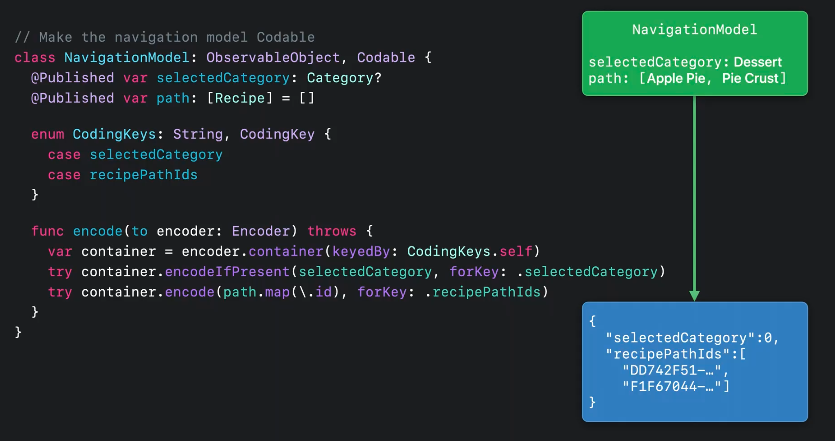
In my encode method, I'll create a keyed container using my coding keys and add the selected category to the container. I'm using encodeIfPresent, so I only write the value if it's non-nil. Then, I'll add the recipe path identifiers. Note that I'm mapping over the path to get the identifiers to encode. For example, suppose my navigation state included Dessert as a selected category, with Apple Pie and Pie Crust on the path, like shown in the green box on top. This might be encoded to JSON, like shown in this other box.
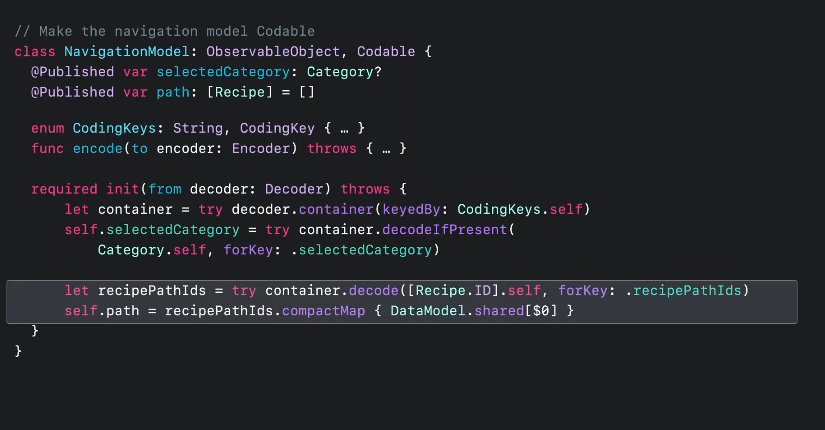
To finish up Codability, I'll add the required initializer. The interesting bit is here where I decode the recipe IDs, then use my shared data model to convert the IDs back into recipes. I'm using compactMap to discard any recipes that couldn't be found. For example, this might happen if I delete a recipe on another device after I have sync working -- something I'm definitely going to do someday. This is a place you'll need to use discretion in your own apps to make sure any restored navigation state still makes sense.
Finally, I'll add a computed property for reading and writing my model as JSON data.
Now that I have a navigation model and it knows how to encode and decode itself, all that's left is to actually save and restore it. For that I'll use SceneStorage.
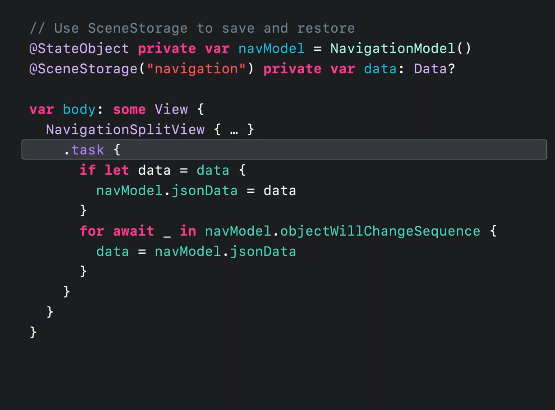
Here's where we left our main view. I was using a StateObject to hold my NavigationModel. Now, I'll introduce some SceneStorage to persist my NavigationModel.
SceneStorage properties automatically save and restore their associated values. When the type of the storage is optional, like my data here, the value is nil when a new scene is created.
When the system restores a scene, SwiftUI ensures that the value of the SceneStorage property is also restored. I'll take advantage of this to persist my NavigationModel. To do that, I'll add a task modifier to my view.
The task modifier runs its closure asynchronously. It starts when the view appears and is cancelled when the view goes away. Whenever my view appears, I'll first check whether I have any existing data from a previous run of the app.
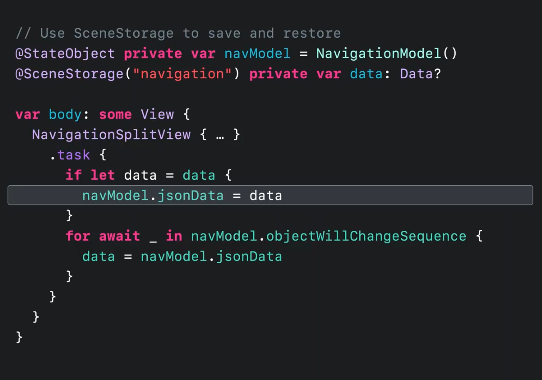
If so, I'll update my navigation model with that data.
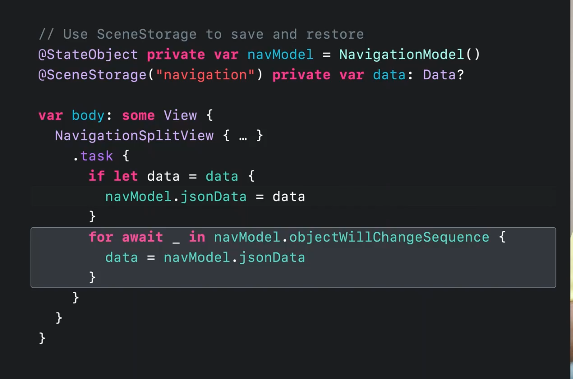
Then, I'll start an asynchronous for loop that will iterate whenever my navigation model changes. The body of this loop will run on each change, so I can use that to save my navigation state back to my scene storage data.
And that's it! When I leave my app to go check out some vintage Julia Child cooking shows on the web, it remembers where I was. When I return to the app, it takes me back to where I left off.
Kitchen tips
마지막으로 주방(아마도 애플)에서 전달하는 몇가지 Navigation 에 대한 팁이 있다.
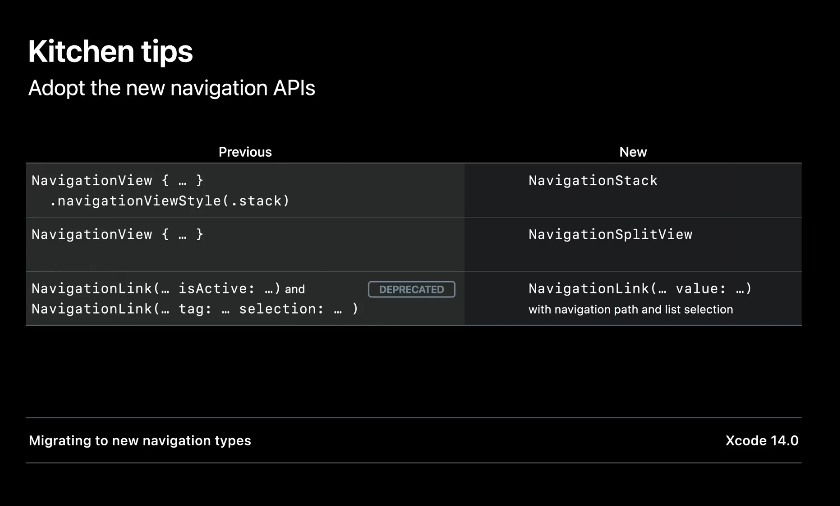
새로운 NavigationStack 와 NavigationSplitView 으로 최대한 빨리 변경하세요!
NavigationView을stack스타일로 사용하고 있다면,NavigationStack으로 바꾸기- NavigationStack은 스택 스타일이 항상 기본인 iPad와 iPhone 뿐만 아니라 Apple TV, Apple Watch 시트에서 가장 좋은 선택지 이다.
- multicolumn의
NavigationView를 사용중이라면NavigationSplitView으로 바꾸기 - programmatic 한 navigation 을 binding을 가지는 link를 이용하여 적용중이라면 아무 강력하게 새로나온 alue-presenting
NavigationLink(navigation path 와 list selection 을 가지는) 으로 바꾸기를 권장- The old-style programmatic links are
deprecatedbeginning in iOS 16 and aligned releases.
- The old-style programmatic links are
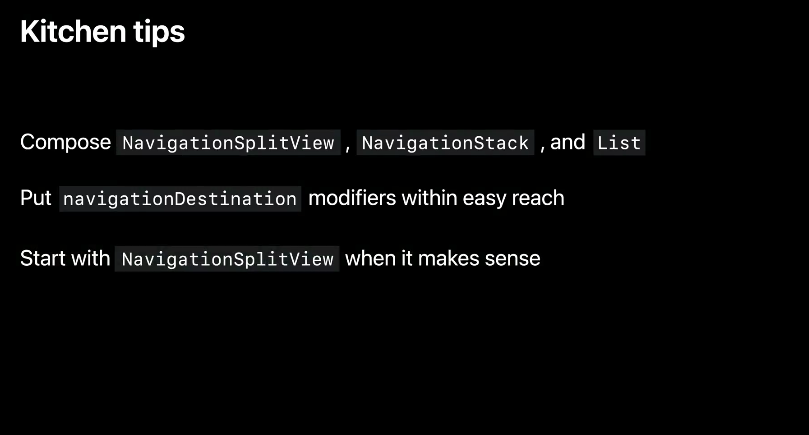
NavigationSplitView,NavigationSplitView그리고List를 함께 섞어서 사용하기 위해 만들어 진것을 명심하라- 이것들을 자유롭게 섞어서 당신의 앱 사용자들이 좋아할만한 navigation 경험을 만들어 내라
- navigation stacks을 사용할때 navigation destinations 은 stack 내부 혹은 이것의 subview이 든 어디든지 될 수 있다.
- navigation destinations 는 연관있는 근처에 넣어 유지 보수를 쉽게 해라
- 단, lazy container 안에 넣지 않도록 할 것
- 마지막으로 NavigationSplitView 을 사용하는 것이 괜찮은 상황에서는 이것을 통해서 navigation 시작하는 것을 추천한다.
iPhone용으로 처음 개발을 시작하더라도 NavigationSplitView는 각 장치에 맞게 자동으로 변환한다. iPhone Pro Max를 가로로 지원하거나 iPad 또는 Mac으로 앱을 전환하게 되어도 NavigationSplitView에서 추가 공간을 모두 활용할 수 있다.
Documentation about Migrating to the new APIs : "Migrating to new navigation types"