개념 정리
오토레이아웃
오토레이아웃은 뷰의 제약 사항을 바탕으로 뷰 체계 내의 모든 뷰의 크기와 위치를 동적으로 계산합니다.
오토레이아웃은 애플리케이션을 사용할 때 발생하는 외부 변경과 내부 변경에 동적으로 반응하는 사용자 인터페이스를 가능하게 합니다.
즉, 오토 레이아웃이란 애플 기기의 다양한 사이즈에 구애받지 않고 시각적으로 동일한 화면을 구성하기 위한 기능으로 뷰의 위치(x,y 앵커)와 크기를 정해주면 자동으로 레이아웃을 그려주는 것이다.
오토 레이아웃이 발생하는 경우는 외부 변경과 내부 변경이 있을 때이다.
외부 변경(External Changes)
외부 변경은 슈퍼뷰의 크기나 모양이 변경될 때 발생한다.
- 사용자가 아이패드의 분할뷰(Split View)를 사용하거나 사용하지 않는 경우(iOS).
- 장치를 회전하는 경우(iOS).
활성화콜(active call)과 오디오 녹음 바가 보여지거나 사라지는 경우(iOS). - 다른 크기의 클래스를 지원하기 원하는 경우
- 다른 크기의 스크린을 지원하기 원하는 경우
즉, 콘텐츠를 담는 틀 자체에 변경이 일어나는 경우를 말한다.
내부 변경(Internal Changes)
내부 변경은 사용자 인터페이스의 뷰의 크기 또는 설정이 변경되었을 때 발생한다.
- 애플리케이션 변경에 의해 콘텐츠가 보여지는 경우
- 애플리케이션이 국제화를 지원하는 경우
- 애플리케이션이 동적 타입을 지원하는 경우
콘텐츠(이미지, 텍스트 길이) 마다 사이즈는 다를 것이고, 같은 콘텐츠여도 언어마다 텍스트의 길이가 다를것이며, 사용자마다 폰트 사이즈나 이미지 크기 등을 다르게 설정할 수 있으므로 내부 콘텐츠의 사이즈에는 변화가 있게 된다.
NSLayoutConstraint
기존 스토리보드를 이용하지 않고 코드상에서 오토 레이아웃을 구현하는 방법은 NSLayoutConstraint 인스턴스 생성을 사용하여 제약조건을 지정하는 것이다.
오토 레이아웃 방정식
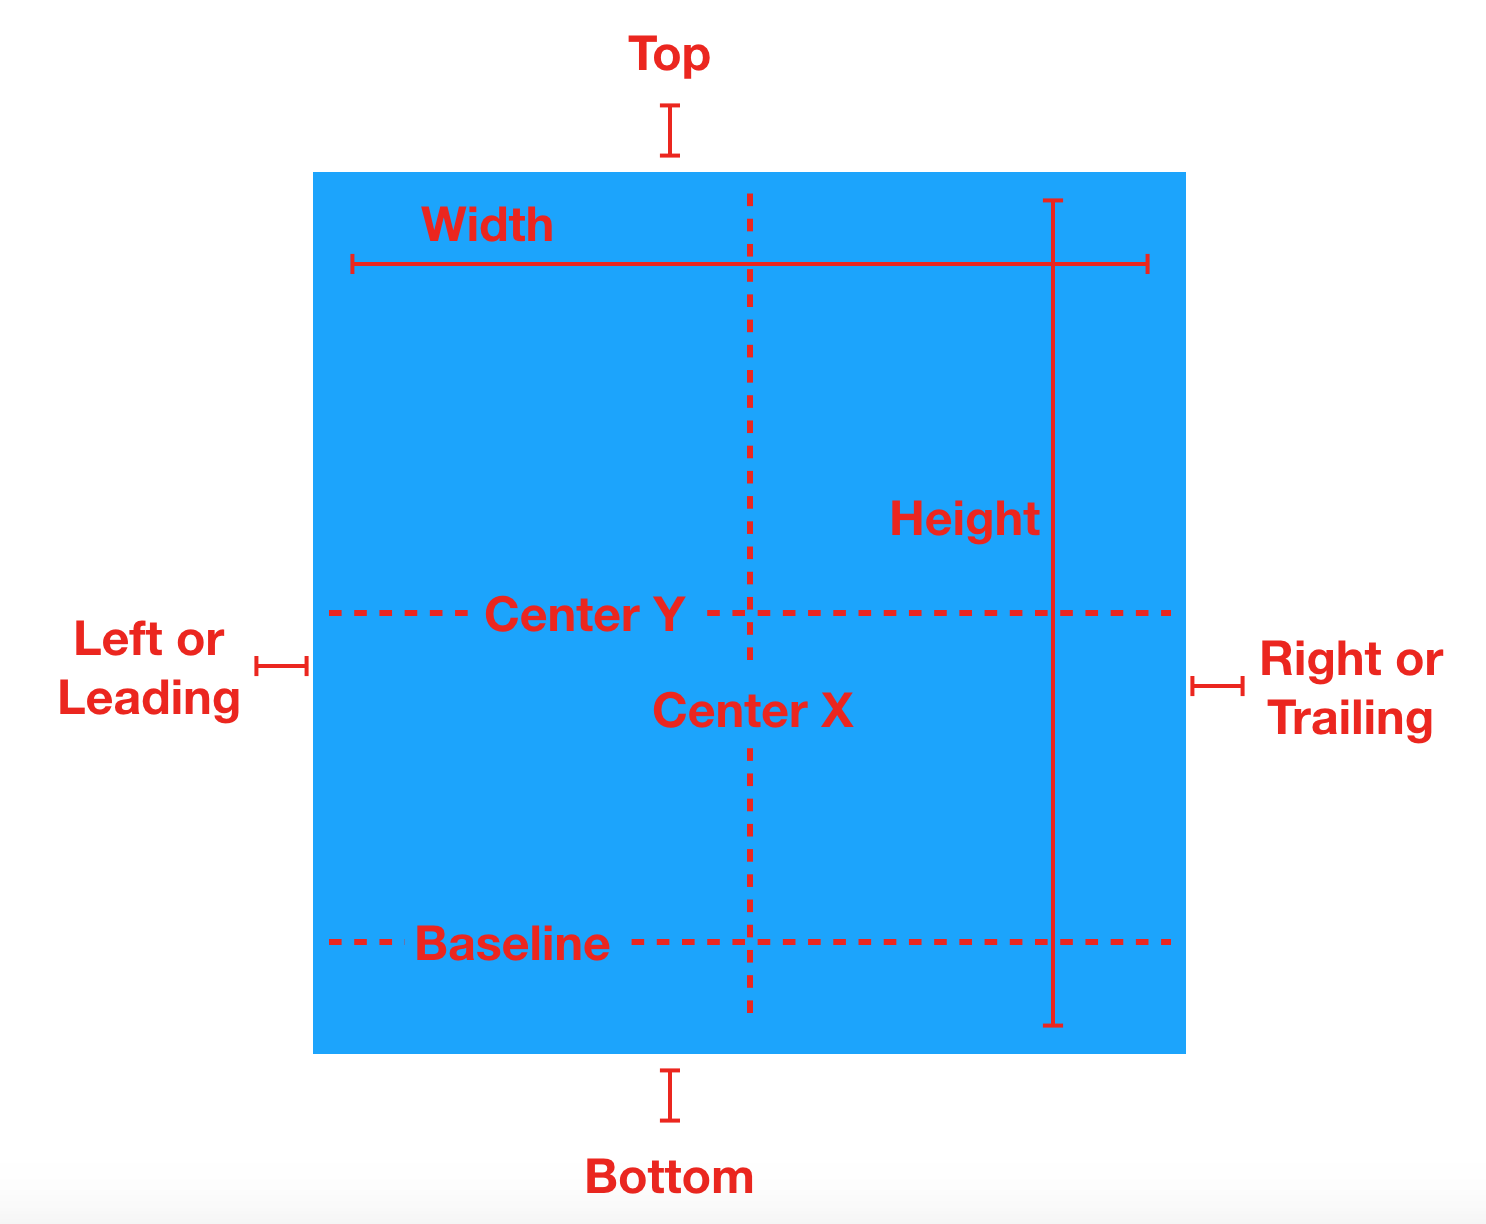
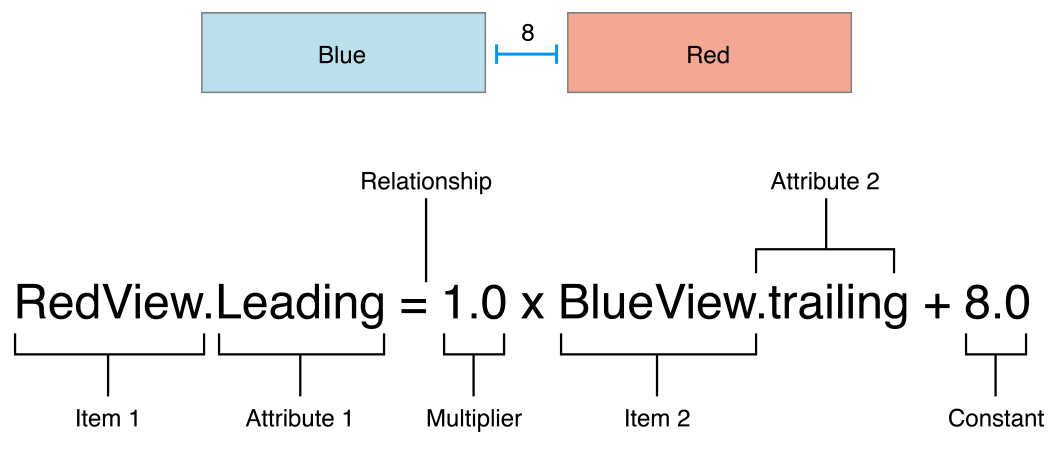
오토 레이아웃은 view의 x,y,width,height만 정해주면 알아서 굴러가는 방식이기 때문에 뷰들의 상대적인 크기나 위치를 정해줘야 한다. 코드상으로는 방정식을 통해 구현해야하고, 이를 오토 레이아웃 방정식이라고 한다.
즉,
view1.attr1 = view2.attr2 * multiplier + constant의 꼴이 되고, 이를 정리하면 다음과 같이 된다.
item.attribute = toItem.attribute * multiplier + constant
구현 예시

이제 코드 상으로 어떻게 구현을 하는지 살펴보자.
1. 텍스트필드를 버튼 오른쪽 8포인트 떨어져 위치시킴

 NSLayoutConstraint(item: button,
 			  attribute: .right,
 			  relatedBy: .equal,
 			  toItem: textField,
 			  attribute: .left,
 			  multiplier: 1.0,
 			  constant: 8.0)
2. 버튼의 너비가 최소 50 이상이 되도록 함

 NSLayoutConstraint(item: button,
 			  attribute: .width,
 			  relatedBy: .greaterThanOrEqual,
 			  toItem: nil,
 			  attribute: .notAnAttribute,
 			  multiplier: 1.0,
 			  constant: 50.0)
3. purpleBox가 superView를 기준으로 왼쪽(Leading) 간격은 50포인트, 오른쪽(Trailing) 간격은 50포인트로 설정
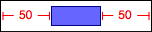
 NSLayoutConstraint(item: purpleBox,
 			  attribute: .left,
 			  relatedBy: .equal,
 			  toItem: self.view,
 			  attribute: .left,
 			  multiplier: 1.0,
 			  constant: 50.0)

 NSLayoutConstraint(item: purpleBox,
 			  attribute: .right,
 			  relatedBy: .equal,
 			  toItem: self.view,
 			  attribute: .right,
 			  multiplier: 1.0,
 			  constant: -50.0)
4. topField와 bottomField의 세로 사이의 간격을 10포인트로 설정

 NSLayoutConstraint(item: topField,
 			  attribute: .bottom,
 			  relatedBy: .equal,
 			  toItem: bottomField,
 			  attribute: .top,
 			  multiplier: 1.0,
 			  constant: -10.0)
5. maroonView와 blueView의 간격이 없음

 NSLayoutConstraint(item: maroonView,
 			  attribute: .right,
 			  relatedBy: .equal,
 			  toItem: blueView,
 			  attribute: .left,
 			  multiplier: 1.0,
 			  constant: 0.0)
6. button의 너비는 100포인트이고 우선도는 20으로 설정
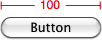
 NSLayoutConstraint(item: button,
 			  attribute: .width,
 			  relatedBy: .equal,
 			  toItem: nil,
 			  attribute: .notAnAttribute,
 			  multiplier: 1.0,
 			  constant: 100.0).priority = UILayoutPriority(rawValue: 20)
오토 레이아웃에서는 우선도 개념이 들어가 있어 NSLayoutConstraint(...).priority = UILayoutPriority(rawValue: 20) 와 같이 우선도(1 ~ 1000)를 정해줄 수 있다. 숫자가 높을수록 우선도가 높다.
7. flexibleButton의 너비 값이 70포인트보다 크거나 같고 100포인트보다 작거나 같도록 제약
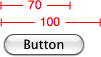
 NSLayoutConstraint(item: flexibleButton,
 			  attribute: .width,
 			  relatedBy: .greaterThanOrEqual,
 			  toItem: nil,
 			  attribute: .notAnAttribute,
 			  multiplier: 1.0,
 			  constant: 70.0)

 NSLayoutConstraint(item: flexibleButton,
 			  attribute: .width,
 			  relatedBy: .lessThanOrEqual,
 			  toItem: nil,
 			  attribute: .notAnAttribute,
 			  multiplier: 1.0,
 			  constant: 100.0)
8. button1, button2, textField와 superView의 간격은 표준 간격(8포인트)이며 textField의 너비 값은 20포인트보다 크거나 같도록 제약

 // button1
 NSLayoutConstraint(item: button1,
 			  attribute: .left,
 			  relatedBy: .equal,
 			  toItem: self.view,
 			  attribute: .left,
 			  multiplier: 1.0,
 			  constant: 8.0)

 // button2
 NSLayoutConstraint(item: button2,
 			  attribute: .left,
 			  relatedBy: .equal,
 			  toItem: button1,
 			  attribute: .right,
 			  multiplier: 1.0,
 			  constant: 8.0)

 // textField
 NSLayoutConstraint(item: textField,
 			  attribute: .left,
 			  relatedBy: .equal,
 			  toItem: button2,
 			  attribute: .right,
 			  multiplier: 1.0,
 			  constant: 8.0)

 NSLayoutConstraint(item: textField,
 			  attribute: .width,
 			  relatedBy: .greaterThanOrEqual,
 			  toItem: nil,
 			  attribute: .notAnAttribute,
 			  multiplier: 1.0,
 			  constant: 20.0)

 NSLayoutConstraint(item: textField,
 			  attribute: .right,
 			  relatedBy: .equal,
 			  toItem: self.view,
 			  attribute: .right,
 			  multiplier: 1.0,
 			  constant: -8.0)
Visual Format Language
단순히 NSLayoutConstraint에 인자를 넣어 뷰를 구현하기에는 복잡하므로, 약간의 ASCII art를 통해 시각화하여 인자를 단순화하도록 한 것이다.
NSLayoutConstraint.constraints(...) 또는 NSLayoutConstraints.constraintsWithVisualFormat(...)을 통해 구현한다.
NSLayoutConstraint.constraints(withVisualFormat:options:metrics:views:)-
withVisualFormat: Visual Format Language(VFL)를 넣는다. 수평(H:) 또는 수직(V:) 제약 조건을 지정한다. 아래 1번 ~ 8번 참조.
-
options: 뷰와 관련된 추가적인 세부 조정을 지정할 수 있는 옵션 배열이다. 제약의 방향, 정렬 등을 조절한다.
.alignAllLeft: 뷰들의 왼쪽 가장자리를 정렬
.alignAllRight: 뷰들의 오른쪽 가장자리를 정렬
.alignAllTop: 뷰들의 상단 가장자리를 정렬
.alignAllBottom: 뷰들의 하단 가장자리를 정렬
.alignAllLeading: 뷰들의 leading(문서의 시작 방향에 따라 왼쪽 또는 오른쪽) 가장자리를 정렬
.alignAllTrailing: 뷰들의 trailing(문서의 시작 방향에 따라 오른쪽 또는 왼쪽) 가장자리를 정렬
.alignAllCenterX: 뷰들의 x축 중심을 정렬
.alignAllCenterY: 뷰들의 y축 중심을 정렬
.alignAllBaseline: 뷰들의 기준선을 정렬
.alignAllFirstBaseline: 뷰들의 첫 번째 텍스트 기준선을 정렬
.alignAllLastBaseline: 뷰들의 마지막 텍스트 기준선을 정렬-
metrics: VFL 문자열 내에서 수치를 참조하는 데 사용되는 딕셔너리 인자다. 예를 들어, metrics: ["margin": 15]과 같이 지정하고 VFL에서 margin을 참조하고 조정할 수 있다.
-
views: VFL 문자열 내에서 뷰 이름을 참조하는 딕셔너리다. 각 키는 VFL 문자열에서 사용되는 뷰 이름이고, 해당하는 값은 그 이름을 가진 뷰 객체를 뜻한다. views: ["myView": myViewInstance]와 같이 지정하면 VFL에서 myView라는 이름으로 myViewInstance를 참조할 수 있다.
1번
 H:[button]-8-[textField]
 	또는
 H:[button]-[textField]
2번
H:[button(>=50)]3번
H:|-50-[purpleBox]-50-|4번
V:[topField]-10-[bottomField]5번
H:[maroonView][blueView]6번
H:[button(100@20)]7번
H:[flexibleButton(>=70,<=100)]8번
H:|-[find]-[findNext]-[findField(>=20)]-|NSLayoutAnchor
//사이즈
widthAnchor
heightAnchor

//수직
topAnchor
bottomAnchor
centerYAnchor

//수평
leadingAnchor
trailingAnchor
leftAnchor
rightAnchor
centerXAnchor

//래이블 텍스트 줄 기준
firstBaselineAnchor
lastBaselineAnchor