
MiniLibX란
MiniLibX는 42에서 만든 그래픽 라이브러리다. #include <mlx.h> 또는 "mlx.h" 로 사용 가능하다. mlx.h에 있는 함수들은 Appkit과 OpenGL을 기반으로 만들어졌다고 한다. 그래서 mlx.h를 사용하려면 Appkit과 OpenGL을 링크해줘야 한다.
mlx는 minilibx_opengl(정적 라이브러리), minilibx_mms(mojave, metal, swift) (동적 라이브러리) 두 가지 버전이 있다. 둘 중 하나만 사용하면 된다. 참고로 mms버전에서는 검은줄 이슈가 있는 듯 하다.
컴파일 방법
라이브러리용인 opengl버전으로 다운받고, make를 해서 정적이든 동적이든 라이브러리를 생성한다.
만약 개인 컴퓨터에서 진행한다면 해당 라이브러리를 /usr/local/lib/ 경로에 복사해줘야 한다. 만약 클러스터 맥을 사용하고 있다면 권한이 없다고 나오고, 경로를 찾아가보면 이미 라이브러리가 있는 것을 확인할 수 있다.
테스크 소스코드를 작성한 뒤에는
gcc -I /usr/local/include/ [소스파일.c] -L /usr/local/lib/ -lmlx -framework OpenGL -framework AppKit로 컴파일 해도 되고,
gcc minilibx_opengl_20191021/libmlx.a [소스파일.c] -framework OpenGL -framework AppKit 어찌됐든 경로에 있는 라이브러리랑 같이 컴파일하면 된다. 다만 앞서 설명한대로 framework 옵션으로 OpenGL과 AppKit을 링크해줘야 한다. 이후 a.out을 실행하면 창이 뜬다.
참고로 클러스터 맥에 mlx라이브러리가 있다. 그리고 -lmlx -L./mlx 이렇게 옵션을 줬을 때 -l 옵션에서 내장된 라이브러리를 찾았다면 -L 옵션을 사용하지 않는다. 라이브러리 경로 지정을 해서 ./libmlx/libmlx.a로 파일이름을 명시해서 목적파일들과 함께 컴파일하는 방법도 있다.
M1이상 맥에서는 gcc와 함께 -arch x86_64 로 아키텍쳐를 전환하여 컴파일하도록 한다.
💡Appkit
MacOS를 위한 그래픽 프레임워크다.
💡OpenGL 3D 그래픽 계산을 위해 하드웨어 제어와 연산을 해주는 오픈 소스 3D그래픽 라이브러리다.
42공식 영상
https://elearning.intra.42.fr/notions/minilibx/subnotions
[참고] Setting Up miniLibX (영문가이드)
1. Download the minilibx library into the root of your project.
For macOs: from intra, whichever version (OpenGL/mms_beta) that works
with your system
For Linux: from the 42Paris repo
The next steps assume you've called the folders  mlx  or  mlx_linux .
2. Now let's create our own Makefile in the root project directory. This will make
compiling our project easier. Add the required rules -  $(NAME) ,  clean ,
fclean ,  re ,  all .
Here's a helpful guide on Makefiles written by another student, Noah Loomans.
3. Create a test main so you can check that everything's working later. It doesn't
have to do anything.
4. Compile the mlx library, so that you get a  libmlx.dylib  (if you're using the
mms_beta version of mlx) or  libmlx.a  file (for Linux & OpenGL versions).
For macOS mms_beta library: you'll need to move  libmlx.dylib  into the same
directory as your build target (as it's a dynamic library).
Tip: you could have your Makefile do all this too.
5. Using miniLibX requires that we link the necessary internal API’s. Here's what
you should add to your project Makefile:
Once again, the following commands assume you've named your mlx folder
mlx  (for Mac) or  mlx_linux . Also,  OBJ  here refers to the object files
of your project source code, e.g.  main.o , not the mlx files.
For macOS: (make sure the compilation command is on one line)
  $(NAME): $(OBJ)
      $(CC) $(OBJ) -Lmlx -lmlx -framework OpenGL -framework AppKit -o
$(NAME)
For Linux: first run  sudo apt-get install gcc make xorg libxext-dev
libbsd-dev  to install the required  xorg ,  libxext-dev , and  libbsd-dev
dependencies
  $(NAME): $(OBJ)
      $(CC) $(OBJ) -Lmlx_linux -lmlx -lXext -lX11 -lm -lz -o $(NAME)
6. Additional steps if you’re doing this through Windows Subsystem for Linux: you
need to install Xming first.
Once Xming is installed, exit Xming and launch XLaunch. Choose the
following options:
Multiple windows  ->  Start no client  -> Enable  "No access control"  ->
Finish
Then execute this command:  export DISPLAY=localhost:0.0
You can check if everything’s working by running  sudo apt-get install
x11-apps  and then executing  xeyes .
Note: XLaunch has to be active and the  export DISPLAY  command above
must have been run before you can launch graphic programs using miniLibX.
7. Does everything compile and link correctly? If so, great! Now you're ready for
the SparkSession and your project!
사용 함수
💡 mlx 시작
void *mlx_init();mlx함수가 포함된 프로그램과 디스플레이의 그래픽적인 연결을 담당하는 mlx 시작 함수로 mlx_ptr를 반환한다.
💡 mlx 윈도우 관리
void *mlx_new_window (void *mlx_ptr, int size_x, int size_y, char *title);화면에 그래픽 구현을 위한 새 윈도를 띄우고 win_ptr를 반환한다. x축의 길이와 y축의 길이, 창의 제목을 지정할 수 있다. mlx_ptr 인자로는 mlx_init()의 리턴값을 넣어준다. 실패하면 NULL을 반환한다.
int mlx_clear_window (void *mlx_ptr, void *win_ptr);윈도를 검은화면으로 clear하는 함수로, mlx_init()과 mlx_new_window()의 리턴값을 차례대로 넣는다.
int mlx_destroy_window (void *mlx_ptr, void *win_ptr);해당하는 윈도를 없애는 함수.
💡 mlx 드로잉 함수
int mlx_pixel_put (void *mlx_ptr, void *win_ptr, int x, int y, int color);해당하는 프로그램의 해당 윈도의 x,y 좌표에 특정 색깔의 픽셀을 그려주는 함수. 0,0 은 윈도의 맨위 좌측을 뜻한다.
color 인자는 big endian에서 ARGB, little endian에서 BGRA의 총 4byte를 int값으로 변환한 값을 넣어준다.
R은 red, G는 green, B는 blue, A는 투명도를 나타낸다. 각 RGBA요소는 0 ~ 255 범위의 값을 가진다.
blue가 least significant byte이고, MacOS는 리틀엔디안이므로 BGRA로 계산하도록 한다.
다음과 같은 rgb_to_int함수를 만들어 주면 쉽게 계산이 가능하다.

int rgb_to_int(double r, double g, double b)
{
    int color = 0;
    color |= (int)(b * 255);
    color |= (int)(g * 255) << 8;
    color |= (int)(r * 255) << 16;
    return (color);
}
int mlx_string_put (void *mlx_ptr, void *win_ptr, int x, int y, int color, char *string);mlx_pixel_put과 비슷하지만 픽셀대신 문자열을 그려주는 함수.
💡 mlx 이미지 함수
void *mlx_new_image(void *mlx_ptr, int width, int height);메모리에 새 이미지를 생성하고, 그 이미지에 해당하는 포인터를 반환한다.
int mlx_put_image_to_window(void *mlx_ptr, void *win_ptr, void *img_ptr, int x, int y);이미지를 특정 윈도에 보여주는 함수로, 윈도의 x,y 좌표에 해당 이미지를 나타낸다.
char *mlx_get_data_addr(void *img_ptr, int *bits_per_pixel, int *size_line, int *endian);메모리에 저장된 이미지의 첫 주소를 가리키는 포인터를 반환한다. 해당 포인터를 통해 이미지를 수정할 수 있다.
⌲ bits_per_pixel 인자는 픽셀 색깔을 나타내기 위해 필요한 비트 수이다. 하드웨어에 따라 픽셀 색깔을 나타내기 위해 필요한 비트 수가 다를 수 있다.
⌲ size_line은 메모리에 저장된 이미지의 한 라인을 저장하기 위해 사용되는 바이트 수이다. 이미지를 이동시킬 때 필요하다.
⌲ endian 인자는 픽셀 색깔이 리틀엔디안(0)인지 빅엔디안(1)인지 나타낸다.
unsigned int mlx_get_color_value(void *mlx_ptr, int color);하드웨어에 따라 픽셀을 다르게 처리하기 때문에 int형의 RGB color 인자를 unsigned int형으로 반환해준다.
int *mlx_destroy_image(void *mlx_ptr, void *img_ptr);메모리에 저장된 이미지를 삭제한다.
void *mlx_xpm_to_image(void *mlx_ptr, char **xpm_data, int *width, int *height);void *mlx_xpm_file_to_image(void *mlx_ptr, char *filename, int *width, int *height);xpm은 X Window에서 사용되는 파일 포맷으로, xpm_data나 filename을 인자로 받아서 새 이미지를 생성해준다.
void *mlx_png_file_to_image(void *mlx_ptr, char *filename, int *width, int *height);png 파일 포맷을 받아서 새 이미지로 생성해 준다.
💡 mlx 이벤트 함수
그래픽 시스템은 양방향 시스템으로 프로그램이 스크린에 이미지를 나타내도록 처리하는 한편 키보드나 마우스로부터 이벤트 정보를 받아온다.
int mlx_loop(void *mlx_ptr);프로그램을 종료시키지 않고 무한 루프로 동작하게 만든다. 이벤트를 받으면 사용자 정의 함수를 호출한다.
이벤트는 키보드나 마우스를 누르는 등의 행위를 말한다.
int mlx_key_hook(void *win_ptr, int (*funct_ptr)(), void *param);키보드 이벤트에 대한 콜백함수 호출. param에 해당하는 인자도 같이 넘겨준다.
다만 keyRelease가 default여서 키를 눌렀다 떼면 이벤트가 발생한다. 키를 눌렀을 때 이벤트를 발생시키려면 mlx_hook함수를 쓰고 x_event를 2로 세팅해야 한다.
int mlx_mouse_hook(void *win_ptr, int (*funct_ptr)(), void *param);마우스 이벤트에 대한 콜백함수를 호출. param에 해당하는 인자도 같이 넘겨준다.
int mlx_expose_hook(void *win_ptr, int (*funct_ptr)(), void *param);윈도우의 일부분을 새로 그려주는 이벤트에 대한 콜백함수 호출. param에 해당하는 인자도 같이 넘겨준다. 리눅스일 때 사용하고 macOS는 사용하지 않는다.
int mlx_loop_hook(void *mlx_ptr, int (*funct_ptr)(), void *param);아무 이벤트가 없을 때 무한루프를 동작시키고 콜백을 호출
int mlx_hook(void *win_ptr, int x_event, int x_mask, int (*funct)(), void *param);간편하게 이벤트를 정의하고 사용할 수 있는 함수. x_evnet에 따른 콜백 함수를 호출한다. x_mask의 경우 macOS면 0
0과 1은 에러처리에 대한 성공, 실패를 나타내고 3부터 x_event가 할당된다.

#	Key	Event	 	#	Key	Event	 		#	Key	Event

02	KeyPress	 	14	NoExpose	 		26	CirculateNotify
03	KeyRelease	 	15	VisibilityNotify	27	CirculateRequest
04	ButtonPress	 	16	CreateNotify	 	28	PropertyNotify
05	ButtonRelease	17	DestroyNotify		29	SelectionClear
06	MotionNotify	18	UnmapNotify	 		30	SelectionRequest
07	EnterNotify	 	19	MapNotify	 		31	SelectionNotify
08	LeaveNotify	 	20	MapRequest	 		32	ColormapNotify
09	FocusIn	 		21	ReparentNotify	 	33	ClientMessage
10	FocusOut	 	22	ConfigureNotify	 	34	MappingNotify
11	KeymapNotify	23	ConfigureRequest	35	GenericEvent
12	Expose	 		24	GravityNotify	 	36	LASTEvent
13	GraphicsExpose	25	ResizeRequest
x_mask는 각 x_event에 대해 키 하나만 할당할지, 여러개를 할당(default)할지를 지정해줄 수 있다.
Mask Description Mask Description
0L NoEventMask (1L<<12) Button5MotionMask
(1L<<0) KeyPressMask (1L<<13) ButtonMotionMask
(1L<<1) KeyReleaseMask (1L<<14) KeymapStateMask
(1L<<2) ButtonPressMask (1L<<15) ExposureMask
(1L<<3) ButtonReleaseMask (1L<<16) VisibilityChangeMask
(1L<<4) EnterWindowMask (1L<<17) StructureNotifyMask
(1L<<5) LeaveWindowMask (1L<<18) ResizeRedirectMask
(1L<<6) PointerMotionMask (1L<<19) SubstructureNotifyMask
(1L<<7) PointerMotionHintMask (1L<<20) SubstructureRedirectMask
(1L<<8) Button1MotionMask (1L<<21) FocusChangeMask
(1L<<9) Button2MotionMask (1L<<22) PropertyChangeMask
(1L<<10) Button3MotionMask (1L<<23) ColormapChangeMask
(1L<<11) Button4MotionMask (1L<<24) OwnerGrabButtonMask그 외 기타 함수들
int mlx_do_key_autorepeatoff(void *mlx_ptr);
int mlx_do_key_autorepeaton(void *mlx_ptr);
int mlx_do_sync(void *mlx_ptr);
int mlx_mouse_move(void *mlx_ptr, void *win_ptr, int x, int y);
int mlx_mouse_hide(void *mlx_ptr, void *win_ptr);
int mlx_mouse_show(void *mlx_ptr, void *win_ptr);
int mlx_mouse_get_pos(void *win_ptr, int *x, int *y);
int mlx_get_screen_size(void *mlx_ptr, int *sizex, int *sizey);
int mlx_window_get_size(void *win_ptr, int *width, int *height);
int mlx_window_set_min_size(void *win_ptr, int width, int height);
int mlx_window_set_max_size(void *win_ptr, int width, int height);
int mlx_window_resizable_on(void *win_ptr);
int mlx_window_resizable_off(void *win_ptr);
int mlx_window_miniaturizable_on(void *win_ptr);
int mlx_window_miniaturizable_off(void *win_ptr);
int mlx_window_closable_on(void *win_ptr);
int mlx_window_closable_off(void *win_ptr);
int mlx_window_titled_on(void *win_ptr);
int mlx_window_titled_off(void *win_ptr);
int mlx_window_toggle_fullscreen(void *win_ptr);
int mlx_window_set_title(void *win_ptr, char *title);
int mlx_window_set_background(void *win_ptr, int color);
int mlx_screen_get_resolution(int *width, int *height);참고로 key_press 사용자 함수를 만들면 원하는 key값이 입력됐을 경우 그에 따른 결과를 보여줄 수 있다.
기타 확장자들
BER 확장자?
BER은 Basic Encoding Rules의 약자로, 데이터를 인코딩하는 방법 중 하나로 보인다.
위키피디아를 찾아보자
The format for Basic Encoding Rules specifies a self-describing and self-delimiting format for encoding ASN.1 data structures. Each data element is encoded as a type identifier, a length description, the actual data elements, and, where necessary, an end-of-content marker. These types of encodings are commonly called type–length–value (TLV) encodings. However, in BER's terminology, it is identifier-length-contents. This format allows a receiver to decode the ASN.1 information from an incomplete stream, without requiring any pre-knowledge of the size, content, or semantic meaning of the data.[1] Data encoding consists of three or four components, in the following order:
...
Abstract Syntax Notation One (ASN.1) is a standard interface description language for defining data structures that can be serialized and deserialized in a cross-platform way.
m 확장자?
objective-c 로 작성된 파일이다.
기초 함수 사용법
열심히 MinilibX 함수를 공부했어도 So_long에서 사용되는 함수는 제한적이다. 그래도 mlx.h의 대표적인 함수 사용법을 몇개 익혀보자.
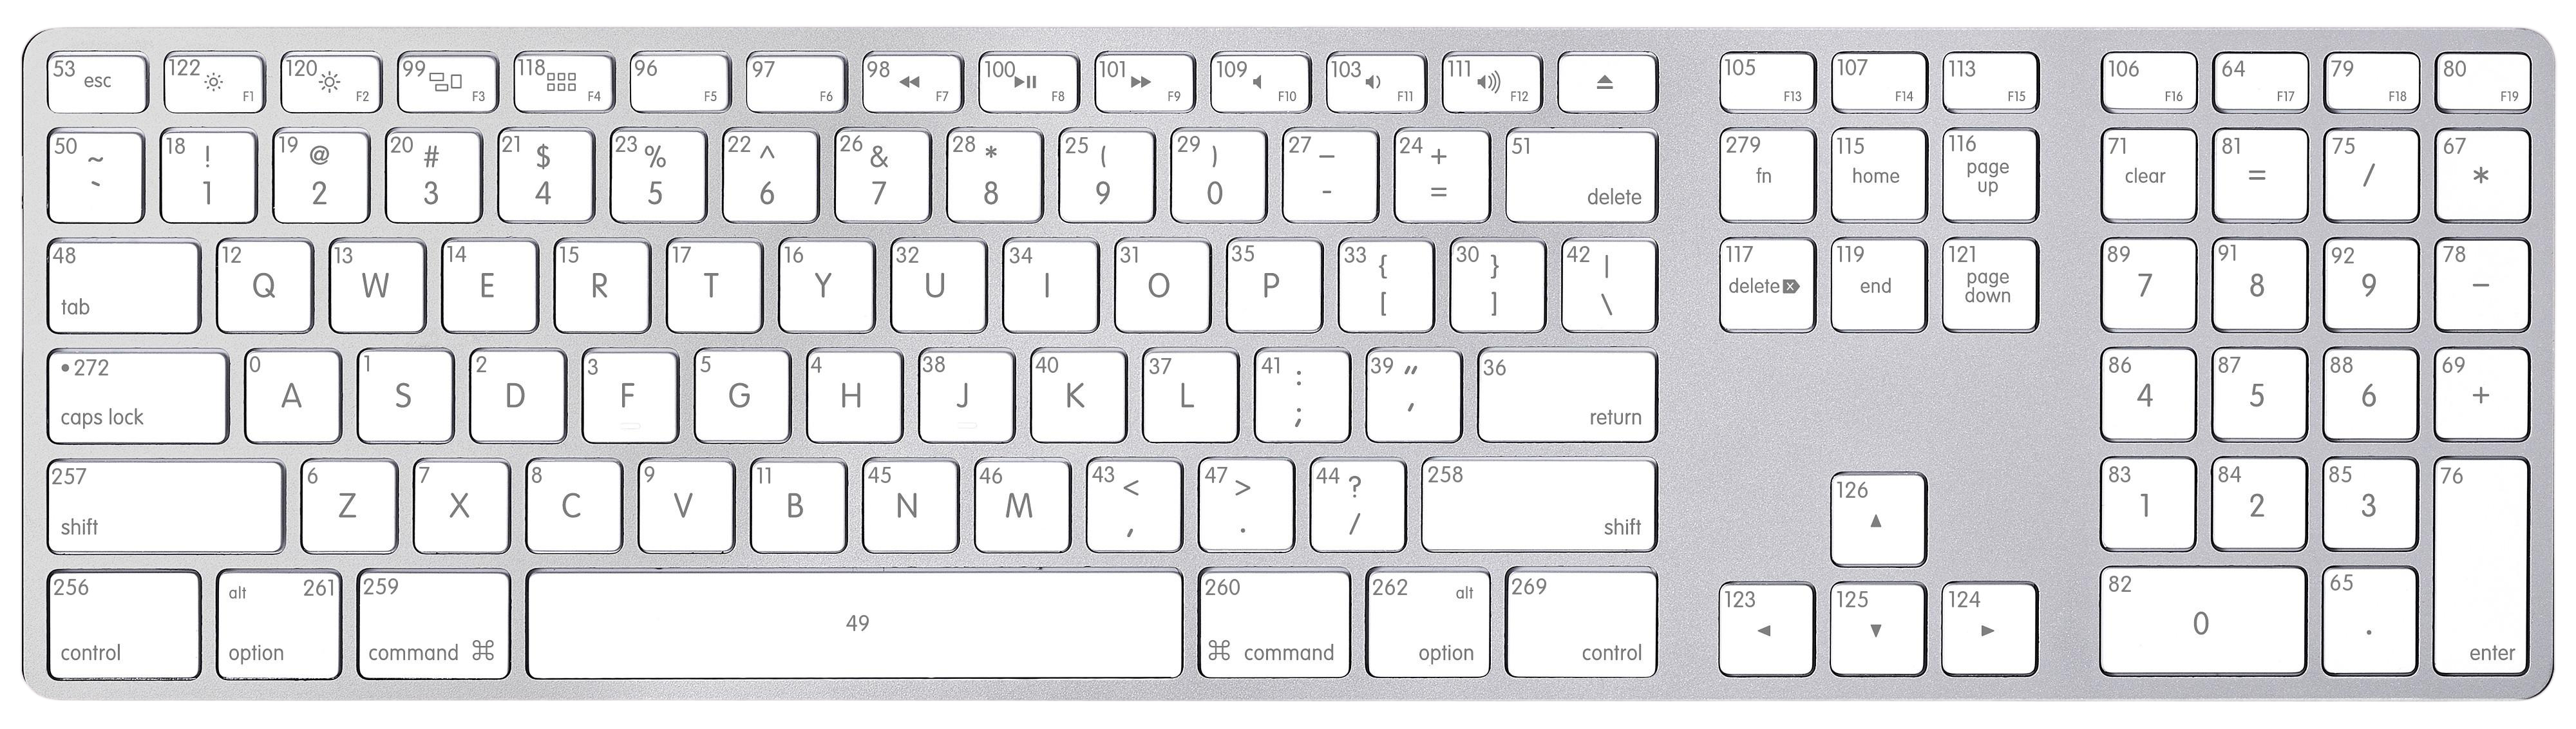
💡 키보드 키 위치 값 출력
int	key_press(int keycode, t_pos *pos)
{
	if (keycode == W_KEY)
		pos->y = (pos->y)++;
	else if (keycode == S_KEY)
		pos->y = (pos->y)++;
	else if (keycode == D_KEY)
		(pos->x)++;
	else if (keycode == A_KEY)
		(pos->x)--;
	else if (keycode == ESC_KEY)
		exit(0);
	printf("x=%d, y=%d\n", pos->x, pos->y);
	return (0);
}

int	main(void)
{
	void	*mlx_ptr;
	void	*win_ptr;
	void	*img_ptr;
	t_pos	pos;
	int		bits_per_pixel;
	int		size_line;
	int		endian;
	char	*img_addr;

	pos.x = 0;
	pos.y = 0;
	mlx_ptr = mlx_init();
	win_ptr = mlx_new_window(mlx_ptr, WIDTH, HEIGHT, "jibang");
	mlx_hook(win_ptr, KEY_RELEASE, 0, &key_press, &pos);
	mlx_loop(mlx_ptr);

	return (0);
}
💡 픽셀 화면 출력
int	main(void)
{
	void	*mlx_ptr;
	void	*win_ptr;
	void	*img_ptr;
	t_pos	pos;
	int		bits_per_pixel;
	int		size_line;
	int		endian;
	char	*img_addr;

	pos.x = 0;
	pos.y = 0;
	mlx_ptr = mlx_init();
	win_ptr = mlx_new_window(mlx_ptr, WIDTH, HEIGHT, "jibang");
	img_ptr = mlx_new_image(mlx_ptr, WIDTH, HEIGHT);
	img_addr = mlx_get_data_addr(img_ptr, &bits_per_pixel, &size_line, &endian); //bpp, sizeline, endian은 pc에서 자동 세팅

	mlx_put_image_to_window(mlx_ptr, win_ptr, img_ptr, 0, 0);
	int		i;

	i = 0;
	while (i < WIDTH / 5)
	{
		int		j;
		j = 0;
		while (j < HEIGHT / 5)
		{
			mlx_pixel_put(mlx_ptr, win_ptr, i, j, 0x00FFFFF);
			j++;
		}
		i++;
	}
	// mlx_hook(win_ptr, KEY_RELEASE, 0, &key_press, &pos);
	mlx_loop(mlx_ptr);

	return (0);
}
💡 이미지 파일 출력
무료 이미지 다운로드: https://itch.io/game-assets/free/tag-sprites
int	main(void)
{
	void	*mlx_ptr;
	void	*win_ptr;

	t_pos	pos;

	void	*hero_left;
	void	*hero_right;
	void	*bird;
	void	*grass;
	void	*box;
	void	*dark_tile;
	void	*light_tile;
	int		img_width;
	int		img_height;

	pos.x = 0;
	pos.y = 0;
	mlx_ptr = mlx_init();
	hero_left = mlx_xpm_file_to_image(mlx_ptr, "./graphic_src/char_left.xpm", &img_width, &img_height);
	hero_right = mlx_xpm_file_to_image(mlx_ptr, "./graphic_src/char_right.xpm", &img_width, &img_height);
	bird = mlx_xpm_file_to_image(mlx_ptr, "./graphic_src/bird.xpm", &img_width, &img_height);
	grass = mlx_xpm_file_to_image(mlx_ptr, "./graphic_src/grass.xpm", &img_width, &img_height);
	box = mlx_xpm_file_to_image(mlx_ptr, "./graphic_src/box.xpm", &img_width, &img_height);
	dark_tile = mlx_xpm_file_to_image(mlx_ptr, "./graphic_src/dark_tile.xpm", &img_width, &img_height);
	light_tile = mlx_xpm_file_to_image(mlx_ptr, "./graphic_src/light_tile.xpm", &img_width, &img_height);
	win_ptr = mlx_new_window(mlx_ptr, WIDTH, HEIGHT, "jibang");

	mlx_put_image_to_window(mlx_ptr, win_ptr, hero_left, 0, 0);
	mlx_put_image_to_window(mlx_ptr, win_ptr, hero_right, 64, 0);
	mlx_put_image_to_window(mlx_ptr, win_ptr, bird, 128, 0);
	mlx_put_image_to_window(mlx_ptr, win_ptr, box, 0, 64);
	mlx_put_image_to_window(mlx_ptr, win_ptr, grass, 64, 64);
	mlx_put_image_to_window(mlx_ptr, win_ptr, dark_tile, 128, 64);
	mlx_put_image_to_window(mlx_ptr, win_ptr, light_tile, 128, 64);

	mlx_loop(mlx_ptr);

	return (0);
}
so_long 만드는 과정
- 기본 함수들을 써보면서 mlx.h에 대한 감을 익힌다.
- 이미지들을 다운받은 뒤 일정한 크기로 만들어서 이미지를 출력해본다.
- 맵을 파싱한다.
- 캐릭터를 움직여본다.
- 추가 예외처리를 해준다.
결과물
💡 버그버전

💡최종본