이 문법의 핵심 기능은 함수를 작성 할 때 함수를 특정 구간에 멈춰놓을 수도 있고, 원할 떄 다시 돌아가게 할 수도 있다. 그리고 결과값을 여러번 반환 할 수도 있다.
function weirdFunction() {
  return 1;
  return 2;
  return 3;
  return 4;
  return 5;
}
이 경우에는 무조건 1만 반환하게 될 것이다.
하지만, 제너레이터 함수를 사용하면 함수에서 값을 순차적으로 반활할 수 있다. 함수의 흐름을 도중에 멈춰놓았다가 나중에 이어서 진행할 수도 있다.
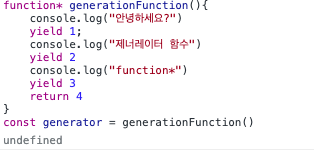
제너레이터 함수를 호출한다고 해서해당 함수 아느이 코드가 바로 실행되지는 않는다.
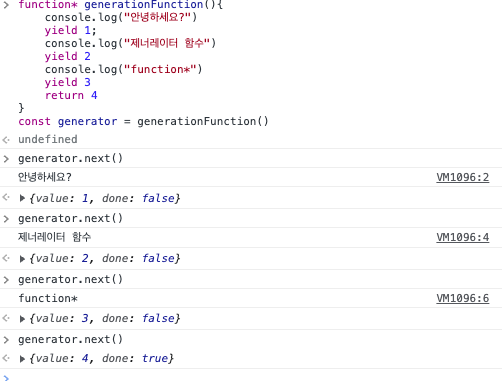
generator.next()를 호출해야만 코드가 실행되며, yield를 한 값을 반환하고 코드의 흐름을 멈춘다.
코드의 흐름을 멈추고 나서 generator.next()를 다시 호출하면 흐름이 이어서 다시 시작된다.
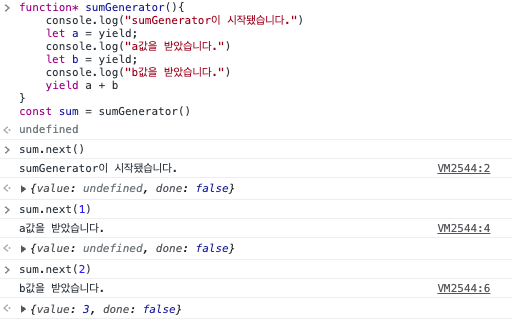
또 다른 예시로는 next 를 호출 할 때 인자를 전달하여 제너레이터 함수 내부에서 사용할 수도 있다.
Generator로 액션 모니터링
redux - saga는 액션을 모니터링 할 수 있다.

redux-saga에서는 이러한 원리로 액션을 모니터링하고, 특정 액션이 발생했을 때 우리가 원하는 자바스크립트 코드를 실행시켜준다.
비동기 카운터 만들기
액션 생성 함수 / counter.js
// 액션 타입
const INCREASE = 'INCREASE';
const DECREASE = 'DECREASE';
const INCREASE_ASYNC = 'INCREASE_ASYNC';
const DECREASE_ASYNC = 'DECREASE_ASYNC';

// 액션 생성 함수
export const increase = () => ({ type: INCREASE });
export const decrease = () => ({ type: DECREASE });
export const increaseAsync = () => ({ type: INCREASE_ASYNC });
export const decreaseAsync = () => ({ type: DECREASE_ASYNC });

// 초깃값 (상태가 객체가 아니라 그냥 숫자여도 상관 없습니다.)
const initialState = 0;

export default function counter(state = initialState, action) {
  switch (action.type) {
    case INCREASE:
      return state + 1;
    case DECREASE:
      return state - 1;
    default:
      return state;
  }
}
그 다음엔 , increasSaga와 decreaseSaga를 다음과 같이 만들어보자. redux-saga에서는 제너레이터 함수를 "사가"라고 부른다.
import {delay, put, takeEvery, takeLatest} from 'redux-saga/effects';

//액션 타입
const INCREASE = "INCREASE";
const DECREASE = "DECREASE";
const INCREASE_ASYNC = "INCREASE_ASYNC";
const DECREASE_ASYNC = "DECREASE_ASYNC";

//액션 생성 함수
export const increase = () => ({ type:INCREASE });
export const decrease = () => ({ type:DECREASE });
export const increaseAsync = () => ({ type: INCREASE_ASYNC });
export const decreaseAsync = () => ({ type: DECREASE_ASYNC });

function* increaseSaga() {
  yield delay(1000); // 1초를 기다립니다.
  yield put(increase()); // put은 특정 액션을 디스패치 해줍니다.
}
function* decreaseSaga() {
  yield delay(1000); // 1초를 기다립니다.
  yield put(decrease()); // put은 특정 액션을 디스패치 해줍니다.
}

export function* counterSaga() {
  yield takeEvery(INCREASE_ASYNC, increaseSaga); // 모든 INCREASE_ASYNC 액션을 처리
  yield takeLatest(DECREASE_ASYNC, decreaseSaga); // 가장 마지막으로 디스패치된 DECREASE_ASYNC 액션만을 처리
}

// 초깃값 (상태가 객체가 아니라 그냥 숫자여도 상관 없다.)
const initialState = 0;


export default function counter(state = initialState, action) {
  switch (action.type) {
    case INCREASE:
      return state + 1;
    case DECREASE:
      return state - 1;
    default:
      return state;
  }
counterSaga 함수의 경우 다른 곳에서 불러와서 사용해야 하기 때문에 export 키워드를 사용해야한다.
이제, 루트 사가를 만들어보자. 프로젝트에서 여러개의 사가를 만들게 될텐데 , 이를 모두 합쳐서 루트 사가를 만든다.
modules/index.js
import {combineReducers} from 'redux';
import counter, {counterSaga} from "./counter";
import posts from "./posts"
import {all} from "redux-saga/effects";

const rootReducer = combineReducers({ counter, posts });
export function* rootSaga() {
	yield all ([counterSaga]); // all은 배열 안의 여러 사가를 동시에 실행시켜준다.
}

export default rootReducer;
이제 리덕스 스토어에 redux-saga 미들웨어를 적용해보자.
index.js(최상단)
import React from 'react';
import ReactDOM from 'react-dom';
import './index.css';
import App from './App';
import * as serviceWorker from './serviceWorker';
import { createStore, applyMiddleware } from 'redux';
import { Provider } from 'react-redux';
import rootReducer, { rootSaga } from './modules';
import logger from 'redux-logger';
import { composeWithDevTools } from 'redux-devtools-extension';
import { Router } from 'react-router-dom';
import { createBrowserHistory } from 'history';
import createSagaMiddleware from 'redux-saga';

const customHistory = createBrowserHistory();
const sagaMiddleware = createSagaMiddleware(); // 사가 미들웨어를 만든다.

const store = createStore(
  rootReducer,
  // logger 를 사용하는 경우, logger가 가장 마지막에 와야합니다.
  composeWithDevTools(
    applyMiddleware(
      sagaMiddleware, // 사가 미들웨어를 적용하고
      logger
    )
  )
); // 여러개의 미들웨어를 적용 할 수 있다.

sagaMiddleware.run(rootSaga); // 루트 사가를 실행한다.
// 주의: 스토어 생성이 된 다음에 위 코드를 실행해야한다.

ReactDOM.render(
  <Router history={customHistory}>
    <Provider store={store}>
      <App />
    </Provider>
  </Router>,
  document.getElementById('root')
);

serviceWorker.unregister();
