CORS 리뷰
Cross Origin Resource Sharing
다른 서버에 있는 자원을 요청해서 사용하는 것. 기본적으로 보안상 이유로 브라우저에서는 cors를 제한한다.
cors가 제한되는 문제는 서버사이드에서 해결해준다. 서버에서 클라이언트 보내는 response 헤더에 cors가능하다는 내용을 추가해주면, 브라우저는 해당 cors를 막지 않는다.
클라이언트(브라우저)는 cors 요청을 보내기 전 OPTIONS 메서드로 preflight 요청을 서버에 보내고, 해당 서버에서 오류없는 응답을 받으면 진짜 cors 요청을 다시 서버로 보낸다.
아래와 같이 모든 응답에 헤더를 추가하거나 cors 라이브러리를 활용한다.
const defaultCorsHeader = {
  'Access-Control-Allow-Origin': '*',
  'Access-Control-Allow-Methods': 'GET, POST, PUT, DELETE, OPTIONS',
  'Access-Control-Allow-Headers': 'Content-Type, Accept',
  'Access-Control-Max-Age': 10
};
function.prototype.bind()
- 새로운 함수를 반환한다.
- 반환된 함수의 this값이 첫번째 인자로 변경된다.
- bind의 다음 인자로 binding된 함수의 인자로 들어갈 값을 지정할 수 있다.
- 예시 - 기본 바인딩
const module = {
  x: 42,
  getX: function(y) {
    return this.x + y;
  }
};

const unboundGetX = module.getX;
console.log(unboundGetX()); // The function gets invoked at the global scope
// expected output: undefined

const boundGetX = unboundGetX.bind(module);
console.log(boundGetX());
// expected output: 42
- 부분 적용 함수
내장함수를 binding해서 커스터마이즈한 형태로 활용할 수 있다.
wrapper함수를 재선언해서 활용도 가능하지만, 단순한 로직에 대해서는 bind를 활용하면 문법이 깔끔해진다.
    function list() {
      return Array.prototype.slice.call(arguments);
    }

    var list1 = list(1, 2, 3); // [1, 2, 3]

    // 선행될 인수를 설정하여 함수를 생성합니다.
    var leadingThirtysevenList = list.bind(null, 37);

    var list2 = leadingThirtysevenList();  // [37]

    var list3 = leadingThirtysevenList(1, 2, 3);  // [37, 1, 2, 3]


    function addArguments(arg1, arg2) {
        return arg1 + arg2
    }

    var result1 = addArguments(1, 2); // 3

    // 첫 번째 인수를 지정하여 함수를 생성합니다.
    var addThirtySeven = addArguments.bind(null, 37);

    var result2 = addThirtySeven(5); // 37 + 5 = 42

    // 두 번째 인수는 무시됩니다.
    var result3 = addThirtySeven(5, 10); // 37 + 5 = 42
- setTimout에서 콜백 함수를 인스턴스 메서드로 활용해야 할때
new로 인스턴스를 만들때마다 this.petalCount에서 랜덤하게 생성되는 petalCount를 계속 활용하기 위해서 binding 해준다.
만약 바인딩하지 않았을 경우 setTimeout의 콜백으로 전달된declare의 this는 window가 되므로 window.petalCount는 undefined가 된다.
(기본적으로 콜백함수의 this는 window)
function LateBloomer() {
  this.petalCount = Math.ceil(Math.random() * 12) + 1;
}

// 1초 지체 후 bloom 선언
LateBloomer.prototype.bloom = function() {
  window.setTimeout(this.declare.bind(this), 1000);
};

LateBloomer.prototype.declare = function() {
  console.log('I am a beautiful flower with ' +
    this.petalCount + ' petals!');
};

var flower = new LateBloomer();
flower.bloom();
// 1초 뒤, 'declare' 메소드 유발
sprint
http 모듈
http 모듈을 직접 활용해서 코딩할 필요는 없겠지만, 저수준의 코드를 다루면서 노드와 웹서버에 대한 이해가 조금은 깊어졌다고 생각한다.
예시를 통해서 스트림와 이벤트 에미터, cors에 대해 조금 더 깊이 학습할 수 있었다.
eventEmitter
이벤트생성 객체는 EventEmitter를 상속받는 객체의 인스턴스로 생성할 수 있다.
이벤트를 발생시키는 인스턴스는 메서드로 emit()을 가지고, 이를 통해 이벤트가 발생했음을 알려준다. 이벤트 발생과 동시에 매개변수도 전달 가능하다.
const EventEmitter = require('node:events');

class MyEmitter extends EventEmitter {}

const myEmitter = new MyEmitter();
myEmitter.on('event', (...args) => {
  console.log('an event occurred!');
  if (args.length !== 0) {
      console.log('args are ', ...args);
  }
});

myEmitter.emit('event');
myEmitter.emit('event','arg1', 'arg2');myEmitter.once()로 한번만 실행되는 이벤트 정의 가능
myEmitter.on('error', callback)을 정의하지 않으면
myEmitter.emit('error')발생시 에러 객체가 던져지고, 프로세스가 멈출 수 있다.
싱글스레드 기반 노드에서는 에러처리를 철저하고, 꼼꼼하게 해주자.
stream
스트림이란 streaming data를 다루기 위해 노드에서 제공하는 인터페이스다. stream의 종류는 writable, readable, duplex, transform 네 가지가 있다.
http 모듈에서 request 객체가 Readable Stream이다. ReadableStream은 EventEmitter 이므로, on 메서드로 Emitted 이벤트를 수신 가능하다.
ReadableStream이 스트림의 소비자로 해당 청크의 데이터 소유권을 포기할 때 발생하는 이벤트가 'data'다. 'data' 이벤트는 스트림이 pipe(),resume(),read() 될때 발생한다. 아래의 코드에서는 'data' 이벤트가 발생시 body라는 배열에 해당하는 청크의 데이터를 지속적으로 푸쉬한다.
'end'이벤트는 스트림에 더 이상 소비될 데이터가 없을때 발생한다.
아래에서 request 스트림이 'end' 이벤트를 방출하면, 헤더와 바디에 데이터를 response객체에 실어 클라이언트로 쏴준다.
request
      .on("data", (chunk) => body.push(chunk))
      .on("end", () => {
        body = Buffer.concat(body).toString();
        response.writeHead(200, defaultCorsHeader);
        response.end(body.toUpperCase());
      });
CORS Again!!
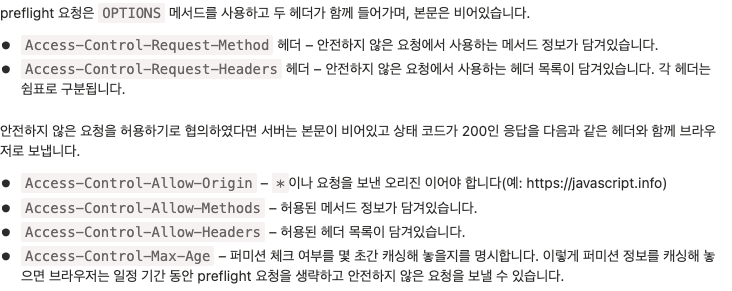
안전하지 않은 요청
정리해보면...
-
CORS 요청에는 origin 헤더가 붙는다. origin 헤더는 사용자가 임의로 변경할 수 없다.
Origin: https://javascript.info -
안전하지 않은 CORS에는 preflight요청이 선행된다.
2-1. 서버가 preflight 요청에 대해서 아래와 같이 응답하면 OK200 OK Access-Control-Allow-Origin: https://javascript.info Access-Control-Allow-Methods: PUT,PATCH,DELETE Access-Control-Allow-Headers: API-Key,Content-Type,If-Modified-Since,Cache-Control Access-Control-Max-Age: 86400 -
브라우저는 실제요청을 서버로 보낸다.
-
실제 응답에는
Access-Control-Allow-Origin: https://javascript.info이라는 헤더가 들어간다.
CORS로 쿠키를 보내려면?
쿠키와 같은 credential은 CORS요청에 포함되지 않는다.(대부분의 HTTP 요청은 쿠키도 함께 송한다.)
- 쿠키를 전송하려면 클라이언트에서 자격증명이 담긴 옵션을 포함해서 서버에 요청을 보낸다.
fetch('http://another.com', {
  credentials: "include"
});- 서버에서는 credential을 허용하겠다고 preflight 응답 헤더에 명시해줘야 한다.
200 OK
Access-Control-Allow-Origin: https://javascript.info
Access-Control-Allow-Credentials: true
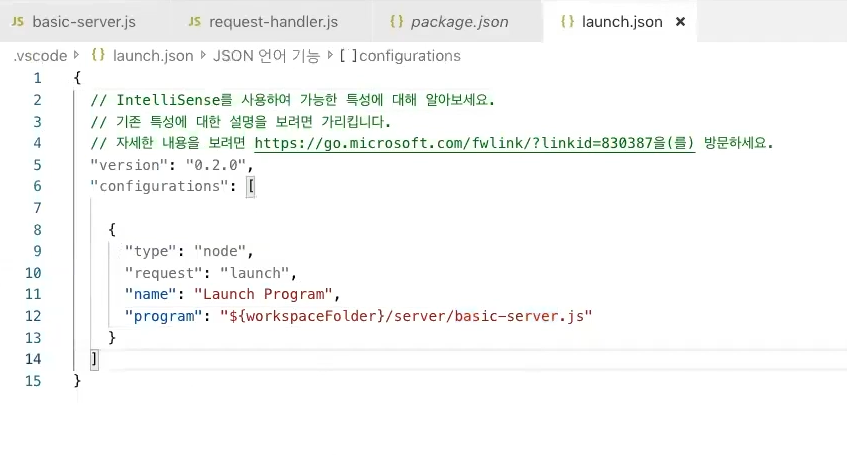
how to debug node app
chrome developer console
nodemon --inpect app.js
nodemon --inspect-brk app.js
vscode
vscode debugger also works well
edit launch.json for detailed settings