공부 시간 잔디 화면을 이미지로 저장하기 [With AWS (CDK + API Gateway + Lambda + S3)] (aka. Html to Image)
TroubleShooting
개요
개인 프로젝트로 진행중인 myGarden 프로젝트에서는 하루 일과를 기록하고, 하루 일과를 통계적으로 볼 수 있는 기능이 있습니다.
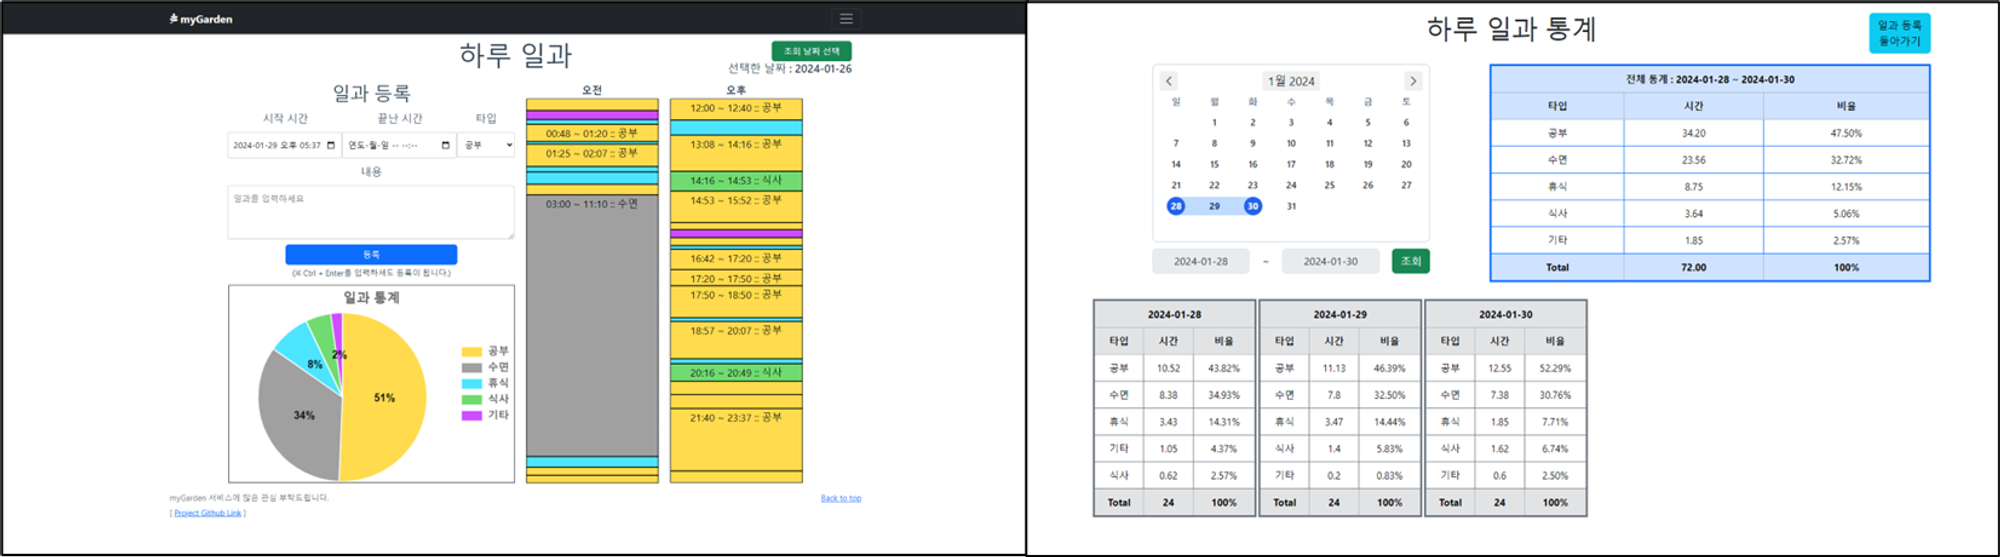
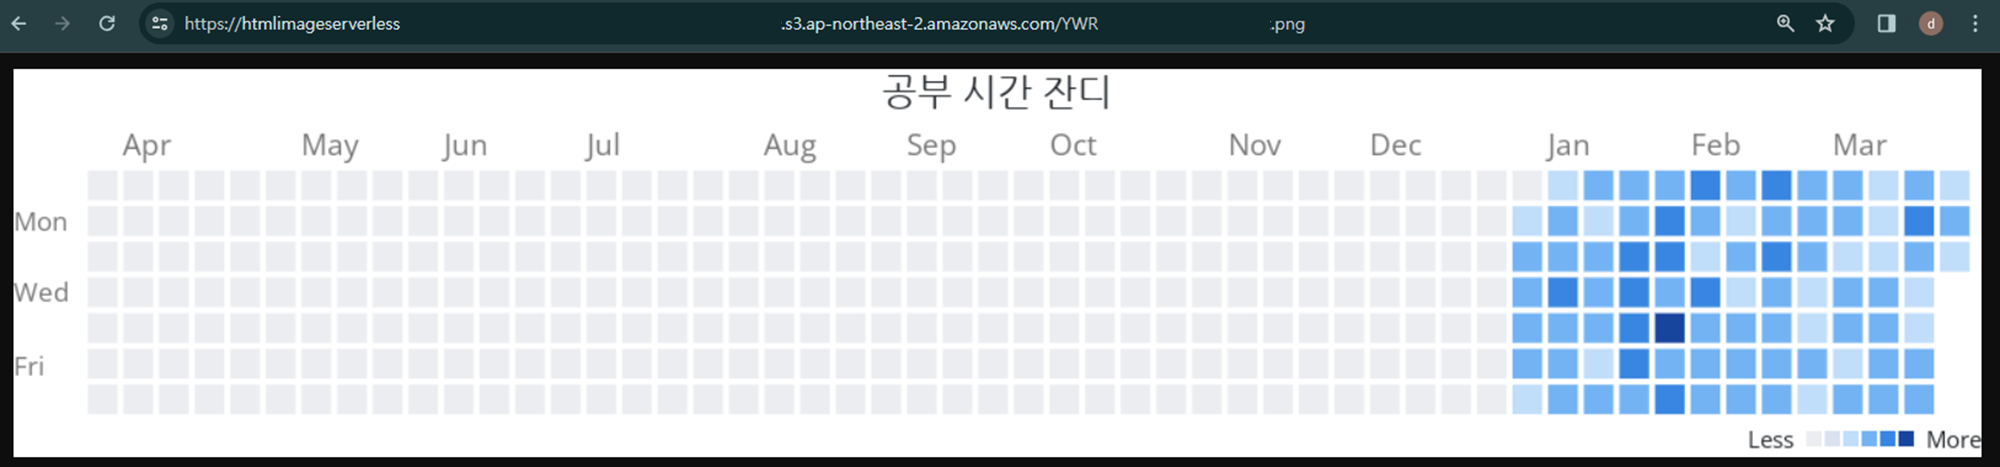
그리고 최근에 공부 시간 잔디라고 해서, GitHub 잔디처럼 공부 시간을 모아서 Calendar Heatmap으로 볼 수 있도록 기능을 추가했습니다.
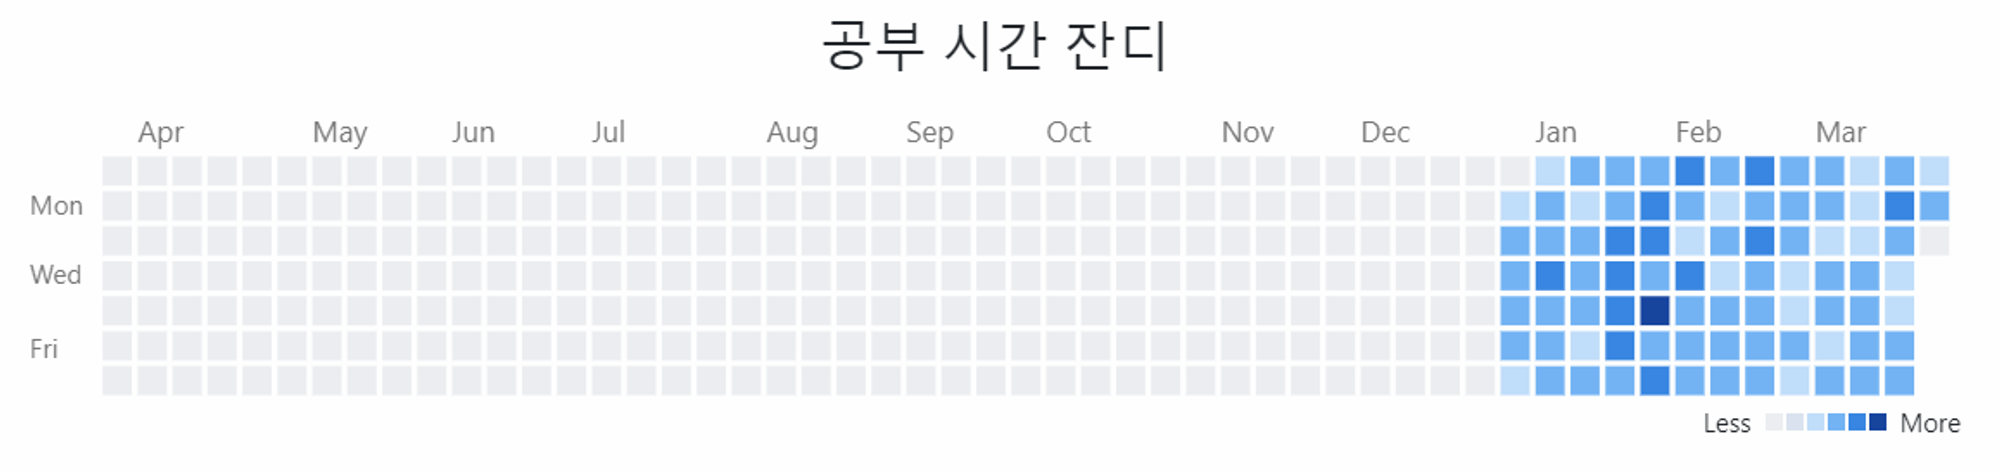
이렇게 열심히 만든 기능을 제 GitHub ReadMe에서도 볼 수 있게 만들고 싶었습니다.
그래서 어떻게 해야 Vue의 화면을 Image로 만들고 저장할 수 있을까 고민하기 시작했고, HTML To Image 라는 키워드로 검색을 하기 시작했습니다.
열심히 검색을 해본 결과, AWS Lambda를 사용하면 Serverless로 제가 원하는 기능을 모두 구현할 수 있겠다는 생각이 들었습니다.
그래서 제목에 적혀있는 것처럼 AWS CDK, AWS API GateWay, AWS Lambda, AWS S3를 모두 이용해서 제가 생각한 기능을 만들어 보겠습니다.
해당 AWS 기능들이 익숙하지 않으신 분들을 위해서 간단하게 설명을 하고 넘어가겠습니다.
AWS CDK (Cloud Development Kit): 개발자가 코드를 사용하여 클라우드 인프라를 정의하고 프로비저닝할 수 있게 해주는 도구입니다.
AWS API Gateway: 개발자가 HTTP, RESTful API를 쉽게 생성, 배포, 유지보수할 수 있게 하는 서비스입니다.
AWS Lambda: 코드를 서버 없이 실행할 수 있게 해주는 컴퓨팅 서비스로, 코드가 특정 이벤트에 의해 자동으로 실행됩니다.
AWS S3 (Simple Storage Service): 인터넷을 통해 언제 어디서나 데이터를 저장하고 검색할 수 있는 스토리지 서비스입니다.
프로젝트 설정
- 프로젝트 설정을 통해 만들고자 하는 목표 아키텍처 (이미지 출처)
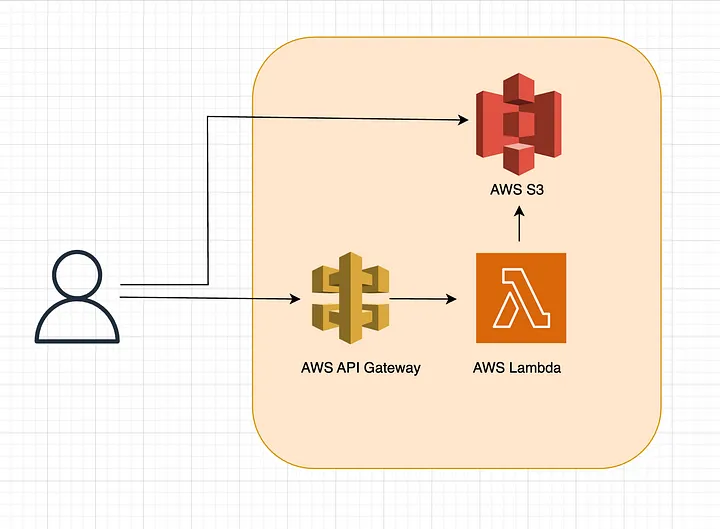
-
Node.js를 사용해서lambda를 실행시킬 예정이기 때문에 반드시Node.js가 설치되어 있어야 합니다. -
AWS CDK를 사용해서lambda를 작성하고 배포할 예정이기 때문에,AWS CDK를 설치해줍니다. 그리고 앞으로 npm 대신에yarn을 통해서 명령어를 칠 것이기 때문에yarn도 같이 설치 해줍니다.npm i -g aws-cdk yarn -
프로젝트를 생성합니다.
#폴더 생성 -> 폴더 진입 -> 프로젝트 생성 mkdir html-image-serverless cd html-image-serverless cdk init app --language javascript -
S3,puppeteer,chromium등등 필요한 라이브러리를 설치합니다.puppeteer,chromium에 관한 버전은 해당 사이트를 참조합니다.
[ puppeteer support page. ]
yarn add @aws-sdk/client-s3 @aws-sdk/s3-request-presigner @aws-sdk/lib-storage puppeteer-core@19.6.0 @sparticuz/chromium@110.0.0명령어 설명
@aws-sdk/client-s3: Amazon Web Services의 Simple Storage Service(S3)와 상호작용하기 위한 AWS SDK의 클라이언트 모듈입니다.@aws-sdk/s3-request-presigner: AWS S3 서비스의 요청을 사전에 서명하기 위한 모듈입니다. 이는 권한 부여가 필요한 자원에 대한 URL을 생성할 때 사용됩니다.@aws-sdk/lib-storage: AWS SDK의 일부로, S3 업로드를 더 효율적으로 처리하기 위한 라이브러리입니다.puppeteer-core@19.6.0: 웹 페이지를 크롤링하거나 스크린샷을 찍는 등, 브라우저 자동화를 위한 라이브러리입니다. 'puppeteer-core'는 Chrome 또는 Chromium을 직접 제어합니다.@sparticuz/chromium@110.0.0: 'puppeteer-core'와 함께 사용되는 Chromium 브라우저의 특정 버전을 설치하는 것입니다. 이는 'puppeteer-core'가 작동하기 위해 필요한 실제 브라우저입니다.
-
lambda랑esbuild를 설치해줍니다.yarn add -D aws-lambda esbuild -
lambda에서chromium headless browser를 실행시키기 위해서는바이너리 파일을 프로젝트root에 저장할 필요가 있습니다. (Lambda Layer를 사용할 예정)- https://github.com/Sparticuz/chromium/releases 에서 우리가 설치한
chromium의 버전에 맞게 바이너리 파일을 다운로드 합니다.- 예를 들면, 저는
chromium-v110.0.0-layer.zip를 다운로드 받아서, 프로젝트root에 저장했습니다.
- 예를 들면, 저는
- https://github.com/Sparticuz/chromium/releases 에서 우리가 설치한
-
저희는 2가지의
REST API를 만들 예정입니다.Health Check API와Html To Image를 만드는 API 입니다.그 중에
Health Check를 하는REST API를 먼저 만들어 저희가 만든CDK를 통해서 배포가 제대로 되는지 확인해보겠습니다.lambdas/healthcheck-lambda의 경로에index.js파일을 만들어줍니다.
exports.handler = async (event) => { return { statusCode: 200, body: "Ok" }; }; -
lib/html-image-serverless-stack.js파일을 열고 다음과 같이 입력해줍니다.const { Stack, Duration } = require('aws-cdk-lib'); const lambda = require('aws-cdk-lib/aws-lambda'); const apigateway = require('aws-cdk-lib/aws-apigateway'); const { Construct } = require('constructs'); class HtmlImageServerlessStack extends Stack { /** * * @param {Construct} scope * @param {string} id * @param {StackProps=} props */ constructor(scope, id, props) { super(scope, id, props); // Lambda 함수 정의 const healthcheckLambda = new lambda.Function(this, 'HealthcheckLambda', { runtime: lambda.Runtime.NODEJS_18_X, // 런타임 지정 handler: 'index.handler', // 파일명과 함수명 지정 code: lambda.Code.fromAsset('lambdas/healthcheck-lambda'), // Lambda 코드가 포함된 디렉토리 }); // API Gateway 정의 const api = new apigateway.RestApi(this, 'HtmlToImageRestApi', { restApiName: 'HTML IMAGE API', }); // Lambda와 API Gateway 통합 const healthCheckIntegration = new apigateway.LambdaIntegration(healthcheckLambda); api.root.addMethod('GET', healthCheckIntegration); // 루트 경로에 GET 메소드 추가 } } module.exports = { HtmlImageServerlessStack } -
aws 계정 정보를 세팅하기 위해
aws-cli를 설치해줍니다. (설치된 분은 넘어가셔도 됩니다.)OS마다 설치 방법이 다릅니다. 해당 공식 문서를 참조해주세요.Window를 쓰시는 경우 다음과 같습니다.
# cmd를 열고, 다음 명령어를 실행시켜주세요. msiexec.exe /i https://awscli.amazonaws.com/AWSCLIV2.msi #cmd를 종료 후, 다시 실행시킨 후 다음 명령어를 쳤을 때 버전이떠야 합니다. aws --version # 이렇게 뜨면 성공 (aws-cli/2.10.0 Python/3.11.2 Windows/10 exe/AMD64 prompt/off) -
cmd에서AWS설정을 해줘야 합니다.본인이 진행하려는 프로젝트의 성격에 맞게 최소한의 권한만을 가진
IAM을 사용해주세요.(※ 최소한으로 권한을 설정하시고, 권한이 부족하면 추후에
deploy할 때 해당 권한이 부족하다고 에러가 발생하기 때문에 그때 추가해주셔도 됩니다.)# cmd에서 해당 명령어를 치면 AccessKey, SecretKey 등등을 설정할 수 있습니다. aws configure AWS Access Key ID [None]: ${AccessKey} AWS Secret Access Key [None]: ${ScretKey} Default region name [None]: ap-northeast-2 Default output format [None] : json -
추가적으로
cdk bootstrap를 설정합니다.${ACCOUNT-NUMBER},${REGION}에는 해당하는 값을 넣으면 됩니다.
cdk bootstrap aws://${ACCOUNT-NUMBER}/${REGION} # 예시 cdk bootstrap aws://123123123123/ap-northeast-2 -
cdk deploy명령어를 통해서 배포합니다.cdk deploy -
처음에는 시간이 오래 걸립니다.
Outputs아래에 저희가 사용할 수 있는REST API가 나오게 됩니다.해당 API로 접속을 해서 정상적으로 OK 응답이 오는지 확인합니다.
-
HealthCheck가 정상적으로 되었다면, 이제는 다음으로 HTML을 Image로 만들어주는lambda를 만들어 보겠습니다.-
lambdas/html-image-lambda의 경로에index.js파일을 만들어줍니다. (※확인하고자 하는사이트 주소를targetUrl에 넣어주세요)// index.js const {S3Client} = require('@aws-sdk/client-s3'); const { generateImage } = require('./generateImage'); const {Upload} = require("@aws-sdk/lib-storage"); const s3Client = new S3Client([{ region: 'ap-northeast-2' }]); const BUCKET_NAME = process.env.S3_IMAGE_BUCKET; exports.handler = async (event) => { try { // 쿼리 파라미터에서 확인할 memberEmail을 받아온다. (해당 memberEmail은 UrlSafeBase64로 인코딩되어 있으므로 원래 값을 보려면 디코딩이 필요합니다.) const urlSafeBase64MemberEmail = event.queryStringParameters.memberEmail; const objectKey = `${urlSafeBase64MemberEmail}.png`; // Key for the S3 object // Generate the image from the URL const targetUrl = `https://sample.example.com/study-hours-calendar-heatmap/${urlSafeBase64MemberEmail}`; const imageBuffer = await generateImage(targetUrl); if(!imageBuffer) { throw new Error('Failed to created Image buffer from HTML') } // Upload the image to S3 const s3Upload = new Upload({ client: s3Client, params: { Bucket: BUCKET_NAME, Key: objectKey, Body: imageBuffer, ContentType: 'image/png', } }); // Upload progress s3Upload.on("httpUploadProgress", (progress) => { console.log(progress); }); await s3Upload.done(); return { statusCode: 200, body: JSON.stringify({ message: "Image uploaded successfully" }) }; } catch (error) { console.log("Error converting HTML to image"); console.error(error); return { statusCode: 500, body: JSON.stringify({ error: "Internal server error" }) }; } }; -
같은 폴더에서
generateImage.js파일을 만들어 줍니다.해당 파일은 실제 HTML을 기반으로 특정 요소를 스크린샷을 찍어 Image로 만들어줍니다.
// generateImage.js
const chromium = require('@sparticuz/chromium');
const puppeteer = require('puppeteer-core')

exports.generateImage = async (url) => {
    let browser = null;

    // Load NanumGothic font for Korean characters
    // 혹시 다른 Font가 필요하시면, 해당 주소를 넣어주시거나, 파일을 직접 올려주셔야 합니다.
    await chromium.font('https://rawcdn.githack.com/demun/NanumGothic/dce7dfebb1bd3020be65b169db27188dea26d1f3/fonts/NanumGothic-Regular.ttf')

    // Launch Chromium
    try {
        browser = await puppeteer.launch({
            args: chromium.args,
            defaultViewport: chromium.defaultViewport,
            executablePath: await chromium.executablePath(),
            headless: chromium.headless,
            ignoreHTTPSErrors: true,
        });

        console.log('Chromium launched -> url : ' + url);

        // Open new page
        const page = await browser.newPage();
        // Go to the URL and wait for the page to load
        await page.goto(url, { waitUntil: ['domcontentloaded', 'networkidle0'] });

        // 'wrapper' ID를 가진 요소의 마진 조정
        await page.evaluate(() => {
            const wrapper = document.querySelector('#wrapper');
            wrapper.style.marginTop = '10px'; // 위쪽 마진 조정
            wrapper.style.marginBottom = '10px'; // 아래쪽 마진 조정
            wrapper.style.marginRight = '10px'; // 오른쪽 마진 조정
            wrapper.style.marginLeft = '10px'; // 왼쪽 마진 조정
        });

        // 'wrapper' id를 가진 요소 선택
        const element = await page.$('#wrapper');
        // Take a screenshot
        const imageBuffer = await element.screenshot();
        return imageBuffer;
    } catch (e) {
        console.log('Chromium error', { e })
    } finally {
        // Close the browser
        if (browser !== null) {
            await browser.close();
        }
    }
};
-
-
필요한 파일들을 만들었으니, AWS에 배포를 위해서
lib/html-image-serverless-stack.js파일을 수정합니다.const { Stack, Duration } = require('aws-cdk-lib'); const lambda = require('aws-cdk-lib/aws-lambda-nodejs'); const {Runtime, Code, LayerVersion } = require('aws-cdk-lib/aws-lambda'); const s3 = require('aws-cdk-lib/aws-s3'); const apigateway = require('aws-cdk-lib/aws-apigateway'); const { Construct } = require('constructs'); class HtmlImageServerlessStack extends Stack { /** * * @param {Construct} scope * @param {string} id * @param {StackProps=} props */ constructor(scope, id, props) { super(scope, id, props); // S3 bucket for storing images const bucket = new s3.Bucket(this, 'MyGardenStudyHoursImageS3Bucket'); // Lambda Layer for Chromium const chromeAwsLambdaLayer = new LayerVersion(this, 'ChromeAWSLambdaLayer', { layerVersionName: 'ChromeAWSLambdaLayer', compatibleRuntimes: [Runtime.NODEJS_18_X], code: Code.fromAsset('chromium-v110.0.0-layer.zip') }); // Lambda function for generating image from HTML const htmlToImageLambda = new lambda.NodejsFunction(this, 'HtmlToImageLambda', { runtime: Runtime.NODEJS_18_X, handler: 'index.handler', entry: 'lambdas/html-image-lambda/index.js', // Entry point to your Lambda function layers: [chromeAwsLambdaLayer], environment: { S3_IMAGE_BUCKET: bucket.bucketName }, bundling: { externalModules: ['aws-sdk'], nodeModules: ['@sparticuz/chromium'], }, timeout: Duration.seconds(30), memorySize: 1024 }); // Grant the Lambda function write permissions to the bucket bucket.grantWrite(htmlToImageLambda); // API Gateway to trigger the Lambda function const htmlToImageApi = new apigateway.RestApi(this, 'htmlToImageApi', { restApiName: 'HTML To Image Service', description: 'Converts HTML to Image' }); // Integrate the Lambda function with the API Gateway const integration = new apigateway.LambdaIntegration(htmlToImageLambda); htmlToImageApi.root.addMethod('GET', integration); //================================================================================================ // Lambda 함수 정의 const healthcheckLambda = new lambda.NodejsFunction(this, 'HealthcheckLambda', { runtime: Runtime.NODEJS_18_X, // 런타임 지정 handler: 'index.handler', // 파일명과 함수명 지정 entry: 'lambdas/healthcheck-lambda/index.js', // Entry point for the health check function }); // API Gateway 정의 const healthCheckApi = new apigateway.RestApi(this, 'HealthCheckApi', { restApiName: 'Health Check API', }); // Lambda와 API Gateway 통합 const healthCheckIntegration = new apigateway.LambdaIntegration(healthcheckLambda); healthCheckApi.root.addMethod('GET', healthCheckIntegration); // 루트 경로에 GET 메소드 추가 } } module.exports = { HtmlImageServerlessStack } -
cdk deploy명령어를 통해서 배포합니다.cdk deploy -
배포가 정상적으로 완료되었으면, AWS 계정에 들어가면 실제로
AWS API GateWay,AWS Lambda,AWS S3가 모두 생성이 되어 있습니다. -
AWS API GateWay의테스트탭에 들어가면, 파라미터를 넣고 테스트가 가능합니다.
결과
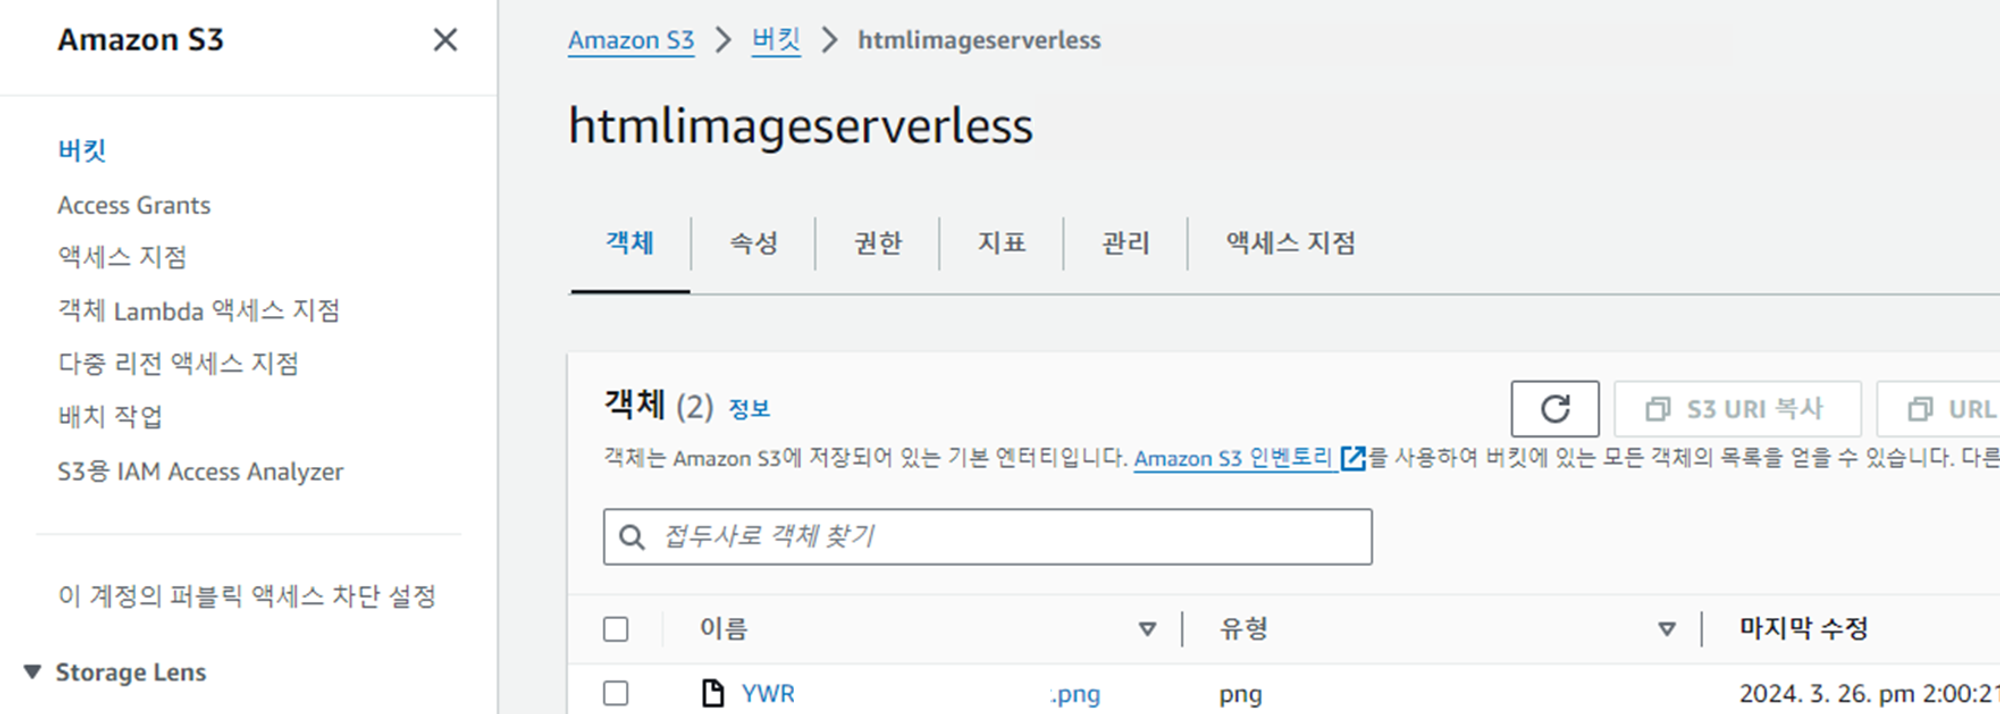
제 S3에 실제로 저장된 파일 입니다.
해당 AWS CDK 프로젝트도 GitHub에 업로드 시켜뒀습니다.
저는 이렇게 만들어진
공부 잔디 Image를GitHub ReadMe에 첨부하여 사용하고 있습니다.
(외부에서 읽어서 사용하시려면, 해당 객체를Public으로 만드셔야 합니다!)※ S3 Bucket을 Public으로 여시려면, 다음 블로그를 참고해주세요.
그리고 자동으로 매일 매일 업데이트 시키기 위해서
AWS Event Bridge Scheduler를 이용하고 있습니다.
참고
