파이프
파이프는 요청이 라우터 핸들러로 전달되기 전에 요청 객체를 변환 할 수 있다.
파이프는 보통 2가지 목적으로 사용한다.
- 변환(Transformation): 입력데이터를 원하는 형식으로 변환
- 유효성 검사(Validation) : 입력데이터의 유효성 검사
왜 파이프에서 처리하는가?
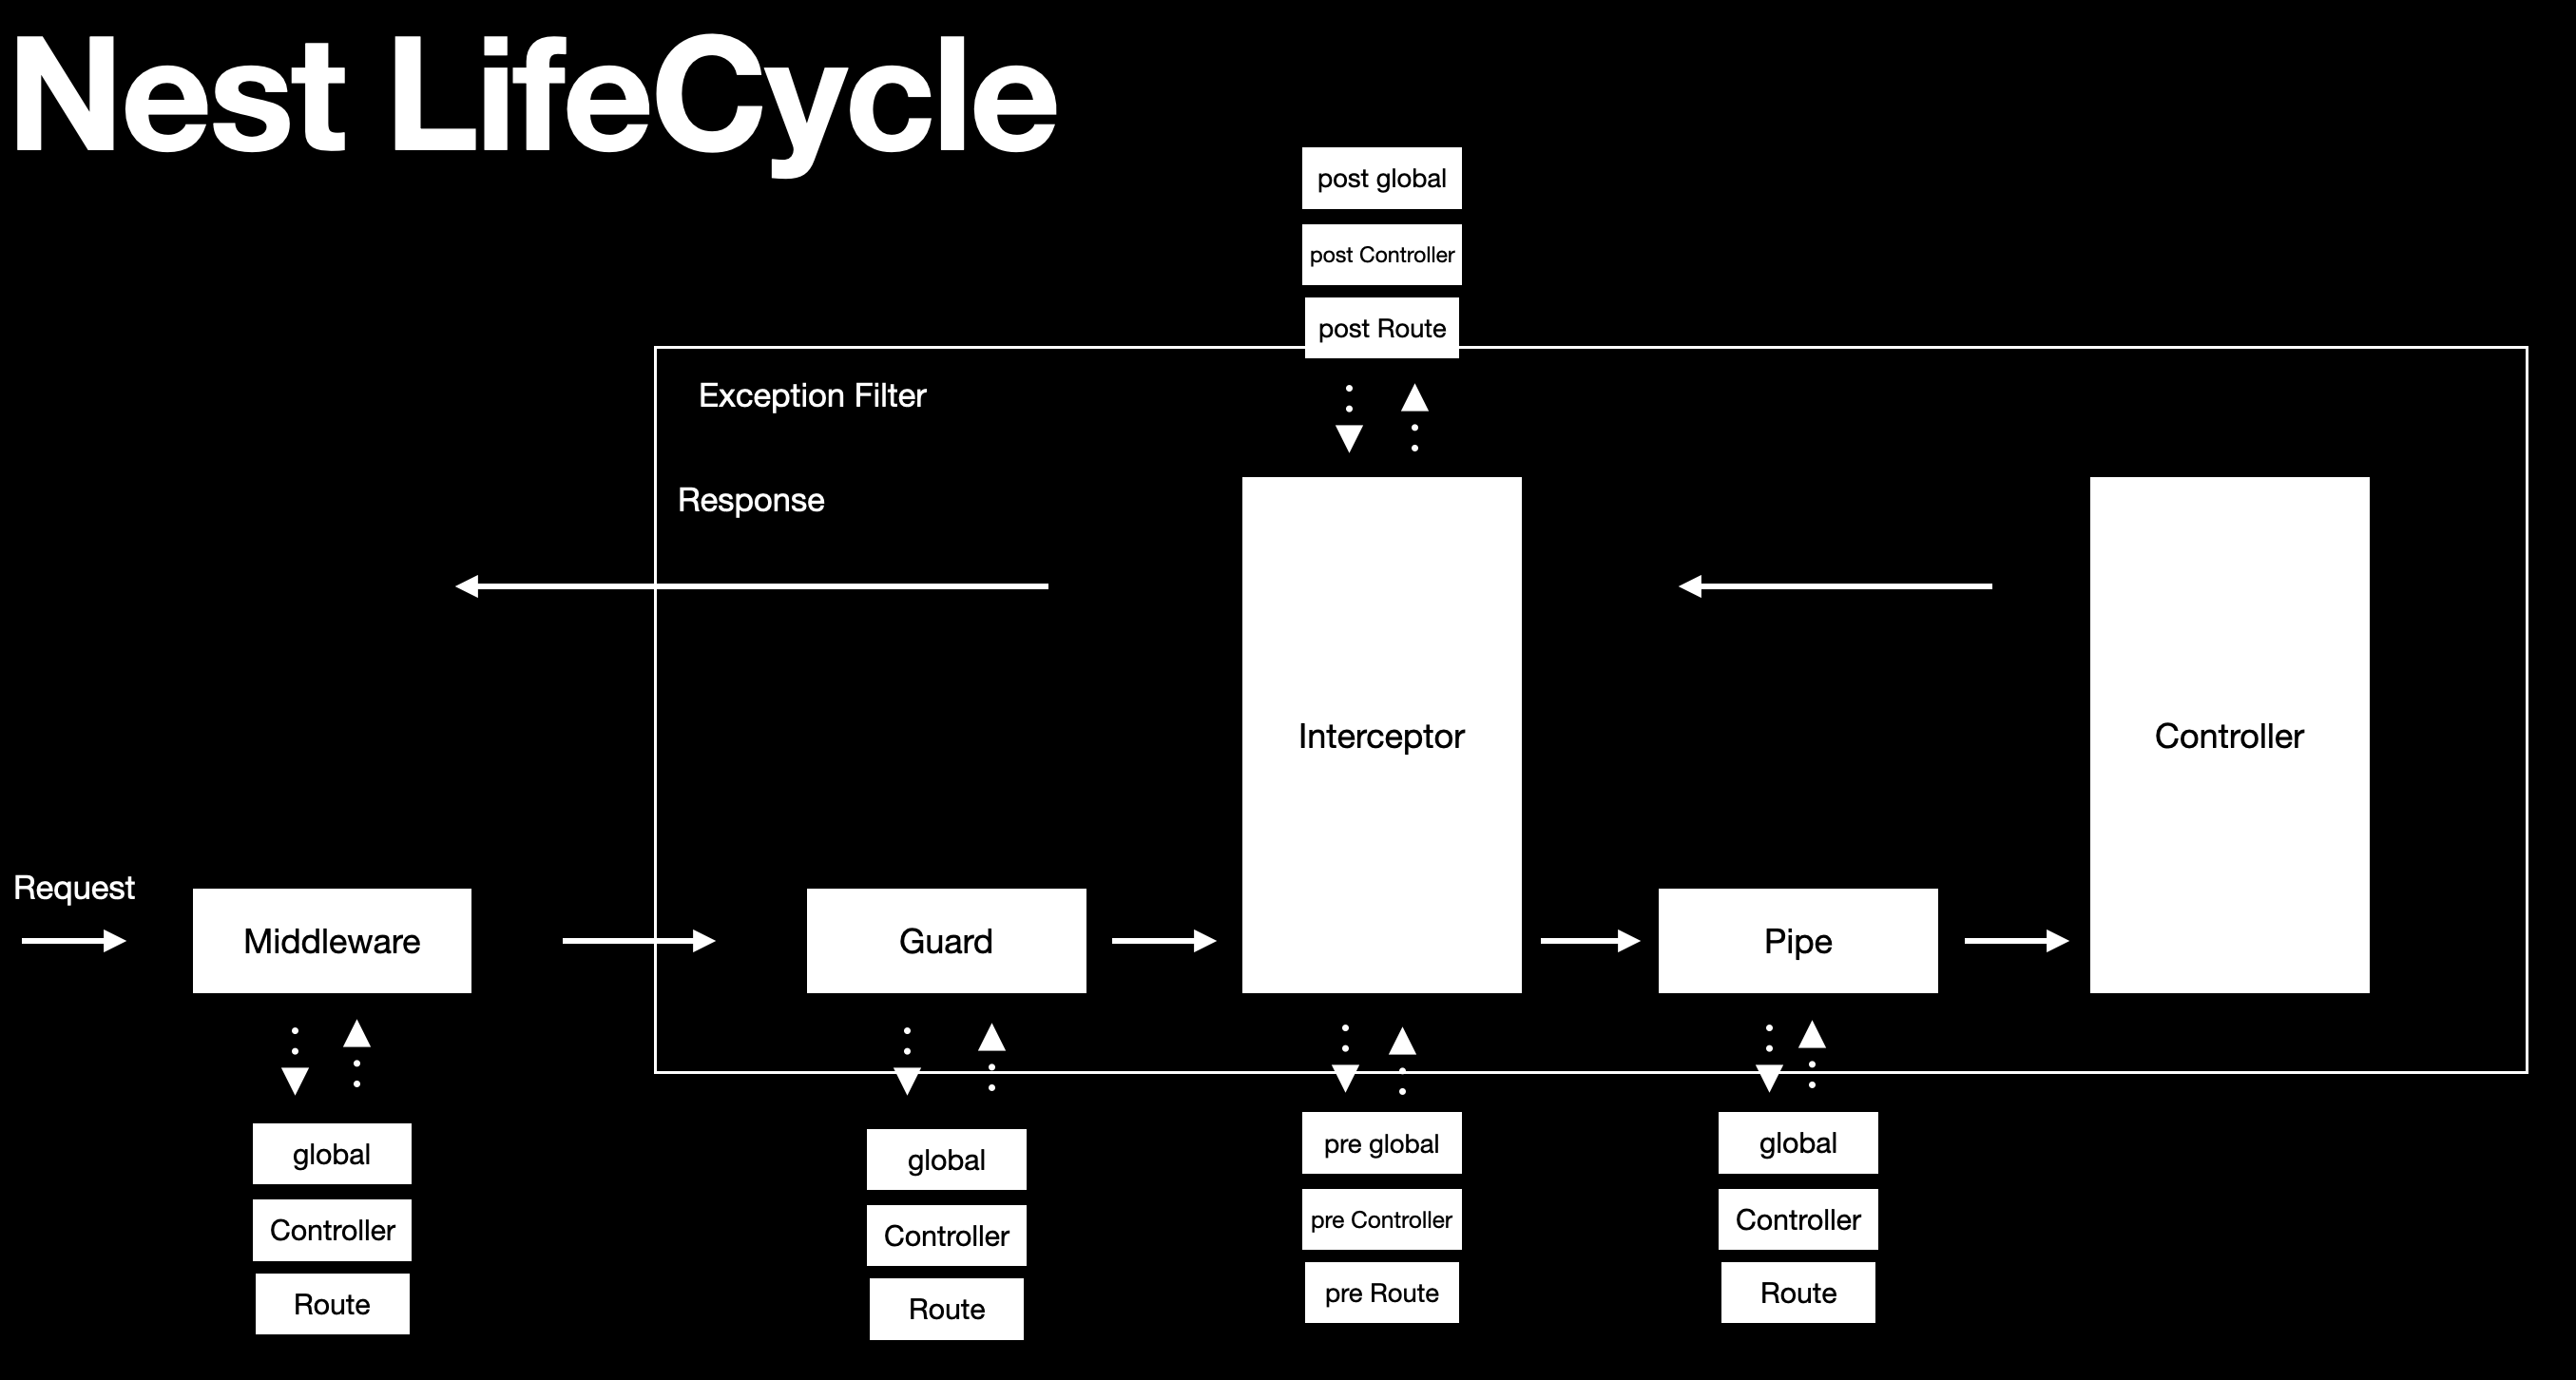
파이프는 컨트롤러에 요청이 가기전 마지막 필터사이클이라고 보면되는데
극단적으로 순간적으로 한 라우터에 요청이 1억개 발생 했다고 생각해보자.
1억개의 요청을 모두 변환하고 유효성검사를 먼저 한 후 권한을 검사하는게 좋을까?
아님 권한 검사를 먼저하여 걸러낸 후 권한이 있는 요청에만 유효성검사와 변환을 하는게 좋을까?
위 예시에서도 알 수 있듯, 사이클의 최적화를 위해 필터 사이클을 여러개 분리해둔것이다.
때문에 상황에 따라 제외하거나 추가해도된다.
NestJS에는 내장파이프가 마련되어 있으며, 다음과 같다.
ValidationPipe: 유효성 검사 파이프ParseIntPipe: 정수타입 변환 파이프ParseBoolPipe: boolan 타입 변환 파이프ParseArrayPipe: 배열 변환 파이프ParseUUIDPipe: UUID 변환 파이프DefaultValuePipe: 기본값 설정 파이프
바인딩 파이프
- app.module.ts
import { Controller, Get, Param, ParseIntPipe } from '@nestjs/common';
import { AppService } from './app.service';

@Controller()
export class AppController {
  constructor(private readonly appService: AppService) {}

  @Get(":id")
  getHello(@Param('id') id :number): string {
    console.log(id);
    return this.appService.getHello();
  }
}
위 처럼 VariableUrlPath를 받는 라우터가 하나 있다고 해보자.
number타입으로 받겠다고 정의해두었지만 "hello", "ww"처럼 number형으로 변환되지않는 값을 넣어도 예외가 생기진 않는다. ( 물론 서비스에서 내가 따로 예외처리 해도 되겠지만 이는 AOP에 어긋난다.)

이번엔 NestJS내장 파이프인 ParseIntPipe를 이용해 변환과 유효성검사를 진행해서 받아보겠다.
  @Get(":id")
  getHello(@Param('id', ParseIntPipe) id :number): string {
    console.log(id);
    return this.appService.getHello();
  }
숫자로 변환 할 수 없는건 예외처리가 되고, 요청이 라우터에 전달되지않는 모습을 볼 수 있다.
커스텀 파이프
class-validator라이브러리를 사용해서 유효성 검사 커스텀 파이프를 만들어 볼 것이다.
공식 문서에선 joi라이브러리로 설명하는데, class-validator가 좀 더 직관적이고 쉽다고 생각한다. (개인적으로)
$ yarn add class-validator class-transformer- validate.pipe.ts
import { PipeTransform, Injectable, ArgumentMetadata, BadRequestException } from '@nestjs/common';
import { validate } from 'class-validator';
import { plainToClass } from 'class-transformer';

@Injectable()
export class ValidationPipe implements PipeTransform<any> {
  async transform(value: any, { metatype }: ArgumentMetadata) {
    if (!metatype || !this.toValidate(metatype)) {
      return value;
    }
    const object = plainToClass(metatype, value);
    const errors = await validate(object);
    if (errors.length > 0) {
      throw new BadRequestException('Validation failed');
    }
    return value;
  }

  private toValidate(metatype: Function): boolean {
    const types: Function[] = [String, Boolean, Number, Array, Object];
    return !types.includes(metatype);
  }
}
커스텀 파이프는 PipeTranform인터페이스를 상속받은 클래스에 @Injectable 를 붙여주면 된다.
PipeTranform의 원형은 다음과 같이 정의된다.
export interface PipeTransform<T = any, R = any> {
    transform(value: T, metadata: ArgumentMetadata): R;
}- value: 현재 파이프에 전달된 인자
- metadata: 현재 파이프에 전달된 인자의 메타데이터
이제 이 ValidatePipe를 적용해보자.
import { Body, Controller, Get, Param, ParseIntPipe, Post } from '@nestjs/common';
import { IsEmail, IsString, MaxLength, MinLength } from 'class-validator';
import { AppService } from './app.service';
import { ValidationPipe } from './filter/pipe/validate.pipe';

export class CreateUserDto {
  @IsString()
  @MinLength(1)
  @MaxLength(20)
  name: string;

  @IsEmail()
  email: string;
}

@Controller()
export class AppController {
  constructor(private readonly appService: AppService) {}

  @Get(":id")
  getHello(@Param('id', ParseIntPipe) id :number): string {
    console.log(id);
    return this.appService.getHello();
  }

  @Post()
  create(@Body(ValidationPipe) createUserDto: CreateUserDto) {
    return createUserDto;
  }
}
잘못된 데이터를 전달하면 exception이 발생 하는 것을 확인 할 수 있다.
$ curl http://localhost:3000/users -X POST -H "Content-Type: application/json" -d '{"name":"","email":"dexter.haan@gmail.com"}'
{
  "statusCode": 400,
  "message": "Validation failed",
  "error": "Bad Request"
}
만약 핸들러에 일일 적용하지않고
글로벌하게 적용하고 싶다면 부트스트랩에서 다음과 같이 설정해주면 된다.
- main.ts
import { NestFactory } from '@nestjs/core';
import { AppModule } from './app.module';
import { ValidationPipe } from './filter/pipe/validate.pipe';

async function bootstrap() {
  const app = await NestFactory.create(AppModule);
  app.useGlobalPipes(new ValidationPipe)
  await app.listen(3000);
}
bootstrap();