
다른 강의를 보면 정적파일 랜더링이나, 서버사이드 랜더링을 먼저 알려주는데,
요즘 Spring을 그렇게 쓸려고 개발하는 곳은 거의 없으니 넘어가겠다.
( 서버 사이드 랜더링은 swagger나 h2 console에서 잠깐 언급하긴 할거다. )
MVC
Model View Controller의 약자로 요즘 REST API 개발에서 가장 많이 쓰이는 디자인 패턴중 하나이다. 백앤드 개발자라면 MVC중 M,C개발이 전체 업무의 70%이상을 차지 할 것이다. (나머지 30%는 개발환경설정 및 잡무)
그만큼 중요한 디자인 패턴이니 잘 숙지 할 필요가있다.
Model
Entity, Repository, Domain등을 정의하고 처리한다.
View
사용자에게 보여지는 부분이다. 요즘은 프론트앤드가 이 부분을 전문적으로 맡아서 처리한다.
Controller
endpoint에 따른 기능 및 요청에 대한 반환을 정의하는 곳이다.
요즘엔 service부분에선 기능 controller에선 라우팅만 하도록 세분화하여 많이 쓴다.
Spring에서 MVC 맛보기
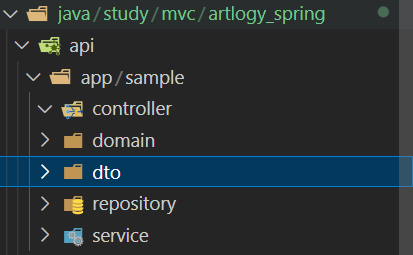
내 파일 구조는 다음과 같다. 물론 다른 편한 파일구조를 사용해도 상관은 없다.
MVC에서 V는 프론트앤드에서 만들어 줄꺼니 치우고 Model부터 정의해보자.
댓글 기능을 만든다고 가정하고 진행하겠다.
Model 정의하기
Domain (Entity & Repo)
Spring에선 Model 부분을 Domain이라고 부른다. (근데 난 node유저라 걍 Model이라고 부른다.)
domain/CommentEntity.java
package study.mvc.artlogy_spring.api.app.comment.domain;

import java.sql.Date;
import java.time.LocalDateTime;

import javax.persistence.Column;
import javax.persistence.Entity;
import javax.persistence.GeneratedValue;
import javax.persistence.GenerationType;
import javax.persistence.Id;
import javax.validation.constraints.NotNull;

import org.hibernate.annotations.ColumnDefault;
import org.springframework.data.annotation.CreatedDate;
import org.springframework.data.annotation.LastModifiedDate;
import org.springframework.format.annotation.DateTimeFormat;

import lombok.Getter;
import lombok.Setter;

@Getter
@Setter
@Entity
public class CommentEntity {

    @Id
    @GeneratedValue(strategy = GenerationType.IDENTITY)
    private long id;

    @Column(columnDefinition = "TEXT")
    private String content;

    @Column
    private LocalDateTime createdAt;

    @Column
    private LocalDateTime updatedAt;

    @DateTimeFormat(pattern = "YYYY-MM-DD")
    private Date deleteAt;

    @NotNull
    @ColumnDefault("true")
    private boolean isActive = true;

    @NotNull
    @ColumnDefault("false")
    private Boolean isDeleted = false;
}
DB를 배웠다면 눈치 챘겠지만 Table을 정의하는것이다.
위 처럼 @Entity 어노테이션을 선언해주면 JPA가 알아서 테이블을 만든다.
테이블이름은 class이름에서 Entity를 제외하고 자동적으로 선언되지만,
name속성을 이용해 다음과 같이 직접 정의 할 수 있다.
@Entity(name="comments") //comments 이름의 테이블로 생성@Entity는 이름만 매핑이 가능하기 때문에 더 많은 Entity 속성을 정하고 싶다면
@Table을 추가하여 사용하면 된다.
repository/CommentRepository.java
package study.mvc.artlogy_spring.api.app.comment.repository;

import org.springframework.data.jpa.repository.JpaRepository;
import org.springframework.stereotype.Repository;

import study.mvc.artlogy_spring.api.app.comment.domain.CommentEntity;

@Repository
public interface CommentRepository extends JpaRepository<CommentEntity, Long> {

} @Repository어노테이션을 붙이고 위 처럼 인터페이스를 정의해주면된다.
Repository는 Spring에서 SQL에 직접적으로 중계 및 관리해주는 역할을 한다.
(SQL 로직과 결과를 정의하는 Mapper도 있지만 나중에 다루겠다.)
내가 만들어둔 Entity(Table)과 소통은 Repository와 한다고 생각하면 된다.
보면 JpaRepository를 상속받는데 <Entity, Primary DataType>라고 생각하면된다.
Comment에서 primary(id)는 Long타입이기 때문에 Long을 넣어준것이다.
Controller 정의하기
DTO (Data Transfer Object)
다른 사람은 어떨지 몰라도 나는 Domain(Model)정의가 끝나면 DTO부터 만든다.
DTO는 데이터의 구조를 정의된 타입이다. 말로 설명할려니깐 적당한 용어가 생각안나니 일단 보자.
dto/CommentDto.java
package study.mvc.artlogy_spring.api.app.comment.dto;

import java.sql.Date;
import java.time.LocalDateTime;

import lombok.Getter;
import lombok.Setter;

public class CommentDto {

  @Getter
  @Setter
  public static class Reponse {
      private long id;
      private String comment;
      private LocalDateTime createdAt;
      private LocalDateTime updatedAt;
  }

  @Getter
  @Setter
  public static class createRequest {
      private String comment;
  }
}
Reponse는 결과 값으로 반환 할 때, createRequest는 댓글을 생성 할 때 쓸 것이다.
Service
service/CommentService.java
package study.mvc.artlogy_spring.api.app.comment.service;

import java.time.LocalDateTime;

import org.springframework.stereotype.Service;
import org.springframework.web.bind.annotation.RequestBody;

import lombok.RequiredArgsConstructor;
import study.mvc.artlogy_spring.api.app.comment.domain.CommentEntity;
import study.mvc.artlogy_spring.api.app.comment.dto.CommentDto;
import study.mvc.artlogy_spring.api.app.comment.repository.CommentRepository;

@Service
@RequiredArgsConstructor
public class CommentService {
  private final CommentRepository commentRepo;

  public CommentDto.Reponse create(@RequestBody CommentDto.createRequest data) {
      CommentEntity comment = new CommentEntity();
      comment.setContent(data.getComment());
      comment.setCreatedAt(LocalDateTime.now());
      comment.setUpdatedAt(LocalDateTime.now());
      CommentEntity result = commentRepo.save(comment);
      CommentDto.Reponse response = new CommentDto.Reponse();
      response.setComment(result.getContent());
      response.setId(result.getId());
      response.setCreatedAt(result.getCreatedAt());
      response.setUpdatedAt(result.getUpdatedAt());
      return response;
  }
}
@Service어노테이션을 붙이면 기능을 담당하는 서비스 class가 만들어진다.
방금 말한 Dto도 사용하는 모습을 볼 수있는데 반환값으로 Reponse, 파라미터로 @RequestBody어노테이션이 붙은 createRequest를 쓰고있다. Dto는 결과값 및 받아야 할 데이터를 정확히 하는데 그 의미가 있다.
@RequiredArgsConstructor는 생성자를 자동으로 만들어주는 어노테이션이다.
controller
controller/CommentConroller.java
package study.mvc.artlogy_spring.api.app.comment.controller;

import org.springframework.web.bind.annotation.RequestBody;
import org.springframework.web.bind.annotation.RequestMapping;
import org.springframework.web.bind.annotation.RequestMethod;
import org.springframework.web.bind.annotation.RestController;

import lombok.RequiredArgsConstructor;
import study.mvc.artlogy_spring.api.app.comment.dto.CommentDto;
import study.mvc.artlogy_spring.api.app.comment.service.CommentService;

@RequiredArgsConstructor
@RestController
@RequestMapping(path = "/api/comment")
public class CommentController {

  private final CommentService commentService;

  @RequestMapping(value = "/create", method = RequestMethod.POST)
  public CommentDto.Reponse create(@RequestBody CommentDto.createRequest data) {
      return commentService.create(data);
  }
}
이제 Postman으로 테스트해보자.
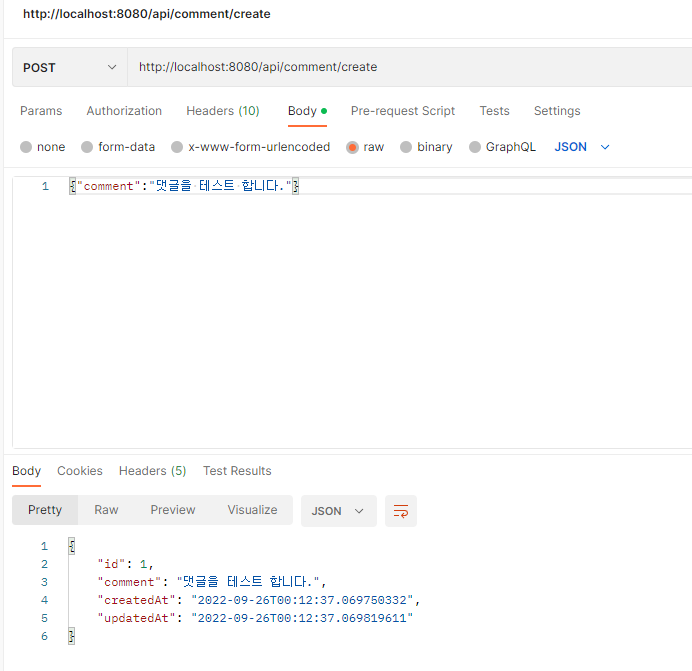
잘된다.
Contoller는 기능은 endpoint마다 service를 매칭해주는게 전부라 별거없지만
어노테이션을 좀 많이 알아둬야 한다.
일단 @RestController를 붙여주면 해당 클레스는 Controller가 된다.
다음으로 중요한건 method를 아는 것인데 method는 크게보면 GET, POST가 있고 작게는
GET, POST, PATCH, PUT, DELETE등이 있는데 근본은 전부 GET, POST이다.
Method와 관련된 어노테이션을 하나씩 살펴보자.
GET (Query String) 1:1 매칭
//@GetMapping("/query") 대체가능
@RequestMapping(value = "/query", method = RequestMethod.GET)
public String funcName(@RequestParam(value = "key") String name) {
   return "key is " + name;
} 
GET (Query String) All Query value
//@GetMapping("/query") 대체가능
@RequestMapping(value = "/query", method = RequestMethod.GET)
public String funcName(HttpServletRequest req) {
    return req.getQueryString();
} 
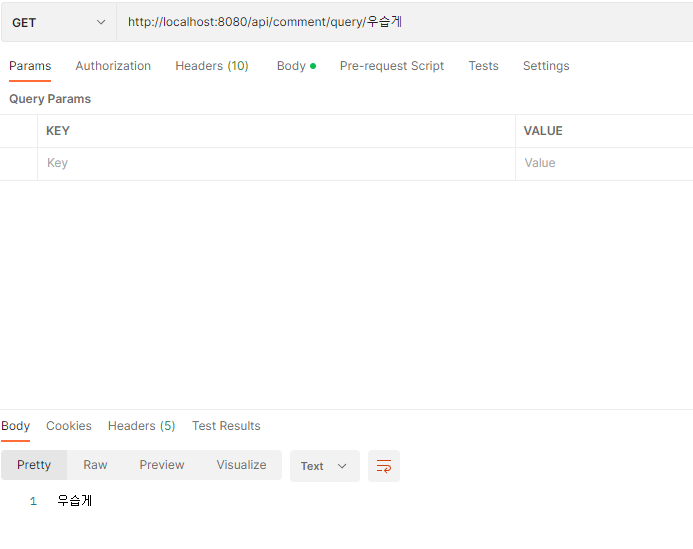
GET (Path Variable)
@RequestMapping(value = "/query/{var}", method = RequestMethod.GET)
public String funcName(@PathVariable(value = "var") String val) {
    return val;
}
POST
 @RequestMapping(value = "/create", method = RequestMethod.POST)
 public CommentDto.Reponse create(@RequestBody CommentDto.createRequest data) {
     return commentService.create(data);
 }
리팩토링
BaseEntity
Entity를 구성하다보면 ID, createdAt, isDelete처럼 대부분 Entity에서 공통적으로 쓰이는 필드가 존재한다. 선배가 말하길 3번이상 반복되면 무조건 리팩토링을 생각하라고 했다. 이것도 리팩토링 해보자.
common/entities/BaseEntityWithId.java
package study.mvc.artlogy_spring.api.common.entities;

import java.time.LocalDateTime;

import javax.persistence.Entity;
import javax.persistence.EntityListeners;
import javax.persistence.GeneratedValue;
import javax.persistence.GenerationType;
import javax.persistence.Id;
import javax.persistence.MappedSuperclass;
import javax.validation.constraints.NotNull;

import org.hibernate.annotations.ColumnDefault;
import org.springframework.data.annotation.CreatedDate;
import org.springframework.data.annotation.LastModifiedDate;
import org.springframework.data.jpa.domain.support.AuditingEntityListener;
import org.springframework.format.annotation.DateTimeFormat;

import lombok.Getter;
import lombok.Setter;

@Getter
@MappedSuperclass
@EntityListeners(AuditingEntityListener.class)
public class BaseEntityWithId {

    @Id
    @GeneratedValue(strategy = GenerationType.IDENTITY)
    private long id;

    @DateTimeFormat(pattern = "YYYY-MM-DD hh:mm:ss")
    @CreatedDate
    private LocalDateTime createdAt;

    @DateTimeFormat(pattern = "YYYY-MM-DD hh:mm:ss")
    @LastModifiedDate
    private LocalDateTime updatedAt;

    @Setter
    @DateTimeFormat(pattern = "YYYY-MM-DD hh:mm:ss")
    private LocalDateTime deleteAt;

    @NotNull
    @Setter
    @ColumnDefault("true")
    private boolean isActive = true;

    @NotNull
    @Setter
    @ColumnDefault("false")
    private Boolean isDeleted = false;
}
먼저 위 처럼 공통적으로 쓰이는 필드를 따로 선언한 클래스를 만들자.
@MappedSuperClass는 Entity에서 상속될 부모 Entity를 선언할때 쓰이며, 필드 매핑을 도와준다.
@EntityListeners는 @CreatedDate, @LastModifiedDate같은 어노테이션을 쓰기위함인데, 테이블에 이벤트를 감지하고 데이터를 조작 할 때 쓰인다. JPA에선 다음과 같은 어노테이션을 지원한다.
- @PrePersist : Persist(insert)메서드가 호출되기 전에 실행되는 메서드
- @PreUpdate : merge메서드가 호출되기 전에 실행되는 메서드
- @PreRemove : Delete메서드가 호출되기 전에 실행되는 메서드
- @PostPersist : Persist(insert)메서드가 호출된 이후에 실행되는 메서드
- @PostUpdate : merge메서드가 호출된 후에 실행되는 메서드
- @PostRemove : Delete메서드가 호출된 후에 실행되는 메서드
- @PostLoad : Select조회가 일어난 직후에 실행되는 메서드
@CreatedDate, @LastModifiedDate이건 뭐냐? 애내들은 미리 선언된 콜백함수를 부른 것으로
다음과 같다.
//@createdDate
  @PrePersist
  public void prePersist() {
      this.createdAt = LocalDateTime.now();
      this.updatedAt = LocalDateTime.now();
  }

//@LastModifiedDate
  @PreUpdate
  public void preUpdate() {
      this.updatedAt = LocalDateTime.now();
  }
이제 이걸 상속받아서 comment를 다시 정의해보자.
domain/CommentEntity.java
package study.mvc.artlogy_spring.api.app.comment.domain;

import java.sql.Date;
import java.time.LocalDateTime;

import javax.persistence.Column;
import javax.persistence.Entity;

import lombok.Getter;
import lombok.Setter;
import study.mvc.artlogy_spring.api.common.entities.BaseEntityWithId;

@Getter
@Setter
@Entity(name = "comment")
public class CommentEntity extends BaseEntityWithId {

  @Column(columnDefinition = "TEXT")
  private String content;

}
코드가 훨씬 깔끔 해진 것을 볼 수 있다.
마지막으로 mainApp에 @EnableJpaAuditing을 추가하면 적용 완료다.
package study.mvc.artlogy_spring;

import org.springframework.boot.SpringApplication;
import org.springframework.boot.autoconfigure.SpringBootApplication;
import org.springframework.data.jpa.repository.config.EnableJpaAuditing;

@SpringBootApplication
@EnableJpaAuditing			//JPA가 이벤트가 감지되면 콜백을 하게해주는 어노테이션
public class ArtlogySpringApplication {

	public static void main(String[] args) {
		SpringApplication.run(ArtlogySpringApplication.class, args);
	}

}
BaseDto
Dto도 request, reponse는 기본적으로 있고, response같은 경우 baseEntity의 일부 필드는 기본적으로 제공해줘야 한다. 이것도 리팩토링 해보자.
common/dtos/BaseDtoWithId.java
package study.mvc.artlogy_spring.api.common.dtos;

import java.time.LocalDateTime;
import java.util.Optional;

import javax.persistence.MappedSuperclass;

import lombok.Getter;
import lombok.NoArgsConstructor;
import lombok.Setter;
import study.mvc.artlogy_spring.api.common.entities.BaseEntityWithId;

@MappedSuperclass
@NoArgsConstructor
public class BaseDtoWithId {

  @Getter
  @Setter
  public static class Response {
      protected long id;
      protected LocalDateTime createdAt;
      protected LocalDateTime updatedAt;

      public Response(BaseEntityWithId entity) {
          this.id = entity.getId();
          this.createdAt = entity.getCreatedAt();
          this.updatedAt = entity.getUpdatedAt();
      }
  }
}
response할때 id, createAt, updatedAt은 기본적으로 반환하게 하겠다.
dto/CommentDto.java
package study.mvc.artlogy_spring.api.app.comment.dto;

import lombok.Data;
import lombok.Getter;
import lombok.NoArgsConstructor;
import lombok.Setter;
import study.mvc.artlogy_spring.api.app.comment.domain.CommentEntity;
import study.mvc.artlogy_spring.api.common.dtos.BaseDtoWithId;

@Data
@NoArgsConstructor
public class CommentDto {

  @Getter
  @Setter
  public static class Reponse extends BaseDtoWithId.Response {
      private String comment;

      public Reponse(CommentEntity comment) {
          super(comment);
          this.comment = comment.getContent();
      }
  }

  @Getter
  @Setter
  public static class createRequest {
      private String comment;
  }
}
BaseDto가 만든 덕분에 위 처럼 공통적인 것을 제외하고 dto를 간편하게 설정 할 수 있다.
service쪽도 살짝 고쳐보자.
service/CommentService.java
package study.mvc.artlogy_spring.api.app.comment.service;

import java.time.LocalDateTime;

import org.springframework.stereotype.Service;
import org.springframework.web.bind.annotation.RequestBody;

import lombok.RequiredArgsConstructor;
import study.mvc.artlogy_spring.api.app.comment.domain.CommentEntity;
import study.mvc.artlogy_spring.api.app.comment.dto.CommentDto;
import study.mvc.artlogy_spring.api.app.comment.repository.CommentRepository;

@Service
@RequiredArgsConstructor
public class CommentService {
  private final CommentRepository commentRepo;

  public CommentDto.Reponse create(@RequestBody CommentDto.createRequest data) {
      CommentEntity comment = new CommentEntity();
      comment.setContent(data.getComment());
      CommentEntity result = commentRepo.save(comment);
      CommentDto.Reponse response = new CommentDto.Reponse(result);
      return response;
  }
}
코드가 훨씬 깔끔해졌다. 더 깔끔하게 만들수도있지만 그건 알아서 해보길바란다.
Java에서 리팩토링을 할땐 생성자를 가지고 놀 줄 아는게 핵심이다.
좀 더 우아하게 MVC작업을 하고 싶다면 Jackson, JSR 303(Validator) 미리 보길 추천한다.
( 나중에 다루긴 할거다.)