인증과 인가
인증은 올바른 접근인지 확인하는 작업을 뜻하고,
인가는 요청한 사용자의 권한을 확인 하는 작업이다.
비유적으로 말하자면, 회사에서 사원증을 검사하여 회사내부사람인지 아닌지 확인 하는건 인증 해당 사원증으로 어떤 자료까지 접근할 수 있는지 확인하는건 인가이다.
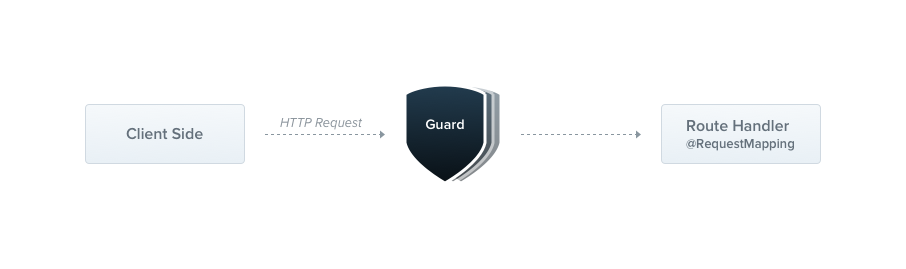
Nest Guard
Nest에서 기본적으로 제공하는 가드를 이용해서 인가기능을 간단하게 구현해보겠다.
auth.guard.ts
import { CanActivate, ExecutionContext, Injectable } from '@nestjs/common';
import { Observable } from 'rxjs';

@Injectable()
export class AuthGuard implements CanActivate {
  canActivate(
    context: ExecutionContext,
  ): boolean | Promise<boolean> | Observable<boolean> {
    const request = context.switchToHttp().getRequest();
    return this.validateRequest(request);
  }

  private validateRequest(request: any) {
    return true;
  }
}
핵심 정리
- 가드를 만들기 위해선
CanActivate인터페이스를 상속받아야 된다. - context(실행컨텍스트)는 내가 사용하는 서비스 Rpc,Http,Ws에 맞게 스위칭해준다.
- validateRequest는 커스텀해서 만드는 인증규칙으로 true를 반환하면 인증완료 false를 반환하면 403 Forbidden Error를 default로 반환한다.
가드 적용
@UseGuards(AuthGuard)
@Controller()
export class AppController {
  constructor(private readonly appService: AppService) { }

  @UseGuards(AuthGuard)
  @Get()
  getHello(): string {
    return this.appService.getHello();
  }
}
원하는 라우터 범위에 UseGuard()데코레이더를 선언해주면된다.
전역범위 적용
...
async function bootstrap() {
  const app = await NestFactory.create(AppModule);
  app.useGlobalGuards(new AuthGuard());
  await app.listen(3000);
}
bootstrap();useGlobalGuards()를 이용하여 전역으로 적용 할 가드를 할당하면 된다.
종속성 주입
import { Module } from '@nestjs/common';
import { APP_GUARD } from '@nestjs/core';

@Module({
  providers: [
    {
      provide: APP_GUARD,
      useClass: AuthGuard,
    },
  ],
})
export class AppModule {}
만약 프로바이더에서 직접 접근하여 사용하고 싶은 경우 위 처럼 커스텀 프로바이더로 사용한다.
JWT
세션방식 인증과 한계
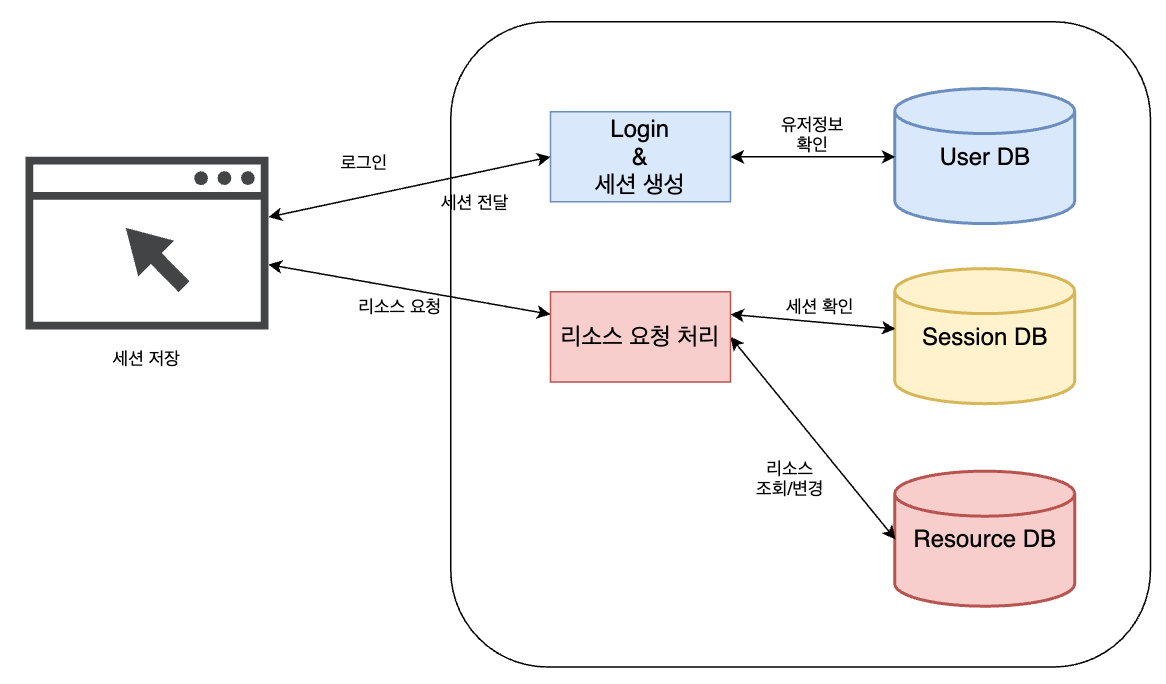
서버가 세션을 생성하고 데이터베이스에 저장하며, 이후 사용자의 요청에 포함된 세션 정보가 세션DB에 저장되어 있는지 확인하는 방식을 세션방식 인증의 보편적인 인증 과정이다. 이 과정에서 나타날 수 있는 문제점은 다음과 같다.
- 사용자가 자신의 정보를 세션으로 가지고 있어야 하기 때문에 중간 탈취의 위험이 있다.
위 단점은 Https통신과 세션만료시간을 정해 해결하거나 세션을 암호화하는 방식이 대부분이다.
- 세션 DB에 저장되어 있는 정보와 비교를 해야 하고 빠른 응답을 위해 메모리에 상주시키는 경우가 많은데 사용자가 몰렸을 경우 요청마다 세션을 확인해야 하므로 DB서버에 많은 부하와 메모리 부족으로 서비스 장애가 발생 될 확률이 높다.
위 단점은 Redis와 클라우드 서버를 이용해 유연한 트래픽 처리로 해결하는 식이 대부분이다.
- 만약 서비스가 여러 도메인으로 되어 있을경우 CORS 문제로 세션을 공유하기 위한 처리가 번거롭다.
이건 ㄹㅇ 노가다임
해결 방법은 써놓은것처럼 있지만 서비스에 인증/인가를 관리할 때마다 저걸 다 처리하기엔 너무 번거로운 일이다.
Hello JWT

세션이 사용자 인증 정보를 서버에 저장하는 방식인 반면, 토큰은 사용자가 로그인 했을 때 서버에서 토큰을 생성해서 전달하고 따로 저장소엔 저장하지 않는 방식이다. 이후 요청에 대해 클라이언트가 전달한 토큰에 대한 검증만 서버에서 진행한다. 이때 가장 보편적으로 많이 사용하는 검증 방식이 JWT이다.
JWT는 RFC 7519에 소개된 것으로써 문서의 abstract에 따르면 다음과 같다.
JWT는 두 당사자 사이에 이전될 수 있는 클레임을 나타내는 간결하고 URL에 안전한 방법입니다. JWT에 포함된 클레임은 JSON 객체로 인코딩되어 JSON 웹 서명(JWS, JSON Web Signature)의 페이로드 또는 JSON 웹 암호화(JWE, JSON Web Encryption)의 일반 텍스트로 사용됩니다. 클레임을 디지털 방식으로 서명하거나 메시지 인증 코드(MAC, Message Authentication Code)로 암호화 되어 무결성을 보호합니다.
JWT 구성요소
JWT는 헤더, 페이로드, 시그니처 3가지 요소를 가지며 dot(.)으로 구분된다. 헤더와 페이로드는 base64로 인코딩 되어 있고 사람은 읽을 수 없지만 디코딩이 쉽기 때문에 토큰에 대한 설정 정보를 담고있다. 핵심은 시그니처 부분이고 이는 서버만 가지고있는 secretKey를 통해 복호화한다.
덕분에 서버는 시크릿키를 활용한 검증만 하면 되는 것이다.
헤더
헤더는 일반적으로 JWT유형("typ") 어떤 알고리즘("alg")에 의해 인코딩 되었는 지를 포함한다.
{
    "typ":"JWT",
    "alg":"HS256"
}"typ": JWS와 JWE에 정의된 미디어 타입을 뜻한다. JWT를 처리하는 애플리케이션에게 페이로드가 무엇인지를 알려주는 역할을 한다. 위 예시는 "JWT"토큰이라는 명시를 하고있다."alg": 토큰을 암호화 하는 알고리즘이다. 암호화 하지 않을 경우 "none"정의하고, 암호화를 할 경우 해당 알고리즘을 기술한다. 위 예시는 HS256으로 토큰을 암호화했다는 뜻이다.
페이로드
페이로드에는 claim이라 부르는 정보를 포함한다.
표준 클레임
필수는 아니지만 JWT의 상호 호환성을 가질려면 작성해야한다.
IANA JWT 클레임 레지스트리에 등록된 클레임인데 쉽게 말해서 표준 클레임 작성법이다.
- "iss"(발급자): 누가 토큰을 발급 했는지를 작성한다.
- "sub"(주제): 주제에 대한 설명을 나타낸다. unique한 값을 가져야한다.
- "aud"(수신자):누구에게 토큰이 전달되는 가를 나타낸다.
- "exp"(만료시간):언제 토큰이 만료되는지를 나타낸다. 일반적으로 UNIX Eproch을 사용한다.
- "nbf"(Not Before): 정의된 시간 이후에 토큰이 활성화 된다. 토큰을 미리 발급하는 경우 사용된다.
- "iat"(Issued At): 언제 토큰이 발급되었는지를 나타낸다.
- "jti"(JWT ID) : 토큰의 고유 식별자다. 같은 값을 가질 확률이 거의 없는 암호학적 방법으로 생성되어야 한다.
🔥 페이로드에 들어갈 비공개 클레임은 비밀번호와 같은 중요 정보를 포함하면 안된다.
페이로드는 암호화되는 부분이 아니기 때문이다.
시그니처
헤더와 페이로드는 base64로 인코딩하기 때문에 토큰을 원하는 값을 넣고 생성할 수 있어 보안적으로 취약하다. 이를 보안하기 위해 해당 토큰이 유효한지 검증하는 시그니처단이 존재하고, 헤더에서 "alg"로 정의되는 방식으로 암호화되고 해당 암호를 복호화할 수 있는 비밀번호는 secretKey로써 서버에 안전한 방식으로 저장해야한다.
PassPort
NestJS공식사이트에 가면 Passport로 local인증/인가를 구현하는데 이건 따로 봐주길 바란다. 나는 딱히 API서버에 로컬인증이 필요하다고 생각하지 않기 때문이다. 또한 passport도 필요없다고 생각하는데 간단하게 언급만하고 가겠다.
물론 기기내(local)에서 인증이 필요한 경우 필요하다.
패키지 설치
# npm
$ npm i -s @nestjs/jwt passport-jwt
$ npm i --save-dev @types/passport-jwt
$ npm i -s @nestjs/passport passport

# yarn
$ yarn add @nestjs/jwt passport-jwt
$ yarn add -D @types/passport-jwt
$ yarn add @nestjs/passport passport
passport (Auth 전략)
passport는 특정 인증전략에 대한 옵션을 집합하고, 상호작용에 따른 콜백 을 주는 인증/인가를 위한 작은 프레임워크라고 생각하면 된다.
다음 코드는 위에서 만들어본 AuthGuard를 passport를 상속받아 구현한 것이다.
auth.guard.ts
import { Injectable } from '@nestjs/common';
import { PassportStrategy } from '@nestjs/passport';
import { ExtractJwt, Strategy } from 'passport-jwt';

@Injectable()
export class AuthGuard extends PassportStrategy(Strategy) {
  constructor() {
    super({
      jwtFromRequest: ExtractJwt.fromAuthHeaderAsBearerToken(),
      ignoreExpiration: false,
      secretOrKey: process.env.JWT_SECRET,
    });
  }
  async validate(payload: any) {
    return { userId: payload.sub, username: payload.username };
  }
}
가장 기본적인 jwt 가드 형태이다. (근데 이렇게 안쓸꺼임)
가드를 정의 했으면 사용할 곳에 모듈을 등록해주면 끝이다.
account.module.ts
...
@Module({
  imports: [
    TypeOrmModule.forFeature([Account]),
    //passportModule
    PassportModule,
  ],
  controllers: [AccountController],
  //Auth Guard
  providers: [AccountService, AuthGuard],
  exports: [AccountService],
})
export class AccountModule {}
근데 난 passport를 안쓴다. guard도 결국엔 인증/인가를 담당하는 미들웨어일 뿐이다. 확장성과 서비스에 맞는 커스텀이 가능해야한다. passport는 이미 정의된 template모음과 같다고 보면 되기때문에 간단하고 빠르게 구현할때만 추천한다.
JWT Guard
패키지 설치
$ npm i -s @nestjs/jwt

# yarn
$ yarn add @nestjs/jwt
환경설정
모듈단위
import { ConfigModule, ConfigService } from '@nestjs/config';
import { JwtModuleAsyncOptions } from '@nestjs/jwt';

export const jwtOptions: JwtModuleAsyncOptions = {
  imports: [ConfigModule],
  useFactory: (configService: ConfigService) => ({
    secret: configService.get('JWT_SECRET'),
    signOptions: { expiresIn: configService.get('JWT_ACCESS_EXPIREIN') },
  }),
  inject: [ConfigService],
};- secret : JWT 시크릿키
- signOptions : 헤더와 표준 클레임을 작성하는 곳이다.
import { Module } from '@nestjs/common';
import { AccountService } from './account.service';
import { AccountController } from './account.controller';
import { Account } from './entities/account.entity';
import { TypeOrmModule } from '@nestjs/typeorm';
import { jwtOptions } from '@config/guard/jwt.config';
import { JwtModule } from '@nestjs/jwt';

@Module({
  imports: [
    TypeOrmModule.forFeature([Account]),
    JwtModule.registerAsync(jwtOptions),
  ],
  controllers: [AccountController],
  providers: [AccountService],
  exports: [AccountService],
})
export class AccountModule {}

export const AccountEntities = [Account];
이 방식으로 예제가 많은데 나는 별로 좋아하지 않는다.
물론 이렇게 해두면 토큰을 제어할 때 등록한 모듈의 옵션값이 default값이 되긴한다.
요즘은 기본적으로 access_token, refresh_token등등 다양한 토큰을 쓰기 때문에 모듈등록은 딱히 의미가 있나..?라는 생각을 해서 나는 잘 안쓴다.
토큰 제어
  private validateRequest(request: any) {
    // 요청 헤더에서 토큰 꺼내기 (보편적으로 이렇게 씀)
    const jwtString = request.headers?.authorization?.split('Bearer ')[1];
    // 토큰 만들기 (로그인할 때 넣어주면 좋겠쥬?)
    this.jwtService.sign(
      { username: 'artlogy' },
      this.jwtOptions.getJwtSignOptions(),
    );
    // 토큰 복호화 (jwt 권한 검사의 알파이자 오메가이다.)
    this.jwtService.verify(jwtString, this.jwtOptions.getJwtVerifyOptions());

    return true;
  }
STD JWT Guard
Custom JWT Guard
import {
  CanActivate,
  ExecutionContext,
  Inject,
  Injectable,
  Module,
  Optional,
} from '@nestjs/common';
import { JwtService } from '@nestjs/jwt';
import { Observable } from 'rxjs';
import { JwtOptions } from './jwt.config';

@Injectable()
export class AuthGuard implements CanActivate {
  constructor(
    @Inject(JwtService) private readonly jwtService: JwtService,
    @Inject(JwtOptions) private readonly jwtOptions: JwtOptions,
  ) {}
  canActivate(
    context: ExecutionContext,
  ): boolean | Promise<boolean> | Observable<boolean> {
    const request = context.switchToHttp().getRequest();
    return this.validateRequest(request);
  }

  private validateRequest(request: any) {
    console.log('do someting');

    return true;
  }
}
결국 돌고돌아 기본형태에서 jwt검사를 하는 것으로 돌아왔다.
내가 쓰는 jwtGuard는 위 코드를 기본 골자로 간다.
위 골자를 기준으로 우린 인증에 관한 모든걸 할 수 있다.
만약 위 골자로 뭘 어쩌라는거야? 라는 생각이 들면 nestJS를 다시 처음부터 보는 걸 추천한다. (으스대는게 아니라 진심으로 추천한다.)
전역 가드
  const authGuard: AuthGuard = app.get<AuthGuard>(AuthGuard);
  app.useGlobalGuards(authGuard);
다른 예제를 보면 new AuthGuard를 하던데 DI, SingleInstance를 전혀 이해못한 코드니깐
위 처럼 하자.
Roles (MetaData)
NestJS에는 MetaData를 정의할 수 있는데 이것으로 Role을 정해 인가를 구현할 수 있다.
MetaData는 데이터의 데이터, 데이터가 어떤 특성을 지니는지 기술한 데이터이다.
ex: shema, API 명세서, DB ERD등등..
메타데이터 만들기
import { SetMetadata } from '@nestjs/common';

export enum AllowAuthRole {
  Admin = 'Admin',
  User = 'User',
}

// 가드 X
const IS_PUBLIC_KEY = 'isPublic';
export const Public = () => SetMetadata(IS_PUBLIC_KEY, true);

// Role별 권한 구분
export const Roles = (...roles: AllowAuthRole[] | string[]) =>
  SetMetadata('roles', roles);
Public은 Guard검사를 건너 뛰고 싶을 때 쓸것이고
Roles는 User의 Role에 따른 인가를 하기 위해 쓸 것이다.
메타데이터 사용하기
  @Public()
  @Roles(AllowAuthRole.Admin, 'User')
  @Get()
  findAll() {
    return this.accountService.findAll();
  }
위 처럼 메타데이터가 적용될 라우터에 데코레이터로 달아주면 된다.
메타데이터 접근하기
import { AllowAuthRole } from '@common/enums/role.enum';
import {
CanActivate,
ExecutionContext,
Inject,
Injectable,
Module,
Optional,
} from '@nestjs/common';
import { Reflector } from '@nestjs/core';
import { JwtService } from '@nestjs/jwt';
import { Observable } from 'rxjs';
import { JwtOptions } from './jwt.config';
@Injectable()
export class AuthGuard implements CanActivate {
constructor(
private readonly refector: Reflector,
@Inject(JwtService) private readonly jwtService: JwtService,
@Inject(JwtOptions) private readonly jwtOptions: JwtOptions,
) {}
canActivate(
context: ExecutionContext,
): boolean | Promise<boolean> | Observable<boolean> {
const isPublic: boolean = this.refector.get<boolean>(
'isPublic',
context.getHandler(),
);
const roles: AllowAuthRole = this.refector.get<AllowAuthRole>(
'roles',
context.getHandler(),
);
const request = context.switchToHttp().getRequest();
console.log(isPublic, roles);
return this.validateRequest(request);
}
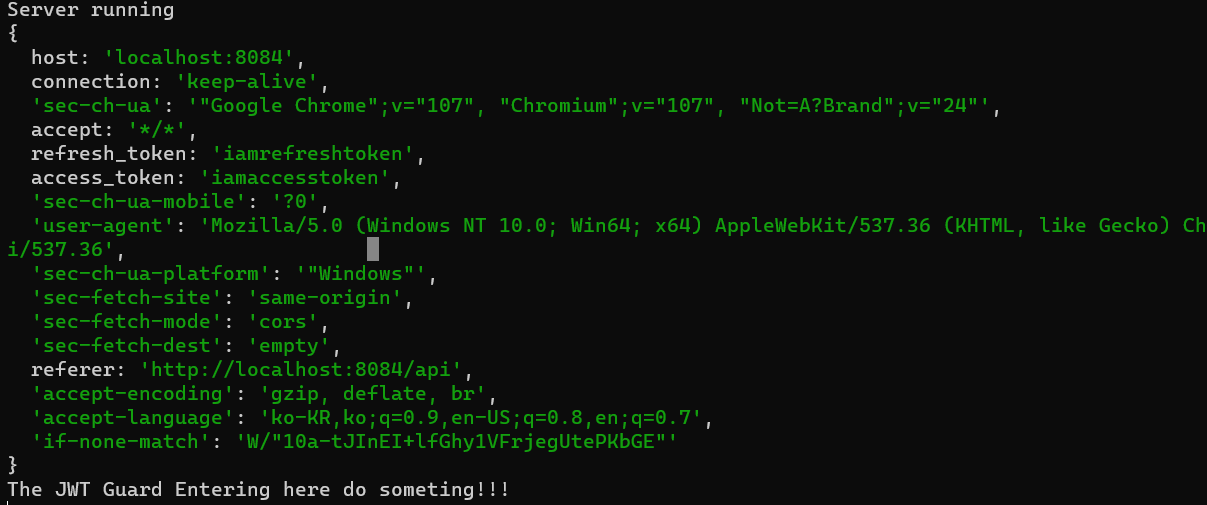
private validateRequest(request: any) {
console.log('The JWT Guard Entering here do someting!!!');
return true;
}
}핵심은 Refector 종속하여 사용하는 것이다.

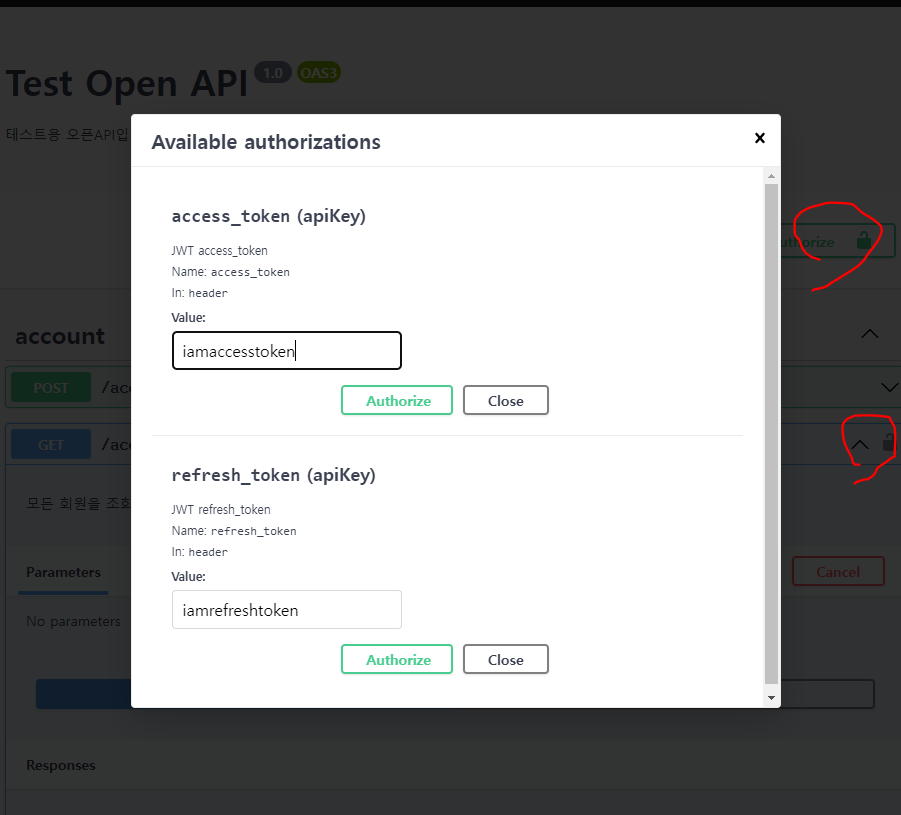
Swagger Auth
스웨거 설정
import { DocumentBuilder } from '@nestjs/swagger';
import { AccessToken, RefreshToken } from './guard/jwt.config';

export const swaggerConfig = new DocumentBuilder()
  .setTitle('Test Open API')
  .setDescription('테스트용 오픈API입니다.')
  .setVersion('1.0')
  .addApiKey(
    {
      description: 'JWT access_token',
      type: 'apiKey',
      bearerFormat: 'JWT',
    },
    AccessToken,
  )
  .addApiKey(
    {
      description: 'JWT refresh_token',
      type: 'apiKey',
      bearerFormat: 'JWT',
    },
    RefreshToken,
  )
  .build();
데코레이터 커스텀 및 적용
export const ApiGuard = (option?: ApiOperationOptions) => {
  return applyDecorators(
    ApiOperation(option),
    ApiBearerAuth(AccessToken),
    ApiBearerAuth(RefreshToken),
    ApiUnauthorizedResponse({ description: '유효하지 않은 토큰' }),
  );
};
스웨거 관련 데코레이터만 4개라 하나로 합쳤다.
  @Roles(AllowAuthRole.Admin)
  @ApiGuard({
    summary: '회원 전체 조회',
    description: '모든 회원을 조회합니다.',
  })
  @Get()
  findAll() {
    return this.accountService.findAll();
  }