
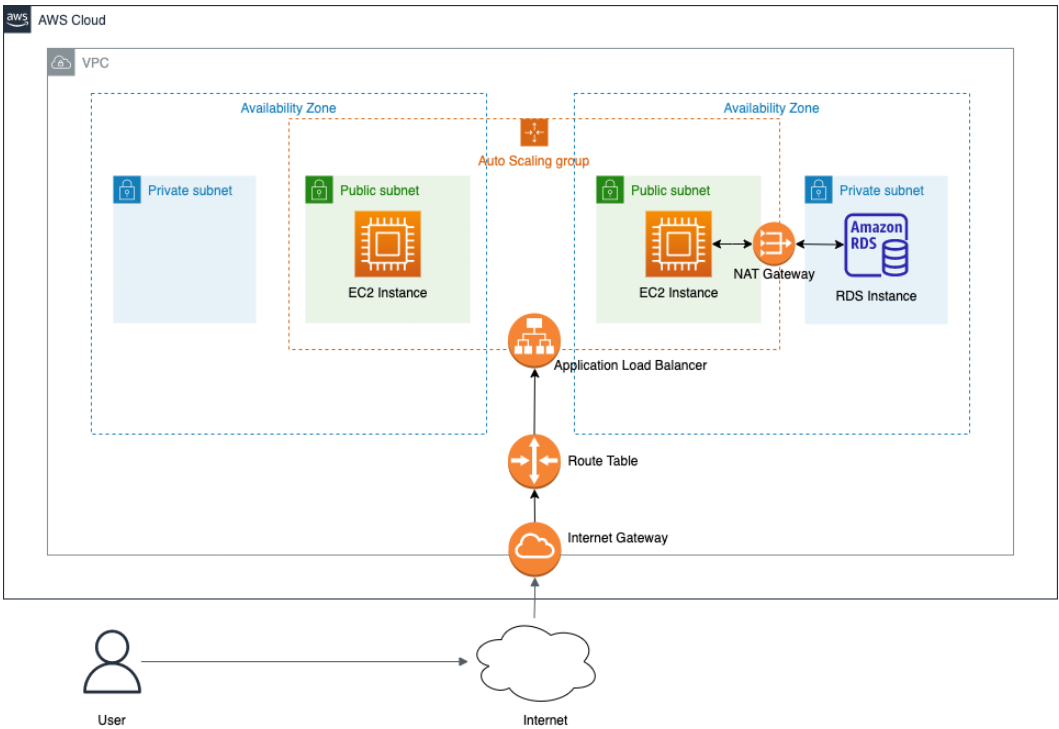
다음의 아키텍처를 terraform을 이용해 작성합니다.
Terraform 작성: 공식 문서
1. 요구사항 작성
main.tf 파일을 만들고 terraform에서 요구되는 사항을 작성했다.
# 요구사항 작성
terraform {
  required_providers {
    aws = {
      source  = "hashicorp/aws"
      version = "~> 4.16"
    }
  }
}

provider "aws" {
  region = "ap-northeast-2"
}
2. VPC 생성
vpc.tf 파일을 만들고 myvpc를 생성했다.
# VPC 생성
data "aws_availability_zones" "available" {
  state = "available"
}
resource "aws_vpc" "new_vpc" {
  cidr_block  = "10.1.0.0/16"
  enable_dns_hostnames = true
  enable_dns_support = true
  instance_tenancy = "default"

  tags = {
    Name = "VPC-TRF"
  }
}
3. Subnet 생성
subnet.tf 파일을 만들고 퍼블릭 서브넷 2개, 프라이빗 서브넷 2개를 생성했다.
퍼블릭 서브넷
# 퍼블릭 서브넷 생성
resource "aws_subnet" "public_subnet_1a" {
  vpc_id = aws_vpc.new_vpc.id
  cidr_block = "10.1.0.0/20"
  map_public_ip_on_launch = true
  availability_zone = data.aws_availability_zones.available.names[0]
  tags = {
    Name = "TRF-PUBLIC-SUBNET-1A"
  }
}

resource "aws_subnet" "public_subnet_2b" {
  vpc_id = aws_vpc.new_vpc.id
  cidr_block = "10.1.16.0/20"
  map_public_ip_on_launch = true
  availability_zone = data.aws_availability_zones.available.names[2]
  tags = {
    Name = "TRF-PUBLIC-SUBNET-2B"
  }
}
프라이빗 서브넷
# 프라이빗 서브넷 생성
resource "aws_subnet" "private_subnet_1a" {
  vpc_id = aws_vpc.new_vpc.id
  cidr_block = "10.1.128.0/20"
  availability_zone = data.aws_availability_zones.available.names[0]
  tags = {
    Name = "TRF-PRIVATE-SUBNET-1A"
  }
}

resource "aws_subnet" "private_subnet_2b" {
  vpc_id = aws_vpc.new_vpc.id
  cidr_block = "10.1.144.0/20"
  availability_zone = data.aws_availability_zones.available.names[2]
  tags = {
    Name = "TRF-PRIVATE-SUBNET-2B"
  }
}
4. 라우팅 테이블 생성
퍼블릭 서브넷 라우팅 테이블
퍼블릭 서브넷 라우팅 테이블을 생성하고 인터넷 게이트웨이에 연결시켰다.
# IGW 생성
resource "aws_internet_gateway" "new_igw" {
  vpc_id = aws_vpc.new_vpc.id
  tags = {
    Name = "TRF-IGW"
  }
}

# 라우팅 테이블 생성
resource "aws_route_table" "public_rtb" {
  vpc_id = aws_vpc.new_vpc.id
  route {
    cidr_block = "0.0.0.0/0"
    gateway_id = aws_internet_gateway.new_igw.id
  }
  tags = {
    Name = "TRF-PUBLIC-RTB"
  }
}

# 라우팅 테이블 연결
resource "aws_route_table_association" "public_subnet_1a_association" {
  subnet_id = aws_subnet.public_subnet_1a.id
  route_table_id = aws_route_table.public_rtb.id
}
resource "aws_route_table_association" "public_subnet_2b_association" {
  subnet_id = aws_subnet.public_subnet_2b.id
  route_table_id = aws_route_table.public_rtb.id
}
프라이빗 서브넷 라우팅 테이블
프라이빗 서브넷 라우팅 테이블을 생성하고 NAT 게이트웨이에 연결시켰다.
# NGW 생성
resource "aws_eip" "nat_ip" {
  vpc   = true

  lifecycle {
    create_before_destroy = true
  }
}

# NAT gateway 생성
resource "aws_nat_gateway" "new_ngw" {
  allocation_id = aws_eip.nat_ip.id
  subnet_id = aws_subnet.public_subnet_2b.id

  tags = {
    Name = "NAT_gateway"
  }
}

# 라우팅 테이블 생성
resource "aws_route_table" "private_rtb" {
  vpc_id = aws_vpc.new_vpc.id
  tags = {
    Name = "TRF-PRIVATE-RTB"
  }
}

# 라우팅 테이블 연결
resource "aws_route" "private_rt_nat" {
  route_table_id              = aws_route_table.private_rtb.id
  destination_cidr_block      = "0.0.0.0/0"
  nat_gateway_id              = aws_nat_gateway.new_ngw.id
}

resource "aws_route_table_association" "private_subnet_1a_association" {
  subnet_id = aws_subnet.private_subnet_1a.id
  route_table_id = aws_route_table.private_rtb.id
}
resource "aws_route_table_association" "private_subnet_2b_association" {
  subnet_id = aws_subnet.private_subnet_2b.id
  route_table_id = aws_route_table.private_rtb.id
}
5. 보안 그룹 생성
퍼블릭 보안 그룹
퍼블릭 보안 그룹을 생성하고 22, 80, 8080, 0.0.0.0/0의 인바운드 규칙을 설정했다.
# ec2 보안그룹 생성
resource "aws_security_group" "instance" {

  name = var.ec2_security_group_name
  vpc_id = "${aws_vpc.new_vpc.id}"

  ingress {
    from_port   = 80
    to_port     = 80
    protocol    = "tcp"
    cidr_blocks = ["0.0.0.0/0"]
  }
  ingress {
    from_port   = 22
    to_port     = 22
    protocol    = "tcp"
    cidr_blocks = ["1.177.172.137/32"] # 내 IP
  }
  ingress {
    from_port   = -1
    to_port     = -1
    protocol    = "icmp"
    cidr_blocks = ["0.0.0.0/0"]
  }
  egress {
    from_port   = 0
    to_port     = 0
    protocol    = "-1"
    cidr_blocks = ["0.0.0.0/0"]
  }
  tags = {
    Name = "terraform-sg"
  }
}

variable "ec2_security_group_name" {
  description = "The name of the security group"
  type        = string
  default     = "terraform-example-instance"
}

#로그 찍기
output "public_ip" {
  value       = aws_instance.example1.public_ip
  description = "The public IP of the Instance"
}

output "public_dns" {
  value       = aws_instance.example1.public_dns
  description = "The Public dns of the Instance"
}

output "private_ip" {
  value       = aws_instance.example1.private_ip
  description = "The Private_ip of the Instance"
}
프라이빗 보안 그룹
프라이빗 보안 그룹을 생성하고 3306포트 인바운드 규칙을 설정했다.
#RDS 보안 그룹 생성
resource "aws_security_group" "rdssg" {

  name = var.rds_security_group_name
  vpc_id = "${aws_vpc.new_vpc.id}"

  ingress {
    from_port   = 3306
    to_port     = 3306
    protocol    = "tcp"
    cidr_blocks = ["0.0.0.0/0"]
  }
  egress {
    from_port   = 0
    to_port     = 0
    protocol    = "-1"
    cidr_blocks = ["0.0.0.0/0"]
  }
  tags = {
    Name = "terraform-sg"
  }
}

variable "rds_security_group_name" {
  description = "The name of the security group"
  type        = string
  default     = "terraform-example-rds"
}
6. EC2 생성
key pair를 현재 디렉토리에 생성하고 연결시킨 뒤, EC2를 두 개 생성했다.
resource "aws_instance" "example1" {
  ami                    = "ami-0970cc54a3aa77466"
  instance_type          = "t2.micro"
  subnet_id              = "${aws_subnet.public_subnet_1a.id}"
  vpc_security_group_ids = [aws_security_group.instance.id]
  key_name  = "sprintkey"
  user_data = <<-EOT
    #!/bin/bash
    echo "Hello, World" > index.html
    nohup busybox httpd -f -p 80 &
    EOT

  tags = {
    Name = "terraform-example1"
  }
}

resource "aws_instance" "example2" {
  ami                    = "ami-0970cc54a3aa77466"
  instance_type          = "t2.micro"
  subnet_id              = "${aws_subnet.public_subnet_2b.id}"
  vpc_security_group_ids = [aws_security_group.instance.id]
  key_name  = "sprintkey"
  user_data = <<-EOT
    #!/bin/bash
    echo "Hello, World" > index.html
    nohup busybox httpd -f -p 80 &
    EOT

  tags = {
    Name = "terraform-example2"
  }
}
7. RDS 생성
DB 서브넷 그룹을 만들고 RDS를 생성했다.
# DB 서브넷 그룹 생성
resource "aws_db_subnet_group" "dbsubg" {
  name = "sprint-db-subg"
  subnet_ids = [
    aws_subnet.private_subnet_1a.id,
    aws_subnet.private_subnet_2b.id
  ]
  tags = {
    "Name" = "sprint-db-subg"
  }
}

# RDS 생성
resource "aws_db_instance" "dbrds" {
    allocated_storage = 20
    max_allocated_storage = 50
    skip_final_snapshot = true
    availability_zone = data.aws_availability_zones.available.names[0]
    vpc_security_group_ids = [aws_security_group.rdssg.id]
    db_subnet_group_name = aws_db_subnet_group.dbsubg.name
    engine = "mysql"
    engine_version = "8.0.28"
    instance_class = "db.t3.micro"
    db_name = "sprintrds"
    username = "admin"
    password = "12341234"

    tags = {
        "Name" = "sprint-rds"
    }
}
variable 파일에 민감 정보 다루기: 공식 문서
8. ALB 생성
ALB를 만들고 EC2 인스턴스 두 개를 타겟으로 지정하고 타겟 그룹으로 만든 뒤, 80 포트 Forward 방식으로 리스너를 생성했다.
# ALB 생성
  resource "aws_alb" "alb" {
  name               = "sprint-alb"
  internal           = false
  load_balancer_type = "application"
  security_groups    = [aws_security_group.instance.id]
  subnets            = [
    aws_subnet.public_subnet_1a.id,
    aws_subnet.public_subnet_2b.id
    ]
  enable_cross_zone_load_balancing = true
}

# 타켓 그룹 생성
  resource "aws_alb_target_group" "albtg" {
  name     = "sprint-alb-tg"
  port     = 8080
  protocol = "HTTP"
  vpc_id   = aws_vpc.new_vpc.id
}

# 인스턴스 연결
resource "aws_alb_target_group_attachment" "albtg1" {
  target_group_arn = aws_alb_target_group.albtg.arn
  target_id        = aws_instance.example1.id
  port             = 8080
}

resource "aws_alb_target_group_attachment" "albtg2" {
  target_group_arn = aws_alb_target_group.albtg.arn
  target_id        = aws_instance.example2.id
  port             = 8080
}

# 리스너 생성
resource "aws_alb_listener" "alblis" {
  load_balancer_arn = aws_alb.alb.arn
  port              = 80
  protocol          = "HTTP"

  default_action {
    type             = "forward"
    target_group_arn = aws_alb_target_group.albtg.arn
  }
}
9. Auto Scailing 생성
최소 2개, 최대 10개로 오토 스케일링 그룹을 생성했다.
# 시작 구성 생성
  resource "aws_launch_configuration" "launch" {
    name_prefix = "laun-"
    image_id = "ami-0970cc54a3aa77466"
    instance_type = "t2.micro"
    security_groups = [aws_security_group.instance.id]
    user_data = <<-EOF
         #!/bin/bash
         echo "Hello, World" > index.html
         nohup busybox httpd -f -p 80 &
         EOF
    lifecycle {
    create_before_destroy = true
    }
  }

# Auto Scailing 그룹 생성
  resource "aws_autoscaling_group" "autogr" {
    name = "sprint-auto"
    launch_configuration = aws_launch_configuration.launch.name
    vpc_zone_identifier = [
        aws_subnet.public_subnet_1a.id,
        aws_subnet.public_subnet_2b.id
        ]
    health_check_type = "ELB"
    target_group_arns = [aws_alb_target_group.albtg.arn]
    force_delete = true

    min_size = 2
    max_size = 5

    tag {
        key                 = "Name"
        value               = "sprint-auto"
        propagate_at_launch = true
  }
}
기록하고 공유하려고 노력하는 DevOps 엔지니어