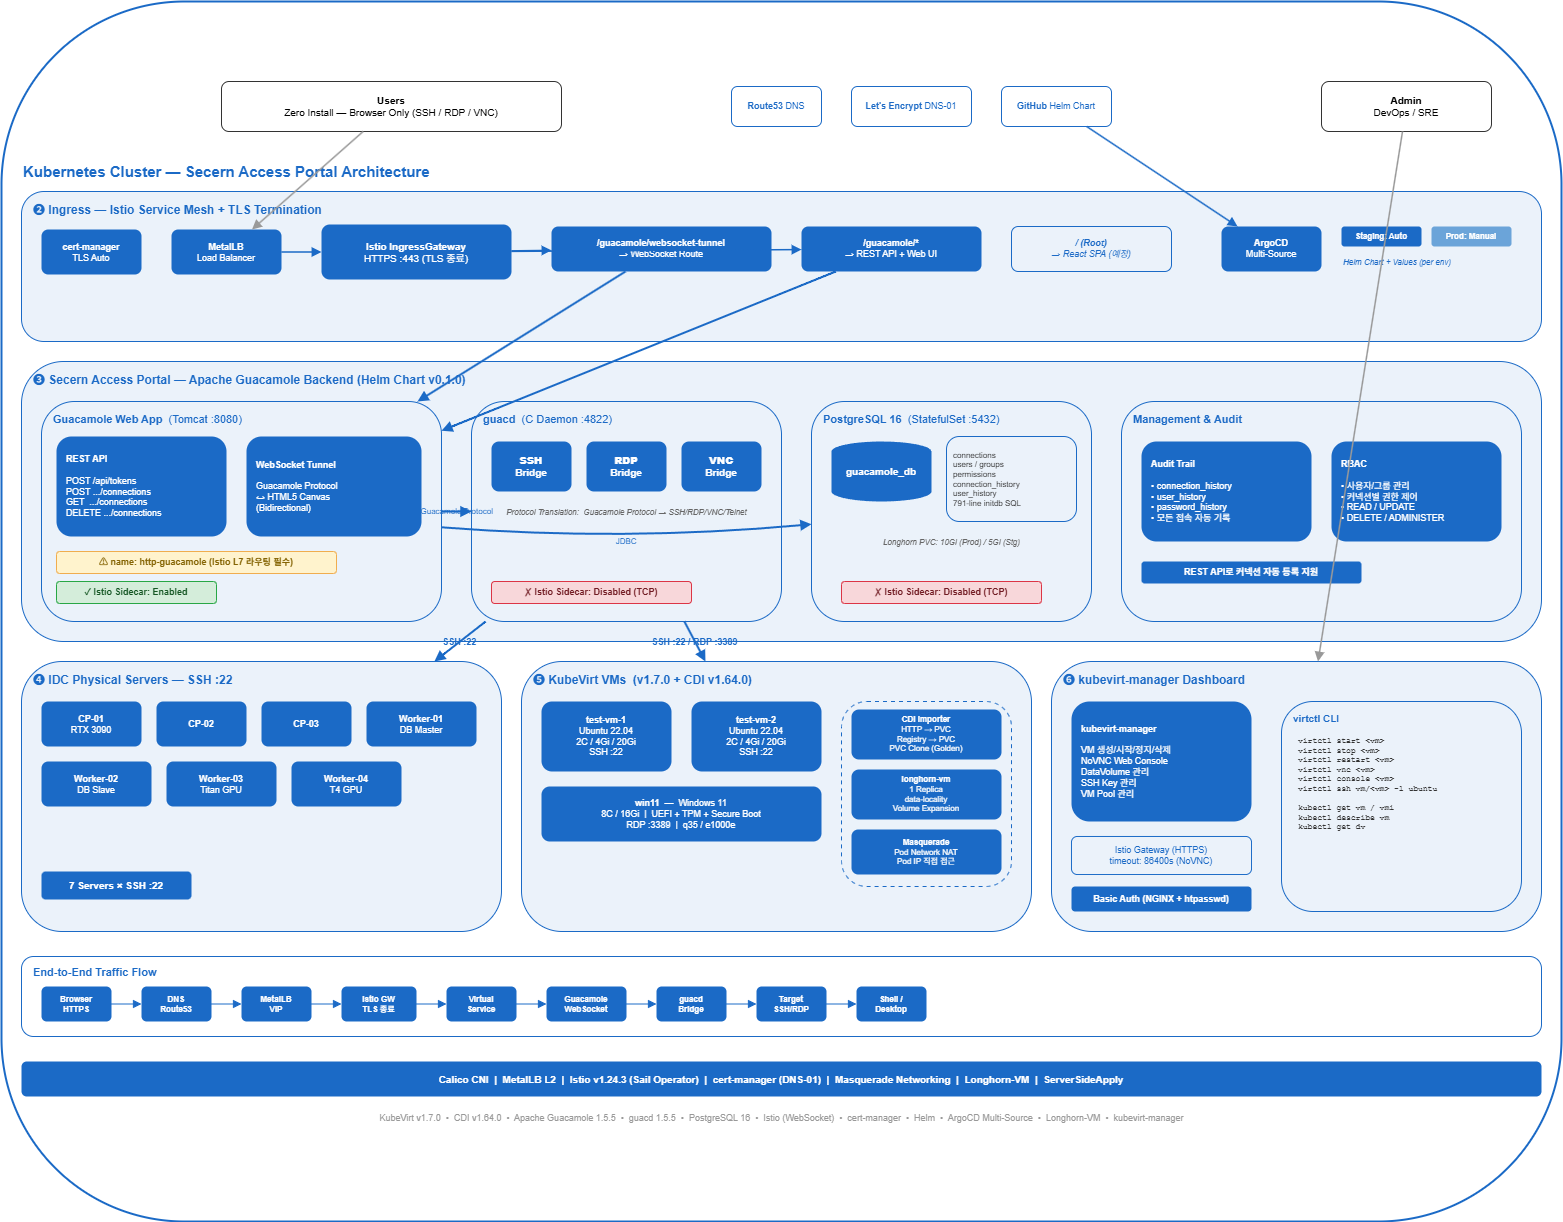
Kubernetes 위에서 가상머신을 운영하고, 웹 브라우저 하나로 모든 인프라에 접속하는 플랫폼을 구축한 이야기
1. 문제 정의: 인프라 접속의 파편화
IDC에 7대의 물리 서버, 그 위에 Kubernetes 클러스터, 그리고 KubeVirt로 운영하는 가상머신들. 인프라가 커질수록 접속 관리는 복잡해집니다.
기존의 접속 방식:
개발자 A → SSH 클라이언트 → 서버1 (IP 직접 입력)
개발자 A → SSH 클라이언트 → 서버2 (IP 직접 입력)
개발자 B → RDP 클라이언트 → Windows VM (별도 클라이언트 필요)
개발자 C → VNC 클라이언트 → Linux VM (또 다른 클라이언트)
운영팀   → SSH 터널 → VPN → 서버3 (복잡한 경로)
문제점:
- 접속 정보(IP, 포트, 계정)가 개인별로 분산 관리
- SSH, RDP, VNC 각각 다른 클라이언트 필요
- 접속 이력 추적 불가 (누가 언제 어디에 접속했는지)
- 새 팀원 온보딩 시 접속 정보 전달이 번거로움
- VPN + SSH 터널 등 복잡한 네트워크 경로
목표:
- 웹 브라우저 하나로 모든 인프라 접속
- 중앙 집중식 접속 관리 및 권한 제어
- 접속 이력 자동 기록
- Kubernetes 네이티브 배포 (GitOps 호환)
2. 기술 선택: 왜 KubeVirt + Apache Guacamole인가?
2.1 KubeVirt: Kubernetes 위의 가상머신
컨테이너화할 수 없는 워크로드(Windows, 레거시 애플리케이션, GPU 패스스루 테스트 등)를 위해 별도의 하이퍼바이저를 운영하는 대신, KubeVirt를 선택했습니다.
| 비교 | 별도 하이퍼바이저 (ESXi 등) | KubeVirt |
|---|---|---|
| 인프라 분리 | VM과 컨테이너가 별도 관리 | 동일 Kubernetes 클러스터 |
| 스토리지 | vSAN, VMFS 등 별도 | Longhorn CSI 공유 |
| 네트워크 | vSwitch, NSX 등 별도 | Pod 네트워크 통합 |
| 모니터링 | vCenter 별도 | Prometheus 통합 |
| GitOps | 불가 | CRD 기반 완전 지원 |
| 라이선스 | 유료 (vSphere) | 오픈소스 (CNCF) |
2.2 Apache Guacamole: 클라이언트리스 원격 접속
Apache Guacamole는 클라이언트 설치 없이 웹 브라우저만으로 SSH, RDP, VNC, Telnet 접속을 지원하는 게이트웨이입니다.
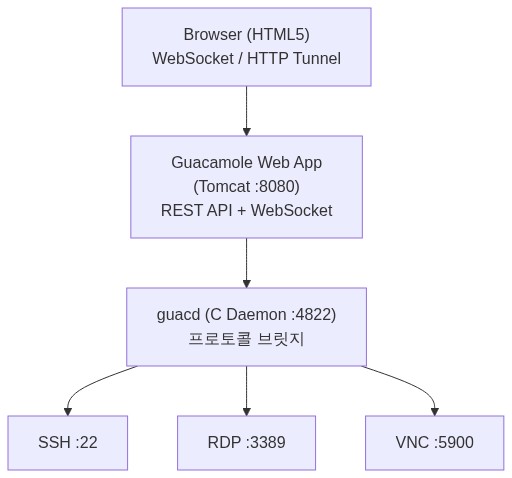
Guacamole의 핵심 장점:
- Zero-install: 브라우저만 있으면 됨 (WebSocket 기반)
- 프로토콜 통합: SSH, RDP, VNC, Telnet을 단일 인터페이스로
- REST API: 프로그래밍 가능한 커넥션/사용자 관리
- 세션 녹화: 접속 이력 및 세션 리플레이 지원
- RBAC: 사용자/그룹별 접속 권한 제어
- Kubernetes 호환: 컨테이너 이미지 제공
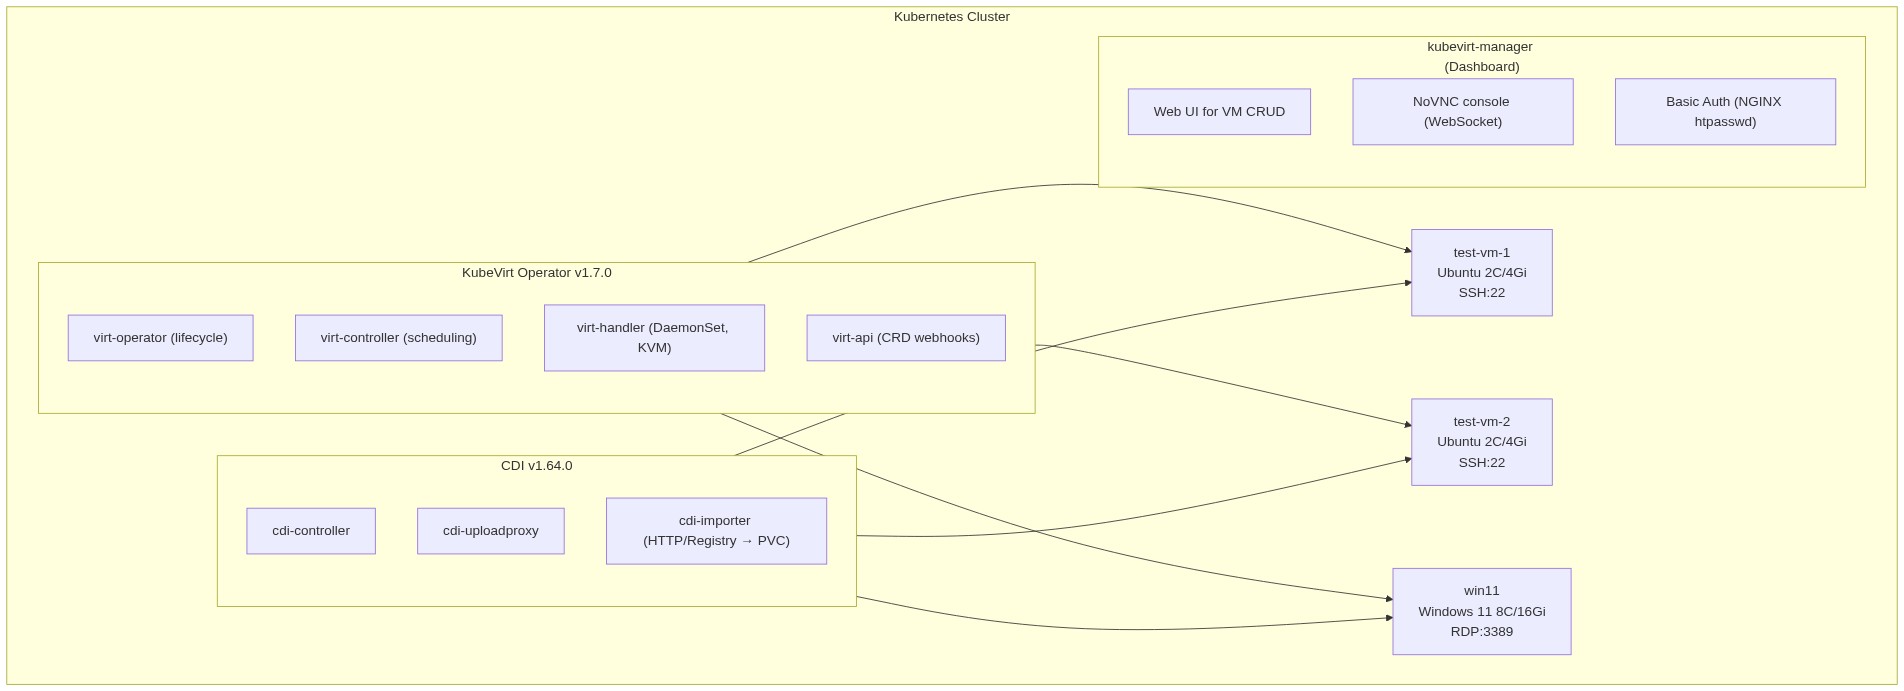
3. KubeVirt 아키텍처 상세
3.1 컴포넌트 구성
3.2 VM 스토리지: Longhorn-VM StorageClass
VM 디스크는 일반 애플리케이션과 다른 스토리지 전략이 필요합니다:
apiVersion: storage.k8s.io/v1
kind: StorageClass
metadata:
  name: longhorn-vm
provisioner: driver.longhorn.io
parameters:
  numberOfReplicas: "1"          # VM은 단일 복제본 (성능 우선)
  dataLocality: "best-effort"    # 가능하면 VM이 실행되는 노드에 데이터 배치
  staleReplicaTimeout: "30"
  recurringJobSelector: '[{"name":"vm-daily-backup","isGroup":true}]'
allowVolumeExpansion: true        # 디스크 온라인 확장 지원
reclaimPolicy: Delete
volumeBindingMode: Immediate
일반 Longhorn(3 replica) 대신 단일 복제본을 사용한 이유:
- VM 디스크 I/O는 매우 빈번 → 3중 복제는 쓰기 성능 3배 저하
- VM 자체에 스냅샷/백업 전략 적용 (recurringJobSelector)
dataLocality: best-effort로 네트워크 I/O 최소화- VM이 stateless가 아닌 경우, 별도 백업 정책으로 데이터 보호
3.3 VM 정의: CRD 기반 선언적 관리
KubeVirt의 핵심은 VM을 Kubernetes CRD로 정의한다는 것입니다:
apiVersion: kubevirt.io/v1
kind: VirtualMachine
metadata:
  name: ubuntu-dev-01
  namespace: kubevirt-test
spec:
  runStrategy: Always              # 항상 실행 상태 유지

  dataVolumeTemplates:             # CDI: 이미지 자동 다운로드 → PVC 생성
    - metadata:
        name: ubuntu-dev-01-rootdisk
      spec:
        storage:
          storageClassName: longhorn-vm
          resources:
            requests:
              storage: 30Gi
          accessModes:
            - ReadWriteOnce
        source:
          http:
            url: "https://cloud-images.ubuntu.com/jammy/current/jammy-server-cloudimg-amd64.img"

  template:
    metadata:
      labels:
        app: ubuntu-dev
    spec:
      domain:
        cpu:
          cores: 4
        resources:
          requests:
            memory: 8Gi
        devices:
          disks:
            - name: rootdisk
              disk:
                bus: virtio          # 최적 성능 (paravirtualized)
            - name: cloudinitdisk
              disk:
                bus: virtio
          interfaces:
            - name: default
              masquerade: {}         # Pod 네트워크 NAT

      networks:
        - name: default
          pod: {}                    # Kubernetes Pod 네트워크 사용

      volumes:
        - name: rootdisk
          dataVolume:
            name: ubuntu-dev-01-rootdisk
        - name: cloudinitdisk
          cloudInitNoCloud:
            userData: |
              #cloud-config
              hostname: ubuntu-dev-01
              user: ubuntu
              ssh_authorized_keys:
                - ssh-ed25519 AAAA... admin@company
              package_update: true
              packages:
                - net-tools
                - curl
                - vim
                - htop
이것이 GitOps와 완벽히 호환되는 이유:
- VM 정의가 YAML 파일 → Git에 커밋 가능
- ArgoCD가 변경 감지 → 자동 적용
runStrategy로 VM 시작/정지 제어 가능dataVolumeTemplates로 OS 이미지 자동 프로비저닝
3.4 Windows VM: UEFI + Secure Boot + TPM
Windows 11은 특별한 하드웨어 요구사항이 있습니다:
apiVersion: kubevirt.io/v1
kind: VirtualMachine
metadata:
  name: win11-workstation
spec:
  runStrategy: RerunOnFailure
  template:
    spec:
      domain:
        cpu:
          cores: 8
        resources:
          requests:
            memory: 16Gi
        features:
          smm:
            enabled: true            # System Management Mode
          tpm: {}                    # TPM 2.0 가상 디바이스
        firmware:
          bootloader:
            efi:
              secureBoot: true       # UEFI Secure Boot
        machine:
          type: q35                   # 최신 머신 타입
        devices:
          disks:
            - name: rootdisk
              disk:
                bus: sata            # Windows 호환성
              bootOrder: 1
          interfaces:
            - name: default
              model: e1000e          # Windows 기본 NIC 드라이버
              masquerade: {}
KubeVirt에서 Windows 11을 실행하기 위한 조건:
firmware.bootloader.efi.secureBoot: true— UEFI Secure Boot 필수features.tpm: {}— TPM 2.0 에뮬레이션features.smm.enabled: true— SMM (Secure Boot의 전제조건)machine.type: q35— 최신 칩셋 에뮬레이션interfaces.model: e1000e— virtio NIC는 Windows 드라이버 없이 동작 불가
3.5 네트워킹: Masquerade 모드
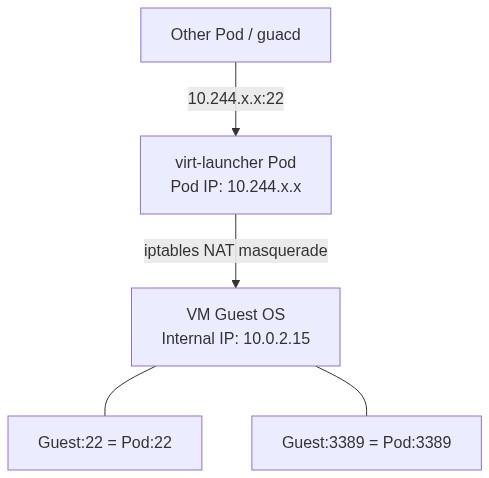
Masquerade 모드에서 VM은 내부적으로 10.0.2.x 대역을 사용하지만, iptables NAT를 통해 Pod IP로 매핑됩니다. 따라서 클러스터 내의 다른 Pod(예: Guacamole의 guacd)에서 Pod IP로 직접 SSH/RDP 접속이 가능합니다.
# VM의 Pod IP 조회
kubectl get vmi ubuntu-dev-01 -n kubevirt-test \
  -o jsonpath='{.status.interfaces[0].ipAddress}'
# 출력: 10.244.93.152

# 클러스터 내부에서 직접 SSH 가능
ssh ubuntu@10.244.93.152
이 특성이 Guacamole + KubeVirt 조합을 강력하게 만듭니다 — guacd가 클러스터 내부에서 VM Pod IP로 직접 프로토콜 연결을 맺습니다.
3.6 CDI: 이미지 자동 임포트
CDI(Containerized Data Importer)는 다양한 소스에서 VM 디스크 이미지를 자동으로 PVC에 임포트합니다:
# HTTP URL에서 Ubuntu 클라우드 이미지 다운로드
source:
  http:
    url: "https://cloud-images.ubuntu.com/jammy/current/jammy-server-cloudimg-amd64.img"

# 컨테이너 레지스트리에서 이미지 Pull
source:
  registry:
    url: "docker://harbor.example.com/vm-images/ubuntu:22.04"

# 기존 PVC 복제 (Golden Image 패턴)
source:
  pvc:
    name: win11-golden-disk
    namespace: kubevirt-test
Golden Image 패턴:
1. Windows 11을 수동으로 한 번 설치 → golden PVC 생성
2. 이후 새 VM 생성 시 golden PVC를 clone → 빠른 프로비저닝
3. 설치 시간: 30분+ → clone 시간: 1-2분
3.7 kubevirt-manager: 웹 기반 VM 관리
CLI(virtctl) 대신 웹 UI로 VM을 관리할 수 있는 kubevirt-manager를 배포했습니다:
주요 기능:
- VM 생성/시작/정지/삭제 (CRUD)
- NoVNC 웹 콘솔 (브라우저에서 직접 VM 화면 접근)
- DataVolume 관리 (디스크 생성, 리사이즈)
- 네트워크 설정 (Multus 지원)
- SSH 키 관리
- VM Pool (동일 스펙 VM 다수 생성)
인증: NGINX Basic Auth
# NGINX sidecar가 인증 처리
apiVersion: v1
kind: ConfigMap
metadata:
  name: auth-config
data:
  basicauth.conf: |
    server {
        listen 8080;
        location / {
            auth_basic "KubeVirt Manager";
            auth_basic_user_file /etc/nginx/secret.d/.htpasswd;
            proxy_pass http://localhost:8080;
        }
    }
Istio Gateway를 통한 HTTPS 접근:
apiVersion: networking.istio.io/v1beta1
kind: Gateway
metadata:
  name: kubevirt-manager-gateway
spec:
  selector:
    istio: ingressgateway
  servers:
    - hosts:
        - kubevirt-mgr.example.com
      port:
        number: 443
        protocol: HTTPS
      tls:
        mode: SIMPLE
        credentialName: kubevirt-mgr-tls    # cert-manager 자동 발급
---
apiVersion: networking.istio.io/v1beta1
kind: VirtualService
metadata:
  name: kubevirt-manager-vs
spec:
  hosts:
    - kubevirt-mgr.example.com
  gateways:
    - kubevirt-manager-gateway
  http:
    - route:
        - destination:
            host: kubevirt-manager.kubevirt-manager.svc.cluster.local
            port:
              number: 8080
      timeout: 86400s    # 24시간 — NoVNC 장시간 세션 지원
timeout: 86400s 설정은 NoVNC 콘솔 세션이 장시간 유지될 수 있도록 합니다. 기본 Istio timeout(15초)으로는 콘솔 세션이 끊깁니다.
4. Secern Access Portal: Guacamole 백엔드 아키텍처
4.1 Helm Chart 설계
단일 Helm Chart로 Guacamole의 3개 컴포넌트를 패키징했습니다:
kubernetes/charts/secern-access-portal/
├── Chart.yaml                          # v0.1.0, appVersion 1.5.5
├── values.yaml                         # 기본값
├── templates/
│   ├── _helpers.tpl                    # 공통 헬퍼 (fullname, labels)
│   ├── postgresql-secret.yaml          # DB 인증정보
│   ├── postgresql-statefulset.yaml     # PostgreSQL 16
│   ├── postgresql-service.yaml         # ClusterIP :5432
│   ├── guacamole-initdb-configmap.yaml # 스키마 초기화 SQL (791줄)
│   ├── guacd-deployment.yaml           # 프로토콜 데몬
│   ├── guacd-service.yaml              # ClusterIP :4822
│   ├── guacamole-deployment.yaml       # 웹 애플리케이션
│   ├── guacamole-service.yaml          # ClusterIP :8080
│   └── guacamole-service-nodeport.yaml # 조건부 NodePort (Staging)
4.2 PostgreSQL: 스키마 자동 초기화
Guacamole는 PostgreSQL에 커넥션, 사용자, 권한 정보를 저장합니다. 초기 스키마를 ConfigMap으로 마운트하여 첫 실행 시 자동 초기화합니다:
# postgresql-statefulset.yaml (핵심 부분)
spec:
  template:
    metadata:
      annotations:
        sidecar.istio.io/inject: "false"    # TCP 프로토콜 → Sidecar 제외
    spec:
      initContainers:
        - name: init-check
          image: "{{ .Values.postgresql.image }}"
          command: ['sh', '-c']
          args:
            - |
              if [ -f /var/lib/postgresql/data/pgdata/PG_VERSION ]; then
                echo "Database already initialized, skipping..."
              else
                echo "Fresh installation, will initialize..."
              fi
          volumeMounts:
            - name: postgresql-data
              mountPath: /var/lib/postgresql/data

      containers:
        - name: postgresql
          image: "{{ .Values.postgresql.image }}"
          env:
            - name: POSTGRES_USER
              valueFrom:
                secretKeyRef:
                  name: postgresql-secret
                  key: POSTGRES_USER
            - name: POSTGRES_PASSWORD
              valueFrom:
                secretKeyRef:
                  name: postgresql-secret
                  key: POSTGRES_PASSWORD
            - name: POSTGRES_DB
              valueFrom:
                secretKeyRef:
                  name: postgresql-secret
                  key: POSTGRES_DB
            - name: PGDATA
              value: /var/lib/postgresql/data/pgdata
          volumeMounts:
            - name: postgresql-data
              mountPath: /var/lib/postgresql/data
            - name: initdb-sql
              mountPath: /docker-entrypoint-initdb.d
              readOnly: true

          readinessProbe:
            exec:
              command: ["pg_isready", "-U", "guacamole"]
            initialDelaySeconds: 5
            periodSeconds: 5
          livenessProbe:
            exec:
              command: ["pg_isready", "-U", "guacamole"]
            initialDelaySeconds: 30
            periodSeconds: 10

      volumes:
        - name: initdb-sql
          configMap:
            name: guacamole-initdb

  volumeClaimTemplates:
    - metadata:
        name: postgresql-data
      spec:
        storageClassName: "{{ .Values.postgresql.storageClass }}"
        accessModes: ["ReadWriteOnce"]
        resources:
          requests:
            storage: "{{ .Values.postgresql.storage }}"
PGDATA 환경변수를 별도로 설정한 이유:
- PostgreSQL 공식 이미지는 마운트 포인트 루트에
lost+found디렉토리가 있으면 초기화 실패 PGDATA=/var/lib/postgresql/data/pgdata로 서브디렉토리를 지정하여 우회
4.3 Guacamole 데이터 모델
791줄의 초기화 SQL이 생성하는 핵심 테이블 구조:
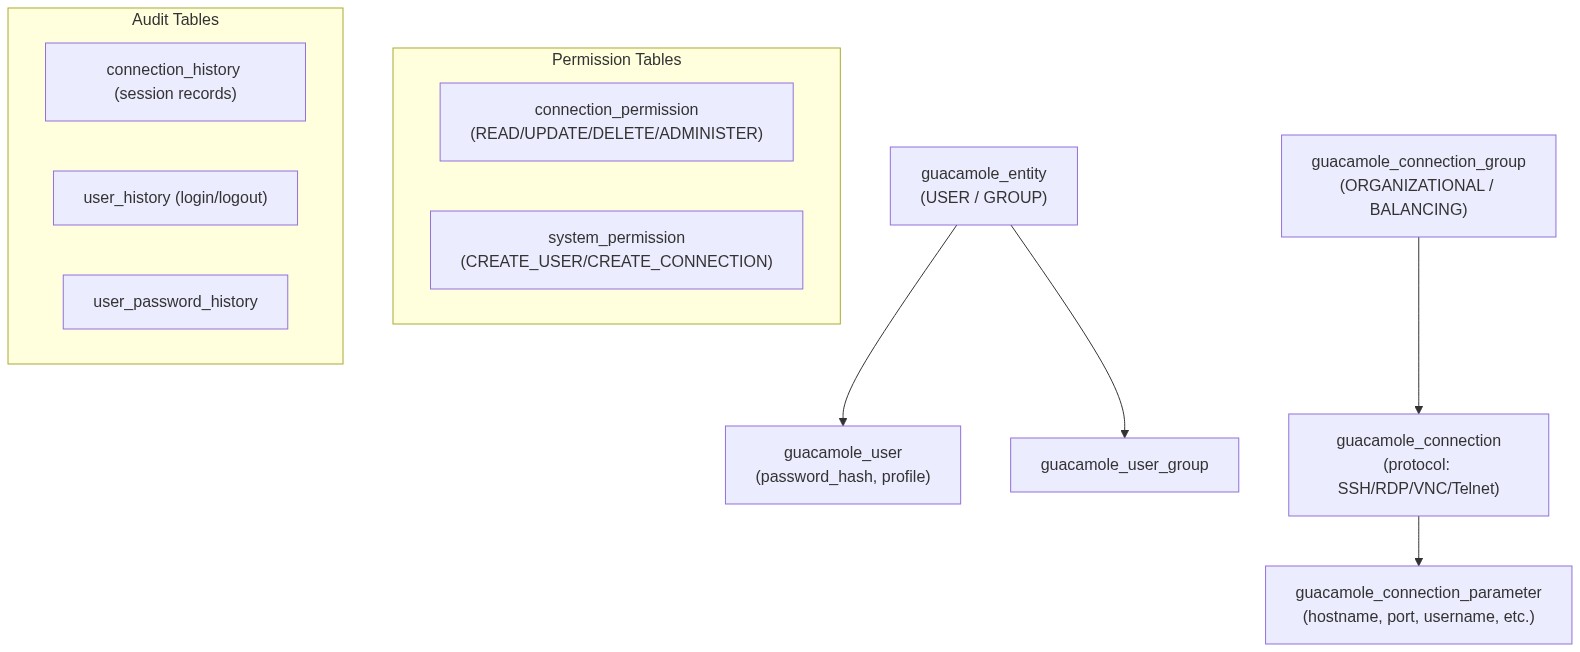
핵심 설계 포인트:
connection_group으로 커넥션을 폴더 구조로 그룹화 (IDC 서버 / VM / 개발 환경 등)BALANCING타입 그룹은 로드밸런싱 지원 (같은 역할의 서버 여러 대)connection_parameter에 프로토콜별 설정 저장 (hostname, port, username, private-key 등)- 모든 접속 이력이
connection_history에 자동 기록
4.4 guacd: 프로토콜 브릿지 데몬
guacd는 C로 작성된 고성능 프로토콜 변환 데몬입니다:
# guacd-deployment.yaml
spec:
  template:
    metadata:
      annotations:
        sidecar.istio.io/inject: "false"    # TCP 전용 → Sidecar 제외
    spec:
      containers:
        - name: guacd
          image: guacamole/guacd:1.5.5
          ports:
            - containerPort: 4822
              protocol: TCP
          readinessProbe:
            tcpSocket:
              port: 4822
            initialDelaySeconds: 5
            periodSeconds: 10
          livenessProbe:
            tcpSocket:
              port: 4822
            initialDelaySeconds: 10
            periodSeconds: 30
          resources:
            requests:
              cpu: 250m
              memory: 256Mi
            limits:
              cpu: "1"
              memory: 1Gi
Istio Sidecar를 비활성화한 이유:
guacd는 자체 바이너리 프로토콜(Guacamole Protocol)을 사용합니다. Istio의 Envoy sidecar는 이를 HTTP로 해석하려 시도하여 연결이 실패합니다. TCP 전용 서비스에는 sidecar를 주입하지 않는 것이 올바른 패턴입니다.
4.5 Guacamole 웹 애플리케이션
# guacamole-deployment.yaml
spec:
  template:
    spec:
      containers:
        - name: guacamole
          image: guacamole/guacamole:1.5.5
          ports:
            - containerPort: 8080
              name: http-guacamole    # ← 포트 이름이 중요!
          env:
            # guacd 연결 정보
            - name: GUACD_HOSTNAME
              value: "guacd.{{ .Values.namespace }}.svc.cluster.local"
            - name: GUACD_PORT
              value: "4822"
            # PostgreSQL 연결 정보
            - name: POSTGRESQL_HOSTNAME
              value: "postgresql.{{ .Values.namespace }}.svc.cluster.local"
            - name: POSTGRESQL_PORT
              value: "5432"
            - name: POSTGRESQL_DATABASE
              valueFrom:
                secretKeyRef:
                  name: postgresql-secret
                  key: POSTGRES_DB
            - name: POSTGRESQL_USER
              valueFrom:
                secretKeyRef:
                  name: postgresql-secret
                  key: POSTGRES_USER
            - name: POSTGRESQL_PASSWORD
              valueFrom:
                secretKeyRef:
                  name: postgresql-secret
                  key: POSTGRES_PASSWORD
            - name: POSTGRESQL_AUTO_CREATE_ACCOUNTS
              value: "true"
name: http-guacamole — 이 한 줄이 핵심입니다.
Istio는 Service 포트의 name 필드로 프로토콜을 판단합니다:
http-*→ HTTP/1.1로 처리 → L7 라우팅 (VirtualService) 동작- 이름 없음 또는
tcp-*→ TCP로 처리 → L4 패스스루
포트 이름을 지정하지 않으면 Istio가 TCP로 처리하여, IngressGateway에서 503 에러가 발생합니다. 이 문제는 디버깅이 매우 어렵습니다 — Pod은 정상이고, Service도 정상이고, VirtualService도 문법적으로 올바른데, 503이 반환되기 때문입니다.
4.6 Secret 관리: ServerSideApply 호환
# postgresql-secret.yaml
apiVersion: v1
kind: Secret
metadata:
  name: postgresql-secret
  namespace: {{ .Values.namespace }}
type: Opaque
data:                                        # ← stringData가 아닌 data 사용
  POSTGRES_USER: {{ .Values.postgresql.user | b64enc | quote }}
  POSTGRES_PASSWORD: {{ .Values.postgresql.password | b64enc | quote }}
  POSTGRES_DB: {{ .Values.postgresql.database | b64enc | quote }}
stringData 대신 data + b64enc를 사용한 이유:
ArgoCD의 ServerSideApply=true 옵션과 stringData를 함께 사용하면 매 sync마다 diff가 발생합니다. API Server가 stringData를 data(base64)로 변환하는데, ServerSideApply는 이 변환 결과를 "변경됨"으로 감지합니다.
4.7 Multi-Environment 배포
동일한 Helm Chart를 환경별 values로 분리합니다:
# kubernetes/staging/platform/secern-access-portal/values.yaml
namespace: secern-access-portal-staging
istioInjection: false                   # Staging: Sidecar 불필요
postgresql:
  storage: 5Gi                          # 작은 디스크
  password: "staging-password"
nodePort:
  enabled: true                         # NodePort로 접근
  port: 30888

# kubernetes/production/platform/secern-access-portal/values.yaml
namespace: secern-access-portal
postgresql:
  storage: 10Gi                         # 충분한 디스크
  password: "production-password"       # 실제로는 Vault 연동 권장
nodePort:
  enabled: false                        # Istio Gateway 사용
5. Istio 통합: HTTPS + WebSocket
5.1 TLS 인증서 자동 발급
apiVersion: cert-manager.io/v1
kind: Certificate
metadata:
  name: accessportal-tls
  namespace: istio-system          # Gateway가 참조하므로 istio-system에 생성
spec:
  secretName: accessportal-tls
  issuerRef:
    name: letsencrypt-prod
    kind: ClusterIssuer
  dnsNames:
    - accessportal.example.com
Certificate를 istio-system 네임스페이스에 생성하는 이유:
Istio IngressGateway는 istio-system에서 실행되며, Gateway의 credentialName으로 참조하는 TLS Secret도 같은 네임스페이스에 있어야 합니다.
5.2 Gateway + VirtualService
apiVersion: networking.istio.io/v1beta1
kind: Gateway
metadata:
  name: accessportal-gateway
  namespace: secern-access-portal
spec:
  selector:
    istio: ingressgateway
  servers:
    - hosts:
        - accessportal.example.com
      port:
        name: https-accessportal
        number: 443
        protocol: HTTPS
      tls:
        mode: SIMPLE
        credentialName: accessportal-tls
---
apiVersion: networking.istio.io/v1beta1
kind: VirtualService
metadata:
  name: accessportal-vs
  namespace: secern-access-portal
spec:
  hosts:
    - accessportal.example.com
  gateways:
    - accessportal-gateway
  http:
    # 1. WebSocket 터널 (Guacamole 세션)
    - match:
        - uri:
            prefix: /guacamole/websocket-tunnel
          headers:
            upgrade:
              exact: websocket
      route:
        - destination:
            host: guacamole.secern-access-portal.svc.cluster.local
            port:
              number: 8080

    # 2. REST API + Web UI
    - match:
        - uri:
            prefix: /guacamole
      route:
        - destination:
            host: guacamole.secern-access-portal.svc.cluster.local
            port:
              number: 8080
WebSocket 라우팅을 별도로 분리한 이유:
Guacamole는 두 가지 터널 방식을 지원합니다:
1. WebSocket 터널 (/guacamole/websocket-tunnel): 양방향 실시간 통신, 낮은 지연
2. HTTP 터널 (/guacamole/tunnel): 롱 폴링 기반, WebSocket 불가 환경 폴백
WebSocket 연결은 Upgrade: websocket 헤더로 시작되는 HTTP 요청입니다. Istio VirtualService에서 이 헤더를 명시적으로 매칭하여 WebSocket 트래픽을 올바르게 라우팅합니다.
주의: timeout: 0s는 사용 불가
Istio VirtualService의 timeout에 0s를 설정하면 오류가 발생합니다:
The VirtualService is invalid: spec.http[0].timeout:
Invalid value: "string": must be a valid duration greater than 1ms
WebSocket의 장시간 연결이 필요하면 timeout을 아예 설정하지 않거나(기본값: 무제한), 충분히 큰 값(예: 86400s)을 사용해야 합니다.
6. REST API를 활용한 자동 커넥션 등록
Guacamole의 REST API를 활용하면 커넥션 등록을 자동화할 수 있습니다:
6.1 인증 토큰 획득
TOKEN=$(curl -sk -X POST \
  "https://accessportal.example.com/guacamole/api/tokens" \
  -d "username=guacadmin&password=guacadmin" \
  | python3 -c "import sys,json; print(json.load(sys.stdin)['authToken'])")
6.2 SSH 커넥션 등록
API="https://accessportal.example.com/guacamole/api/session/data/postgresql/connections"

# IDC 물리 서버 등록
curl -sk -X POST "$API?token=$TOKEN" \
  -H "Content-Type: application/json" \
  -d '{
    "parentIdentifier": "ROOT",
    "name": "CP-01 (Control Plane, GPU)",
    "protocol": "ssh",
    "parameters": {
      "hostname": "x.x.x.221",
      "port": "22"
    },
    "attributes": {
      "max-connections": "5",
      "max-connections-per-user": "3"
    }
  }'
6.3 KubeVirt VM 커넥션 등록
# VM의 Pod IP 조회 후 등록
VM_IP=$(kubectl get vmi test-vm-1 -n kubevirt-test \
  -o jsonpath='{.status.interfaces[0].ipAddress}')

curl -sk -X POST "$API?token=$TOKEN" \
  -H "Content-Type: application/json" \
  -d "{
    \"parentIdentifier\": \"ROOT\",
    \"name\": \"test-vm-1 (Ubuntu VM)\",
    \"protocol\": \"ssh\",
    \"parameters\": {
      \"hostname\": \"$VM_IP\",
      \"port\": \"22\"
    },
    \"attributes\": {
      \"max-connections\": \"5\",
      \"max-connections-per-user\": \"3\"
    }
  }"
6.4 Windows RDP 커넥션 등록
WIN_IP=$(kubectl get vmi win11 -n kubevirt-test \
  -o jsonpath='{.status.interfaces[0].ipAddress}')

curl -sk -X POST "$API?token=$TOKEN" \
  -H "Content-Type: application/json" \
  -d "{
    \"parentIdentifier\": \"ROOT\",
    \"name\": \"win11 (Windows 11 VM)\",
    \"protocol\": \"rdp\",
    \"parameters\": {
      \"hostname\": \"$WIN_IP\",
      \"port\": \"3389\",
      \"security\": \"nla\",
      \"ignore-cert\": \"true\"
    },
    \"attributes\": {
      \"max-connections\": \"3\",
      \"max-connections-per-user\": \"2\"
    }
  }"
6.5 자동화 스크립트 패턴
#!/bin/bash
# register-connections.sh
# Guacamole에 모든 인프라 커넥션을 자동 등록하는 스크립트

GUAC_URL="https://accessportal.example.com/guacamole"

# 토큰 획득
get_token() {
  curl -sk -X POST "$GUAC_URL/api/tokens" \
    -d "username=$1&password=$2" \
    | python3 -c "import sys,json; print(json.load(sys.stdin)['authToken'])"
}

# SSH 커넥션 등록
register_ssh() {
  local NAME="$1" IP="$2" TOKEN="$3"
  curl -sk -X POST "$GUAC_URL/api/session/data/postgresql/connections?token=$TOKEN" \
    -H "Content-Type: application/json" \
    -d "{
      \"parentIdentifier\": \"ROOT\",
      \"name\": \"$NAME\",
      \"protocol\": \"ssh\",
      \"parameters\": {\"hostname\": \"$IP\", \"port\": \"22\"},
      \"attributes\": {\"max-connections\": \"5\", \"max-connections-per-user\": \"3\"}
    }"
}

# KubeVirt VM 자동 등록
register_kubevirt_vms() {
  local TOKEN="$1"
  # 모든 VMI의 Pod IP를 조회하여 자동 등록
  kubectl get vmi -A -o json | python3 -c "
import sys, json
vmis = json.load(sys.stdin)['items']
for vmi in vmis:
    name = vmi['metadata']['name']
    ns = vmi['metadata']['namespace']
    ip = vmi['status']['interfaces'][0]['ipAddress']
    print(f'{name},{ns},{ip}')
  " | while IFS=',' read name ns ip; do
    register_ssh "$name ($ns)" "$ip" "$TOKEN"
    echo "Registered: $name → $ip"
  done
}

# 실행
TOKEN=$(get_token "guacadmin" "guacadmin")
register_kubevirt_vms "$TOKEN"
7. 전체 트래픽 흐름
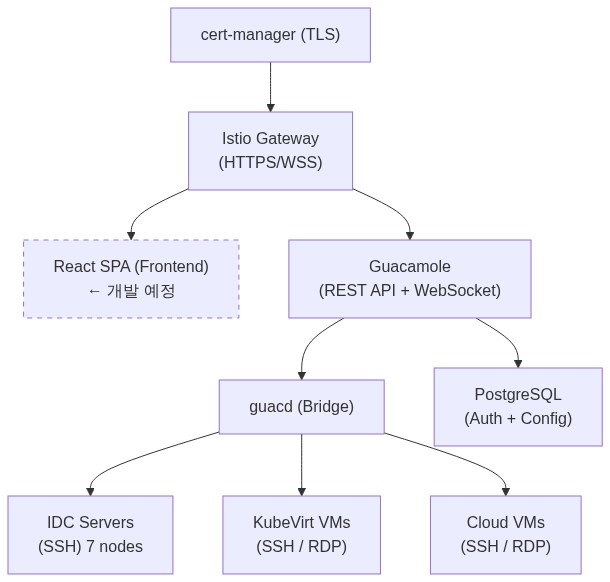
브라우저에서 KubeVirt VM에 SSH 접속하는 전체 경로:
1. 사용자 브라우저
   https://accessportal.example.com/guacamole/
   │
2. DNS 조회 (Route53 → MetalLB VIP)
   │
3. Istio IngressGateway (MetalLB VIP:443)
   │ TLS 종료 (Let's Encrypt 인증서)
   │
4. Istio VirtualService 라우팅
   │ /guacamole/* → guacamole.secern-access-portal:8080
   │
5. Guacamole Web App (Tomcat:8080)
   │ 사용자 인증 → REST API → PostgreSQL 조회
   │ WebSocket 터널 수립
   │
6. guacd (Protocol Bridge :4822)
   │ Guacamole Protocol → SSH Protocol 변환
   │
7. KubeVirt VM (Pod IP:22)
   │ virt-launcher Pod → NAT → Guest OS
   │
8. VM 내부 sshd
   │ 셸 세션 시작
   │
9. 결과: 브라우저에서 SSH 터미널 사용 가능!
8. 배포 과정에서 만난 문제들
8.1 NodePort 충돌
증상: ArgoCD Sync 실패, nodePort already allocated 에러
원인: Istio IngressGateway의 status-port가 이미 30880을 사용
해결: Staging NodePort를 30888로 변경
교훈: NodePort 할당 전 반드시 기존 사용 현황 확인
kubectl get svc -A -o jsonpath='{range .items[?(@.spec.type=="NodePort")]}{.metadata.name}{"\t"}{range .spec.ports[*]}{.nodePort}{","}{end}{"\n"}{end}'8.2 ServerSideApply + stringData 비호환
증상: ArgoCD에서 Secret이 매 sync마다 변경 감지
원인: stringData는 API Server가 data로 변환 → ServerSideApply가 diff로 감지
해결: data + b64enc 사용
# Before (문제)
stringData:
  password: mypassword

# After (해결)
data:
  password: {{ "mypassword" | b64enc }}
8.3 Istio 503 에러 (포트 이름 누락)
증상: Pod 정상, Service 정상, VirtualService 정상인데 503 반환
원인: Service 포트에 name이 없어서 Istio가 TCP로 처리 → L7 라우팅 실패
해결: name: http-guacamole 추가
ports:
  - name: http-guacamole    # http- 접두사 필수
    port: 8080
    targetPort: 8080
8.4 VirtualService timeout: 0s 무효
증상: apply 시 validation 에러
원인: Istio는 timeout 값으로 0 이하를 허용하지 않음 (최소 1ms)
해결: timeout 행 제거 (기본값: 무제한)
8.5 Namespace OutOfSync (ArgoCD)
증상: 모든 리소스가 정상인데 ArgoCD가 계속 OutOfSync 표시
원인: Helm Chart의 Namespace 템플릿과 ArgoCD의 CreateNamespace=true가 동시에 Namespace를 관리하려 시도
해결: Namespace 템플릿 제거 + CreateNamespace=true 유지 + ArgoCD tracking 어노테이션 정리
8.6 .gitignore가 Secret 템플릿 차단
증상: Secret YAML 파일이 git add되지 않음
원인: .gitignore의 *secret* 패턴이 Helm 템플릿까지 매칭
해결: git add -f 사용
git add -f kubernetes/charts/secern-access-portal/templates/postgresql-secret.yaml9. 프론트엔드 확장 계획
현재는 Guacamole 기본 UI를 사용하지만, React 기반 커스텀 프론트엔드를 개발하여 더 나은 UX를 제공할 예정입니다:
# VirtualService에 프론트엔드 라우팅 추가 (예정)
http:
  # WebSocket 터널 (기존)
  - match:
      - uri:
          prefix: /guacamole/websocket-tunnel
    route:
      - destination:
          host: guacamole:8080

  # REST API (기존)
  - match:
      - uri:
          prefix: /guacamole/api
    route:
      - destination:
          host: guacamole:8080

  # React SPA (신규)
  - match:
      - uri:
          prefix: /
    route:
      - destination:
          host: frontend.secern-access-portal.svc.cluster.local
          port:
            number: 80
커스텀 프론트엔드의 장점:
- 회사 브랜딩 적용
- 통합 대시보드 (VM 상태 + 커넥션 목록 + 모니터링 한 화면)
- LDAP/SSO 연동 인증
- 커넥션 그룹 시각화
- 세션 녹화 재생 UI
10. 아키텍처 요약
마무리
KubeVirt와 Apache Guacamole를 조합하여 다음을 달성했습니다:
- 통합 접속: 7대 물리 서버 + Ubuntu VM + Windows VM을 웹 브라우저 하나로 접속
- Zero-install: SSH 클라이언트, RDP 클라이언트, VNC 뷰어 설치 불필요
- 중앙 관리: 커넥션, 사용자, 권한을 한 곳에서 관리
- 감사 추적: 모든 접속 이력 자동 기록
- GitOps 호환: Helm Chart + ArgoCD로 완전 선언적 배포
- 보안: HTTPS (Let's Encrypt), WebSocket Secure, RBAC
핵심 기술 조합:
- KubeVirt v1.7.0 — VM을 Pod처럼 관리
- CDI v1.64.0 — 이미지 자동 임포트
- Apache Guacamole 1.5.5 — 클라이언트리스 원격 접속
- Istio — HTTPS 종료 + WebSocket 라우팅
- cert-manager — TLS 자동 발급/갱신
- PostgreSQL 16 — 커넥션/인증 데이터 저장
- ArgoCD Multi-Source — 환경별 배포 자동화
기술 스택: KubeVirt v1.7.0 | CDI v1.64.0 | Apache Guacamole 1.5.5 | guacd 1.5.5 | PostgreSQL 16 | Istio VirtualService (WebSocket) | cert-manager (DNS-01) | Helm Chart | ArgoCD Multi-Source Application | Longhorn-VM StorageClass | kubevirt-manager
