0. 머리말
리액트를 다뤄봤다면 이 글이 어느정도 이해하기 쉬울 것 같지만, 리액트를 다뤄보지 않았다면 조금 어려울 수도 있다. 여기서는 필수적인 부분, 내가 잊지 않기 위해 적는 것이며 우연히 정보가 필요해서 여기 방문하신 분들 중 이해가 가지 않는다면 황준일 개발자님 블로그를 참고하셔도 좋을 것 같다.
필자도 황준일 개발자님의 블로그를 보고 공부하였는데 정말 많은 도움이 되었다. 이것을 토대로 내 방식대로 내가 기억할 수 있도록 만든 것이다.
또한 자바스크립트의 클래스 문법이 익숙치 않은 분들은 클래스 문법을 공부하고 이 글을 읽는 것을 추천한다.
1. 필수적인 요소와 기능
우선 생각한 컴포넌트에서 최소한 필요한 것은 아래와 같다.
- state
- setState
- props
- Event 설정
- render
이 요소들을 활용하여 컴포넌트를 추상화할 것이다.
2. 컴포넌트 추상화 및 적용
export default class Component {
  $state;
  $props;
  $target;
  constructor($target, $props) {
    this.$target = $target;
    this.$props = $props;
    this.setup();
    this.render();
    this.setEvent();
  }

  setup() {}; // state 초기화
  templete() {return ``}; // 렌더링 할 HTML 반환
  componentDidMount() {}; // 렌더링 직후 수행해야 할 로직
  setEvent() {}; // 이벤트
  render() {
    this.$target.innerHTML = this.templete();
    this.componentDidMount();
  }
  setState (newState) {
    this.$state = { ...this.$state, ...newState };
    this.render(); // state가 변경되면 재렌더링 수행
  }
}
class App extends Component {
setup() {
this.$state = {
data1 : [item1, item2],
data2 : []
}
templete() {
let {data1, data2} = this.$state;
return`
<ul>
${data1.map(item => `<li>${item}</li>`).join('')}
</ul>
`
}
}
}
new App(document.querySelector('.tempDiv'), '');컴포넌트 클래스를 만들어서 추상화를 시킨다. 이후 만들어지는 컴포넌트들은 모두 컴포넌트 클래스를 상속하여 만들어진다.
그리고 컴포넌트들은 컴포넌트 클래스의 메서드를 오버라이딩하여 각 컴포넌트의 기능에 맞게 재정의 되는 방식으로 구현될 것이다. 위 코드와 같이 말이다.
3. 구상 해보기
코드의 구조를 어떻게 구상하면 좋을까?
처음 공부할 때 이 점이 제일 어려웠다. Todo App을 만들어보면서 맨땅에 헤딩해봤는데, 엉망이었다.
이번에도 간단하게 Todo App을 예로 들어보자.
3-1. 기능 구상
정말 간단한 Todo App에서 필요한 기능은 Todo 추가하는 form, TodoList를 보여주는 List, 삭제 버튼 정도만 있으면 어느 정도 구실을 할 수 있을 것 같다.
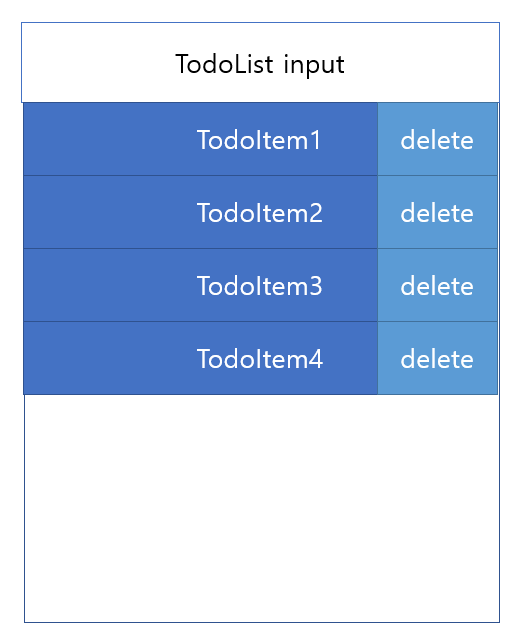
그냥 대충 이런느낌..?
3-2. 컴포넌트 구조 구상
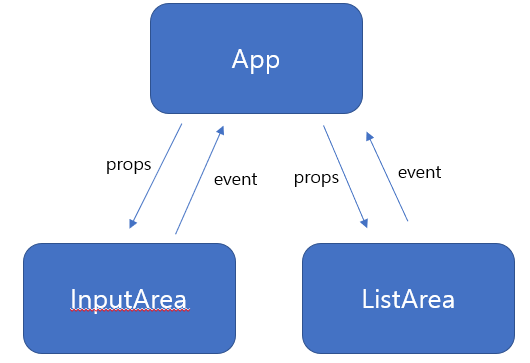
App이 전체 state를 관리하고 자식 컴포넌트에게 props를 전달하는 형태로 컴포넌트를 구상해볼 수 있겠다.
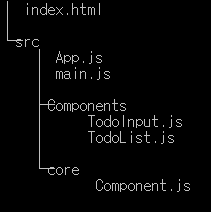
3-3. 폴더 구조 구상
-
core 폴더의 Component.js는 컴포넌트 클래스를 정의한 파일이다.
-
Components 폴더에는 각종 컴포넌트들이 들어가있으며, main.js가 js의 entry포인트이다.
-
main.js에서 App 컴포넌트를 마운트한다.
4. 구현
- index.html
<!DOCTYPE html>
<html lang="en">
<head>
    <meta charset="UTF-8">
    <meta http-equiv="X-UA-Compatible" content="IE=edge">
    <meta name="viewport" content="width=device-width, initial-scale=1.0">
    <title>Document</title>
</head>
<body>
    <div id="App"></div>
</body>
</html>- core/component.js
export default class Component {
    $state;
    $target;
    $props;

    constructor($target, $props) {
        this.$target = $target;
        this.$props = $props;
        this.setup();
        this.render();
        this.setEvent();
    }

    setup() {};
    templete() {return ``};
    componentDidMount() {};
    setEvent() {};
    render() {
        this.$target.innerHTML = this.templete();
        this.componentDidMount();
    }
}- main.js
import App from "./App.js";

/* index.html의 div에 App컴포넌트 마운트 */
new App(document.querySelector('#App')); - App.js
import Component from "./core/Component.js";
import TodoInput from "./Components/TodoInput.js";
import TodoList from "./Components/TodoList.js";
export default class App extends Component {
  /* state 초기화 */
    setup() {
        this.$state = {
            Todos:[
                {id:1, text:'마트가기'},
                {id:2, text:'쇼핑하기'},
                {id:3, text:'강아지 산책 시키기'}
        ],
        }
    }
  /* 감싸주는 태그(wrapper) HTML 작성 */
    templete() {
        return `
            <form class='InputArea'></form>
            <div class="ListArea"></div>
        `
    }
  /* 자식 컴포넌트 마운트 및 props 전달 */
    componentDidMount() {
        let { Todos } = this.$state;
        const $InputArea = this.$target.querySelector('.InputArea');
        const $ListArea = this.$target.querySelector('.ListArea');

        new TodoInput($InputArea, {
          addTodo:this.addTodo.bind(this)
        });
        new TodoList($ListArea, {
          data : Todos
        });
    }

    addTodo(value) {
        /* $state에 추가하는 로직 */
    }
📌 주의할 점!!!
App 컴포넌트에서 자신의 state를 TodoList컴포넌트에 props로 전달하고 있는데, core/Component.js를 잘못 작성하면 App.js에서 state를 참조하지 못하는 경우가 발생한다.
Component.js를 살펴보면
export default class Component {
    $state;
    $target;
    $props;

    constructor($target, $props) {
        this.$target = $target;
        this.$props = $props;
        this.setup();
        this.render();
        this.setEvent();
    }
윗 부분에서 생성자를 보면, this.setup()을 this.render()보다 먼저 실행시켰다. 이 이유는 render()가 먼저 실행된다면 state를 초기화하기도 전이기 때문에 당연히 state를 참조할 수 없고 결국 에러를 발생시킨다. 이 점을 주의해야한다.
또한 App.js에서 자식 컴포넌트에 메서드를 props로 넘겨줄 때, bind()를 사용하였는데, 왜 사용하는지 모르겠다면 bind()에 대해서 꼭 공부할 것을 권장한다.
- Components/TodoInput.js
import Component from "../core/Component";

export default class TodoInput extends Component {
    templete() {
        return`
            <input type='text' placeholder='할 일을 입력하세요'></input>
        `
    }

    setEvent() {
        let input = this.$target.querySelector('input');
        input.addEventListener('keyup', (e)=> {
            if(e.key === 'Enter') {
                this.$props.addTodo(e.target.value);
            }
        })
    }
}
위와 같이 사용하면 될 것 같다.
TodoList.js는 생략한다.