Node.js | React | MongoDB | Express (8)
Node.js | React | MongoDB | Express (8)
1. Concurrently
Concurrently
백엔드 프론트엔드 한번에 ON
다운로드
npm install concurrently --save
root directory script
"dev": "concurrently \"npm run backend\" \"npm run start --prefix client\""
2. Antd CSS Framework
Ant Design
링크
다운로드
cd client
npm install antd --save
src/index.js
import 'antd/dist/antd.css';
3. Redux
Redux
- predictable state container (상태 관리 라이브러리)
- state를 관리해주는 tool
Props vs State
react props 와 state가 있음
1) Props
- 부모 컴포넌트에 자식 컴포넌트 들어갈 수 있듯이 컴포넌트간 무언가 주고받을 때 Prop이용해야됨
- 소통방식은 부모에서 자식컴포넌트로만 보낼 수 있음
- 부모에서 자식에게 1이라는 value 주면 자식 안에서는 Props에서는 변할 수 없음
바꾸려면 부모에서 자식에게 2를 내려줘야함
<ChatMessages
  messaes = {messsages}
  currentMember = {member}
/>
2) State
- 부모에서 자식에게 주는 것이 아니라, 컴포넌트 안 데이터 교환시 state 써야함
- state는 mutable (안에서 value 변경 가능)
- state이 변하면 re-render됨
state = {
  message: '',
  attachFile: undefined,
  openMenu: false,
};
Redux X : 컴포넌트가 메세지 전달할때 계층을 하나하나 타고 올라/내려가서 전달
Redux O : 직접 전달이 가능 (훨씬 편하게 state관리 가능)
Redux Data Flow (unidirectional = 한방향)
action -> reucer -> store -(subscribe)> react component -(dispatch=action)> action
1) Action
객체
무엇이 일어났는지 설명하는 객체
{ type: 'LIKE_ARTICLE', articleId: 42 }
{ type: 'FETCH_USER_SUCCESS', response: {id: 3, name: 'Mary'} }
{ type: 'ADD_TODO', text: 'Read to the Redux docs.' }
2) Reducer
action함으로 3이 4로 변했다는 것을 설명
(previousState, action) => nextState (return값)
3) Store
어플리케이션의 state을 감싸주는 역할
Store 안 여러 Method 활용해서 State관리가능
Redux Dependency 다운로드
1) redux
2) react-redux
3) redux-promise //redux 미들웨어
4) redux-thunk //redux 미들웨어
cd client
npm install redux react-redux redux-promise redux-thunk --save
미들웨어 다운로드 이유
Store안의 state 바꾸려면 dispatch(action)이용해야하는데 action은 객체여야함
but, store에서는 객체가 아닌 promise,function형태의 메세지를 수신할수도 있음
promise // dispatch에게 promise 대처법 알려줌
thunk //dispatch에게 function 대처법 알려줌
src/index.js
import { Provider} from 'react-redux';
import 'antd/dist/antd.css';
import promiseMiddleWare from 'redux-promise';
import ReduxThunk from 'redux-thunk';
import { applyMiddleware, createStore } from 'redux';
import Reducer from './_reducers';
-------------------------------------------------------
const createStoreWithMiddleware = applyMiddleware(promiseMiddleWare, ReduxThunk)(createStore)
//promise와 function받을 수 있게
-------------------------------------------------------
ReactDOM.render(  // react를 redux로 감싸줌
  <Provider
    store={createStoreWithMiddleware(Reducer,
      window.__REDUX_DEVTOOLS_EXTENSION__&&
      window.__REDUX_DEVTOOLS_EXTENSION__()
    )}  // redux 인터넷에 연결

  </Provider>
  ,
  document.getElementById('root')
);
src _reducer 파일에 index.js 생성
import { combineReducers } from 'redux';
// import user from './user_reducer';
// state 여러개 있을 수 있어서 reducer도 나뉘어져있음
// 이 나눠진 reducer를 combineReducers이용해서 root reducer에서 하나로 합쳐줌
const rootReducer = combineReducers({
  // user, 로그인, 코멘트 등등 기능 여러개 만들건데합쳐줌
})
export default rootReducer;
redux extension 크롬 다운로드
4. React Hooks
React Component
1) Class Component
- 더 많은 기능 사용가능
- 코드 길어지고 복잡
- 성능 느려짐
2) Functional Component
- 기능 한정됨
- 코드 짧아짐
- 성능 좋아짐
react 생성 (class component 기준) -> hook도 가능해짐
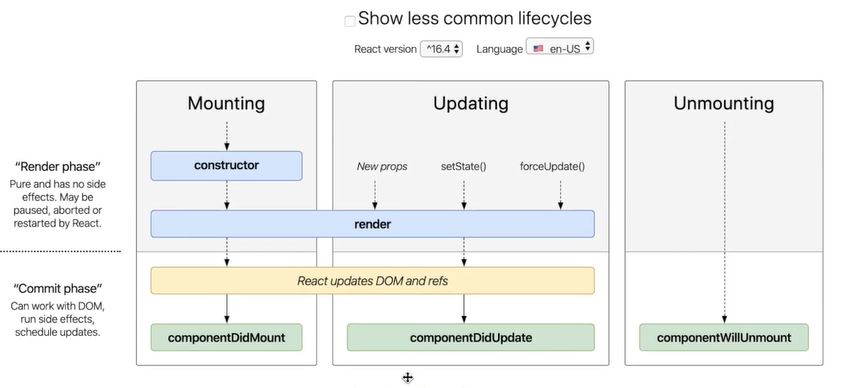
react생성 순서

a) constructor : state 부여 (this.state, name string)
b) redner : DOM에 알맞게 넣어주는 역할 (render() return)
*DOM (Document Object Model) : XML이나 HTML문서에 접근하기 위한 인터페이스 / 문서 객체모델, 문서 내의 모든 요소 정의하고 각 요소에 접근하는 방법 제공 (html-head/title/body/href/a/p)
c) componentmount : 데이터 가져오거나 보내는 등 하고싶은거 함
React Hook 이후 Class component에서 있는 것 Functional Component에서도 사용가능!
React Hooks
constructor -> useState
componentmount -> useEffect