# backend 작업일지
## git branch 분기 설정
develop-db_models: DB 설계 및 models 파일 개발/수정
develop-routes: routes, dao, service, lib 폴더 개발/수정
## git 작업방법
안전한 작업을 위해 develop branch에서 main을 pull해오고 push한다음, main에서 develop branch를 pull해온다.
위와 같은 방법이 꼭 좋은 방법은 아니다. 가능하면 main에서 바로 develop branch를 pull해오자.
### local에서 git merge하기
git merge <branch 명> 이렇게 머지하면 로컬에서 머지가 되는데 commit이 동시에 된다.
확인은 git log로 한다.


로컬에서 main으로 develop branch를 merge하고!! -> git push origin main을 하면!!! develop branch tag는 그자리에 그대로 있겠으나, branch 화살표가 main으로 향해 있을 것이다. 그다음에 아래에 있는 git 착각하기 쉬운 점에서 tag를 옮기는 방법을 참고하면 된다.
### git 착각하기 쉬운 점
branch와 tag는 다른것이다.
develop branch가 main에 pull당해도

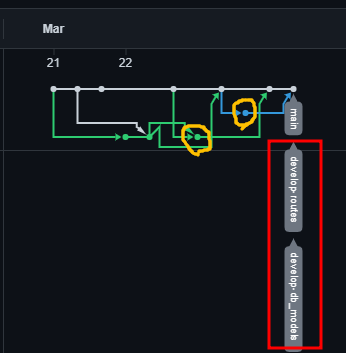
내가 tag라고 표현하는 회색 branch명 이 main과 같은 위치에 있지 아니하면, 그 해당하는 branch명의 현 위치는 main 과 같은것이 아니다. 이것을 착각하면 기껏 개발한 코드를 날릴 수가 있다.
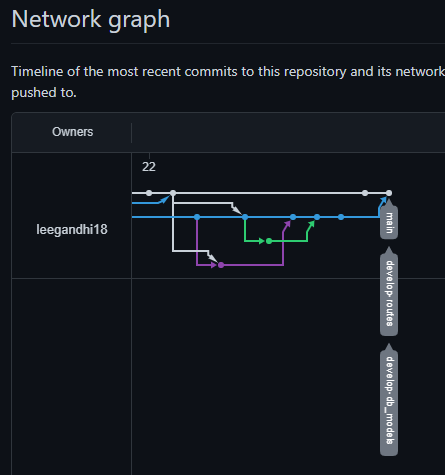
아래 캡처처럼 주황색 원있는곳에 각각 태그가 있었으나, develop branch 상태에서git checout develop-db_models -> git pull origin main을 하였고, -> 그다음에 git push origin develop-db_models 이순서로 진행했다.
중간중간 git log로 현상황을 확인해야 한다.
## git develop branch 병합 연습-1
### develop-db_models tag옮기기
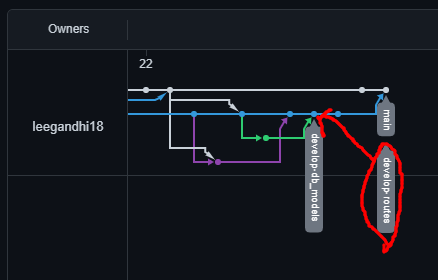
아래 사진에 표시한 것처럼 develop-routes branch는 main과 다른 위치에 있었다.
내가 원하는것은 이미 branch는 병합이 되었으니 develop-routes라 하는 tag를 main과 같은 위치로 옮기고 싶은 것이다.
아래 사진은 먼저 테스트하고 나서의 결과이다.
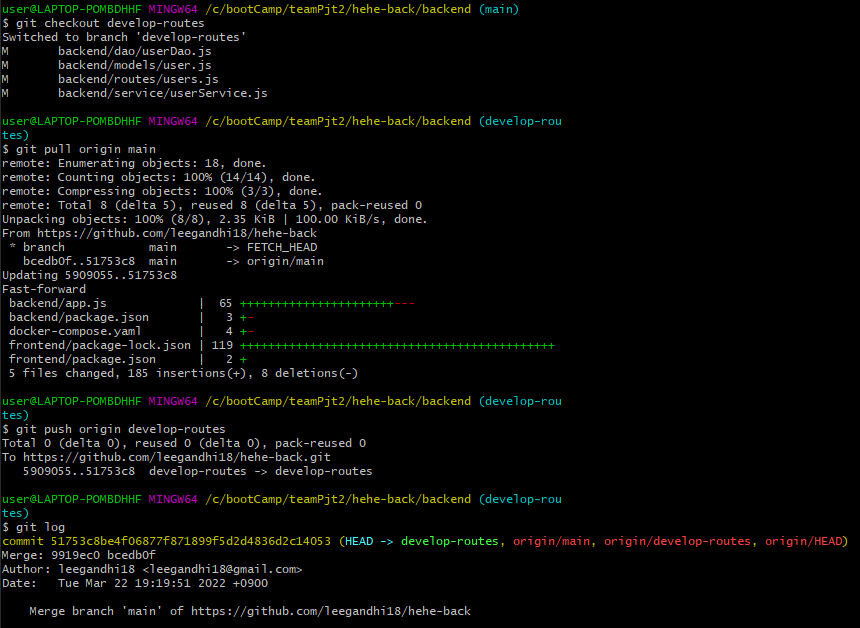
- main branch -> develop-routes으로 checkout 한뒤
- git pull origin main을 한다. network 그래프를 보면 이미 branch 자체는 main에 병합된 뒤이기 때문에 conflict가 발생하지 않을 것이다.
- Fast-forward 라는 글을 보자면 conflict없이 되었다는 것이다.
- 그래서 따로 conflict나 commit 없이도 되는 것이다.
- git push origin develop-routes 를 하게되면 tag가 main branch쪽으로 옮겨질 것이다.
- git log로 상태를 살핀다.
### develop-routes tag 옮기기
한번더 해보자 이번에는 develop-db_models branch를 옮길 것이다.
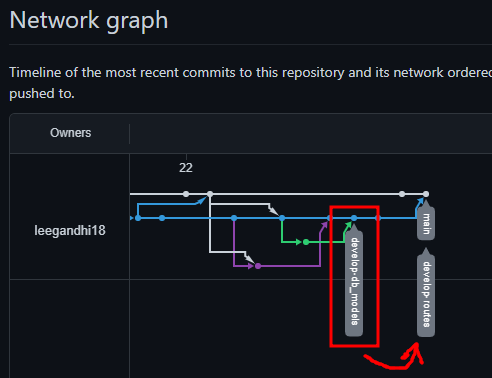
- git checkout develop-db_models
- git pull origin main
- git push origin develop-db_models
- git log


성공! 이제 다시 개발 branch에 push하면서 이력 관리를 하자
## authentication / authorization
### authentication - login
routes/auth.js - 로그인 라우터
lib/tokenUtil.js - 로그인 완료 후, client에게 jwt 형식으로 token 발행
### authorization
acess token
refresh token
cookie
session
XSS 공격
CSRF 공격
- token 지속시키는 방식 3가지
1번이 가장 간단하나 option3를 채택함이 바람직하다.
Option 1: Store your access token in localStorage : prone to XSS. // 사용하지 말아야 한다.
Option 2: Store your access token in httpOnly cookie: prone to CSRF but can be mitigated, a bit better in terms of exposure to XSS. // 이렇게 처리되면, local storage 보다는 낫다.
Option 3: Store your refresh token in httpOnly cookie: safe from CSRF, a bit better in terms of exposure to XSS.
## workStatus table 추가생성
작업지시서(작업전, 작업중 list) - 완료이력 - 중단이력
위의 4가지 data를 select 하여 list화 하여야 한다.
-
작업 상태 분류를 위한, workStatuses 테이블 추가
컬럼 명: id(PK), workStatus(Unique)
'0' : beforeWorking - 작업 전,
'1' : working - 작업 중,
'2' : finishingWork - 작업 완료,
'3' : emoWork - 작업 중단 -
orders 테이블에 workStatus 컬럼 추가 (FK)
작업현황 page에서 '작업지시서 등록'하면 workStatus = 0 (default)
'작업시작' 버튼 누르면 workStatus = 1
'작업완료' 버튼 누르면 workStatus = 2
'작업중단' 버튼 누르면 workStatus = 3 -
완료이력 page list 출력 시, workStatus(작업 상태) 컬럼 추가
## 시계열 DBMS(influxdb) 연동
설비를 모니터링하고 제어하기 위해 설비 데이터를 수집해야한다.
우리가 사용하는 edukit은 시계열 데이터베이스를 이용하는 것이 합리적으로 판단하여(팀원과 의논한 결과) influxDB를 사용하기로 하였다.
- db 연동 순서
설비 -> plc -> (edge)mosquitto -> mqtt -> server(backend) -> influxdb
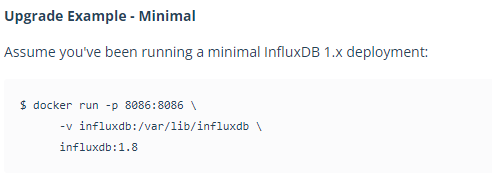
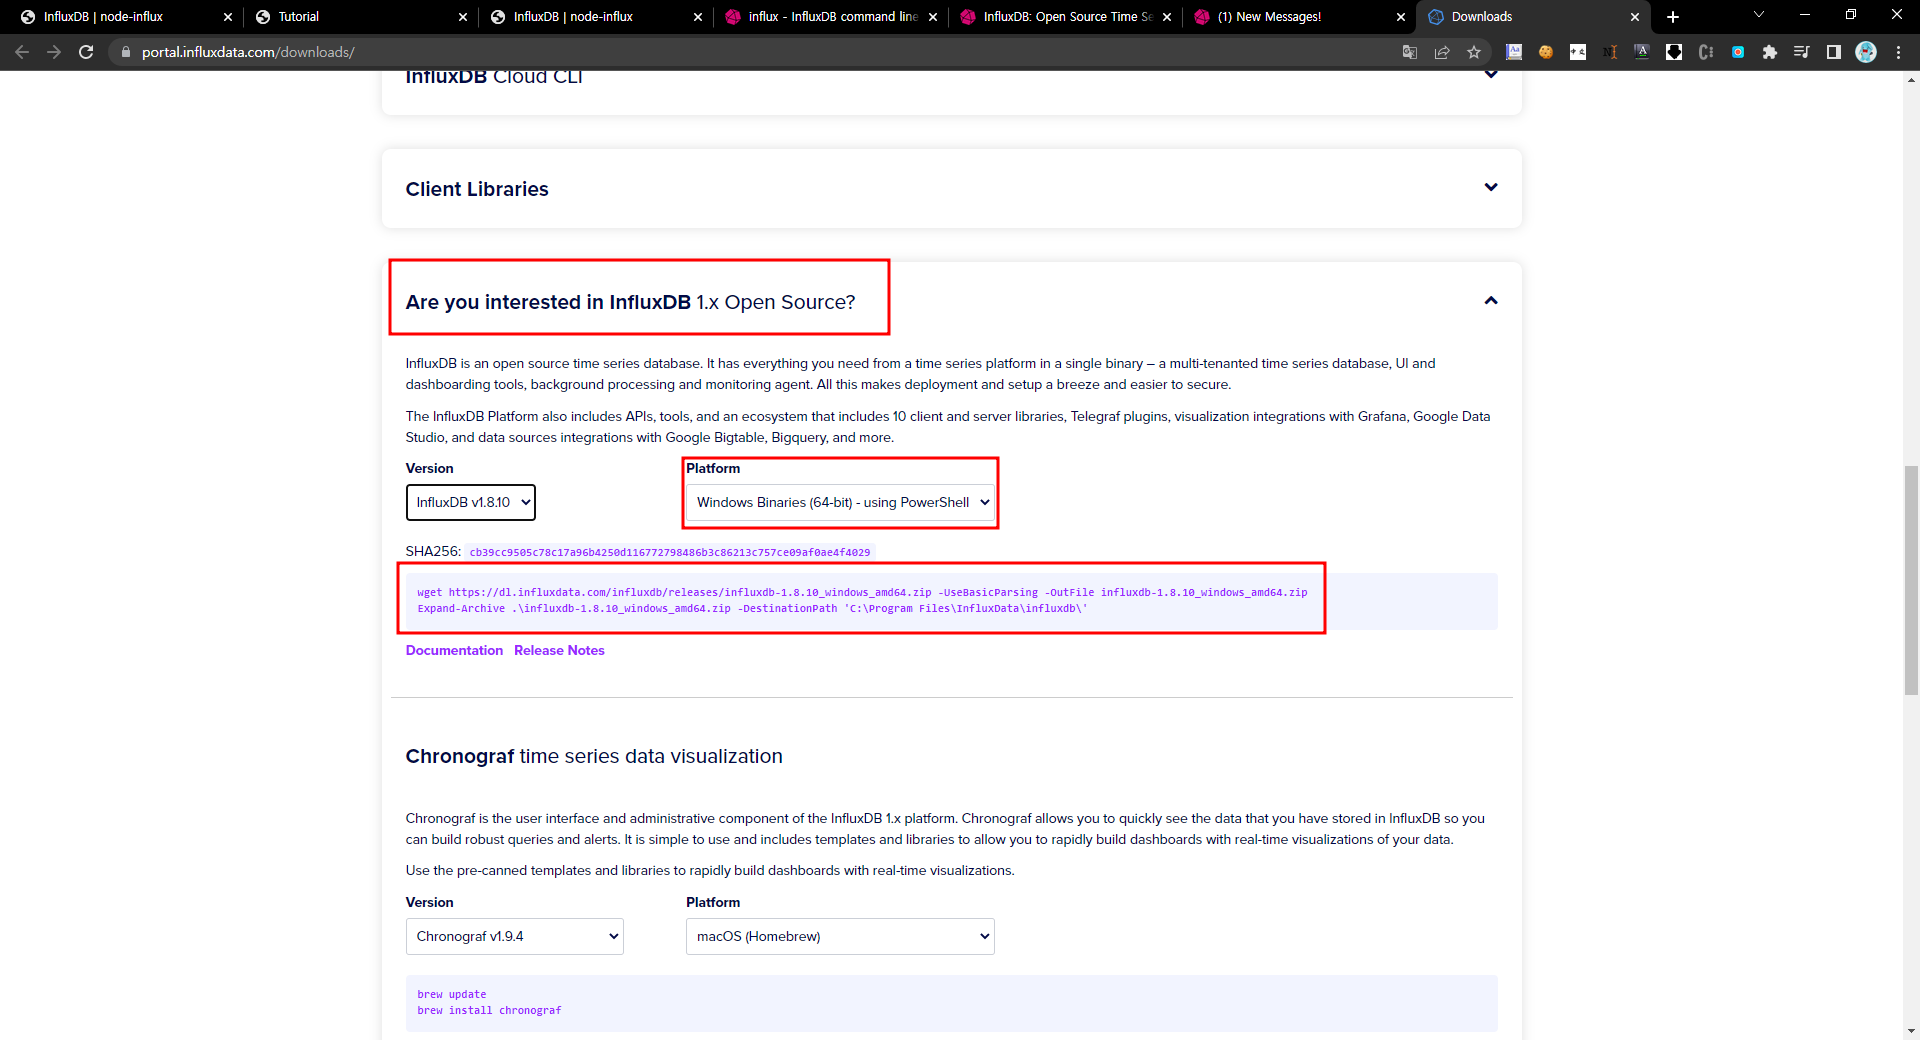
### influxdb 사용 방법-1 실행파일
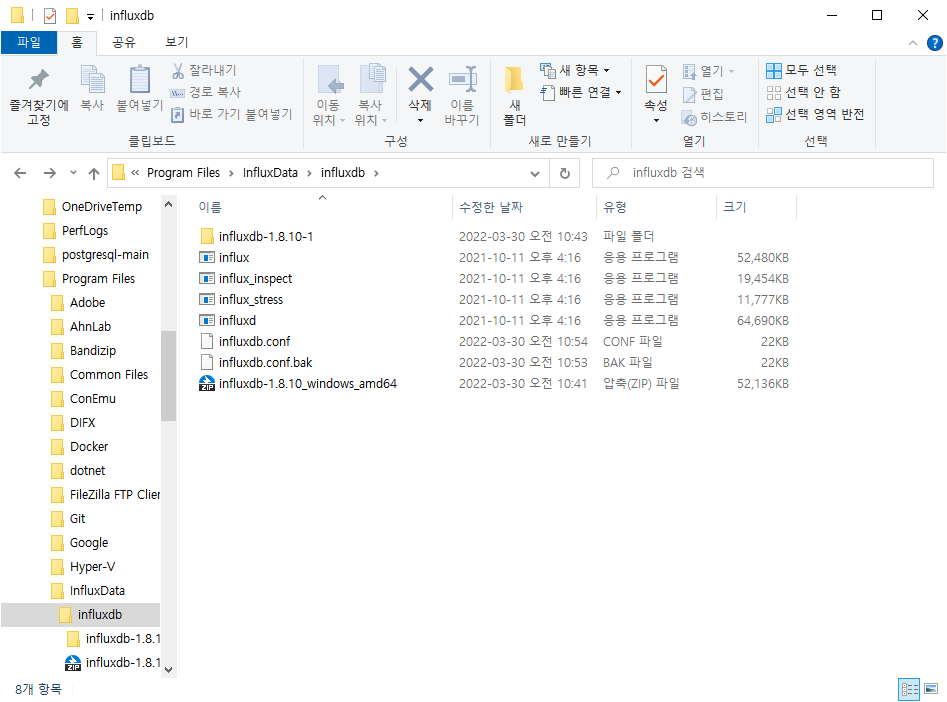
- influxdb 다운로드
사진의 파일을 cli로 다운받고 압축을 해제하면 해당위치에 폴더 사진과 같은 파일들이 나온다.

- influxdb 설치 및 실행
cli에서 influxdb.exe실행하면 설치 완료되었다고 따로 뜨진않는다.
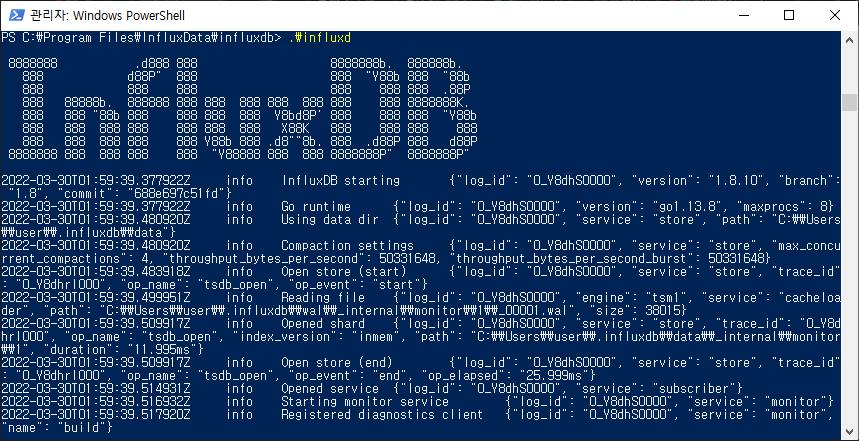
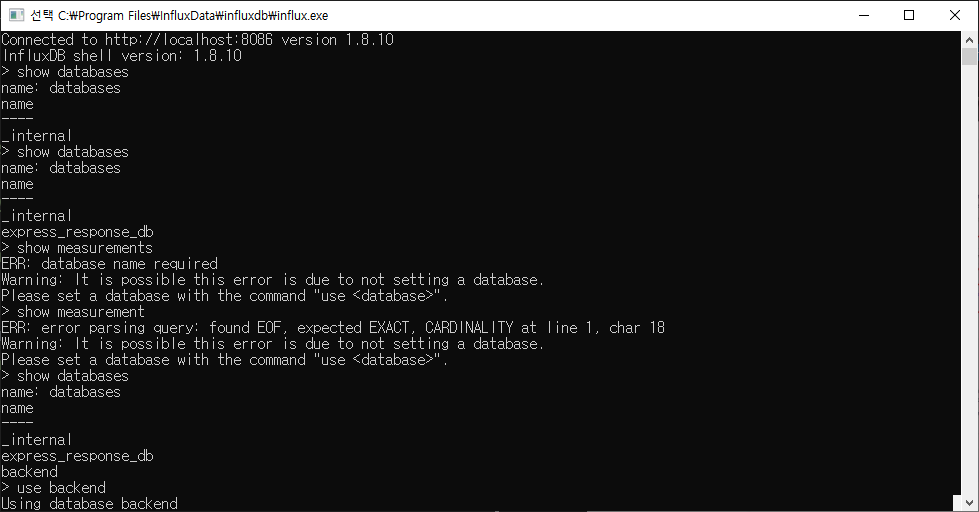
그 상태에서 나가지말고 새 cmd에서 cli로 influx.exe를 실행시키면 db를 cli로 사용가능하다.
여기서 query를 하자

### influxdb 사용 방법-2 docker-compose
- 사용방법
docker-compose up -d
cp 명령어를 사용하여 influxdb.conf파일을 influx image내부에서 꺼내와야 한다.
아무래도 ...custom...인것을 보아 특수상황인경우에 사용하는 것으로 보인다.(아니면 내가 방법을 모르거나)
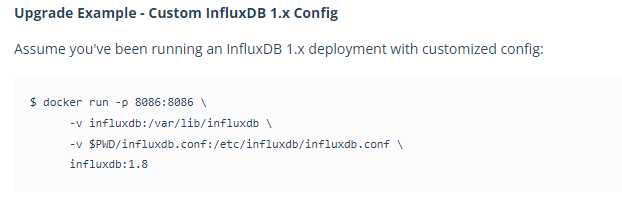
복사까지 완료하면 docker-compose up -d를 했을 때, 아래처럼 설정대로 data, meta, wal폴더가 생성된다.
이상태가 되면 이제 influxdb와 연동이 된 것이다.
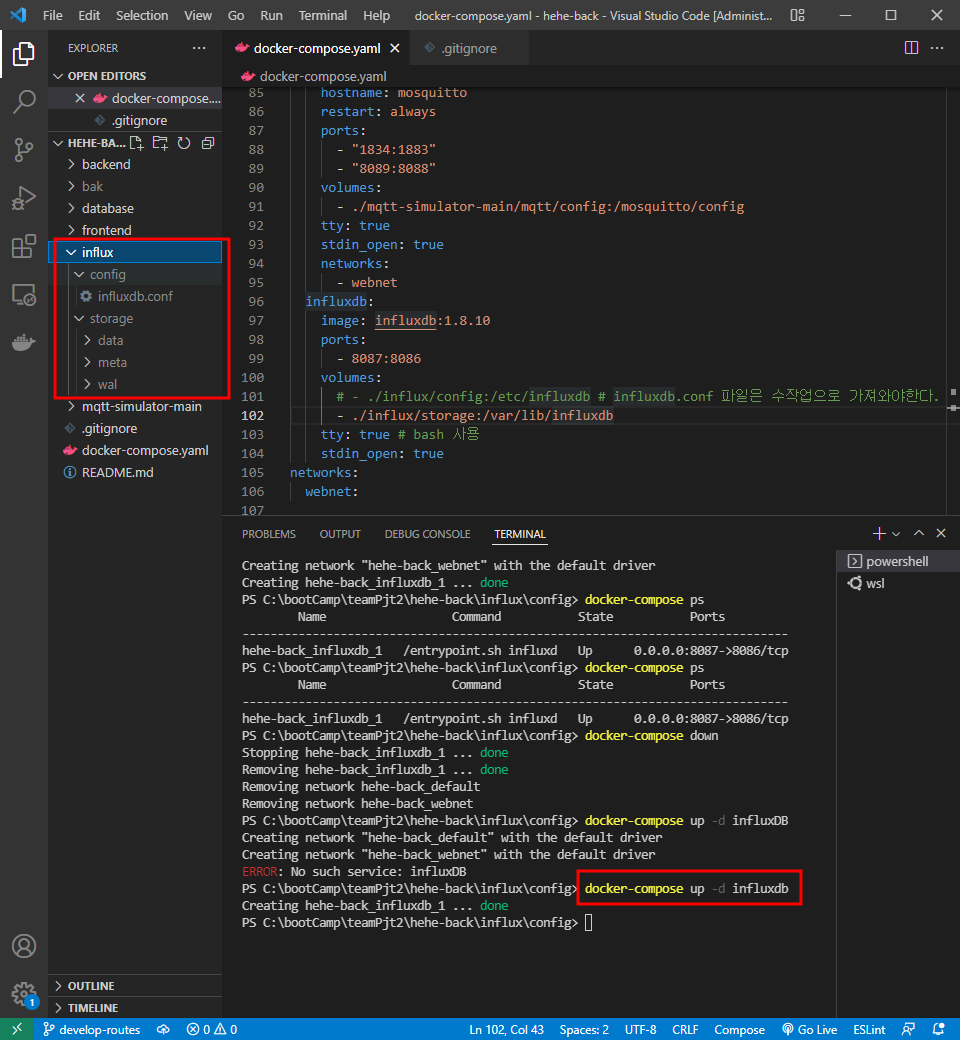
docker-compose.yaml
version: '3.9'
services:
  influxdb:
    image: influxdb:1.8.10
    ports:
      - 8087:8086 # default 설정 8086이나 테스트위해 8086을 로컬 influxdb로 띄웠기 때문에 8087을 사용한다.
    volumes:
      # - ./influx/config:/etc/influxdb # influxdb.conf 파일은 수작업으로 가져와야한다.
      - ./influx/storage:/var/lib/influxdb
    tty: true # bash 사용
    stdin_open: true
networks:
  webnet:

# docker-compose up -d 	// 서비스 실행
# docker-compose ps 		 // 서비스 실행 상태 확인
# docker-compose exec simulator-server npm i 	// 시뮬레이터 서버 npm 모듈 설치
# docker-compose exec simulator-server npm run docker // 시뮬레이터 서버 실행
# mqttbox를 이용하여 테스트
### node.js와 influxdb 연동 방법
참조:influx tutorials
참조:node-influx(new InfluxDB)에 관하여
-
mqtt 연동하여 데이터를 받아온다.
on이벤트로 데이터를 수집한다. -
new InfluxDB()로 연결 옵션 집합을 지정하여 단일 InfluxDB 인스턴스에 연결한다.
-
.getDatabaseNames()로 data 존재를 확인한뒤(query: show databases)
없으면 createDatabase()로 data를 생성한다. -
writePoints()로 가공완료한 데이터를 입력한다.(query: insert <measurement명>,<tag키>=<tag값>,<tag키1>=<tag값1> <fields키>=<fields값>,<fields키1>=<fields값1> <옵션>
-
node.js에서 data를 입력할때, 객체형으로 가공하애야 한다.
const <tag용 객체 변수> = {
  <tag키>: <tag값>
    ...
}

const <fields용 객체 변수> = {
  <fields키>: <fields값>
    ...
}
위의 상태에서 node.js와 연동이 가능하다.
subscrib.js 파일에 테스트용으로 설정하였다.
const express = require('express');
const http = require('http');

const mqtt = require('mqtt');
const Influx = require('influx');

const app = express();

// const client = mqtt.connect('mqtt://220.90.129.47:1883');
const client = mqtt.connect('mqtt://220.90.129.60:1883');
// const client = mqtt.connect('mqtt://localhost'); // 나홀로 test용
client.subscribe('#');

// Connect to a single InfluxDB instance by specifying a set of connection options.
const influx = new Influx.InfluxDB({
  // host: 'hehe-back_influxdb_1',
  host: 'localhost',
  port: '8087',
  database: 'backend',
  schema: [
    {
      measurement: 'plcdata',
      fields: {
        // DataTime: Influx.FieldType.DataTime,
        Start: Influx.FieldType.BOOLEAN,
        No1PartsError: Influx.FieldType.BOOLEAN,
        No1_Action: Influx.FieldType.BOOLEAN,
        No2_Action: Influx.FieldType.BOOLEAN,
        No3Ready: Influx.FieldType.BOOLEAN,
        ColorSensor: Influx.FieldType.BOOLEAN,
        VisionSensor: Influx.FieldType.INTEGER,
        Reset: Influx.FieldType.BOOLEAN,
        no1_on_off: Influx.FieldType.BOOLEAN,
        no2_on_off: Influx.FieldType.BOOLEAN,
        no3_on_off: Influx.FieldType.BOOLEAN,
        sensor1_on_off: Influx.FieldType.BOOLEAN,
        sensor2_on_off: Influx.FieldType.BOOLEAN,
        No1Delay: Influx.FieldType.INTEGER,
        No1Count: Influx.FieldType.INTEGER,
        No2Count: Influx.FieldType.INTEGER,
        No3Count: Influx.FieldType.INTEGER,
        lamp_green: Influx.FieldType.BOOLEAN,
        lamp_yellow: Influx.FieldType.BOOLEAN,
        lamp_red: Influx.FieldType.BOOLEAN,
        No3Motor1: Influx.FieldType.INTEGER,
        No3Motor2: Influx.FieldType.INTEGER,
        No1ChipFull: Influx.FieldType.BOOLEAN,
        No2Chip: Influx.FieldType.BOOLEAN,
        No2CubeFull: Influx.FieldType.BOOLEAN,
        No2InPoint: Influx.FieldType.BOOLEAN,
        No2OutPoint: Influx.FieldType.BOOLEAN,
        No2Sol: Influx.FieldType.BOOLEAN,
        No2SolAction: Influx.FieldType.BOOLEAN,
        No2BackToSquare: Influx.FieldType.BOOLEAN,
        No2Mode: Influx.FieldType.BOOLEAN,
        No3Chip: Influx.FieldType.BOOLEAN,
        VisionCmdMemory: Influx.FieldType.BOOLEAN,
        No3DiceReading: Influx.FieldType.INTEGER,
        Emergency: Influx.FieldType.BOOLEAN,
        OutputLimit: Influx.FieldType.INTEGER,
        DiceValue: Influx.FieldType.INTEGER,
        DiceComparisonValue: Influx.FieldType.INTEGER,
        ColorSensorSensing: Influx.FieldType.BOOLEAN,
        No3Gripper: Influx.FieldType.BOOLEAN,
      },
      tags: ['DataTime'],
    },
  ],
});

influx
  .getDatabaseNames()
// eslint-disable-next-line consistent-return
  .then((names) => {
    if (!names.includes('backend')) {
      console.log(`My database names are: ${names.join(', ')}`);
      console.log('there is no database');
      return influx.createDatabase('backend');
    }
  })
  /* .then(() => {
    http.createServer(app).listen(3000, () => {
      // console.log(`My database names are2: ${names.join(', ')}`);
      console.log('Listening on port 3000');
    });
  }) */
  .catch((err) => {
    console.error('Error creating Influx database!');
    console.log(({ err }));
  });

client.on('message', (topic, payload) => {
  console.log(`0: ${topic}: ${payload}`);
  // console.log(`1: ${topic}: ${JSON.stringify(payload)}`);
  // console.log(`2: ${topic}: ${JSON.parse(payload).tags}`);
  // console.log(`3: ${topic}: ${JSON.parse(payload).Wrapper}`);
  // console.log(`4: ${topic}: ${JSON.parse(payload).Wrapper[1].tagId}`);
  // console.log(`5: ${topic}: ${JSON.parse(payload).Wrapper[1].name}`);

  const keys = [];
  const values = [];
  let tags = {};
  let fields = {};

  for (let i = 0; i < JSON.parse(payload).Wrapper.length; i += 1) {
    keys[i] = JSON.parse(payload).Wrapper[i].name;
    values[i] = JSON.parse(payload).Wrapper[i].value;
    console.log(i, JSON.parse(payload).Wrapper.length, keys[i], values[i]);
  }
  console.log('keys: ', keys);
  console.log('values: ', values);

  for (let i = 0; i < keys.length; i += 1) {
    if (keys[i] === 'DataTime') {
      tags = {
        [keys[i]]: values[i],
      };
    } else {
      fields = {
        ...fields,
        [keys[i]]: values[i],
      };
    }
    console.log(i, keys.length);
    console.log('tags: ', tags);
    console.log('fields: ', fields);
  }

  influx.writePoints([
    {
      measurement: 'plcdata',
      tags,
      fields,
    },
  ], {
    // database: 'backend',
    // retentionPolicy: '1d',
    precision: 's', // 정밀도 (s)초
  }).catch((error) => {
    console.error(`Error saving data to InfluxDB! ${error.stack}`);
  });
});
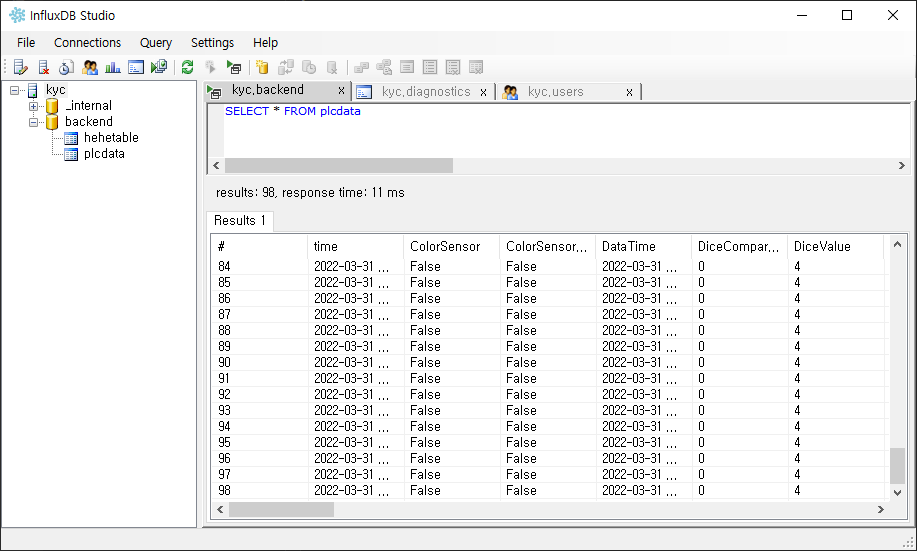
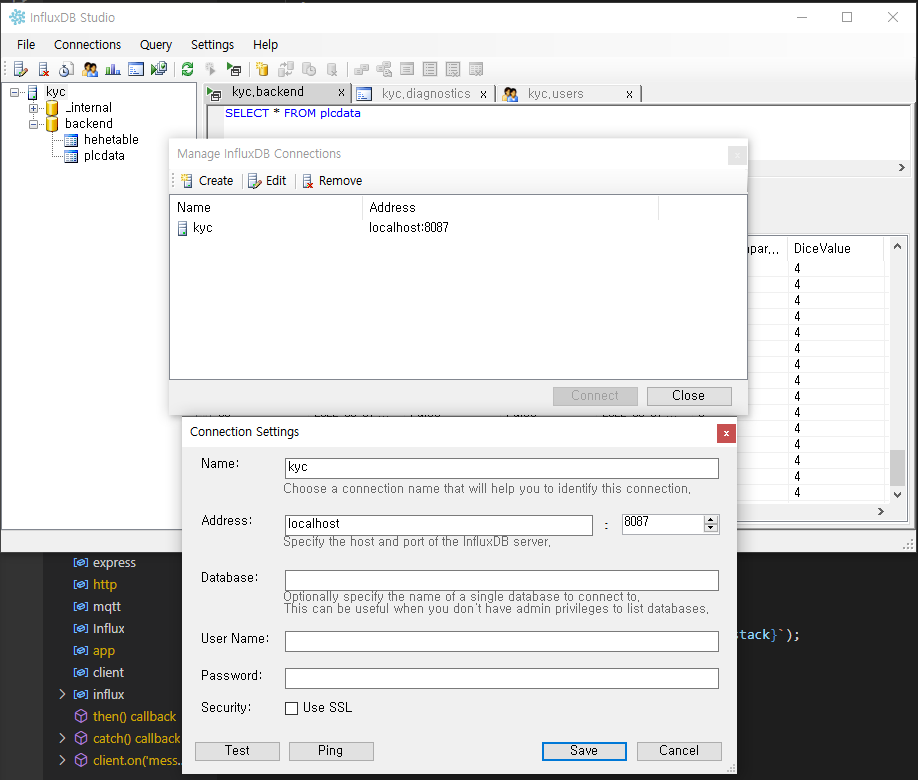
### influxdb data확인
query: select*from <measuerment명>

UI사용 방법
influxDB studio 프로그램을 사용하여 확인가능
## MQTT Sub을 통한 PLC Write 해결 방법
2조 멘토링 관련 - Sub 을 통한 PLC Write
- 먼저 선행적으로 MQTT Sub 을 위한 코드 추가는 다음과 같다
//네임스페이스추가(설치해야함)
using uPLibrary.Networking.M2Mqtt;
using uPLibrary.Networking.M2Mqtt.Messages;
//전역으로 클래스선언
MqttClient client;
string clientId;
//MQTT 브로커와 연결하는 부분
string BrokerAddress = "broker.mqtt-dashboard.com";
client = new MqttClient(BrokerAddress);
// register a callback-function (we have to implement, see below) which is called by the library when a message was received
client.MqttMsgPublishReceived += client_MqttMsgPublishReceived;
// use a unique id as client id, each time we start the application
clientId = Guid.NewGuid().ToString();
client.Connect(clientId);
//MQTT이벤트 핸들러
void client_MqttMsgPublishReceived(object sender, MqttMsgPublishEventArgs e)
    {

        string ReceivedMessage = Encoding.UTF8.GetString(e.Message);

        Console.WriteLine(ReceivedMessage);

        //DO SOMETHING..!

    }
//Subscribe Topic 추가
client.Subscribe(new string[] { Topic }, new byte[] { 0 }); // we need arrays as parameters because we can subscribe to different topics with one call
- 한데 기존의 edukit code 는 Socket 통신으로 write 가 되도록 되어 있다.
97 라인은 소켓 통신이 끊겼을때 다시 통신 하는 코드
106, 108 라인은 서버에서 샌드 데이터를 받아들이는 펑션이 구성되고 있다
그리고 데이터를 받아들였을때 113 번의 dynamic test 데이터를 통해
115 번 라인으로 돌아가도록 되어 있음
[](https://velog.velcdn.com/images/ansunny1170/post/0bddfdbe-a22a-49b3-b737-425b56d2d0fb/image.png)
]((https://velog.velcdn.com/images/ansunny1170/post/0bddfdbe-a22a-49b3-b737-425b56d2d0fb/image.png))
-
MQTT 를 통한 해결책
1번에서의 Do someting 영역에 111번 라인부터 넣으면 PLC 어드레스에서 기반한 커넥션이 이루어 진후 test 대신 dynamic ReceivedMessage 를 통해 MQTT 리시브 데이터를 전달하고 이를 tagid 와 Value 항목을 통해 전달하여 라이팅 되도록 구성
즉 111 ~ 226번 라인을 //DO SOMETHING..! 에 넣을 것!!
# 어려운점
## fk 설정 시, unique 설정 필요
안하면 아래와 같은 에러가 발생함
Sequelize sync error 참조되는 <table> 테이블을 위한 주어진 키와 일치하는 고유, 제약 조건이 없습니다.

## subquery 작성
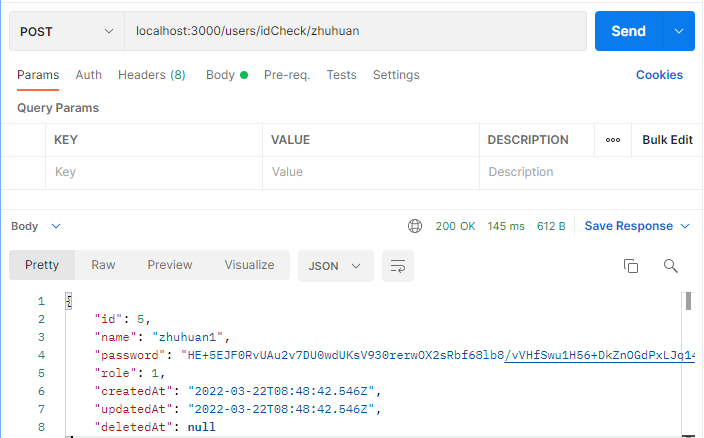
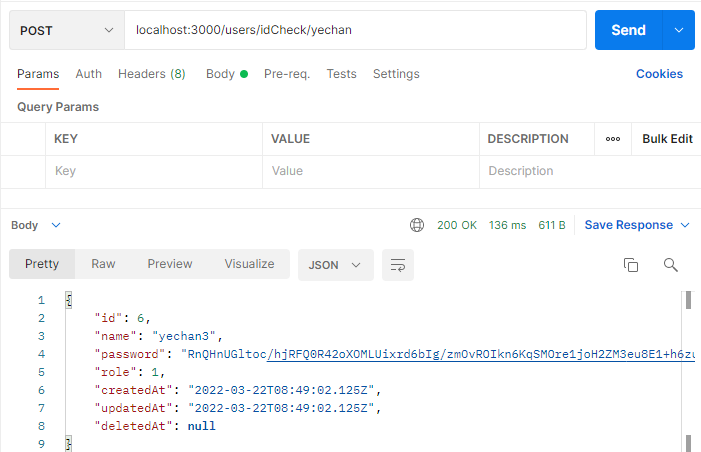
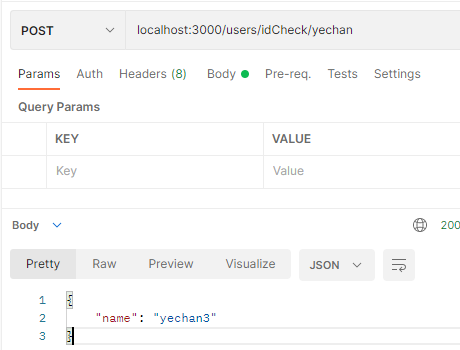
- 아래는 현재 users table의 data다.

내가 원하는 기능은, 관리자가 작업자를 최초 등록할 때, 이름 = 아이디로 사용할 것인데, 동명이인에게는 순서대로 이름 + 숫자의 규칙으로 아이디를 부여할 것이다.
홍길동 -> 홍길동1 -> 홍길동2 -> ...
이렇게 하기위해서는 db상에서 중복된 아이디 체크를 하면 되겠지만, 더좋은 방법은 해당이름으로 등록된 아이디 중에 가장 큰 숫자로(가장 최근에) 등록된 아이디를 찾아내면 되는 것이다.
내가 생각한 방법은 from에 subquery를 사용하여 name중에 원하는 이름%에 해당하는 table로 추려 거기서 가장 큰값의 id에 해당하는 row 하나를 읽어오는 것이다.

여기서 주의할 점은 postrgresql에서 subquery를 사용할 때 alias는 필수라고 한다.
가장 큰 문제는 subquery를 sequelize에서 어떻게 표현하는가 이다. 찬찬히 읽어봐야 겠으나, 공식사이트에도 관련애용이 풍부하지는 않다.
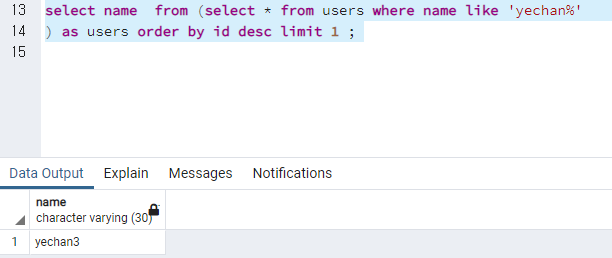
### 해법
- sequelize에서
findOne()함수를 사용하여LIMIT 1의 효과를 주었고, - WHERE 조건문으로 먼저
name col에서like로 원하는 이름을 간추렸다. 여기서 User.like는 안되고 [Op.like]만 되는 문제는 확인해야 한다. - 마지막으로
order문으로 id를 기준으로DESC조건을 주었다.
결과적으로 원하는 이름으로 등록된 DATA중에 가장 최근에 등록된(가장 높은 숫자를 가진) 아이디 값을 가져올 수 있게 되었다.
  idOverlabCheck(params) {
    return new Promise((resolve, reject) => {
      User.findOne({
        where: { name: { [Op.like]: `${params.name}%` } },
        order: [['id', 'DESC']],
      })
        .then((idCehckResult) => {
          resolve(idCehckResult);
        }).catch((err) => {
          reject(err);
        });
    });
  },
};
※가장 좋은것은 sequelize에서 데이터를 받을 때, row가 아닌 id max값에 해당하는 name col값만 받아오면 되는 것이다...
아래 사진처럼 하면 되는데 이건 또 sequelize에서 어떻게 표현 할 수 있을까?
  idOverlabCheck(params) {
    return new Promise((resolve, reject) => {
      User.findOne({
        where: { name: { [Op.like]: `${params.name}%` } },
        order: [['id', 'DESC']],
        attributes: ['name'] // 이렇게 하면 내가 원했던 col만 출력할 수 있다.
        // attributes: ['name', 'alias_name'], // alias를 넣고 싶다면!
      })
        .then((idCehckResult) => {
          resolve(idCehckResult);
        }).catch((err) => {
          reject(err);
        });
    });
  },
## node.js사용하여 influxdb 연동
node.js사용하여 influx연동하는 기술 blog정보가 매우 적다(한국에선)
대부분 mqtt-telegraf-influxdb 순서로 연결을 하였으며 그 것도 node.js를 사용하지 않은 상태였다.
influxdb2.0부터는 달라진점도 더러있어 적용이 더욱 힘들었다.
node.js를 사용하여 influxdb에 연동한 사례는 해외사이트에 자료가 있었는데 대략 5개정도 참고할 수 있는 것을 찾았다.
해당 소스를 통해 influxdb node.js 연동 코드를 연구하였고, 준비해 놓을 수 있었다.
가장 큰 문제는 influxdb의 실행이었다. 방법은 일반 실행파일을 이용하여 실행하는 것과 docker 시스템을 이용하여 porting하는 것이다. 내가 찾은 방법들은 모두 docker파일과 ui를 이용하는 것들 뿐이었고, docker-compose.yaml파일을 사용하는 것은 없었다.
또한 influx1.x와 influx2.x는 차이가 커서 이것도 문제가 많았다.
나는 influx1.8.1을 선택하였다.
작성한 연동 코드와 docker파일 중 어느것도 문제가 없는지 확신할 수 없었기에, 방향을 돌려 실행파일을 이용해보았다.
- google에 influxdb 검색하고 맨 아래 사진에 있는 download cli로 압축 파일을 다운로드 한다.
자세한 설명은 본 게시글 위에 있다.
참조에 도움이 되었던 사이트를 기재하겠다.
참조:
node-influx
node-influx-tutorial
node 명령문, keyword 참조
node-quant - github
influxdb-nodejs - github
mqtt-influxdb-bridge - github
node-infux - github
influxdb-image - docker
MQTT to InfluxDB
influxdb studio, influxdb ui - github
docker-compose.yaml 파일 경로에서
docker-compose 명령어를 사용할 수 있음.
- docker-compose up -d <서비스 이름 or empty> -> 백그라운드에서 서비스 실행
- docker-compose logs <서비스 이름 or empty> -> 서비스에 로그를 확인가능
- docker-compose ps -> 서비스 목록
- docker-compose exec <서비스 이름> <명령어> -> 서비스에 명령 전달
- docker-compose down
- docker-compose restart
## sequelize subquery 설정
query문 예제
update items
set quantity = (select quantity from items where id =1) - 5
where id = 1;
sequelize문 예제
Item.update(
        {
          quantity: Item.findOne({
      where: { name: params.name },
      attributes: ['quantity'],
    }) - 5,
        },
        {
          where: { name: params.name },
        },
      )
이렇게 할경우 문제가 있는데
Item.findOne... 으로 하면 최종 return되는 값은
Promise { undefined } 이거나
Promise { Item { dataValues { quantity {.... 이러한 값이거나
Promise { } 으로 받아진다.
.then을 붙여서 resolve해서 받아도 똑같다.