프로젝트를 진행할 때 멘토님께서 '테스트 코드도 작성해보세요~' 말씀하셨는데, 테스트 코드까지 작성할 여력은 없다고 판단해 그냥 지나갔었다. 그에 대한 아쉬움이 남아 최근에 TDD 강의를 듣기 시작했다.
재밌네.. 테스트...?🥹
Jest 설치
npm install --save-dev jest자세한 설정은 공식문서 참고
watch 명령어 사용
//package.json 파일의 script 부분

"scripts": {
    "test": "jest --watch"
  },
watch를 사용하면 git에 커밋되지 않은, 수정된 파일 존재할 때 그 파일의 테스트를 추적(?)한다.
(계속해서 npm test를 해줄 필요가 없음)
만약 모든 파일이 커밋되어 있으면 npm test 시 "No tests found related to files changed since last commit"과 같은 문구가 뜸.
watchAll이라는 명령어도 존재하는데, 모든 테스트 코드를 계속해서 추적한다.
만약 테스트 코드 양이 많아진다면 부하가 올 수 있으니 필요할 때 사용하는 게 좋을듯.
Matchers
expect
The expect function is used every time you want to test a value. You will rarely call expect by itself. Instead, you will use expect along with a "matcher" function to assert something about a value. 공식문서
.toBe()
특정 값이 되어야 한다, 정도의 뜻으로 이해하면 됨.
expect().not.toBe() 처럼 not을 붙이면 반대의 결과를 검증한다.
.toEqual()
값이 아니라 객체인 값과 동일한지 비교하기 위해서는 toEqual을 사용함.
그 외 matchers
toBeNullmatches only null
toBeUndefinedmatches only undefined
toBeDefinedis the opposite of toBeUndefined
toBeTruthymatches anything that an if statement treats as true
toBeFalsymatches anything that an if statement treats as false
등등이 있음.
에러 코드 테스트
만약 add라는 함수의 결과값이 10보다 클 때 에러를 뿜도록 되어있다면
function add(a, b) {
  if (a + b >= 10) {
    throw new Error("this is not possible");
  }
  return a + b;
}

module.exports = add;
테스트 코드를 작성할 때 toThrow를 이용할 수 있다.
test("greater than 10", () => {
  expect(() => {
    add(2, 8);
  }).toThrow("this is not possible");
});
toThrow를 사용할 때 주의점 : You must wrap the code in a function, otherwise the error will not be caught and the assertion will fail.
위 코드에서도 expect 속에 그냥 바로 함수를 넣는 게 아니라 화살표 함수로 감싸주었음.
describe, it
- describe를 이용하면 여러 테스트 코드를 묶어서 작성할 수 있다.
- it은 Caltulator 테스트를 가리치는 삼인칭이라고 생각하면 됨.
describe("Calculator", () => {
  let cal;
  beforeEach(() => {
    cal = new Calculator();
  });

  it("inits with 0", () => {
    expect(cal.value).toBe(0);
  });

  it("sets", () => {
    cal.set(9);
    expect(cal.value).toBe(9);
  });

  it("clear", () => {
    cal.set(9);
    cal.clear();
    expect(cal.value).toBe(0);
  });

  it("adds", () => {
    cal.set(1);
    cal.add(2);
    expect(cal.value).toBe(3);
  });

  it("substracts", () => {
    cal.substract(1);
    expect(cal.value).toBe(-1);
  });

  //후략

});
beforeEach(), afterEach() : Repeating Setup
If you have some work you need to do repeatedly for many tests, you can use beforeEach and afterEach hooks.
많은 테스트에서 반복적으로 수행되는 코드가 있다면 beforeEach()와 afterEach() 훅을 사용할 수 있다.
beforeAll, afterAll과 같이 모든 테스트가 시작되기 전이나 후에 행동을 설정해줄 수 있는 훅도 존재한다.
coverage
jest.config.js 파일에 collectCoverage 설정을 true로 설정하면 아래와 같이 커버리지 정보가 뜬다.
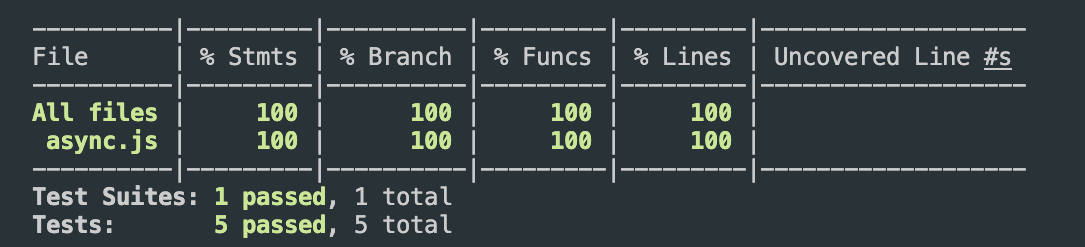
만약 내가 코드를 작성했는데, 작성한 코드의 여러 기능들 중 테스트 코드를 작성하지 않은 부분이 있다면
Uncovered Line에 해당 코드 라인이 표시된다. (ex: 7이면 7번줄에 해당하는 코드에 대한 테스트가 없다는 것)
비동기 함수 테스트 코드 작성
자바스크립트에서는 실제 프로젝트에서 비동기로 돌아가는 코드를 사용하는 경우가 왕왕있는데,
Jest로 테스트 코드를 짤 때 이런 비동기 함수에 대한 처리를 해주지 않으면 테스트가 제대로 실행되지 않고 넘어감.
이런 상황을 핸들링 하기 위해 몇 가지 방법이 존재한다.
fetchData 함수가 프로미스를 반환하는 함수라고 가정하자
- 수동적으로 끝나는 시점 명시 (callback 이용)
테스트 함수가 done이라는 함수 인자를 받게 하고 done 함수를 콜백 함수의 제일 마지막에 호출하도록 수정
(*아래 예시는 공식문서에서 가져온 건 아님)
test('the data is peanut butter', (done) => {
  fetchData().then(data => {
    expect(data).toBe('peanut butter');
  });
  done();
});- 프로미스 리턴하기
test('the data is peanut butter', () => {
  return fetchData().then(data => {
    expect(data).toBe('peanut butter');
  });
});- it의 콜백에 async await 적용
test('the data is peanut butter', async () => {
  const data = await fetchData();
  expect(data).toBe('peanut butter');
});

test('the fetch fails with an error', async () => {
  expect.assertions(1);
  try {
    await fetchData();
  } catch (e) {
    expect(e).toMatch('error');
  }
});- resolve, reject API 사용 (리턴 필수~~)
test('the data is peanut butter', () => {
  return expect(fetchData()).resolves.toBe('peanut butter');
});

test('the fetch fails with an error', () => {
  return expect(fetchData()).rejects.toMatch('error');
});