
난 프로젝트를 create-next-app 명령어로 생성하지 않았으니 타입스크립트를 사용하기 위해
npm으로 타입스크립트와 react, node type 모듈들을 설치하자.
npm i --save typescript @types/react @types/node설치 후 다음 파일들을 생성해주자.
next-env.d.tstsconfig.json
// tsconfig.json

{
	"compilerOptions": {
		"esModuleInterop": true,
		"sourceMap": true,
		"lib": ["ES2020", "DOM"],
		"jsx": "preserve",
		"module": "esnext",
		"moduleResolution": "node",
		"target": "es5",
		"strict": true,
		"resolveJsonModule": true,
		"baseUrl": ".",
		"downlevelIteration": true,
		"paths": {
			"@your_directory/*": ["your_directory/*"]
		},
		"allowJs": true,
		"skipLibCheck": true,
		"forceConsistentCasingInFileNames": true,
		"noEmit": true,
		"isolatedModules": true
	},
	"include": ["next-env.d.ts", "**/*.ts", "**/*.tsx"],
	"exclude": ["node_modules"]
}
// next-env.d.ts
/// <reference types="next" />
/// <reference types="next/types/global" />Next.js + React.js Project에 ESLint, Prettier를 적용해보자.
먼저 필요 모듈들을 npm으로 설치해주자.
npm i --save-dev eslint eslint-config-airbnb eslint-plugin-import eslint-plugin-jsx-a11y eslint-plugin-react eslint-plugin-react-hooks prettier eslint-config-prettier eslint-plugin-prettier그 뒤에 .eslintrc, .prettierrc 파일을 생성해주고 다음과 같이 작성
// .eslintrc

{
	"parser": "@typescript-eslint/parser",
	"env": {
		"browser": true,
		"node": true,
		"commonjs": true,
		"es6": true
	},
	"extends": [
		"plugin:react/recommended",
		"plugin:@typescript-eslint/recommended",
		"prettier/@typescript-eslint",
		"plugin:prettier/recommended"
	],
	"plugins": ["@typescript-eslint", "react", "react-hooks", "prettier"],
	"settings": {
		"react": {
			"version": "detect"
		}
	},
	"overrides": [
		{
			"files": ["*.ts", "*.tsx"],
			"rules": {
				"@typescript-eslint/no-unused-vars": [2, { "args": "none" }]
			}
		}
	]
}
// .prettierrc
{
	"printWidth": 120,
	"tabWidth": 4,
	"singleQuote": true,
	"trailingComma": "all",
	"semi": true,
	"useTabs": true
}
본인은 4 space = 1 tab 크기에 tab으로 indent를 사용하는 것을 좋아해서 위와 같이 세팅해주었다.
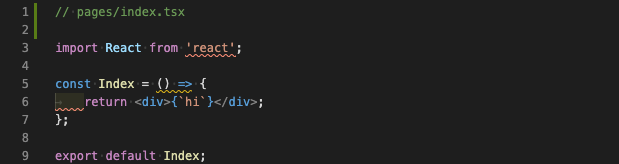
ESLint가 적용되어 default 설정과 맞지 않는 부분이 에러 혹은 경고로 에디터에서 밑줄을 쳐주는 것을 볼 수 있다.
발생하는 에러와 경고를 제거하기 위해 아까 작성한 .eslintrc 파일에 rules를 추가해주었다.
"rules": {
  "arrow-body-style": ["error", "always"],
  "prettier/prettier": "error",
  "no-undef": "off",
  "indent": [4, "tab"],
  "react/jsx-indent": [4, "tab"],
  "react-hooks/rules-of-hooks": "error", // Checks rules of Hooks
  "react-hooks/exhaustive-deps": "warn" // Checks effect dependencies
},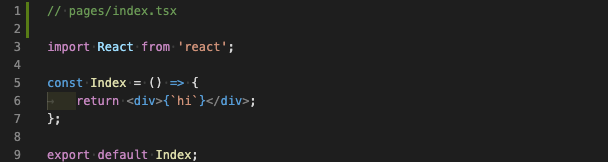
에러와 경고가 더이상 뜨지않는 것을 확인할 수 있다.

안녕하세요 벨로그에서 자기소개를 한 줄로 쓰라고 되어있는데 최대한 한 줄로 자기 소개를 해보겠습니다. 제 이름은 .....