
(Ubuntu 18.04.6 LTS)
2022.05.05 ~ 2022.05.06
프로그래머스 자율주행 데브코스 3기
자율주행에서 perception은 단순히 인식하는 과정이 아닌 유의미한 정보를 생성해 이해하는 과정입니다. 인식이 잘 되더라도 3D POSE(pose, orietnation) 관련 정보가 없으면 대상과의 거리 파악 문제로 자율주행 구현에 어려움이 있습니다.
Camera calibration
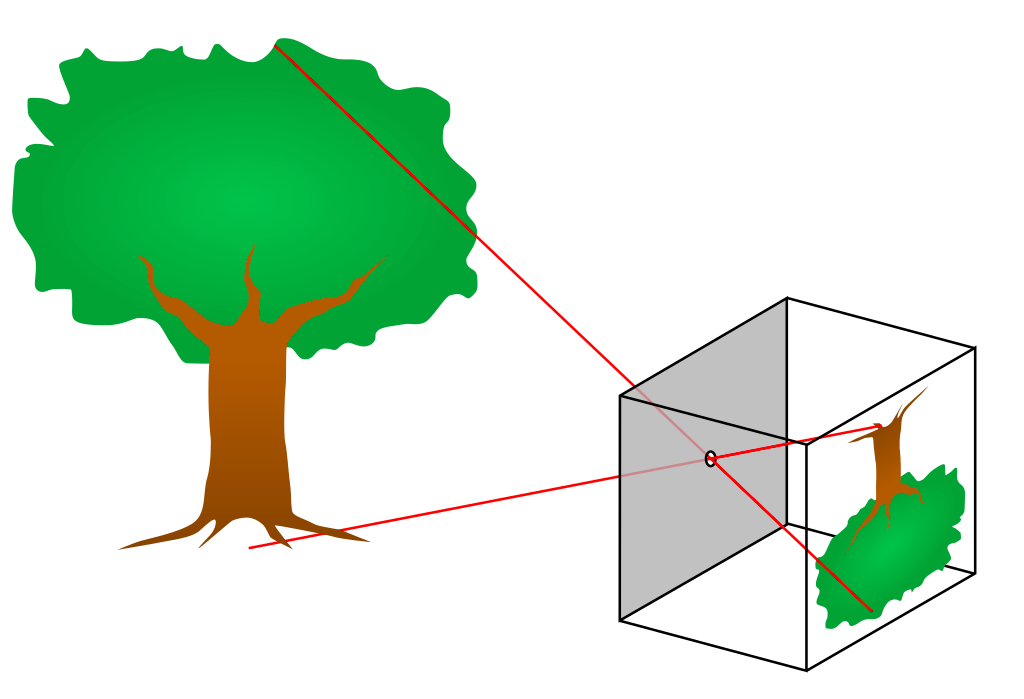
카메라는 3차원 공간에 존재하는 대상을 2차원 공간에 투영하는 센서로, 깊이 정보가 소실되는 특징이 있습니다. 카메라의 원리를 이해하는 방식으로 pinhole camera를 알아보면, 빛이 들어올 수 있는 구멍을 아주 작게 만들어 상을 투영하는 방식입니다. Camera calibration에는 pinhole camera model을 이용했습니다.
Camera calibration과 관련해서는 이 블로그(https://darkpgmr.tistory.com/32)에서 내용을 추가적으로 배울 수 있었습니다. 위키피디아의 내용과 LearnOpenCV의 내용 또한 참고하였습니다.
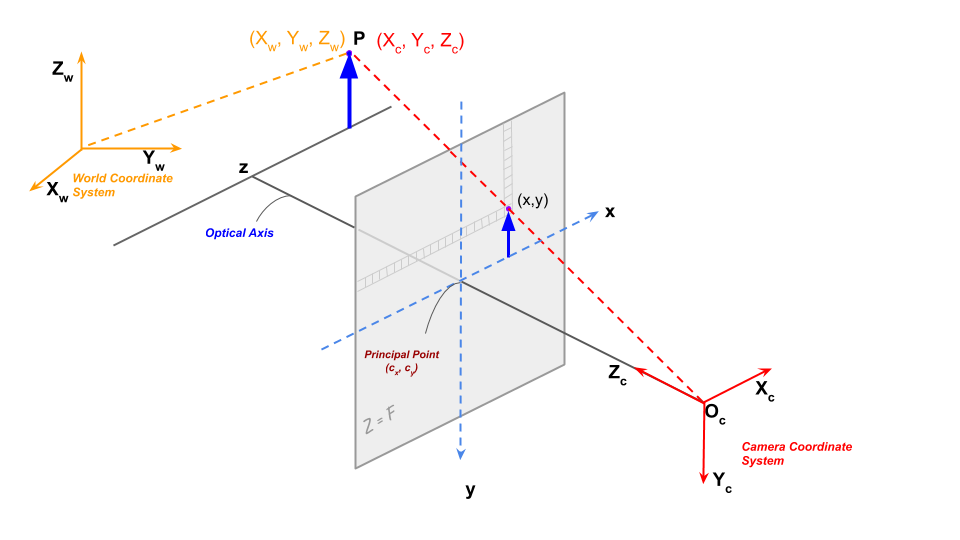
카메라 좌표계에서는 크게 world coordinate, camera coordinate, image coordinate, normalized image coordinate로 나눌 수 있습니다.
- World coordinate는 현실에 존재하는 좌표계로, 특정점과 orientation으로 정의할 수 있습니다.
- Camera coordinat는 카메라를 기준으로 하는 좌표계로, 방향은 카메라 렌즈의 방향, 방향은 카메라의 아래쪽 방향, 방향은 카메라의 오른쪽 방향으로 나타냅니다.
- Image coordinate에서도 방향, 방향을 동일하게 사용하며, 를 구별을 위해 로도 표현합니다. OpenCV등에서 이미지의 표현방식의 Point(x,y)과 동일한 표현입니다. 이 때 렌즈(camera coordinate의 원점)에서 이미지 평면까지의 거리를 초점거리라고 정의합니다.
- Normalized image coordinate는 computer vision에서 해석을 위해 정의한 가상의 좌표계로, 초점거리를 1로 정규화환 image coordinate입니다.

World coordinate와 camera coordinate의 관계를 나타낸 것을 extrinsic calibration, 렌즈와 이미지 센서와의 관계에서 발생하는 초점거리, 주점 등의 영향을 나타낸 것을 intrinsic calibration으로 볼 수 있습니다. Normalize 과정은 초점 거리를 이용하여 식을 세울 수 있습니다.
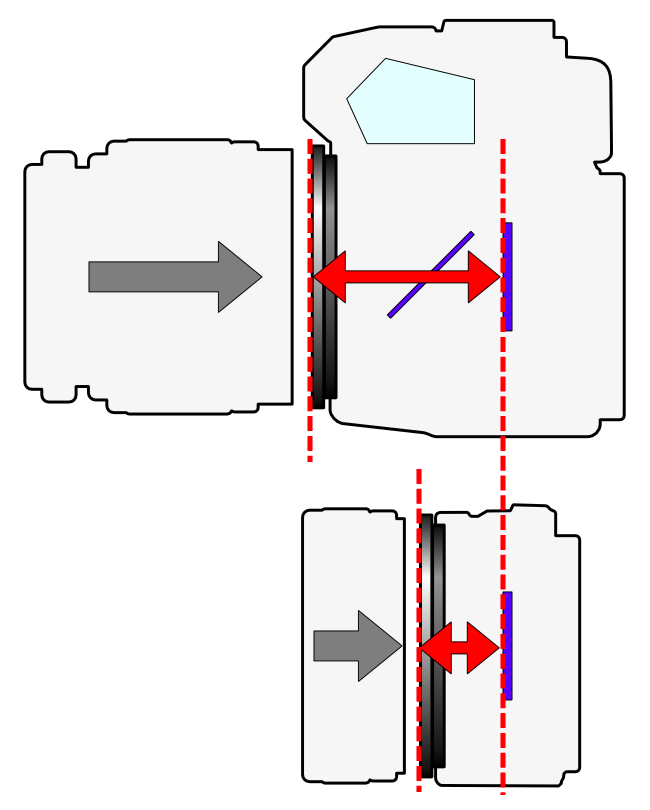
초점 거리는 렌즈로부터 상까지의 거리로 카메라에서는 실제 물리단위인 mm로 표기합니다. Computer vision에서 초점거리는 이미지 센서의 cell 크기에 대한 상대적인 pixel 단위로 표현하며, 니다. Image plane에서 normalize 등을 처리할 때는 pixel 단위로 처리하기 때문에 pixel 단위로 표현합니다.
Principal point는 pin hole camera model에서 pin hole이 이미지 센서에 직교하는 위치를 의미합니다. Principal point는 이상적으로 영상의 center point와 일치하지만, 카메라 제조 공정에서 발생하는 다양한 문제로 일치하지 않는 경우가 있습니다.
전체적인 camera calibration과 관련된 식은 위와 같습니다. 우항의 앞의 행렬은 intrinsic calibration을, 뒤의 행렬은 extrinsic calibration을 의미합니다.
Intrinsic calibration의 는 focal length와 principal point의 좌표값들을 의미합니다. 는 비대칭 계수로 이미지 센서의 y축이 기울어진 정도를 의미합니다. 현재 카메라 공정에서는 잘 나타나지 않아 0의 값을 주로 사용합니다.
Extrinsic calibration은 좌표 변환과 관련된 내용으로 SE(3) group의 행렬으로, SO(3) group에 translation을 추가한 것입니다. 좌표축의 이동과 방향에 대한 내용으로 robotics에서 좌표 변환을 나타내는데 사용합니다.
행렬들의 연산으로 이루어져있기 때문에 image coordinate에서 world coordinate를 역행렬을 구해 얻을 수 있어보이지만, 변환 과정에서 1개의 차원에 대한 정보 손실이 일어났기 때문에 불가능합니다.
Distortion
실제 카메라에서는 pinhole camera model에서 작은 구멍이 아니라 렌즈로 빛을 모으게 되고, 렌즈는 크기를 가지는 물체로 빛이 굴절됩니다. 렌즈 자체의 특성, 렌즈와 이미지 센서의 관계에서 왜곡이 발생하게 되며, 렌즈 형상이 곡률을 가지는 구면 형태이기 때문에, 주점에서 멀어질수록 표현의 비율이 달라져 왜곡 현상은 일반적으로 커집니다.

방사 왜곡 현상은 대표적으로 barrel distortion, pincushion distortion로 나타나며, 이 두가지 타입이 같이 나타난 mustache distortion도 있습니다.
접선 왜곡은 타원형태로 발생하는 왜곡으로 방사왜곡과는 다르게 방향에 따라 정도가 달라집니다. 카메라 제조 공정에서 렌즈와 이미지 센서의 수평이 맞지 않는 경우 발생합니다. 왜곡에 대한 이미지는 블로그(https://darkpgmr.tistory.com/31)에서 잘 확인할 수 있습니다.
이러한 왜곡 현상을 해결하는 방법으로는 Brown-Conrady distortion model이 있습니다.

는 distorted image point, 는 undistorted image point를 의미하며, 는 distortion cetner, pin hole camera에서는 주점입니다. 은 각각 방사 왜곡, 접선 왜곡에 대한 계수이고, 입니다.

Undistorted image를 계산하기 위한 식으로 바꾸면 이와 같게됩니다. 이 식을 이용하기 위해서 계수들을 구하는 과정이 필요하고, 여러 점들을 이용하여 계수를 설정하여 이러한 왜곡 현상을 줄일 수 있습니다.
방사/접선 왜곡 이외에도 다양한 왜곡이 존재하며, 대표적으로는 원근 왜곡이 있습니다. 원근 왜곡은 3차원 공간이 2차원으로 투영되는 과정에서 생기게 되며 위에서 사용한 방식으로 해결할 수 없습니다. 이러한 문제를 해결하기 위해서는 2장 이상의 이미지를 이용하여 disparity를 계산하고, 3차원 위치를 추정하는 방식이 가능합니다. (Multiple View Geometry)
이외에도 사물의 실제크기에 대한 정보나 사물과 주변의 관계, 추정 가능한 구조를 통해 크기를 추정하는 방식이 있을 수 있습니다.

cv2.calibrateCamera(objectPoints, imagePoints, imageSize, cameraMatrix,
					distCoeffs[, rvecs[, tvecs[, flags[, criteria]]]])
'''리턴값: retval, cameraMatrix, distCoeffs, rvecs, tvecs'''OpenCV에서는 calibrateCamera 함수를 이용하여 camera calibration을 합니다. cv2.calibrateCamera 함수는 여러가지를 리턴하는데, mtx는 camera matrix이며, dist는 위의 계수의 값들, rvecs, tvecs는 회전과 이동의 값입니다.
지금까지의 내용을 코드로 구현해본 결과입니다.
import cv2
import glob
import numpy as np
import time
# Get image path list
image_path_list = glob.glob("./images/*.jpg")
# print(image_path_list)
# Chessboard Config
BOARD_WIDTH = 9
BOARD_HEIGHT = 6
SQUARE_SIZE = 0.025 # 단위는 [m]
'''
chessboard는 일반적으로 홀수 * 짝수개의 조합을 사용해
가로 세로를 구분한다.
'''
pattern_size = (BOARD_WIDTH, BOARD_HEIGHT)
criteria = (cv2.TERM_CRITERIA_EPS + cv2.TERM_CRITERIA_MAX_ITER, 30, 0.001)
def chessboard_finding():
DISPLAY_IMAGE = True
for image_path in image_path_list[0:1]:
src = cv2.imread(image_path, cv2.IMREAD_COLOR)
gray = cv2.cvtColor(src, cv2.COLOR_BGR2GRAY)
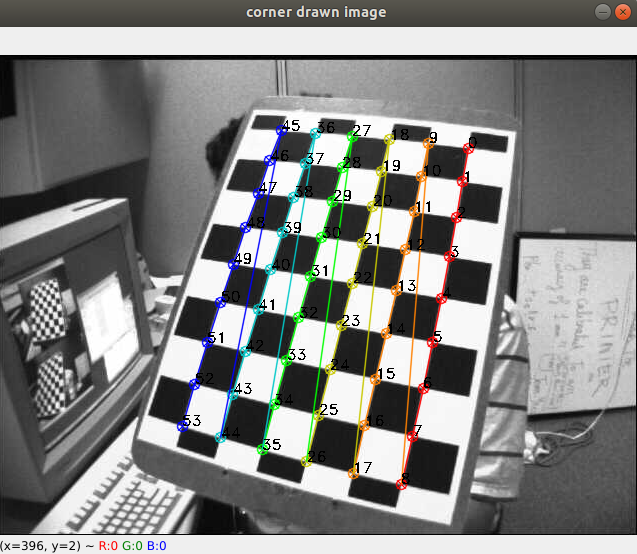
ret, corners = cv2.findChessboardCorners(gray, pattern_size, None)
corners2 = cv2.cornerSubPix(
gray, corners, (11, 11), (-1, -1), criteria)
# print(corners)
'''
corners는 [ [[x1, y1]], [[x2, y2]] ]와 같은 형태로 표현된다.
cornerSubPix는 코너 위치를 refine하는 역할을 수행한다.
'''
counter = 0
if ret:
if DISPLAY_IMAGE:
image_corner = cv2.drawChessboardCorners(
src, pattern_size, corners2, ret)
for corner in corners2:
counter_text = str(counter)
corner = list(map(int, np.squeeze(corner)))
cv2.putText(image_corner, counter_text,
corner, 2, 0.5, (0, 0, 0), 1)
counter += 1
cv2.imshow("corner drawn image", image_corner)
while (cv2.waitKey(0) != 27):
continue
cv2.destroyAllWindows()
def undistorting():
VISUALIZATION = True
img_pts = [] # 2D location
obj_pts = [] # 3D location
for i in range(len(image_path_list)):
object_point = list()
height = 0
for _ in range(0, BOARD_HEIGHT):
# Loop Width -> 9
width = 0
for _ in range(0, BOARD_WIDTH):
# Loop Height -> 6
point = [[height, width, 0]]
object_point.append(point)
width += SQUARE_SIZE
height += SQUARE_SIZE
obj_pts.append(object_point)
obj_pts = np.asarray(obj_pts, dtype=np.float32)
for image_path in image_path_list:
src = cv2.imread(image_path, cv2.IMREAD_COLOR)
gray = cv2.cvtColor(src, cv2.COLOR_BGR2GRAY)
ret, corners = cv2.findChessboardCorners(gray, pattern_size, None)
corners2 = cv2.cornerSubPix(
gray, corners, (11, 11), (-1, -1), criteria)
# print(corners)
'''
corners는 [ [[x1, y1]], [[x2, y2]] ]와 같은 형태로 표현된다.
cornerSubPix는 코너 위치를 refine하는 역할을 수행한다.
'''
if ret:
img_pts.append(corners2)
# print(np.shape(obj_pts), np.shape(img_pts), sep="\n")
# obj_pts : (13, 54, 1, 3)
# img_pts : (13, 54, 1, 2)
ret, mtx, dist, rvecs, tvecs = cv2.calibrateCamera(
obj_pts, img_pts, gray.shape[::-1], None, None)
print("=" * 20)
print(f"reprojection error\n {ret}\n")
print(f"camera matrix\n {mtx}\n")
print(f"distortion coefficientes error\n {dist}\n")
print(f"extrinsic for each image\n {len(rvecs)} {len(tvecs)}")
print("=" * 20)
temp_img = cv2.imread(image_path_list[0], cv2.IMREAD_ANYCOLOR)
image_size = list(temp_img.shape[:2])
image_size.reverse()
print(image_size)
mtx, roi = cv2.getOptimalNewCameraMatrix(
mtx, dist, image_size, 1, image_size)
'''
getOptimalNewCameraMatrix 함수를 이용해 보완할 수 있다.
'''
start_time = time.process_time()
for image_path in image_path_list:
image = cv2.imread(image_path, cv2.IMREAD_COLOR)
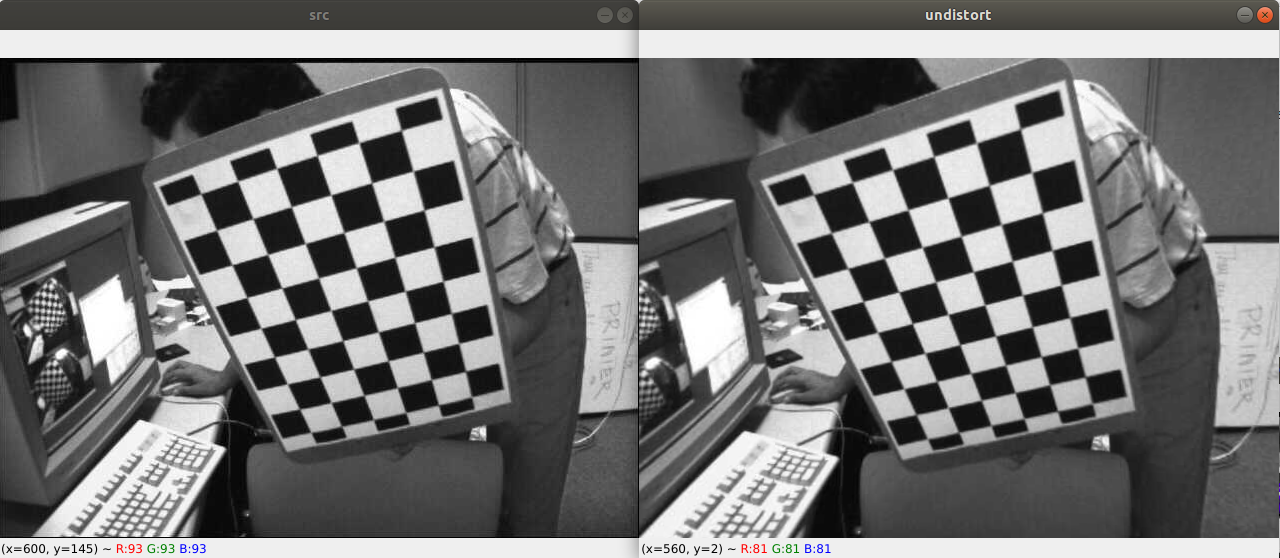
image_undist = cv2.undistort(image, mtx, dist, None)
end_time = time.process_time()
print("using cv2.undistort:", end_time - start_time)
start_time = time.process_time()
mapx, mapy = cv2.initUndistortRectifyMap(
mtx, dist, None, None, image_size, cv2.CV_32FC1)
for image_path in image_path_list:
image = cv2.imread(image_path, cv2.IMREAD_COLOR)
image_undist = cv2.remap(image, mapx, mapy, cv2.INTER_LINEAR)
end_time = time.process_time()
print("using cv2.remap:", end_time - start_time)
'''
using cv2.undistort: 0.40413022899999973
using cv2.remap: 0.16632978899999973
'''
if VISUALIZATION:
cv2.imshow("src", image)
cv2.imshow("undistort", image_undist)
while (cv2.waitKey() != 27):
continue
cv2.destroyAllWindows()
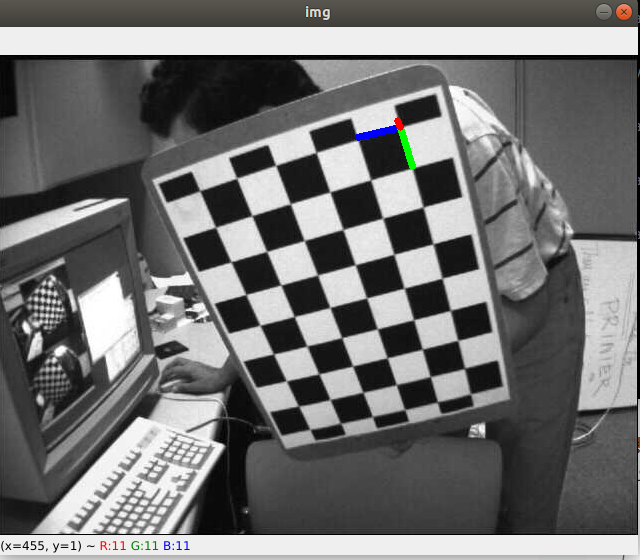
print(rvecs)
axis = np.float32([[0.025, 0, 0], [0, 0.025, 0],
[0, 0, -0.025]]).reshape(-1, 3)
# Find the rotation and translation vectors.
ret, rvecs, tvecs = cv2.solvePnP(obj_pts[-1], corners2, mtx, dist)
# project 3D points to image plane
imgpts, jac = cv2.projectPoints(axis, rvecs, tvecs, mtx, dist)
corner = tuple(map(int, corners2[0].ravel()))
img = cv2.line(src, corner, tuple(
map(int, imgpts[0].ravel())), (255, 0, 0), 5)
img = cv2.line(img, corner, tuple(
map(int, imgpts[1].ravel())), (0, 255, 0), 5)
img = cv2.line(img, corner, tuple(
map(int, imgpts[2].ravel())), (0, 0, 255), 5)
if VISUALIZATION:
cv2.imshow("img", img)
while (cv2.waitKey() != 27):
continue
cv2.destroyAllWindows()
if __name__ == "__main__":
chessboard_finding()
undistorting()
기타 사항들..
calibration tools: gml, matlab, mc-calib(multi camera), opencv
chessboard는 파워포인트로도 쉽게 만들 수 있음. (3cm 3cm
한 장의 이미지에서는 차이가 없지만, 영상에서 보정을 하는 경우 undistort보다 remap을 이용하는 경우가 더 빠르다.
python zip 함수로 여러 데이터 묶어서 사용 가능.(iteration 과정)
Vision-based ACC with a Single Camera: Bounds on Range and Range Rate Accuracy
