기초
-
삼원색
-
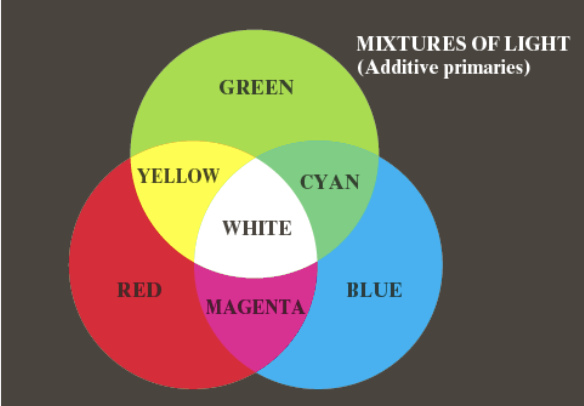
빛의 삼원색(Primary colors of light): blue, green, red
-
색의 삼원색(Secondary colors of light): magenta, yellow, cyan
-
무채색(Achromatic color): 유채색 반대말로 색상 정보가 존재x, blue,green,red 색상 비율이 동일
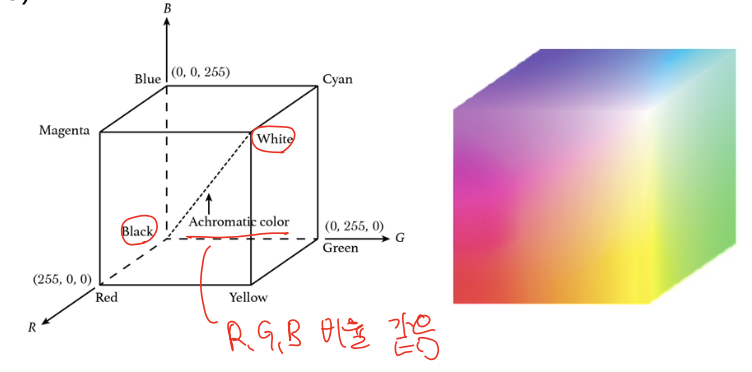
- 검정과 흰색은 색상은 없고 밝기만 존재
- 검정이 얕아지면 회색이 되고 회색이 얕아지면 흰색이 됨 --> 밝고 어두움의 차이, 즉 명도의 차이만 존재
-
color model
- RGB
- R-channel, G-channel, B-channel로 구성
- opencv에서는 bgr순서임 --> rgb 반대 순서로 기억
- red=(0,0,255)
- white=(255,255,255)
- black=(0,0,0)
- R-channel, G-channel, B-channel로 구성
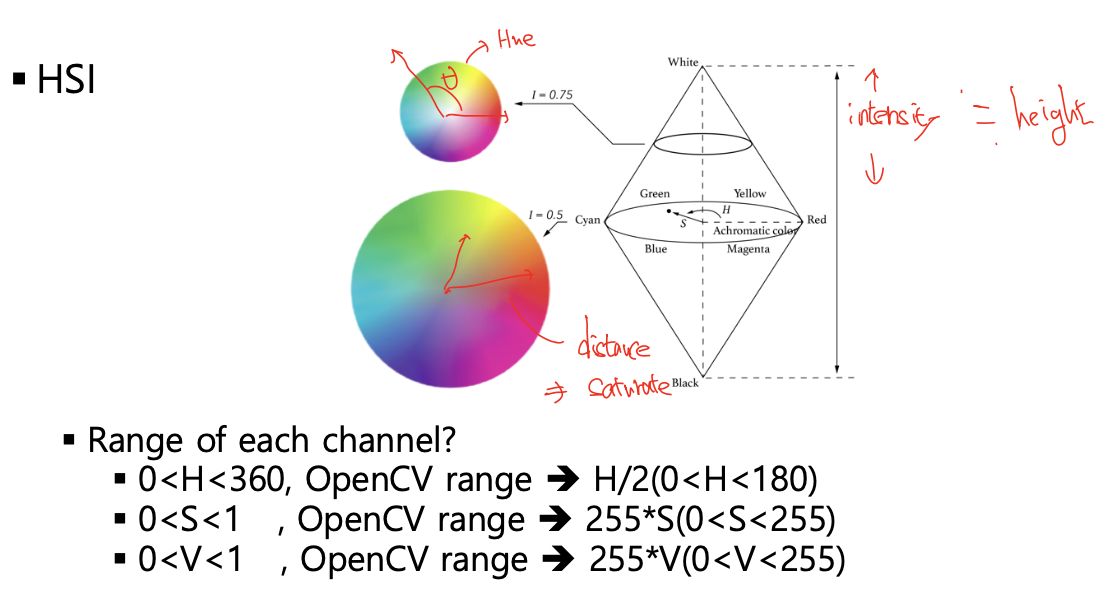
- HSI(≅ HSV)
- Hue-channel, Saturation-channel, Intensity-channel로 구성
- intensity(brightness, value): 어떤 색상의 밝기 값, 색상 정보 값은 포함되어 있지 않고 단지 세기를 표현
- hue(색): 색조, 특정한 색상을 결정짓는 우세한 파장 == 색..?
- saturation(선명함): 상대적인 색상의 순도(채도), 색이 선명할 수록 높고 무채색에 가까울 수록 채도가 낮음
- s가 크면 --> 선명한 색상, i가 크면 --> 밝기가 밝은 색상
- rgb --> hsv 변환 이유
- rgb 이미지에서 색 정보를 검출하기 위해서는 r,g,b 속성 모두 참고해야함 --> hsv 이미지에서는 hue가 일정한 범위를 갖는 색정보를 가지기 때문에 색 분류 더 쉬움
- Hue-channel, Saturation-channel, Intensity-channel로 구성
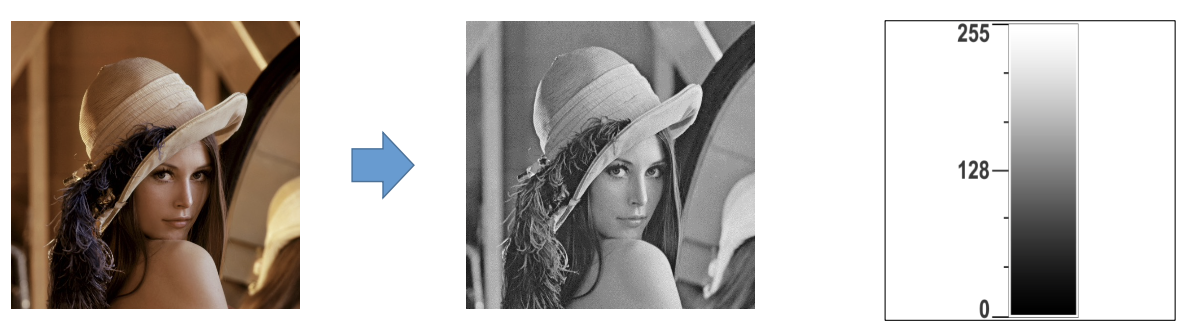
- YCbCr
1. y: brightness(밝기 값, intensity), rgb 값의 평균
2. Cb(Chrominace-색차): blue값과 brihtness(밝기 값) 차이(B-Y)
3. Cr: red값과 brihtness(밝기 값) 차이(R-Y)
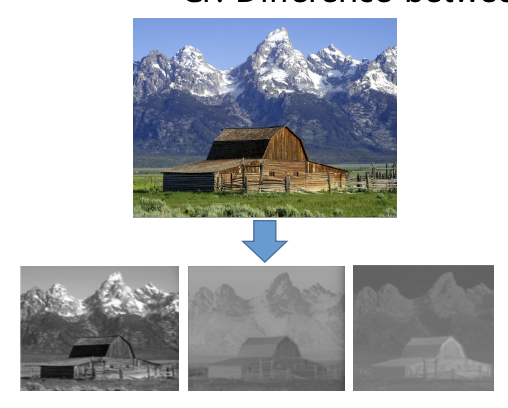
왼쪽부터 Y,Cb, Cr
하늘 영역의 blue 값은 상대적으로 크기 때문에 이 영역에 대한 Y값은 이 영역의 blue값보다 작음 --> 가운데 사진을 보면 하늘에 대한 픽셀값(intensity)가 크기 때문에 Cb임을 알 수 있음 - Grayscale image
- hue와 saturation 값이 모두 0 --> 각 픽셀의 밝기만 표현 가능한 흑백 영상 의미
- hue와 saturation 값이 모두 0 --> 각 픽셀의 밝기만 표현 가능한 흑백 영상 의미
color image processing
-
문제점
- rgb에서는 color processing(Intensity transformation, Histogram equalization 그리고 Spatial filtering)을 적용할 때 r,g,b 각각의 채널을 따로 해주어야함
- 영상의 톤이 달라지거나 화질 저하 등의 문제 발생
-
해결책
- color space를 hsi 또는 YCbCr로 변환 --> intensity channel을 분리하여 intensity channel에만 Intensity transformation 등을 적용
-
종류
-
Usage of HSI
- intensity 이미지 분리
- intensity image를 분리시킴으로써 image의 image의 intensity 값만을 변경할 수 있음
- color slicing
- hue-channel에서 원하는 색상의 픽셀 값을 찾고 saturation-channel에서 다른 모든 픽셀 값을 0으로 설정
- color conversion
1. hue-channel에 접근함으로써 color 영역을 변경할 수 있음

원본 / change intensity value / color slicing / color conversion
- 코드
color conversion
void cvtColor(Mat src, Mat dst, int code, int dstCn =0)
§ Convert an image frame one color space to another
§ Code: CV_BGR2GRAY, CV_BGR2HSV, CV_BGR2YCrCb, CV_BGR2Lab, ......)
§ dstcn: destination channel number. If 0, automatically determined by src and dstint main() { Mat image, image_YUV; image = imread("lena.png"); cvtColor(image, image_YUV, CV_BGR2YUV); }color split/merge
§ void split(Mat src, Mat mv)
§ Splits multi-channel array into separate single-channel arrays
§ mv: output array (vector of arrays) mv[c][I] = src[I] the number of arrays must match src.channels()
§merge(InputArrayOfArray mv, OutputArray dst): reverse of split
§ mv: vector of matrices all of the matrices in mv must have same size and depth
§ dst : output array of the same size and depth as mv[0]int main() { Mat image, image_YUV, dst; Mat yuv_channels[3]; image = imread("lena.png"); cvtColor(image, image_YUV, CV_BGR2YUV); split(image_YUV, yuv_channels); merge(yuv_channels,3,dst); imshow("input image", image); imshow("Y", yuv_channels[0]); imshow("U", yuv_channels[1]); imshow("V", yuv_channels[2]); imshow("YUV image", dst); waitKey(0); return 0; }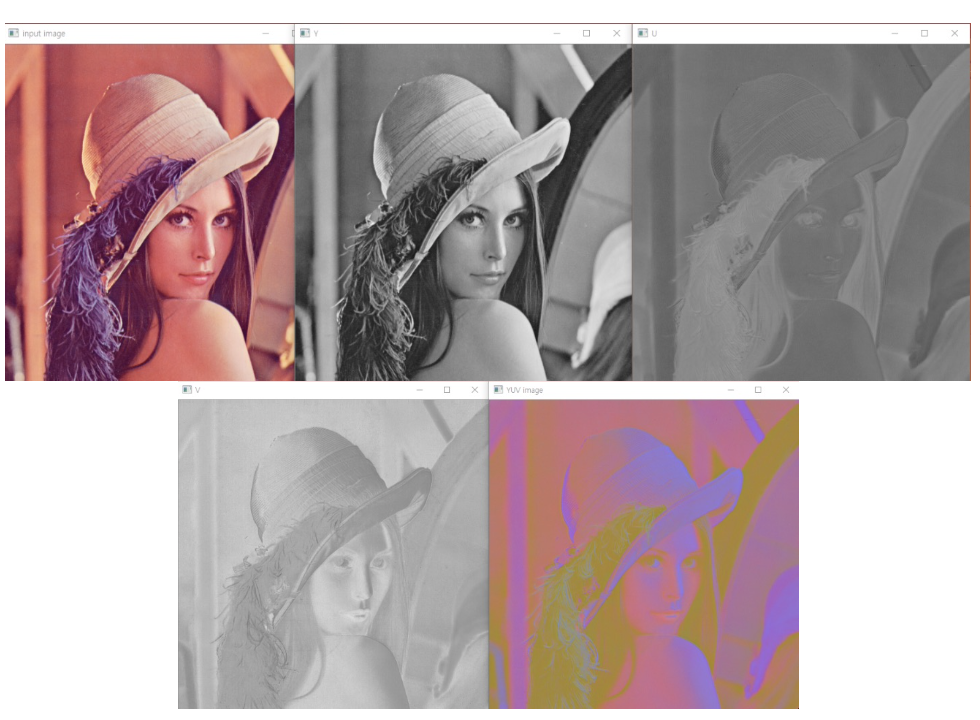
usage of HSI
int main() {

  Mat image = imread("colorful.jpg");
  Mat HSV, intensity_change, mask_out, change_color;
  vector<Mat> ic(3);
  vector<Mat> mo(3);
  vector<Mat> cc(3);

  int rows = image.rows;
  int cols = image.cols;
  uchar* h;
  uchar* s;
  uchar* v;

  cvtColor(image, HSV, CV_BGR2HSV);
  split(HSV, ic);
  split(HSV, mo);
  split(HSV, cc);

  //eqaulizing the histogram of I mat
  equalizeHist(ic[2], ic[2]);

  //masking out except orange
  for (int j = 0; j < rows; j++){
      h = mo[0].ptr<uchar>(j);
      s = mo[1].ptr<uchar>(j);
      for (int i = 0; i < cols; i++) {
          if (h[i] > 9 && h[i] < 23) s[i] = s[i];
          else s[i] = 0;
      }
	}

  //changing all colors
  for (int j = 0; j < rows; j++) {
  	h = mo[0].ptr<uchar>(j);
    s = mo[1].ptr<uchar>(j);
  	for (int i = 0; i < cols; i++) {
  		if (h[i] + 50 > 179) h[i] = h[i] + 50 - 179;
        else h[i] += 50;
  	}
  }
  merge(ic, intensity_change);
  merge(mo, mask_out);
  merge(cc, change_color);
  cvtColor(intensity_change, intensity_change, CV_HSV2BGR);
  cvtColor(mask_out, mask_out, CV_HSV2BGR);
  cvtColor(change_color, change_color, CV_HSV2BGR);

  imshow("image", image);
  imshow("intensity change", intensity_change);
  imshow("mask out", mask_out);
  imshow("change color", change_color);


  waitKey(0);
  return 0;
}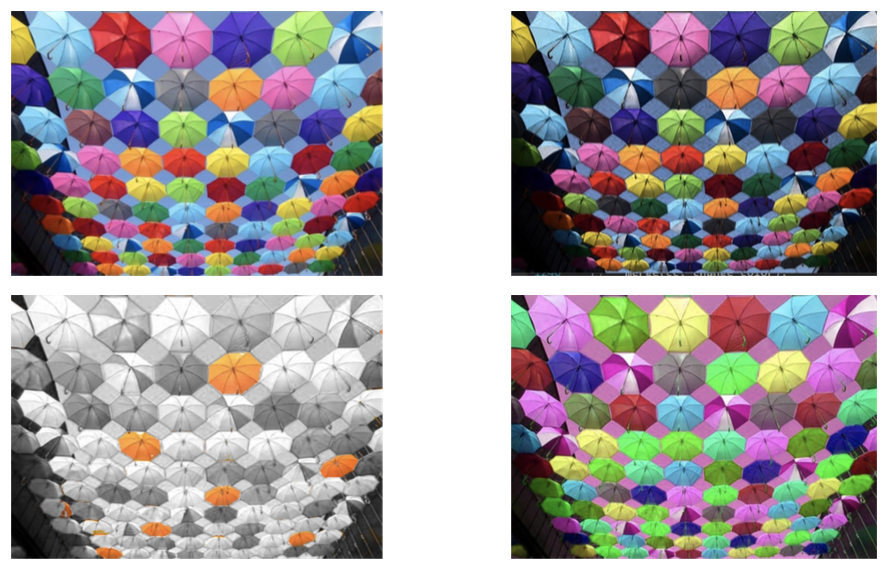
- intensity 이미지 분리
-
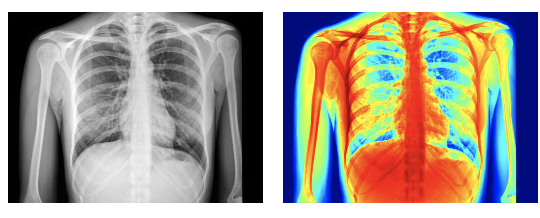
pseudo coloring
- gray scale image --> color image(임의의 색 입힘, 원래의 색을 찾는 것x)
1. 사람은 30~50 가지의 회색 음영 인식 가능 --> 컬러는 100k~10m 컬러 인식 가능
- 코드
int main() {

  Mat gray = imread("xray.jpg", 0);
  Mat color;

  // Applies a colormap on a given image
  // gray: src, color: dst, COLORMAP_JET: the color map to apply applyColorMap(gray, color, COLORMAP_JET);
  imshow("gray", gray);

  imshow("image", color);

  waitKey(0);
  return 0;
}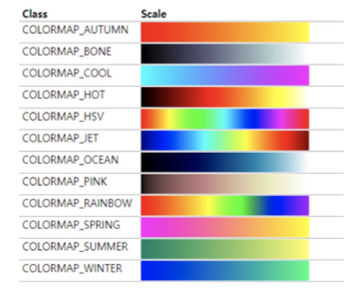
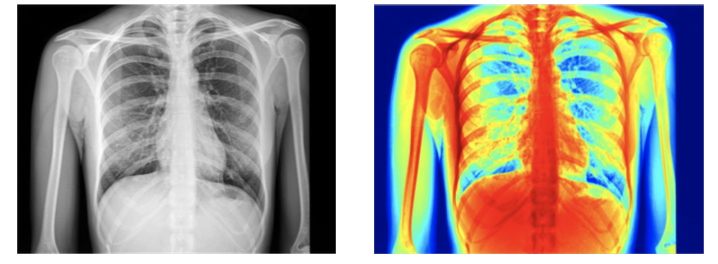
- gray scale image --> color image(임의의 색 입힘, 원래의 색을 찾는 것x)
-
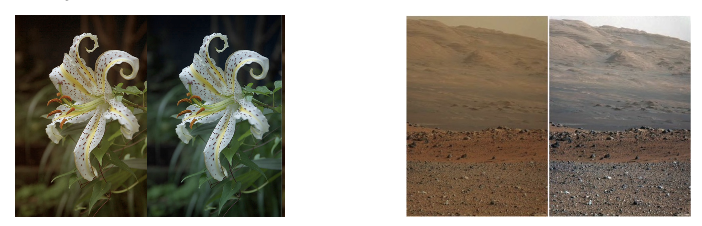
white balancing
-
color의 intensity 전체적으로 조절 --> 자연의 빛을 제거하는 과정
-
방식
- R, G, B 값 Scaling
1. 우리 눈에서 흰색이라고 인식하지만 실제 (255,255,255) 값의 흰색이 아닌 것을 255 흰색 값으로 바꿔주는 연산 수행
2. r,g,b 구성 요소의 scale을 조정하여 중립적으로 보이게 함
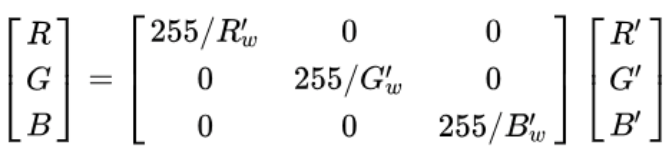
r', g', b': 입력된 r,g,b 값 --> 해당 값들을 일련의 작업을 통해 모두 255로 만들어줌
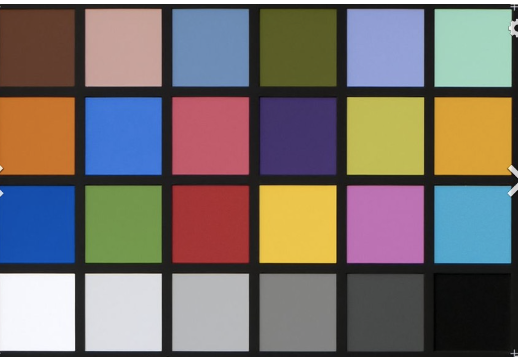
- Color Checker 이용
- 이미지에서 흰색을 추정해내는 방법(2가지 가정)
- gray world assumption
- 일반 색상 균형이 잘 잡힌 사진에서, 모든 color의 평균이 중간 회색(128,128,128)이라고 가정 --> 실제로 촬영한 영상의 픽셀 값의 평균을 구한 후, 회색이 아니라면 회색에 맞출 수 있도록 매트릭스를 구해서 맞추는 방법
- 영상 내 가장 밝은 값을 흰색으로 추정 --> 원래 흰색 값이 영상 내에서 장 밝기 때문에
- gray world assumption
- 이미지에서 흰색을 추정해내는 방법(2가지 가정)
- R, G, B 값 Scaling
-
코드
  int main() {
    Mat balancing;
    Mat balancing_result;

    balancing = imread("balancing.jpg");
    balancing_result = balancing.clone();
    white_balacing(balancing_result);

    imshow("image", balancing);
    imshow("balancing", balancing_result);

    waitKey(0);
  }

	void white_balacing(Mat img) {

    Mat bgr_channels[3]; split(img, bgr_channels);

    double avg;
    int sum,temp,i, j, c;

    for (c = 0; c < img.channels(); c++) {
      sum = 0;
      avg = 0.0f;
      for (i = 0; i < img.rows; i++) {
        for (j = 0; j < img.cols; j++) {
        	sum += bgr_channels[c].at<uchar>(i, j);
        }
    	}
      avg = sum / (img.rows * img.cols);
      for (i = 0; i < img.rows; i++) {
        for (j = 0; j < img.cols; j++) {
          temp = (128 / avg) * bgr_channels[c].at<uchar>(i, j);
          if (temp>255) bgr_channels[c].at<uchar>(i, j) = 255;
          else bgr_channels[c].at<uchar>(i, j) = temp;
        }
      }
     }
    merge(bgr_channels, 3, img);
  }
-
-
