rectangle
- 히스토그램 그리는데 사용
- 2가지 방식 존재
void rectangle(Mat& img, Point pt1, Point pt2, const Scalar& color, int thickness=1, int lineType=8, int shift=0)
- point: 꼭짓점 위치
- thickness: 음수 --> rectangle 안 색칠
void rectangle(Mat& img, Rect rect, const Scalar& color, int thickness=1, int lineType=8, int shift=0)
Rect(x_LT, y_LT, width, height)
int main(){
  Mat image = imread("lena.png");
  Rect rect = Rect(10, 10, 100, 100); // LT position, width, height rectangle(image, rect, Scalar(255, 0, 0), 4, 8, 0); imshow("image",image);

  waitKey(0);
  return 0;
}
line/circle
void line(Mat& img, Point pt1, Point pt2, const Scalar& color, int thickness=1, int lineType=8, int shift=0)
- lineType
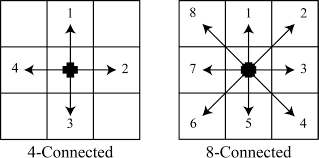
- 8: 8-connected line.
- 4: 4-connected line.
- CV_AA: antialiased line
void circle(Mat& img, Point center, int radius, const Scalar& color, int thickness=1, int lineType=8, int shift=0)
int main(){

  Mat image = imread("lena.png");
  Point p1(25, 25), p2(100, 50);
  line(image, p1, p2, Scalar(255, 0, 0), 3, 8, 0);
  imshow("image",image);

  waitKey(0);
  return 0;

}
polygon
void fillPoly(Mat& img, const Point* pts, const int npts, int ncontours, const Scalar& color, int lineType=8, int shift=0, Point offset=Point())
- npts: 꼭지점 개수
int main() {
  Mat image = Mat::zeros(400, 400, CV_8UC3);
  int w = 400;

  Point trapezoid[1][4];
  trapezoid[0][0] = Point(w*2 / 6, w / 4);
  trapezoid[0][1] = Point(w*4 / 6, w / 4);
  trapezoid[0][2] = Point(w*5 / 6, w*3 / 4);
  trapezoid[0][3] = Point(w / 6, w*3 / 4);

  const Point* ppt[1] = { trapezoid[0] };
  int npt[] = { 4 };

  fillPoly(image, ppt, npt, 1, Scalar(255, 255, 255), 8);
  imshow("image", image);

  waitKey(0);
}- Scalar(255, 255, 255) --> white
- Scalar(0, 0, 0) --> black
Writing Text
void putText(Mat& img, const string& text, Point org, int fontFace, do uble fontScale, Scalar color, int thickness=1, int lineType=8, bool bott omLeftOrigin=false)
- bottomLeftOrgin: 왼쪽 아래 글씨 쓰기
- 기본은 오른쪽 위임(False)
int main() {
  // Create black empty images
  Mat image = Mat::zeros(400, 600, CV_8UC3);
  int w = image.cols;
  int h = image.rows;
  putText(image, format("width: %d, height: %d", w, h), Point(50, 80), FONT_HERSHEY_SIMPLEX, 1, Scalar(0, 200, 200), 4);
  imshow("image", image);

  waitKey(0);
  return(0);
}
drawing histogram
- 적절한 bin의 개수 설정이 중요함
int main() {
  Mat image;
  Mat hist_equalized_image;
  Mat hist_graph;
  Mat hist_equalized_graph;

  image = imread("lena.png", 0);
  if (!image.data) exit(1); //Check image

  equalizeHist(image, hist_equalized_image); //histogram equlization

  hist_graph = drawHistogram(image); // drawHistogram는 opencv에 없음!
  hist_equalized_graph = drawHistogram(hist_equalized_image);

  imshow("Input Image", image);
  imshow("Hist Equalized Image", hist_equalized_image);
  imshow("Hist Graph", hist_graph);
  imshow("Hist Equalized Graph", hist_equalized_graph);

  waitKey(0);
  return 0;
}
Mat drawHistogram(Mat src){ Mat hist, histImage;
// establish the number of bins int i, hist_w, hist_h, bin_w, histSize; float range[] = { 0, 256 };
const float* histRange = { range };
hist_w = 512;
hist_h = 400;
histSize = 256;
bin_w = cvRound((double)hist_w / histSize);
//draw the histogram
histImage = Mat(hist_h, hist_w, CV_8UC3, Scalar(255, 255, 255));
// compute the histograms
// &src: input image, 1: #of src image, 0: #of channels numerated from 0 ~ channels()-1, Mat(): optional mask
// hist: output histogram, 1: histogram dimension, &histSize: array of histogram size, &histRange: array of histogram’s boundaries
calcHist(&src, 1, 0, Mat(), hist, 1, &histSize, &histRange);
// Fit the histogram to [0, histImage.rows]
// hist: input Mat, hist: output Mat, 0: lower range boundary of range normalization, histImage.rows: upper range boundary // NORM_MINMAX: normalization type, -1: when negative, the ouput array has the same type as src, Mat(): optional mask
normalize(hist, hist, 0, histImage.rows, NORM_MINMAX, -1, Mat());
for (i = 0; i < histSize; i++)
{
rectangle(histImage, Point(bin_w * i, hist_h), Point(bin_w * i+hist_w/histSize, hist_h - cvRound(hist.at<float>(i))), Scalar(0, 0, 0), -1);
} // 히스토그램 직접 그리는 부분 --> 여러개 rect 사용
return histImage;
}Write image
void imwrite(const String& filename, InputArray img,
const std::vector< int>& params = std::vector< int>());
- 이미지 저장 함수
videoWriter class
VideoWriter::VideoWriter(constr String& filename, int fourcc, double f
ps, Size frameSize, bool isColor = true)
-
멤버 function
-
비디오 저장
void VideoWriter::write(const Mat& image)
-
비디오 종료 --> 자동으로 실행
void VideoWriter::release()
-
int main(){
  VideoCapture cap(0); // webcam 동영상임
  // Check if camera opened successfully if(!cap.isOpened()){
  cout << "Error opening video stream" << endl;
  return -1;}

  // Default resolutions of the frame are obtained.The default resolutions are system dependent. int frame_width = cap.get(cv::CAP_PROP_FRAME_WIDTH);
  int frame_height = cap.get(cv::CAP_PROP_FRAME_HEIGHT);

  // Define the codec and create VideoWriter object.The output is stored in 'outcpp.avi' file.
  VideoWriter video("outcpp.avi", cv::VideoWriter::fourcc('M','J','P','G'), 10, Size(frame_width,frame_height));

  while(1){

    Mat frame;
    // Capture frame-by-frame
    cap >> frame;

    // If the frame is empty, break immediately if (frame.empty()) break;
    // Write the frame into the file 'outcpp.avi’

    video.write(frame);
    // Display the resulting frame
    imshow( "Frame", frame );

    // Press ESC on keyboard to exit
    char c = (char)waitKey(1);
    if( c == 27 ) break;
  }
  cap.release();
  video.release(); // Closes all the frames destroyAllWindows();
  return 0;

}