1. 자료형과 변수
1. 자료형: 데이터 타입
├─ 자료형
   ├─ 기본 자료형: 실제 데이터 값을 저장
	  └─ int, long, float, double, boolean, char, ...
   └─ 참조 자료형: 데이터가 저장된 메모리 주소 값을 저장
      └─ 클래스, 인터페이스, 배열, 열거형, ...(String)
기본자료형
| 자료형 | 데이터 | 크기(byte) | 표현범위 |
|---|---|---|---|
| int | 정수 | 4 | -2,147,483,648 ~ 2,147,483,647 |
| long | 정수 | 8 | -9,223,372,854,775,808 ~ 9,223,372,854,775,807 |
| float | 실수 | 4 | (정밀도 기준) 6~7자리 |
| double | 실수 | 8 | (정밀도 기준) 15자리 |
| boolean | 참/거짓 | 1 | true, false |
| char | 문자 | 2 | 하나의 문자 |
2. 변수: 자료(값)를 저장하기 위한 공간
선언과 동시에 초기화
자료형 변수명 = 값;
// 선언과 동시에 초기화
String name ="자바";
int hour = 15;
double score = 90.5;
char grade = 'A';
boolean pass = true;
선언과 초기화 분리
자료형 변수명;
변수명 = 값;
// 선언 따로,값 저장 따로
int hour;
hour = 15;
3. 주석: 코드에 설명을 추가할 때 사용(문장 실행X)
한줄 주석: //
어떤 문장 1; // 주석
// 어떤 문장2;
int hour = 15; // 현재시각(15시)
// double score = 90.5;
여러 줄 주석: /* 주석 내용 */
/* 어떤 문장 1; 어떤 문장 2; */
/* int hour = 15;
double score = 90.5; */
4. 변수 이름 짓는 법
변수명: 값을 가장 잘 표현하는 이름
1. 밑줄(_), 문자(abc), 숫자(123) 사용 가능! (공백 사용 불가)
2. 밑줄 또는 문자로 시작 가능
3. 한 단어 또는 2개 이상 단어의 연속
4. 소문자로 시작, 각 단어의 시작 글자는 대문자(첫 단어 제외)
5. 예약어 사용 불가 ex) public, static, void, int, ...
6. 대소문자 구분 ex) myName과 myname은 다른 변수
5. 상수: 변하지 않는 값
final 자료형 변수명 = 값;
final int hour = 15;
hour = 20; // 값 변경 불가(에러 발생)
6. 형 변환: 정수, 실수, 문자열 간의 변환
(자료형) 변수명 or 값;
묵시적 형 변환(=자동 형 변환)
int -> long -> float -> double
int score = 93;
// 실수로 변환
float score_f = (float)score; // 변수명
double score_d = (double)93;
// (float), (double) 생략 가능
명시적 형 변환
double -> float -> long -> int
dobule score_d = 98.8;
int score = (int) score_d;
// (int) 생략 불가
2. 연산자
1. 연산자: 값의 계산을 위해 사용되는 기호
산술 연산자
+(더하기), -(빼기), *(곱하기), /(나누기), %(나머지), ++(증가), --(감소)
대입 연산자
=: 오른쪽에 있는 값 또는 식을 왼쪽에 있는 변수에 대입
+=: (왼쪽 + 오른쪽) 결과를 왼쪽에 대입
-=: (왼쪽 - 오른쪽) 결과를 왼쪽에 대입
*=: (왼쪽 * 오른쪽) 결과를 왼쪽에 대입
/=: (왼쪽 / 오른쪽) 결과를 왼쪽에 대입
%=: (왼쪽 % 오른쪽) 결과를 왼쪽에 대입
비교 연산자
>: 왼쪽이 오른쪽보다 큰가?
>=: 왼쪽이 오른쪽보다 크거나 같은가?
<: 왼쪽이 오른쪽보다 작은가?
<=: 왼쪽이 오른쪽보다 작거나 같은가?
==: 왼쪽과 오른쪽이 같은가?
!=: 왼쪽과 오른쪽이 다른가?
논리 연산자
&&: 왼쪽과 오른쪽이 모두 참인가?
||: 왼쪽 또는 오른쪽이 하나라도 참인가?
!: (참 ㄸ도는 거짓)의 반대
삼항 연산자
조건?참일때:거짓일때: 물음표 왼쪽의 조건이 참이면 왼쪽, 거짓이면 오른쪽
3. 문자열
1. 문자열: 여러 문자들의 집합
String s = "I like Java";| 기능 | 설명 | 예시 | 결과 |
|---|---|---|---|
| length | 길이 | s.length(); | 11 |
| toUpperCase | 대문자로 | s.toUpperCase(); | I LIKE JAVA |
| toLowerCase | 소문자로 | s.toLowerCase(); | i like java |
| contains | 포함 여부 | s.contains("Java"); | true |
| indexOf | 위치 정보 | s.indexOf("Java"); | 7 |
| lastIndexOf | 마지막 위치 정보 | s.lastIndexOf("a") | 10 |
| startsWith | 문자열로 시작하는가? | s.startsWith("I like") | true |
| endsWith | 문자열로 끝나는가? | s.endsWith(".") | false |
| replace | 문자열 변환 | s.replace("like", "love") | I love Java |
| substring | 문자열 자르기 | s.substring(7) | Java |
| trim | 앞뒤 공백 제거 | s.trim() | I like Java |
| concat | 문자열 결합 | s.concat(" and Python") | I like Java and Python |
2. 문자열 비교
정수 비교
int num1 = 3;
int num2 = 3;
System.out.println(num1 == num2); // true
문자열 비교
String s1 = "Java";
String s2 = "Java"
System.out.println(s1 == s2); // true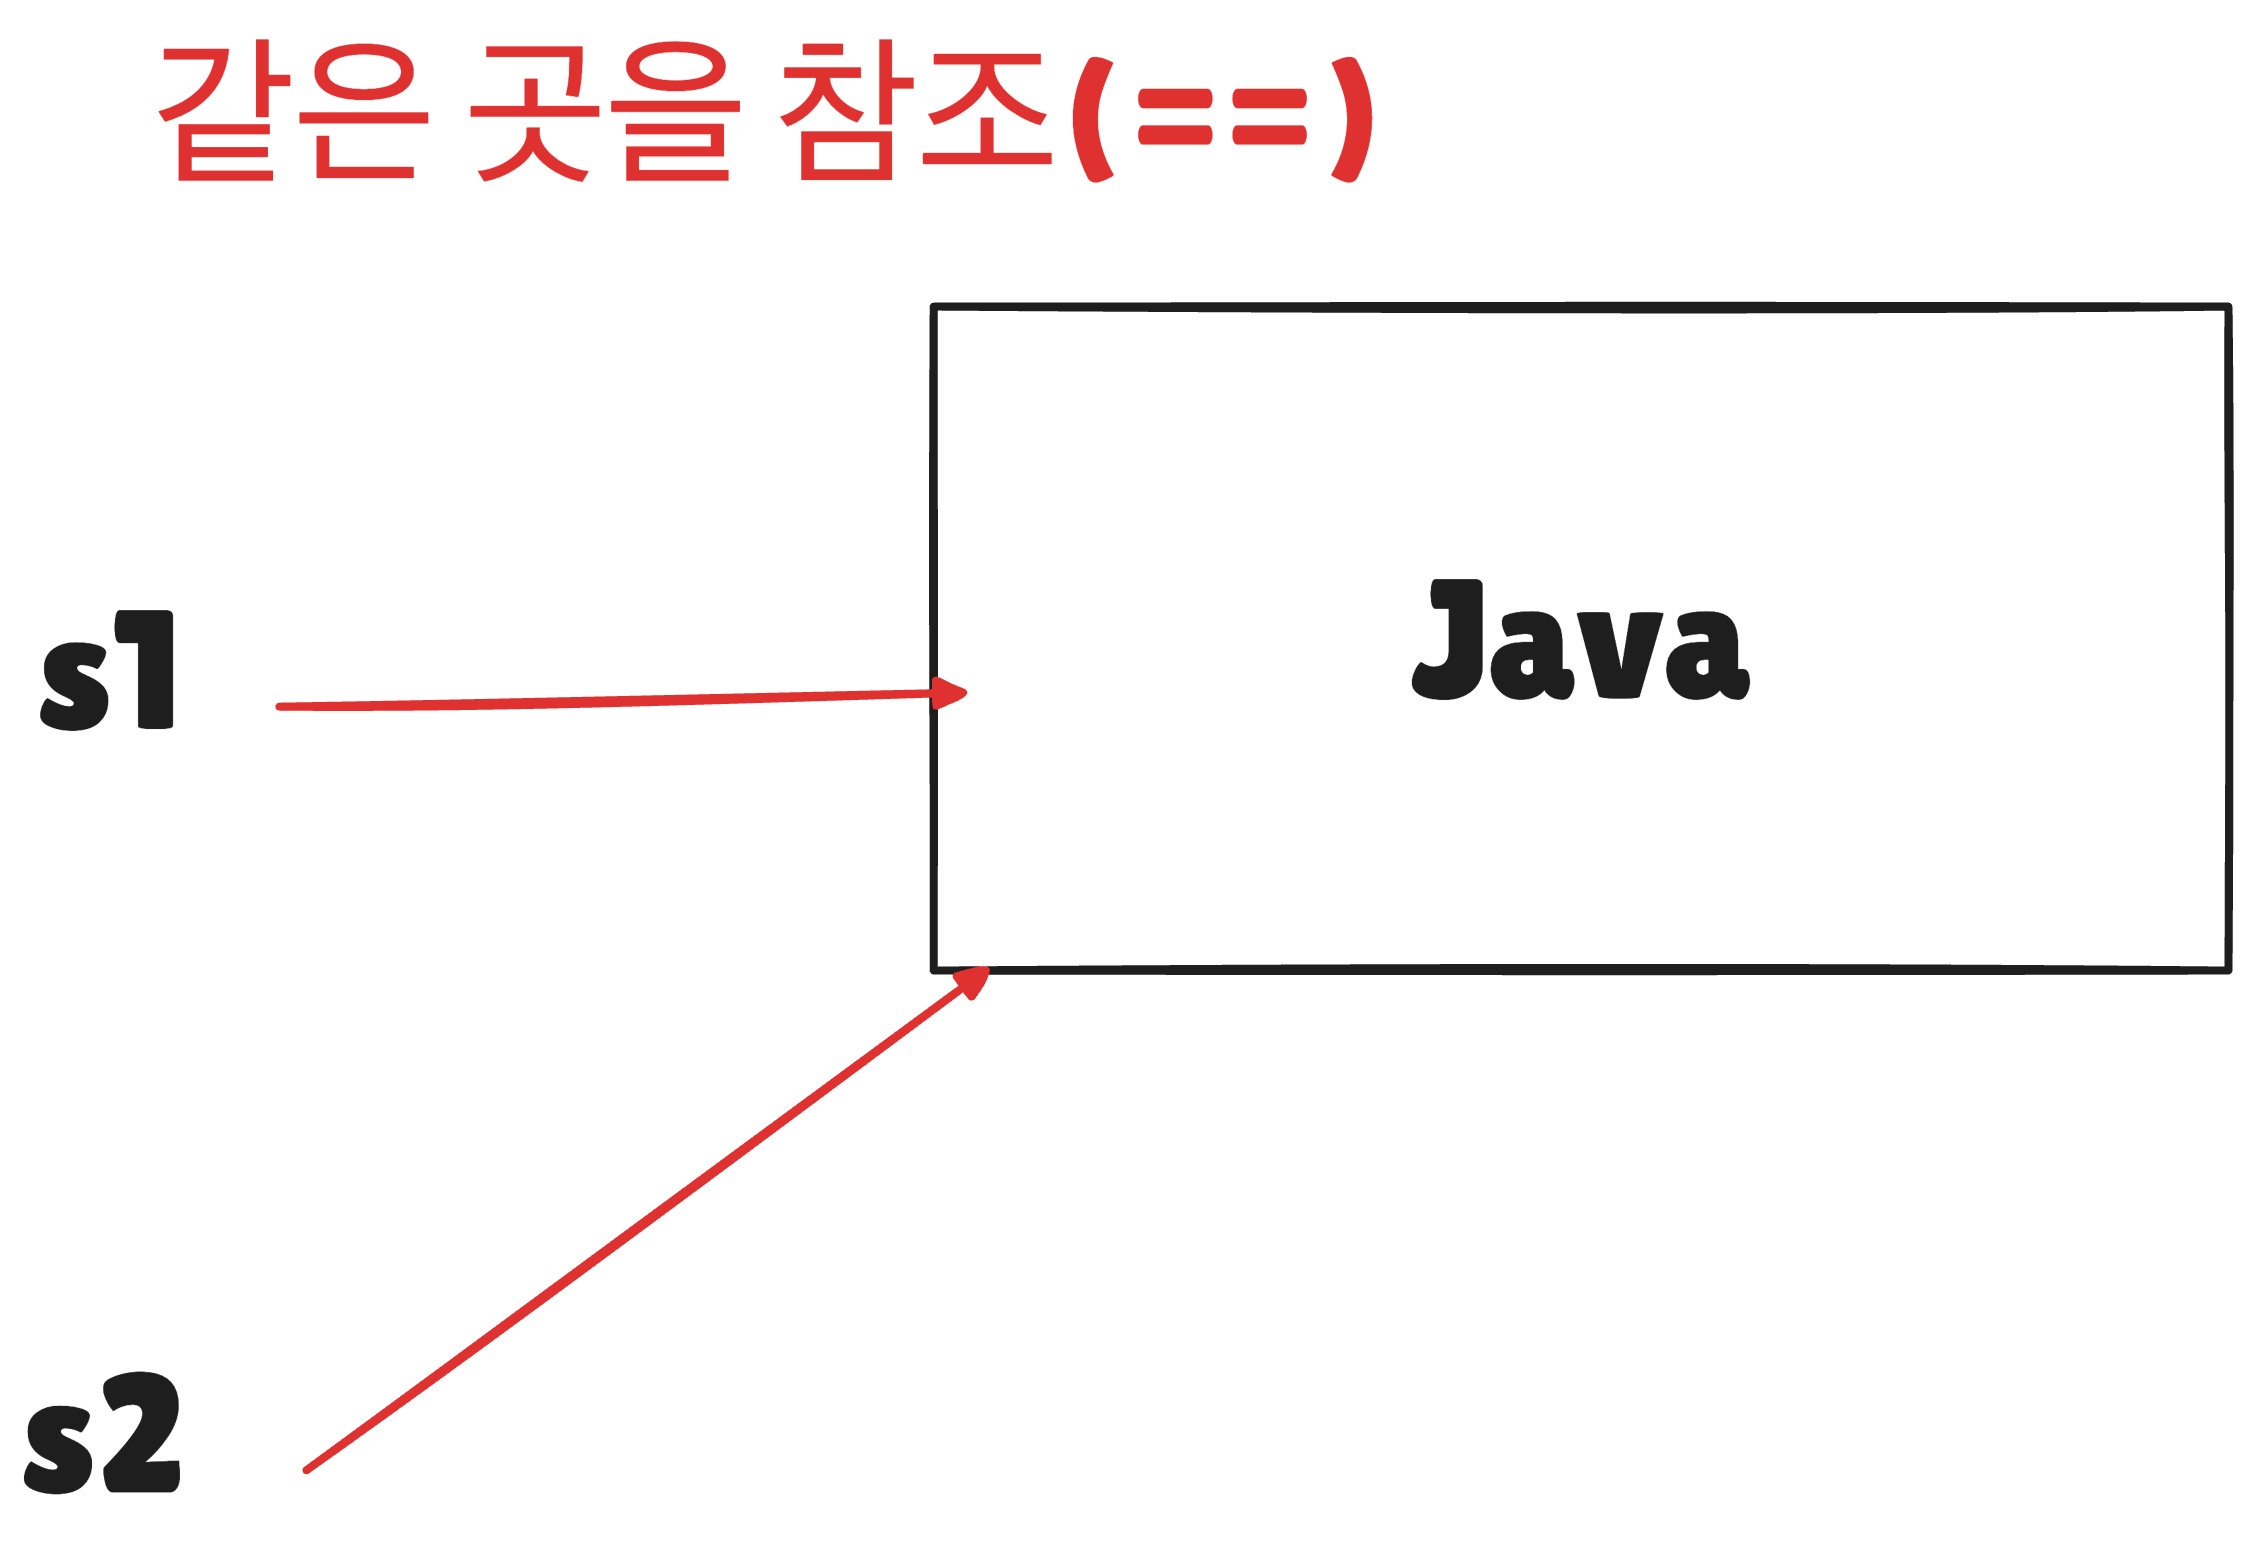
String s1 = new String("Java");
String s2 = new String("Java");
System.out.println(s1 == s2); // false
⭐️ 따라서, 문자열 비교는 equals 이용
String s1 = new String("Java");
String s2 = new String("Java");
System.out.println(s1.equals(s2)); // true(문자열 내용이 같다)
3. 특수문자
| 특수문자 | 설명 | 예시 | 결과 |
|---|---|---|---|
| \n | 줄바꿈 | System.out.println("A\nB); | A B |
| \t | 탭 | System.out.println("A\tB); | A B |
| \ | 역슬래시 | System.out.println("C:\Java); | C:\Java |
| \" | 큰따옴표 | System.out.println("A\"B\"C"); | A"B"C |
| \' | 작은 따옴표 | System.out.println("A\'B\'C"); | A'B'C |
4. 제어문
1. If: 조건에 따른 분기
if(조건) 명령문;
또는
if(조건) { 명령문1; 명령문2; ...}
2. Else: 조건을 만족하지 않는 경우
if(조건)
	명령문;
else
	명령문;
또는
if(조건) {
	명령문;
} else{
	명령문;
}
3. Else If: 다른 조건 추가
if(조건1)
	명령문;
else if(조건2)
명령문;if(조건1) {
명령문;
} else if(조건2){
명령문;
}4. Switch Case: 경우에 따른 분기
switch(조건) {
	case 값1: 명령문
    	break;
    case 값2: 명령문
    	breka;
    ...
    default: 명령문
}
5. For: 반복문
for(선언;조건;증감)
	명령문;
또는
for(선언;조건;증감) {
	명령문 1;
    명령문 2;
}
6. While: 또 다른 반복문
while(조건)
	명령문;
또는
while(조건) {
	명령문1;
    명령문2;
}
7. Do While: 명령문 한 번은 무조건 실행
do {
	명령문1;
    명령문2;
} while(조건)
8. 이중 반복문: 반복문의 중첩
for(int i=0;i<2;i++){
	for(int j=0;j<3;j++){
    	System.out.println("안녕?");
    }
}
// 총 6번 반복 2x3
9. Break: 반복문 탈출
for(int i=0;i<5;i++){
	if(i==3) break;
	System.out.println("안녕?");
}
/*
안녕?
안녕?
안녕?
*/
10. Continue: 반복문 건너뛰기
for(int i=0;i<5;i++){
	if(i==3) continue;
	System.out.println("안녕?");
}
/*
안녕?
안녕?
(3번째는 건너뜀)
안녕?
안녕?
*/
5. 배열
1. 배열: 같은 자료형의 값 여러 개
자료형[] 변수명 = new 자료형[크기];
자료형 변수명[] = new 자료형[크기];
int[] numbers = new int[5];
String[] names = new String[3];
또는
int numbers[] = new int[5];
String names[] = new String[3];
변수명[인덱스] = 값;: 배열에 값 넣기
→ 인덱스는 항상 0부터 시작
int[] numbers = new int[5];
numbers[0] = 1;
numbers[1] = 5;
numbers[2] = 10;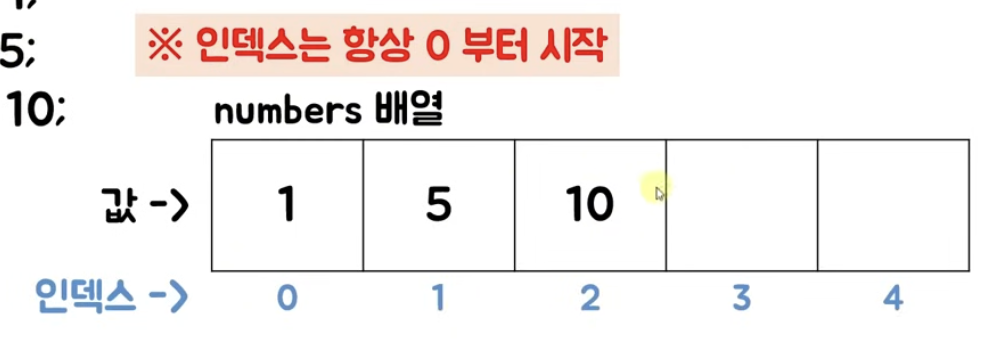
변수 생성 및 초기화
자료형[] 변수명 = new 자료형[]{값1, 값2, ...};
자료형[] 변수명 = {값1, 값2, ...};
int[] numbers = new int[]{1, 2, 3, 4, 5};
String[] names = new String[]{"A", "B", "C"};
또는
int numbers[] = {1, 2, 3, 4, 5};
String names[] = {"A", "B", "C"};
2. 배열순회: 반복문 이용한 배열의 각 요소 접근
for(int i=0;i<배열.length;i++){
	... // 배열[i]
}
또는
for(int i : 배열) {
	... // i
}
ex)
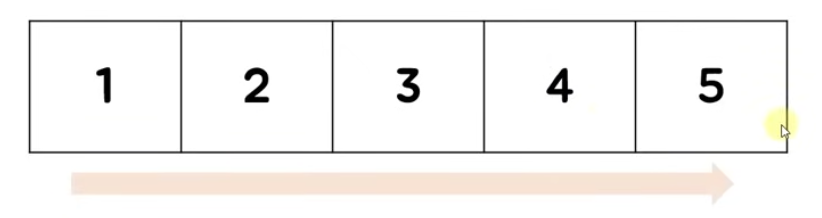
int[] numbers = {1,2,3,4,5};

for(int i=0;i<numbers.length;i++){
	System.out.println(numbers[i]);
}

for(int i:numbers){
    System.out.println(i);
}
3. 다차원 배열: 2차원 이상 배열
1차원 배열
2차원 배열
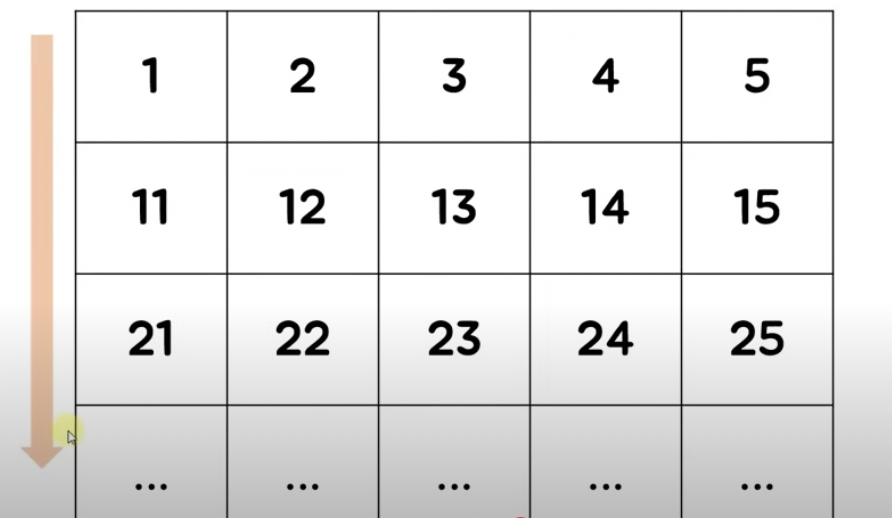
자료형[][] 변수명 = new 자료형[세로][가로];
int[][] numbers = new int[2][5];
numbers[0][2] = 3;
선언+초기화
int[][] numbers = new int[][] {
        {1,2,3,4,5},
        {6,7,8,9,10}
};
4. 다차원 배열 순회
for(int i=0;i<세로;i++){
	for(int j=0;j<가로;j++){
    	... // 배열[i][j]
    }
}int[][] numbers = new int[][] {
{1,2,3,4,5},
{6,7,8,9,10}
};
for(int i=0;i<numbers.length;i++){
for(int j=0;j<numbers[i].length;j++){
System.out.println(numbers[i][j]);
}
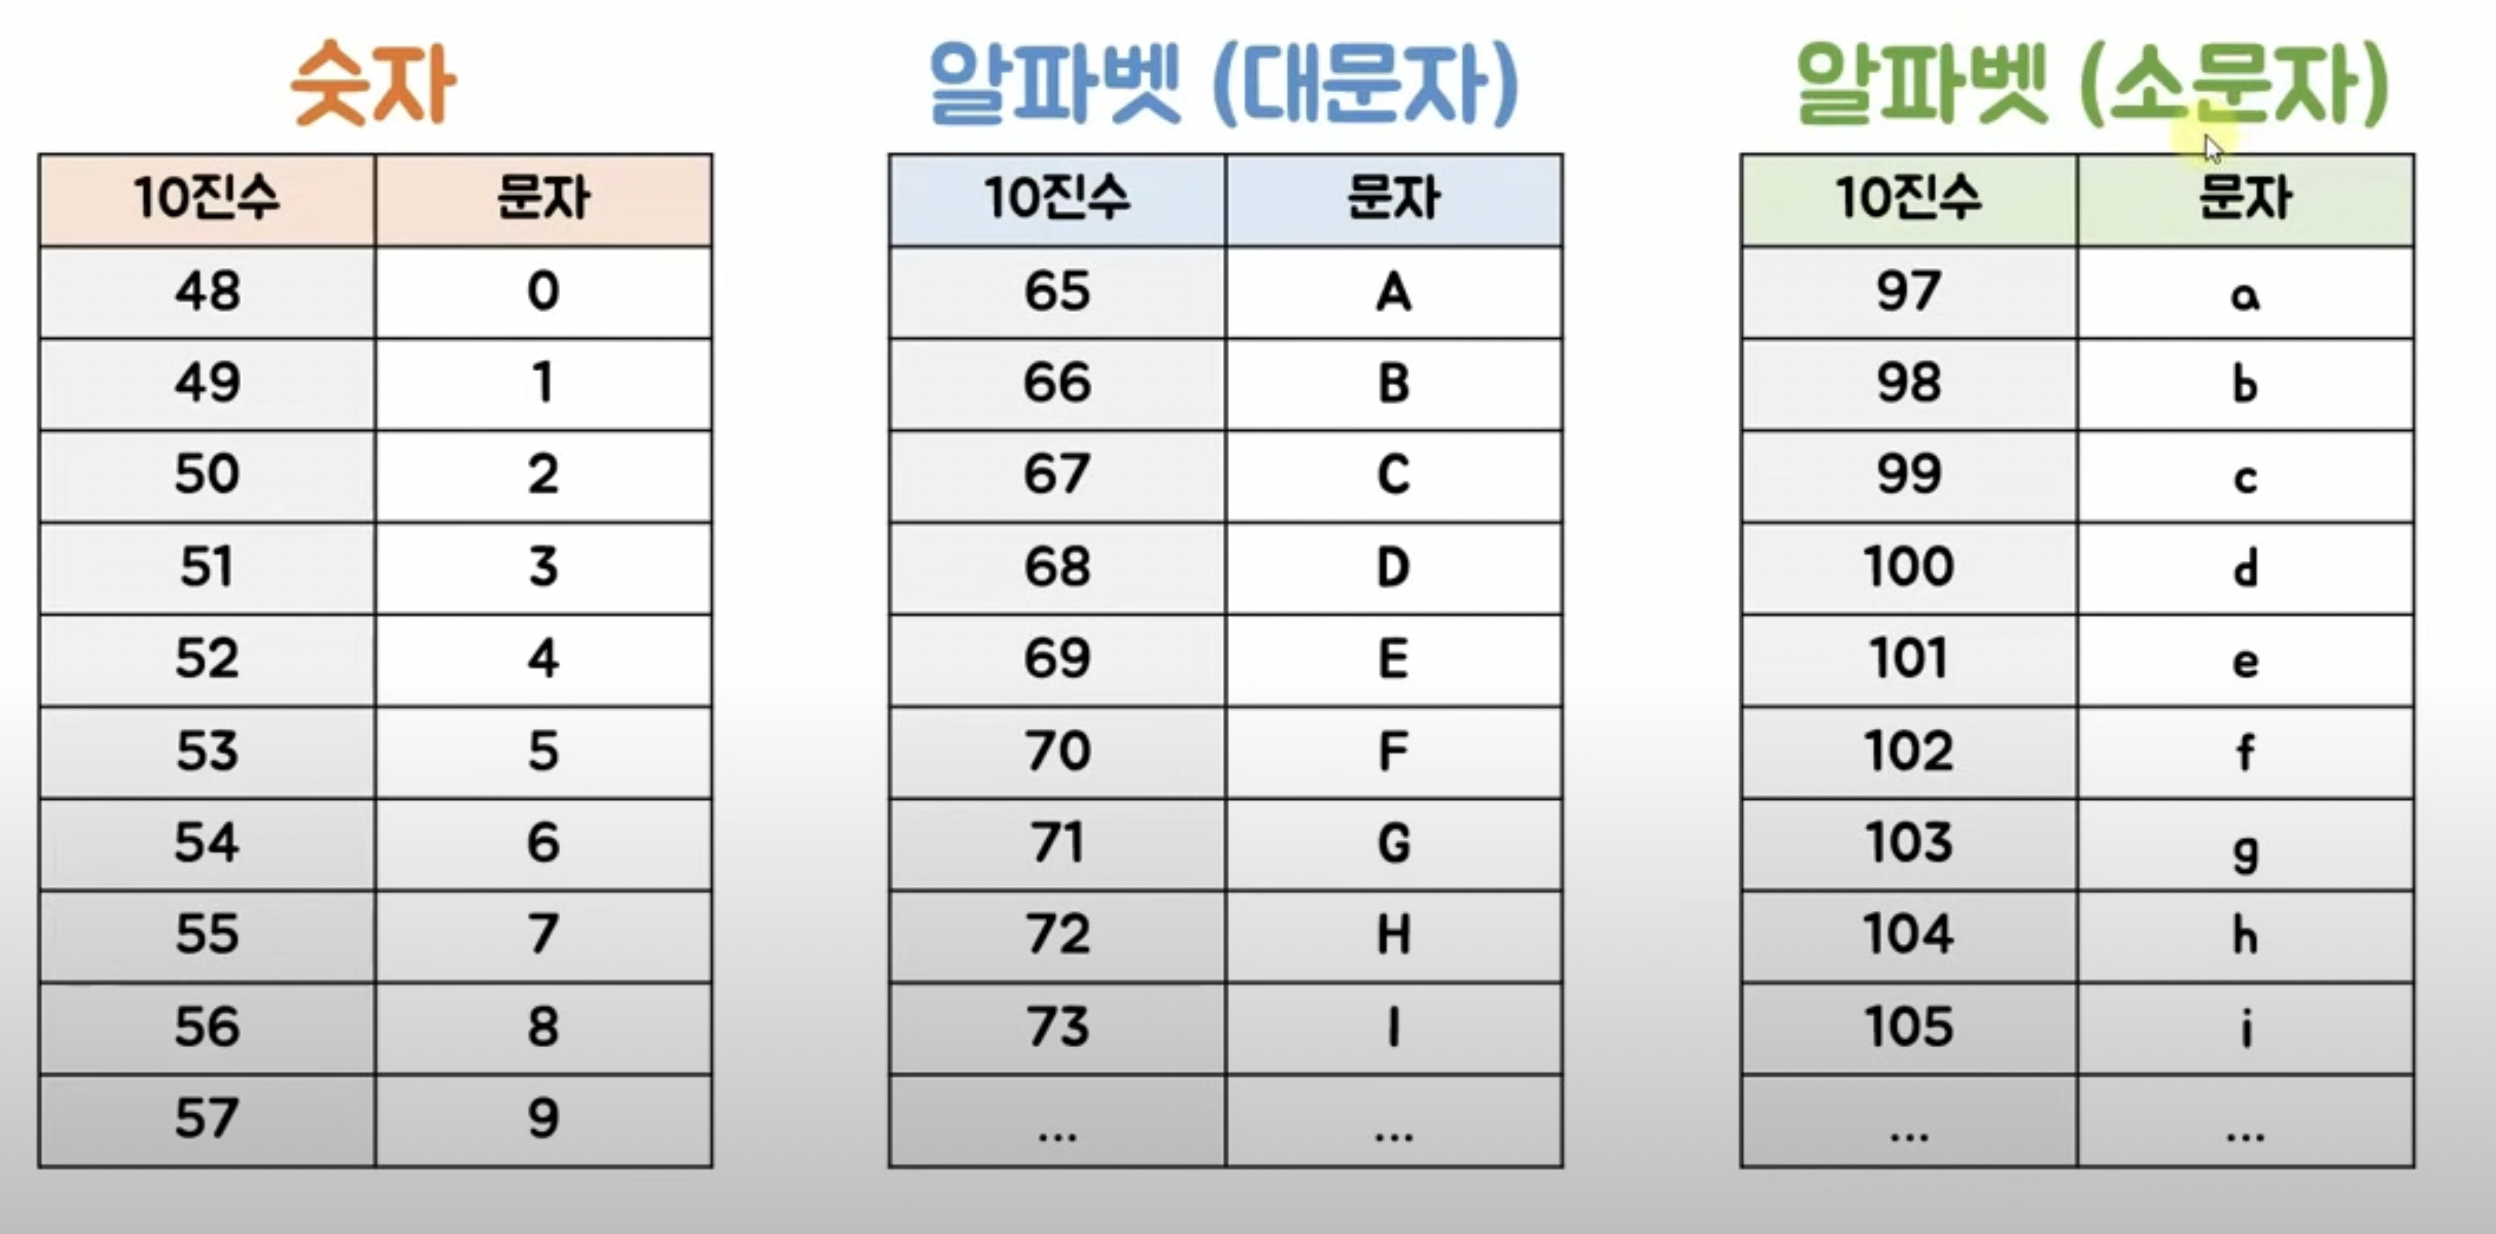
}5. 아스키 코드: (ANSI) 미국 표준 코드
6. 메소드
1. 메소드: 특정 기능을 수행하기 위한 코드의 묶음
접근제어자 반환형 메소드명(전달값){
	명령문1;
    명령문2;
    ...
    // return 반환값;
}
public static void print(){
System.out.println("안녕");
}
public static void main(String[] args){
print(); // 메소드 호출
}- 메소드는 한 번만 정의하면, 필요한 만큼 얼마든지 사용 가능
2. 전달값=파라미터: 메소드 호출 시 전달하는 값
public static void main(String[] args){
    print(); // 안녕
    printA(3); // 3
    printB(1,2); // 3
}
// 전달값이 없는 메소드
public static void print(){
    System.out.println("안녕");
}
// 전달값(1개)이 있는 메소드
public static void printA(int a){
    System.out.println(a);
}
// 전달값(2개)이 있는 메소드
public static void printB(int a, int b){
    System.out.println(a+b);
}
3. 반환값: 메소드 실행 결과 반환
public static void main(String[] args){
    int num = getMaxLottoNumber();
    System.out.println(num); // 45
}
public static int getMaxLottoNumber(){
    return 45; // 반환 값
}
4. 전달값과 반환값
public static void main(String[] args){
    int result = add(1, 2);
    System.out.println("1+2="+ result);
}
public static int add(int a, int b){
    return a+b; // 반환 값
}
5. 메소드 오버로딩: 같은 이름, 다른 매개변수
접근제어자 반환형 메소드명(정수 전달값){}

접근제어자 반환형 메소드명(정수 전달값1, 정수 전달값2){}

접근제어자 반환형 메소드명(실수 전달값){}
public static void main(String[] args){
System.out.println(add(1,2));
System.out.println(add(1,2,3));
System.out.println(add(5.2, 3.2));
}
public static int add(int a, int b){
return a+b;
}
public static int add(int a, int b, int c){
return a+b+c;
}
public static double add(double a, double b){
return a+b;
}6. 변수의 범위: 변수가 유효한 영역
public static void main(String[] args){
    int a = 10; // a는 main 함수 내에서만 사용 가능
    System.out.println(a); // 10
}
public static void scope(){
    System.out.println(a); // error → a 사용 불가
}
public static void main(String[] args){
System.out.println(b); // 에러 발생 b 사용 불가
}
public static void scope(){
int b = 20; // scope 메서드 내에서만 사용 가능!
System.out.println(b); // 20
}public static void main(String[] args){
int c= 30;
if(c>10){
int d = 40; // d는 if 조건문 내에서만 사용 가능
System.out.println(d);
}
System.out.println(d); // 에러 발생 d 사용 불가
}7. 클래스
1. 클래스: 데이터와 기능을 포함하는 코드 묶음
- 클래스로부터 만들어진 실체가 바로 "객체"
클래스 만들기
class 클래스명 {

}
ex) Person 클래스 만들기
class Person {

}

public static void main(String[] args){
    // 객체 만들기
    // 클래스명 객체이름 = new 클래스명();
    Person person = new Person();
}
2. 인스턴스 변수: 클래스 내에 선언된 변수
- 객체마다 서로 다른 값 가질 수 있음
class 클래스명 {
	인스턴스 변수1
    인스턴스 변수2
    ...
}
ex) Person 객체에 인스턴스 변수에 값 정의하기
class Person {
	// 인스턴스 변수
	String name;
    int age;
}

public static void main(String[] args){
    // 인스턴스 변수에 값 정의
    Person person = new Person();
    // 객체이름.인스턴스변수명
    person.name = "철수";
    person.age = 20;
}
3. 클래스 변수: 클래스 내에 static으로 선언된 변수
- 모든 객체가 공유하는 변수
- 객체 만들 필요없이 클래스 명으로 접근 가능
class 클래스명 {
	static 클래스 변수1
    static 클래스 변수2
    ...
}
ex) Person 클래스에 사람 수 카운트하는 클래스 변수만들기
class Person {
	// 인스턴스 변수
	String name;
    int age;
    // 클래스 변수
    static int personCount = 0;
}

public static void main(String[] args){
    // 클래스 변수 사용하기
    // 클래스명.클래스변수
    Person.personCount = 10;
    System.out.println(Person.personCount); // 10
}
4. 인스턴스 메소드: 클래스 내에 정의된 메소드
class 클래스명 {
	인스턴스 메소드1
    인스턴스 메소드2
    ...
}
ex) Person 클래스에 인스턴스 메소드 만들기
class Person {
	// 인스턴스 변수
	String name;
    int age;
    // 클래스 변수
    static int personCount = 0;

    // 인스턴스 메소드
    public void introduce(){
    	System.out.println("이름:"+name);
        System.out.println("나이:"+age);
    }
}

public static void main(String[] args){
    // 인스턴스 메소드 호출하기
    // 객체명.메소드명();
    Person person = new Person();
    person.name = "철수";
    person.age = 20;
    person.introduce(); // 메소드 호출
}
5. 클래스 메소드: 클래스 내에 static으로 정의된 메소드
class 클래스명 {
	static 클래스 메소드1
    static 클래스 메소드2
    ...
}
ex) Person 클래스에 클래스 메소드 만들기
class Person {
	// 인스턴스 변수
	String name;
    int age;
    // 클래스 변수
    static int personCount = 0;

    // 클래스 메소드
    public static void printPersonCount(){
    	System.out.println(personCount);
    }
}

public static void main(String[] args){
    // 클래스 메소드 호출하기
    // 클래스명.클래스메소드
    Person.personCount = 10;
    Person.printPersonCount(); // 10
}
6. This:자기자신(인스턴스/지역변수 구분)
this.인스턴스변수
public static void main(String[] args){
    Person person = new Person();
    person.setName("철수");
    System.out.println(person.name); // 철수
}

class Person {
    String name;
    public void setName(String name){
        this.name = name;
    }
}
7. 생성자:객체가 생성될 떄 호출되는 메소드
클래스명(전달값){
	초기화 명령문
}
public static void main(String[] args){
Person person = new Person("철수", 20);
}
class Person {
String name;
int age;
// 생성자
Person(String name, int age){
// 초기화 작업
this.name = name;
this.age = age;
}
}8. Getter와 Setter
Getter: 인스턴스 변수 값 반환
반환형 get이름() {
	return 반환값;
}
Setter: 인스턴스 변수의 값 설정
void set이름(전달값) {

}
public static void main(String[] args){
Person person = new Person();
person.setAge(20); // 값 설정
System.out.println(person.getAge()); // 값 가져오기
}
class Person {
String name;
int age;
// Getter
public int getAge(){
return age;
}
// Setter
public void setAge(int age){
this.age = age;
}
}9. 접근 제어자: 접근 권한 지정
접근제어자 class 클래스명 {
	접근제어자 인스턴스 변수
    접근제어자 인스턴스 메소드
}| 접근 제어자 | 접근 가능 범위 |
|---|---|
| private | 해당 클래스 내에서만 |
| public | 모든 클래스에서 |
| default | 같은 패키지 내에서만(아무것도 적지 않았을 때) |
| protected | 같은 패키지 내에, 다른 패키지인 경우 자식 클래스에서 |
public static void main(String[] args){
    Person person = new Person();
    System.out.println(person.age); // error
    person.setAge(20); // 값 설정
}

class Person {
    private int age; // 클래스 외부에서 사용 불가
    // Setter
    public void setAge(int age){
        this.age = age;
    }
}
10. 패키지: 관련 클래스들의 그룹화(폴더)
package 패키지명;
다른 패키지에 있는 클래스 사용
import 패키지명.클래스명;
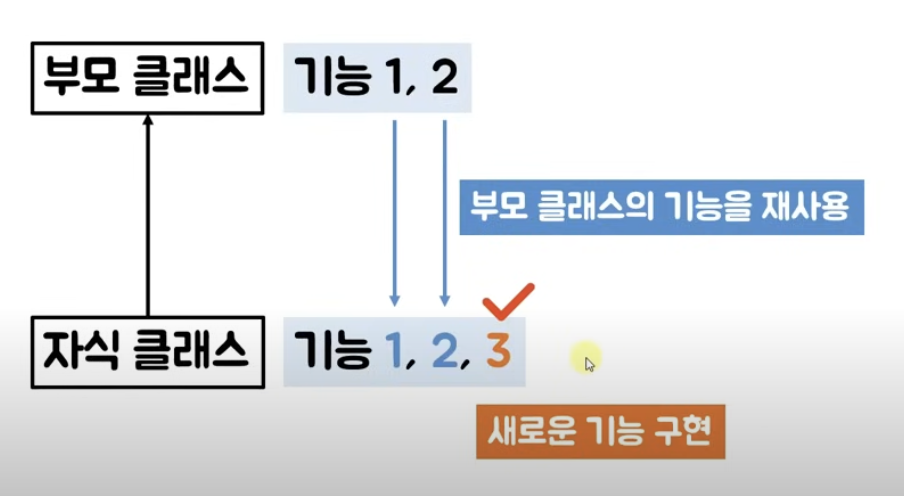
11. 상속: 특정 클래스의 기능을 재사용 및 확장
class 자식클래스명 extends 부모클래스명 {
}
public class Exam {
public static void main(String[] args){
Student student = new Student("aa", 10);
student.whereInfo();
}
}
class Person {
public int age;
public static int n = 10;
public Person(int age){
this.age = age;
}
public void setAge(int age){
this.age = age;
}
}
class Student extends Person {
String school;
// 부모 클래스의 인스턴스 변수나 메소드가 private일 경우 getter, setter 이용해야함
public Student(String school, int age) {
super(age);
this.school = school;
}
public void whereInfo() {
System.out.println(this.school+" "+this.age+" "+n);
}
}12. 메소드 오버라이딩: 부모 클래스의 메소드 재정의
class Person {
    public void introduce(){
        System.out.println("사람입니다.");
    }
}

class Student extends Person {
    @Override
    public void introduce() {
        System.out.println("학생입니다.");
    }
}
13. 다형성: 여러 형태로 동작할 수 있는 성질
public class Exam {
    public static void main(String[] args){
        // 서로 다른 객체를 만들고, 부모 클래스로 똑같이 참조 가능
        Person person = new Person();
        Person student = new Student();
        person.introduce(); // 사람입니다.
        student.introduce(); // 학생입니다.
    }
}

class Person {
    public void introduce(){
        System.out.println("사람입니다.");
    }
}

class Student extends Person {
    @Override
    public void introduce() {
        System.out.println("학생입니다.");
    }
}
14. Super: 부모 클래스 접근
super.부모 클래스 변수;
super.부모 클래스 메소드();
super();
class Person {
int age;
Person(int age){
this.age = age;
}
}
class Student extends Person {
String school;
Student(int age, String school){
super(age); //this.age = age;
this.school = school;
}
}15. 참조(Reference): 객체의 메모리 주소를 가리킴
기본 자료형
int a = 10;
int b = 20;
a = b; // b의 값을 a에 복사
참조 자료형
String s1 = "사과";
String s2 = "바나나";
s1 = s2; // s2의 값을 s1에 복사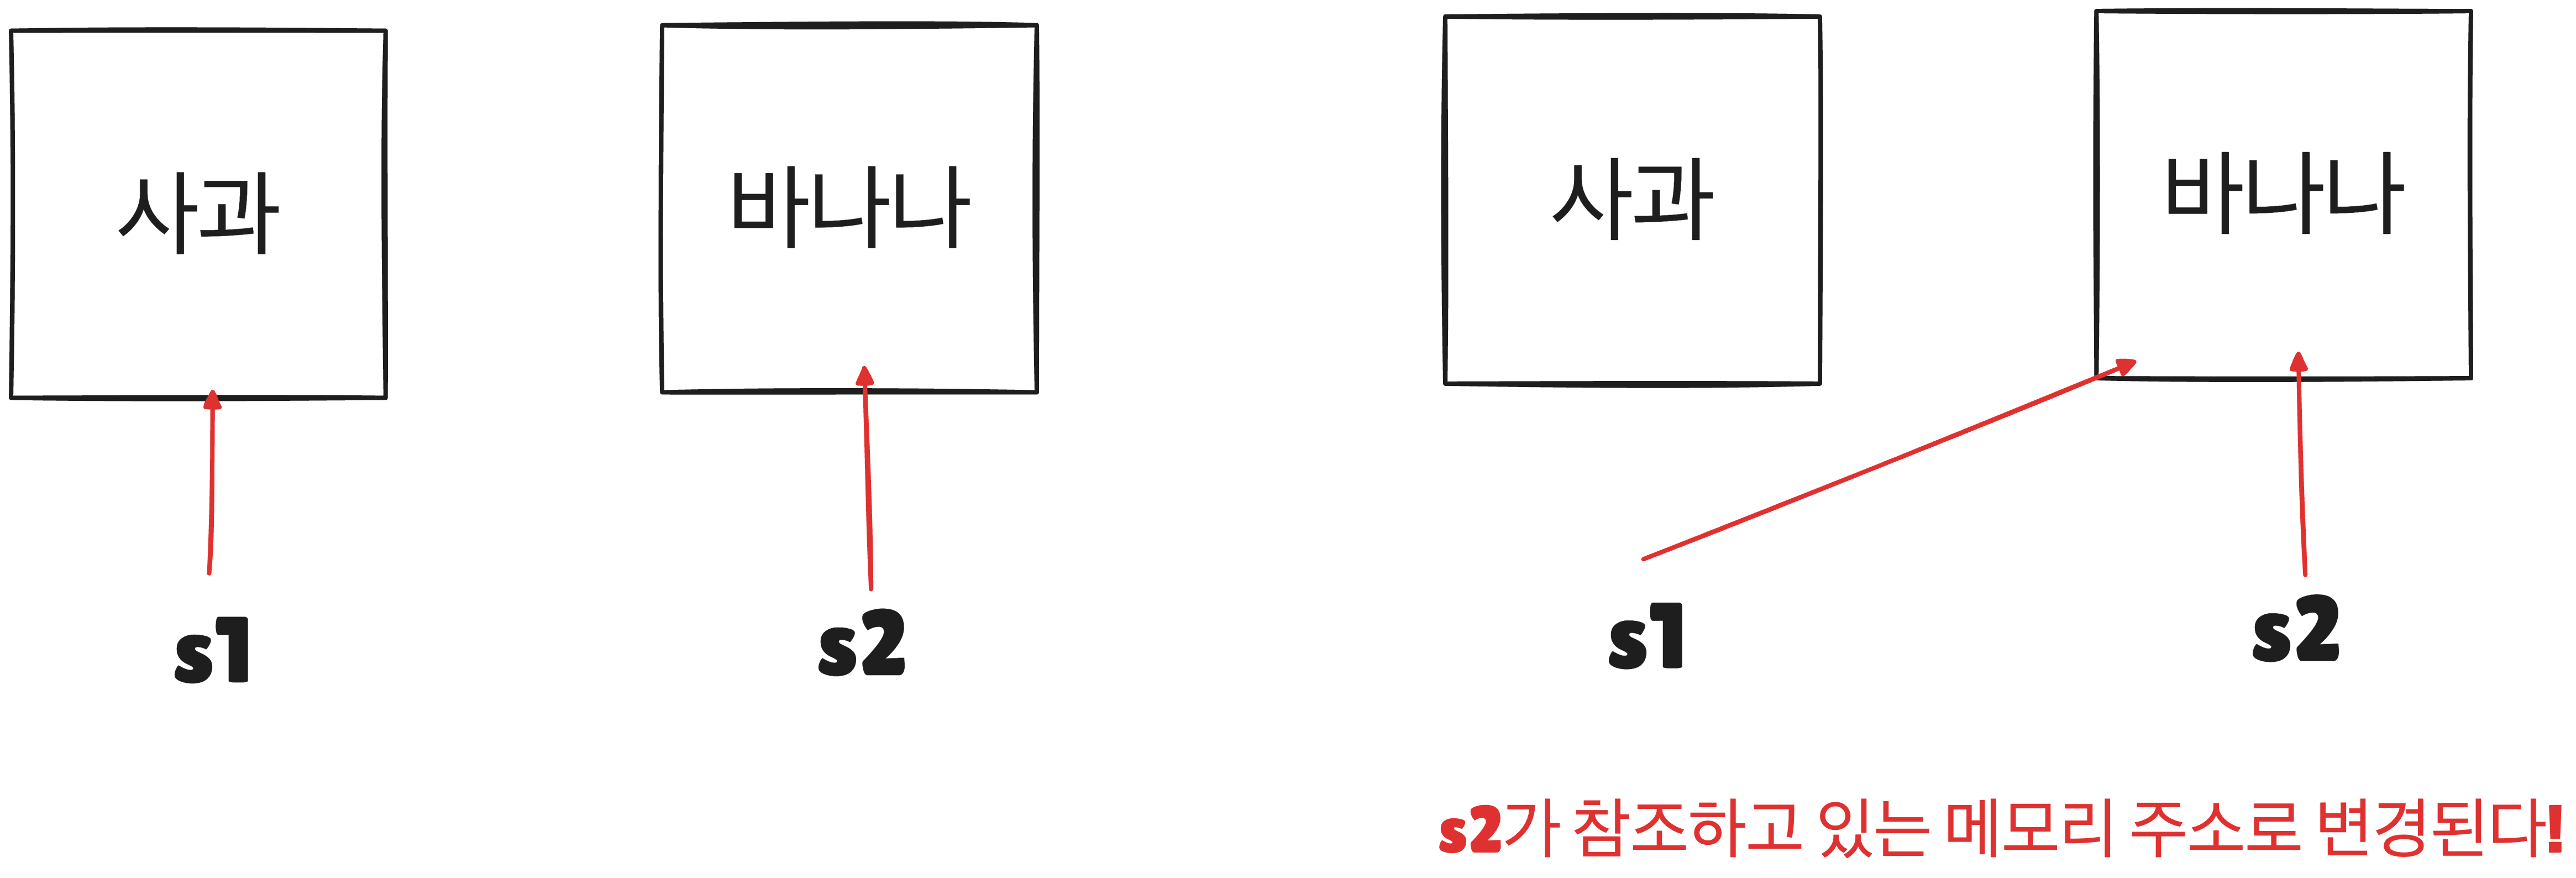
16. Final: 변경할 수 없게
- final은 값을 변경할 수 없기 때문에 선언과 동시에 초기값을 넣어주어야함!
class Person {
    final String name = "철수";
    // final로 정의된 메소드는 재정의 불가!
    public final void introduce() {
        System.out.println("사람입니다.");
    }
}

class Student extends Person {
    // error 오버라이딩 불가
    public void introduce() {
        System.out.println("학생입니다.");
    }
}
17. 열거형(enum): 상수들의 묶음
enum 열거형명 {
	상수명1
    상수명2
    ...
}
public class Exam {
public static void main(String[] args){
Person person = new Person();
person.setGender(Gender.MALE); // MALE, FEMALE
person.setGender("DD"); // Error(Gender 타입이 와야함)
}
}
enum Gender {
MALE,
FEMALE
}
class Person {
Gender gender;
public void setGender(Gender gender) {
this.gender = gender;
}
}8. 추상클래스와 인터페이스
1. 추상 클래스: 아직 완성되지 않은 클래스
abstract class 클래스명 {
}
// 추상 클래스 생성
abstract class Shape {
abstract double calculateArea();
}
// 자식 클래스에서 메서드 완성시키기
class Square extends Shape{
private double s;
public Square(double s){
this.s = s;
}
@Override
double calculateArea() {
return s*s;
}
}
class Circle extends Shape{
private double r;
public Circle(double r){
this.r = r;
}
@Override
double calculateArea() {
return Math.PI*r*r;
}
}2. 인터페이스: 클래스를 작성할 때 기본이 되는 뼈대
interface 인터페이스명{
}
// 인터페이스 생성
interface Shape {
double calculateArea(); // 인터페이스를 구현하는 클래스에서 반드시 정의해주어야 함
}
// 자식 클래스에서 인터페이스 내 메서드 완성시키기
class Square implements Shape{
private double s;
public Square(double s){
this.s = s;
}
@Override
public double calculateArea() {
return s*s;
}
}
class Circle implements Shape{
private double r;
public Circle(double r){
this.r = r;
}
@Override
public double calculateArea() {
return Math.PI*r*r;
}
}9. 제네릭스
1. 제네릭스: 다양한 형태의 데이터를 다룰 수 있게
- 코드의 재사용성 높이고, 타입 안정성 확보
T 변수명
제네릭스 이용X(오버로딩 개념 활용)
public class Exam {
    public static void main(String[] args){
        int intValue = 3;
        double doubleValue = 3.14;
        String stringValue = "안녕";

        printValue(intValue);
        printValue(doubleValue);
        printValue(stringValue);
    }

    // 원래는 이런식으로 오버로딩 이용해야 했음
    public static void printValue(int value){
        System.out.println(value);
    }
    public static void printValue(double value){
        System.out.println(value);
    }
    public static void printValue(String value){
        System.out.println(value);
    }
}
제네릭스 이용
public class Exam {
    public static void main(String[] args){
        int intValue = 3;
        double doubleValue = 3.14;
        String stringValue = "안녕";

        printValue(intValue);
        printValue(doubleValue);
        printValue(stringValue);
    }

    // 제네릭스 이용하면 여러개 만들지 않아도됨
    public static <T> void printValue(T value){
        System.out.println(value);
    }
}
2. 제네릭 클래스: 제네릭 기반 클래스
class 클래스명<T> {
}
제네릭 클래스 X
- 타입만 다르고 하는 동작은 동일함 → 이럴 때 제네릭 이용!
public class Exam {
    public static void main(String[] args){
        BoxInteger iBox = new BoxInteger();
        iBox.setData(3); // 정수 담기

        BoxString sBox = new BoxString();
        sBox.setData("안녕"); // 문자열 담기
    }
}

class BoxInteger {
    int data;
    public void setData(int data){
        this.data = data;
    }
}
class BoxString {
    String data;
    public void setData(String data){
        this.data = data;
    }
}
제네릭 클래스
public class Exam {
    public static void main(String[] args){
        Box<Integer> iBox = new Box<>();
        iBox.setData(3); // 정수 담기

        Box<String> sBox = new Box<>();
        sBox.setData("안녕"); // 문자열 담기
    }
}

class Box<T> {
    T data;
    public void setData(T data){
        this.data = data;
    }
}
3. Wrapper 클래스: 기본 자료형 + 추가기능 제공 클래스
Integer: int 기본자료형
Double: double 기본자료형
Character: char 기본자료형
Integer i = 1; // int i = 1;
Double d = 1.0; // double d= 1.0;
Character c ='a'; // char c = 'a';

System.out.println(i.intValue()); // 정수로 출력
System.out.println(d.intValue()); // 실수를 정수형태로 변환해서 출력
System.out.println(c.charValue()); // 문자 형태로 출력
4. ArrayList: 배열 기반 리스트, 빠른접근 + 순차저장
ArrayList<T>
ArrayList<String> list = new ArrayList<>();
list.add("철수"); // 리스트에 아이템 추가
list.add("영희");

// 리스트 순회하기
for(String s:list){
    System.out.println(s);
}| 기능 | 설명 | 예시 | 결과 |
|---|---|---|---|
| add | 추가 | list.add("철수"); | {"철수"} |
| get | 가져오기 | list.get(0); | "철수" |
| size | 크기 | list.size() | 1 |
| set | 수정 | list.set(0, "영희"); | {"영희"} |
| contains | 포함 여부 | list.contains("영희"); | true |
| remove | 삭제 | list.remove("영희"); | { } |
| clear | 전체 삭제 | list.clear(); | { } |
5. LinkedList: 연결 리스트, 데이터의 빠른 삽입+삭제
LinkedList<T>
LinkedList<String> list = new LinkedList<>();
list.add("철수");
list.add("영희");

for(String s: list){
    System.out.println(s);
}| 기능 | 설명 | 예시 | 결과 |
|---|---|---|---|
| add | 추가 | list.add("철수"); | {"철수"} |
| get | 가져오기 | list.get(0); | "철수" |
| getFirst | 처음 요소 가져오기 | list.getFirst() | "철수" |
| getLast | 마지막 요소 가져오기 | list.getLast(); | "철수" |
| addFirst | 맨 앞에 추가 | list.addFirst("영희"); | {"영희", "철수"} |
| addLast | 맨 뒤에 추가 | list.addLast("영철"); | {"영희", "철수", "영철"} |
| clear | 전체 삭제 | list.clear(); | { } |
6. HashSet: 순서, 중복을 허용하지 않는 데이터 집합
HashSet<T>
HashSet<String> set = new HashSet<>();
set.add("철수"); // {"철수"}
set.add("영희"); // {"철수", "영희"}
set.add("철수"); // {"철수", "영희"}| 기능 | 설명 | 예시 | 결과 |
|---|---|---|---|
| add | 추가 | set.add("철수"); | {"철수"} |
| contains | 포함여부 | set.contains("영희"); | false |
| size | 크기 | set.size() | 1 |
| remove | 삭제 | set.remove("철수"); | { } |
| clear | 전체 삭제 | set.clear(); | { } |
7. HashMap: (Key, Value) 자료구조, 중복 X, 순서 X
HashMap<K, V>
HashMap<String, Integer> map = new HashMap<>();
map.put("철수", 100);
map.put("영희", 90);| 기능 | 설명 | 예시 | 결과 |
|---|---|---|---|
| put | 추가 | map.put("철수", 100); | {"철수":100} |
| size | 크기 | map.size(); | 1 |
| get | 가져오기 | map.get("철수"); | 100 |
| containsKey | Key포함여부 | map.containsKey("영희"); | false |
| remove | 삭제 | map.remove("철수"); | { } |
| clear | 전체 삭제 | map.clear(); | { } |
8. Iterator: 컬렉션의 모든 데이터 순회
Iterator<T>
ArrayList<String> list = new ArrayList<>();
list.add("철수");
list.add("영희");

Iterator<String> it = list.iterator();
while(it.hasNext()) {
    System.out.println(it.next());
}| 기능 | 설명 | 예시 | 결과 |
|---|---|---|---|
| hasNext | 다음 요소 확인 | it.hasNext(); | true |
| next | 다음 요소 가져오기 | it.next(); | "철수" |
| remove | 삭제 | it.remove(); | { } |
10. 익명클래스, 람다와 스트림
1. 익명 클래스: 한 번만 사용되는 이름없는 클래스
public class Exam {
    public static void main(String[] args){
        Person person = new Person();
        person.introduce(); // 사람입니다.

        // 익명클래스
        Person person2 = new Person() {
            @Override
            public void introduce(){
                System.out.println("익명입니다");
            }
        };
        person2.introduce(); // 익명입니다
    }
}

class Person {
    public void introduce(){
        System.out.println("사람입니다.");
    }
}
2. 람다식: 간결한 형태의 코드 묶음
(전달값1, 전달값2, ...) -> {코드}
public int add(int x, int y){
    return x+y;
}

// 람다식
(x, y) -> x+y
3. 함수형 인터페이스: 람다식을 위한 인터페이스
- 딱 하나의 추상 메서드를 가져야하는 제약사항 존재
@FunctionalInterface
interface 인터페이스명 {
	// 하나의 추상메소드
}
public class Exam {
public static void main(String[] args){
Calculator add = (x, y) -> x+y; // 람다식
int result = add.calculate(2, 3);
System.out.println(result); // 5
}
}
@FunctionalInterface
interface Calculator {
int calculate(int x, int y); // 하나의 추상메소드
}4. 스트림: 배열, 컬렉션 데이터를 효과적으로 처리
List<Integer> numbers = Arrays.asList(1,2,3,4,5);
numbers.stream()
        .filter(n -> n%2 ==0) // 짝수만 필터링
        .map(n -> n*2) // 각 요소 값을 2배로 변환
        .forEach(System.out::println); // 결과 출력
10. 예외처리
1. 예외처리:발생 가능한 문제 상황 처리
try {
	명령문
}catch(변수) {
	예외처리
}int[] numbers = {1,2,3};
int index = 5; // 존재하지 않는 인덱스
try{
int result = numbers[index];
System.out.println("결과: "+result);
}catch (Exception e){
System.out.println("문제 발생");
}2. Catch
try {
	명령문
}catch(변수1) {
	예외처리1
}catch(변수2) {
	예외처리2
}int[] numbers = {1,2,3};
int index = 5; // 존재하지 않는 인덱스
try{
int result = numbers[index];
System.out.println("결과: "+result);
}catch (ArrayIndexOutOfBoundsException e){
// 잘못된 인덱스
System.out.println("문제 발생");
}3. 예외 발생시키기: 의도적으로 예외 상황 만들기
throw new 예외();
try{
    int age = -5;
    if(age < 0){
        throw new Exception("나이는 음수일 수 없습니다");
    }
}catch (Exception e){
    System.out.println(e.getMessage());
}
4. Finally: 항상 실행되는 코드
- 리소스 해제 또는 정리 작업
try {
	명령문
} catch(변수) {
	예외처리
} finally {
	명령문
}try{
int result = 3/0;
}catch (Exception e){
System.out.println("문제 발생");
}finally {
System.out.println("실행 종료");
}5. Try With Resources: 리소스 관리 편하게
try (자원할당){
	명령문
} catch(변수) {
	예외처리
}try(FileWriter writer = new FileWriter("file.txt")){
writer.write("안녕?");
}catch (Exception e){
System.out.println("문제 발생");
}6. 사용자 정의 예외: 직접 정의한 예외
class 클래스명 extends Exception {
}
public class Exam {
public static void main(String[] args){
try{
int age= -5;
if(age<0){
throw new MyException("나이는 음수일 수 없습니다");
}
}catch(MyException e){
System.out.println("문제발생"+e.getMessage());
}
}
}
class MyException extends Exception{
public MyException(String message){
super(message);
}
}7. 예외 처리 미루기: 메소드를 호출한 곳에서 처리
반환형 메소드명() throws 예외 {
	명령문
}
public static void main(String[] args){
try{
divide(3, 0);
}catch(Exception e){
System.out.println("0으로 나눌 수 없어요"); // 예외 처리
}
}
public static int divide(int a, int b) throws Exception{
return a/b;
}11. 쓰레드
1. Thread: 여러 작업을 동시에
class 클래스명 extends Thread {
	public void run() {
    }
}
public class Exam {
public static void main(String[] args){
// 쓰레드 실행
MyThread thread = new MyThread();
thread.start();
/**
* Thread: 1
* Thread: 2
* Thread: 3
* Thread: 4
* Thread: 5
*/
}
}
// 쓰레드 생성
class MyThread extends Thread {
@Override
public void run() {
for(int i=1;i<=5;i++){
System.out.println("Thread: "+i);
}
}
}2. Runnable: 여러 작업을 동시에
- 쓰레드와의 차이점은 클래스 상속은 1개 밖에 안되지만, 인터페이스는 여러 개 상속 가능
class 클래스명 implements Runnable {
	public void run() {
    }
}
public class Exam {
public static void main(String[] args){
MyRunnable runnable = new MyRunnable();
Thread thread = new Thread(runnable);
thread.start();
/**
Runnable: 1
Runnable: 2
Runnable: 3
Runnable: 4
Runnable: 5
*/
}
}
// runnable 생성
class MyRunnable implements Runnable {
@Override
public void run() {
for(int i=1; i<=5;i++){
System.out.println("Runnable: "+i);
}
}
}