
Redux
각각의 컴포넌트 데이터를 한곳에서 관리하는 중앙 저장소
컴포넌트는 공통적으로 사용되는 데이터도 개별적으로 관리하기 때문에 Props를 사용해 데이터를 전달한다.
그래서 이러한 수동적인 과정을 해결하기 위해 Redux를 사용한다.
Redux는 데이터를 중앙 저장소 한곳에서 관리하여 컴포넌트로 직접 전달하기 때문에 컴포넌트는 화면을 그리는 역활에만 집중하면서 별도의 모듈, 라이브러리를 통해 데이터 요청작업을 수행한다.
Redux의 불변성
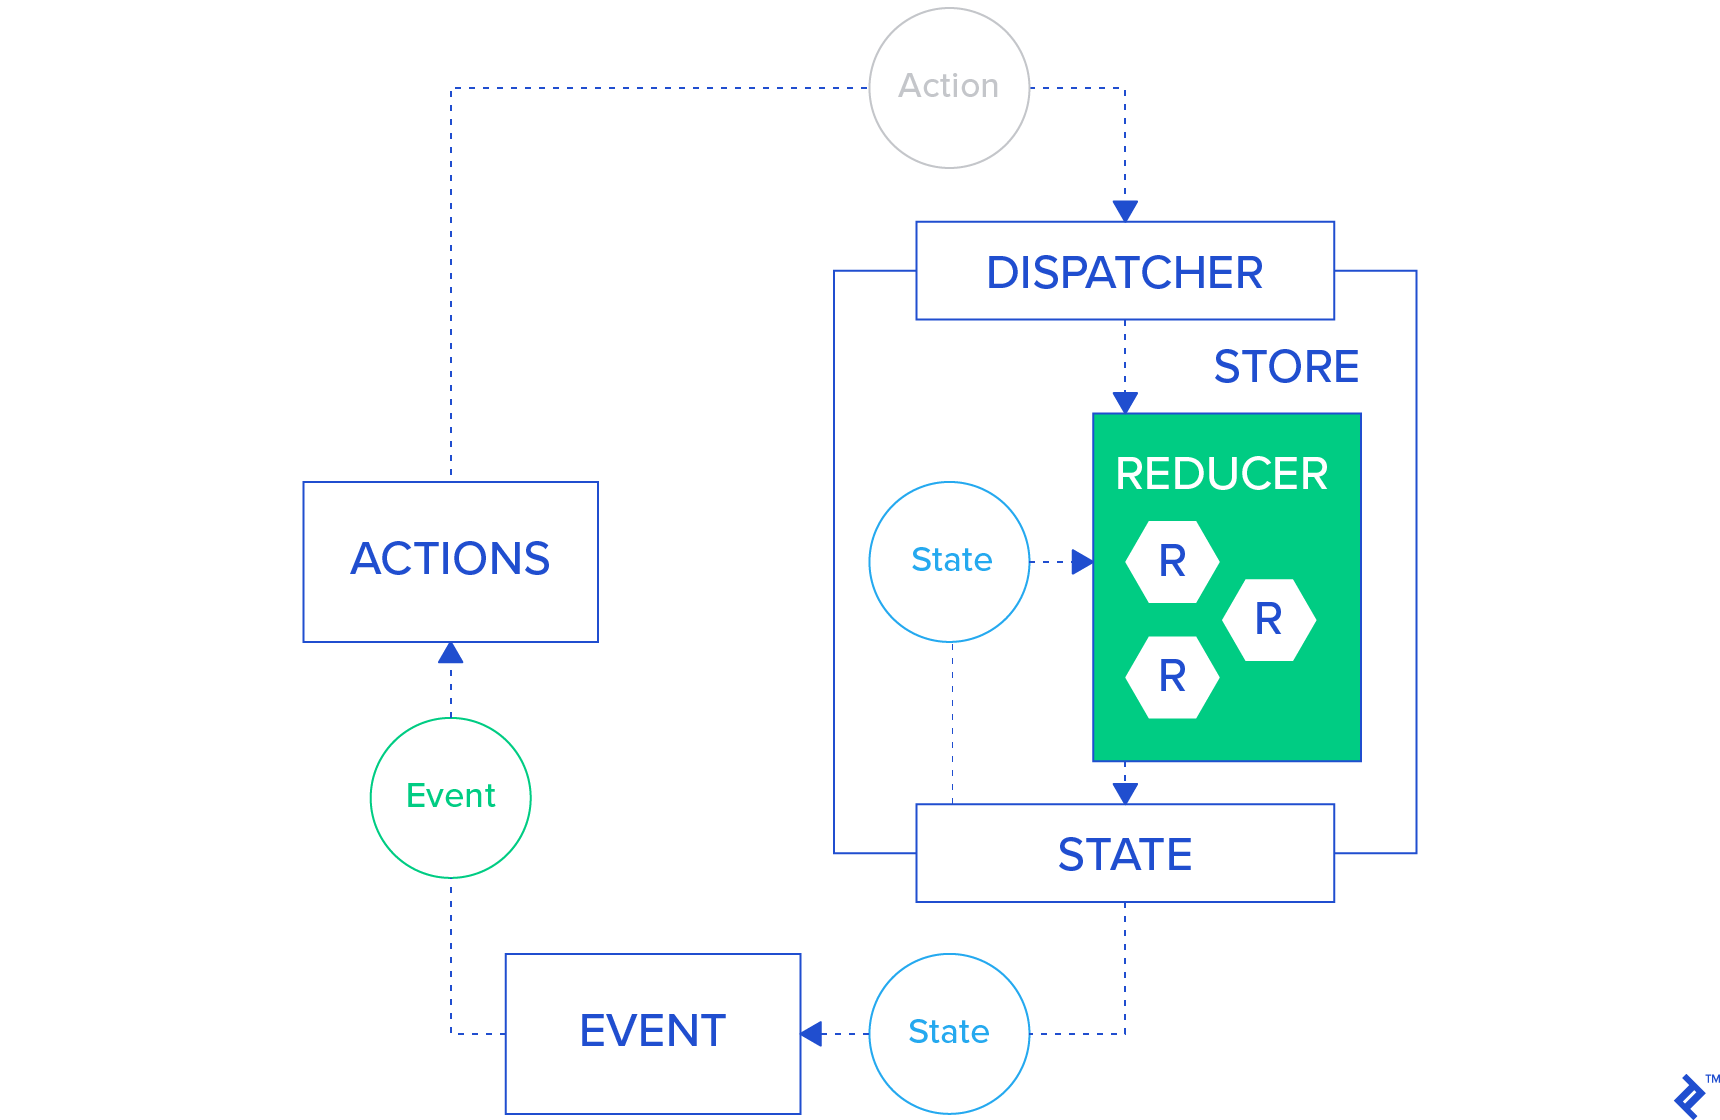
Redux는 앞선 포스팅에서 소개한 useReducer와 비슷하게 Action을 정의한 뒤 이를 통해 Dipatch하여 중앙 저장소의 데이터를 변경한다.
다만 다른점은 Redux의 Action은 전부 기록되기 때문에 데이터의 변경 기록을 전부 확인할 수 있어 디버깅에 도움이 된다.
이 과정에서 유의해야할 점은 데이터 변경시 변화를 탐지할 수 있게 불변성을 유지해야 한다는 점이다.
아래 예제는 스프레드(Spread)문법을 사용해 불변성을 지켜 Redux의 데이터를 변경한다.
const initialState = {
  name: 'Mirrer',
  age: 20,
  gender: 'Man',
};

const rootReducer = (state = initialState, action) => {
  switch (action.type) {
    case 'CHANGE_AGE':
      return {
        ...state, // 불변성을 유지하기 위해 새로운 객체를 생성
        age: action.data,
      }
     default:
      return state
  }
};

export default rootReducer;
Redux 설정
Next.js에서 Redux를 설정하는 과정은 매우 복잡하기 때문에 Next Redux Wrapper라는 간편화 라이브러리를 사용한다.
사용 방법은 다음과 같다.
- 아래 npm명령어를 통해
Redux,Next Redux Wrapper를 설치
npm i redux
npm i next-redux-wrapper- 프로젝트 루트 디렉토리에
store폴더,configureStore.js파일을 생성하여 기본설정
// store/configureStore.js
import { createWrapper } from 'next-redux-wrapper';
import { createStore } from 'redux';

// dispatch
const configureStore = () => {
  const store = createStore(reducer);
  return store;
};

const wrapper = createWrapper(configureStore, {
  debug: process.env.NODE_ENV === 'development',
});

export default wrapper;- 모든 페이지 컴포넌트의 공통 속성을 관리하는
_app.js파일을고차함수(High Order Function)로 감싼다.
// _app.js
import React from 'react';
import Head from 'next/head';
import PropTypes from 'prop-types';
import 'antd/dist/antd.css';

import wrapper from '../store/configureStore';

const ShoppingList = ({ Component }) => {
  return (
    <>
      <Head>
        <title>쇼핑 리스트</title>
      </Head>
      <Component />
    </>
  );
};

NodeBird.propTypes = {
  Component: PropTypes.elementType.isRequired,
};

export default wrapper.withRedux(ShoppingList);
Redux 구현
Redux는 앞서 소개한대로 데이터를 한곳에서 관리하는 중앙 저장소이다.
그래서 State, Action...등등 하나의 파일에서 작성한다, 이는 데이터 관리측면에서 편하다는 장점이 있지만 Action이 증가함에 따라 코드의 양 또한 증가한다는 단점이 있다.
Redux를 사용하는 방법은 다음과 같다.
- 프로젝트 루트 디렉토리에
reducers파일을 생성하여 함수를 구현
// reducers/index.js

// state
const initialState = {
  name: 'Mirrer',
  age: 20,
  gender: 'Man',
};

// reducer (이전상태 + action = 다음상태)
const rootReducer = (state = initialState, action) => {
  switch (action.type) {
    case 'CHANGE_AGE':
      return {
        ...state,
        age: action.data,
      }
  }
};

export default rootReducer;- 아래 npm명령어를 통해
useSelector를 설치하여Reducer의State를 컴포넌트에서 접근
받아온 데이터가 변화하면 컴포넌트는 자동으로 리랜더링
npm i react-redux// pages/index.js
import React, { useCallback } from 'react';
import AppLayout from '../components/AppLayout';
import { useSelector } from 'react-redux'; // useSelector 불러오기
const ExamCompo = () => {
const name = useSelector((state) => state.name);
// 구조분해 문법을 사용하면 다수의 state에 접근 가능
const { age, gender } = useSelector((state) => state);
return (
<AppLayout>
<h2>User Info</h2>
<p>이름 : {name}</p>
<p>이름 : {age}</p>
<p>이름 : {gender}</p>
<button>Change Age</button>
</AppLayout>
)
};
export default ExamCompo;
useDispatch를 사용하여Reducer의Action을 컴포넌트에서 접근
// pages/index.js
import React, { useCallback } from 'react';
import AppLayout from '../components/AppLayout';
import { useSelector, useDispatch } from 'react-redux'; // useDispatch 불러오기

const ExamCompo = () => {
  const dispatch = useDispatch(); // useDispatch 변수에 저장
  const { name, age, gender } = useSelector((state) => state);

  const onClickBtn = useCallback(() => {
    // action을 dispatch
    dispatch({
      type: 'CHANGE_AGE',
      data: 30,
    })
  }, []);

  return (
    <AppLayout>
      <h2>User Info</h2>

      <p>이름 : {name}</p>
      <p>이름 : {age}</p>
      <p>이름 : {gender}</p>

      <button onClick={onClickBtn}>Change Age</button>
    </AppLayout>
  )
};

export default ExamCompo;
코드를 실행하면 다음과 같이 정상적으로 Action이 실행된 것을 확인할 수 있다.
Dynamic Action Creator
컴포넌트에서 State를 변경하기 위해 매번 Action을 생성하는 것은 비효율적이다.
이 때 Action을 생성해주는 함수, 동적 액션 생성기(Dynamic Action Creator)를 사용하면 이러한 단점을 해결할 수 있다.
// pages/index.js
export const changeAge = (data) => {
  return {
    type: 'CHANGE_AGE',
    data,
  }
};
// pages/index.js
import { changeAge } from '../reducers/index';
const onClickBtn = useCallback(() => {
dispatch(changeAge(30));
}, []);참고 자료