YOLO-NAS
YOLO 새 모델인 YOLO-NAS를 안드로이드에 적용해보자.
공식사이트는 아래와 같다.
https://github.com/Deci-AI/super-gradients

사진을 보면 large 모델을 제외하고 대부분 mAP가 증가했으며 추론 속도 또한 빨라졌다. 그러나 nano 모델은 없어서 이번에는 YOLO-NAS-S 모델을 사용했다. 학습된 데이터는 coco 데이터 셋이다.
✔ 1. YOLO-NAS-S 모델 onnx 변환
모델을 가져오는 코드는 python이다.
import torch
from super_gradients.training import models
from super_gradients.common.object_names import Models
from super_gradients.training.utils.quantization.selective_quantization_utils import SelectiveQuantizer
model = models.get(Models.YOLO_NAS_S, pretrained_weights='coco')

# 예측 테스트
# prediction = model.predict("https://www.aljazeera.com/wp-content/uploads/2022/12/2022-12-03T205130Z_851430040_UP1EIC31LXSAZ_RTRMADP_3_SOCCER-WORLDCUP-ARG-AUS-REPORT.jpg?w=770&resize=770%2C436&quality=80")
# prediction.show()

# onnx 변환
torch.onnx.export(model, torch.rand(1, 3, 640, 640), "yolo_nas_s.onnx")
모델의 형태는 https://netron.app/ 에서 확인할 수 있다.
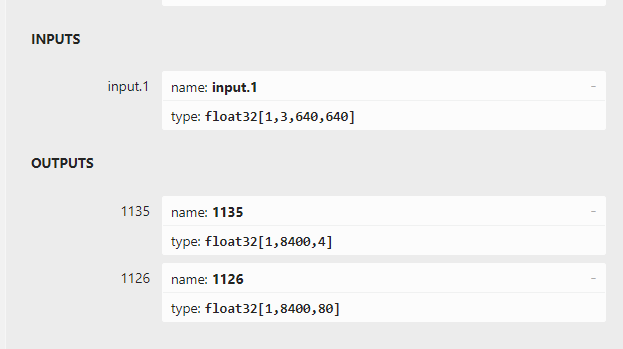
입력은 [1 3 640 640] 이며 출력은 [1 8400 4], [1 8400 80] 이다.
입력의 크기와 형태는 지금까지의 모델과 동일하게 [배치 사이즈, 픽셀 사이즈, 입력 사진의 가로 사이즈, 입력 사진의 세로 사이즈] 이다.
아래는 YOLO v8의 출력 형태이다.

예측할 수 있듯이, NAS 모델과 출력 배열이 비슷하다. 다면 차원의 구조만 조금 달라진 것이다.
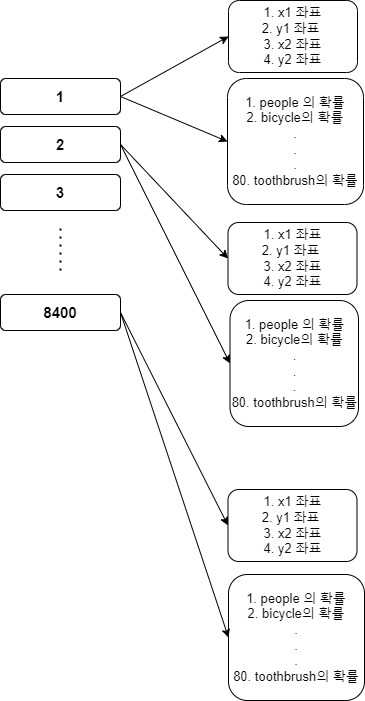
정리하면 위의 형태와 같다. 총 8400개의 후보군이 있으며 각 후보군 안에는 바운딩 박스의 xyxy가 있고, 각 라벨들의 확률값이 담겨있다. 지금까지의 YOLO와 다른 점이라면 확률값의 배열과 바운딩 박스의 배열이 분리되었다는 점, 바운딩 박스를 xywh가 아닌 xyxy로 표현한다는 점이다. 이 처럼 출력 배열만 다르고 나머지는 비슷하므로 이전 글인 YOLO v8 글을 참고하면 될 듯하다.
✔ 2. 안드로이드 코드
후처리 단계를 제외하고 나머지는 YOLO v8과 흡사해서 자세한 내용은 생략한다.
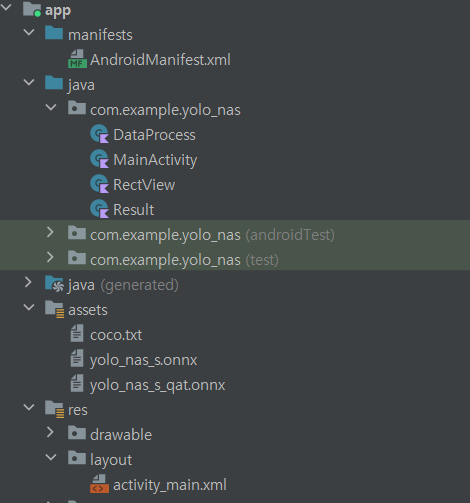
총 4개의 클래스를 사용했고, assets안에 coco 라벨들과 onnx 모델을 추가하면 된다. 모델 중 yolo_nas_q_qat.onnx는 무시해도 된다.
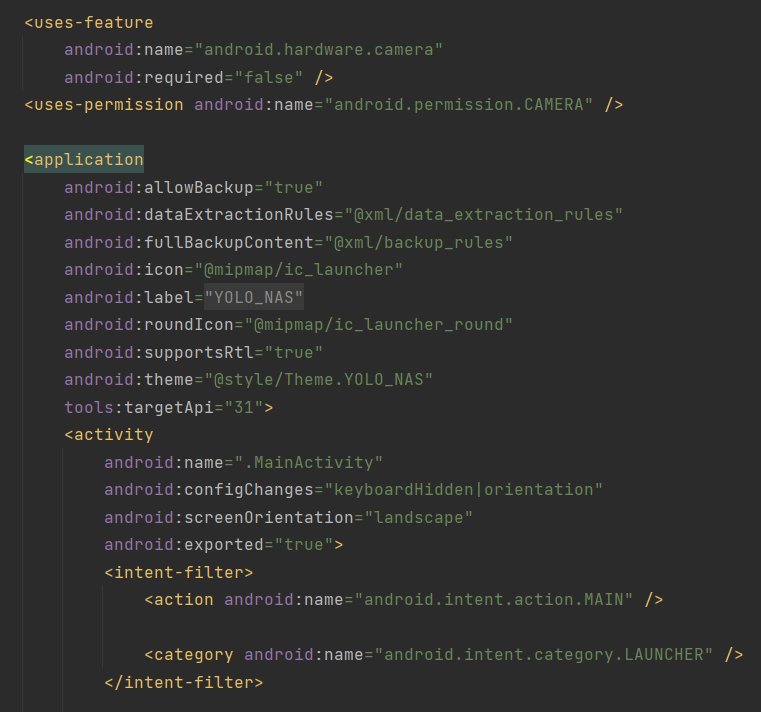
manifest.xml 파일에 카메라 권한에 대한 내용을 추가한다.
<uses-feature
    android:name="android.hardware.camera"
    android:required="false" />
<uses-permission android:name="android.permission.CAMERA" />
가로 모드 고정도 추가한다.
android:configChanges="keyboardHidden|orientation"
android:screenOrientation="landscape"
아래 사진과 같이 추가하면 된다.
앱 수준의 gradle에 아래 라이브러리를 추가한다.
onnx 추론을 위한 라이브러리, cameraX를 이용해 카메라로 부터 화면을 받아오는 라이브러리이다.
    // https://mvnrepository.com/artifact/com.microsoft.onnxruntime/onnxruntime-android
    implementation 'com.microsoft.onnxruntime:onnxruntime-android:1.15.0'

    // CameraX core library using the camera2 implementation
    def camerax_version = "1.3.0-alpha07"
    // The following line is optional, as the core library is included indirectly by camera-camera2
    implementation "androidx.camera:camera-core:${camerax_version}"
    implementation "androidx.camera:camera-camera2:${camerax_version}"
    // If you want to additionally use the CameraX Lifecycle library
    implementation("androidx.camera:camera-lifecycle:${camerax_version}")
    // If you want to additionally use the CameraX View class
    implementation("androidx.camera:camera-view:${camerax_version}")
메인 액티비티의 xml 파일에 아래 코드를 추가한다. 카메라로 받아온 화면과 바운딩 박스를 그릴 뷰이다.
  <androidx.camera.view.PreviewView
        android:id="@+id/previewView"
        android:layout_width="match_parent"
        android:layout_height="match_parent"
        app:layout_constraintBottom_toBottomOf="parent"
        app:layout_constraintEnd_toEndOf="parent"
        app:layout_constraintStart_toStartOf="parent"
        app:layout_constraintTop_toTopOf="parent" />

    <com.example.yolo_nas.RectView
        android:id="@+id/rectView"
        android:layout_width="match_parent"
        android:layout_height="match_parent"
        app:layout_constraintBottom_toBottomOf="parent"
        app:layout_constraintEnd_toEndOf="parent"
        app:layout_constraintStart_toStartOf="parent"
        app:layout_constraintTop_toTopOf="parent" />
res -> values -> themes 아래 두 개의 파일에 아래 코드를 추가한다.
위의 타이틀 바, 액션 바를 지우고 전체화면으로 바꾸는 코드이다.
        <item name="windowNoTitle">true</item>
        <item name="windowActionBar">false</item>
        <item name="android:windowFullscreen">true</item>
아래는 메인 액티비티 전체 코드이다.
// 메인 액티비티

import ai.onnxruntime.OnnxTensor
import ai.onnxruntime.OrtEnvironment
import ai.onnxruntime.OrtSession
import android.content.pm.PackageManager
import android.os.Bundle
import android.view.WindowManager
import android.widget.Toast
import androidx.appcompat.app.AppCompatActivity
import androidx.camera.core.CameraSelector
import androidx.camera.core.ImageAnalysis
import androidx.camera.core.ImageProxy
import androidx.camera.core.Preview
import androidx.camera.core.resolutionselector.AspectRatioStrategy
import androidx.camera.core.resolutionselector.ResolutionSelector
import androidx.camera.lifecycle.ProcessCameraProvider
import androidx.camera.view.PreviewView
import androidx.core.app.ActivityCompat
import java.util.Collections
import java.util.concurrent.Executors

class MainActivity : AppCompatActivity() {
    private lateinit var previewView: PreviewView
    private lateinit var ortEnvironment: OrtEnvironment
    private lateinit var ortSession: OrtSession
    private lateinit var rectView: RectView
    private val dataProcess = lazy { DataProcess() }

    override fun onCreate(savedInstanceState: Bundle?) {
        super.onCreate(savedInstanceState)
        setContentView(R.layout.activity_main)
        previewView = findViewById(R.id.previewView)
        rectView = findViewById(R.id.rectView)

        window.addFlags(WindowManager.LayoutParams.FLAG_KEEP_SCREEN_ON)
        setPermissions()
        load()
        setCamera()
    }

    // 카메라 켜기
    private fun setCamera() {
        // 카메라 제공 객체
        val processCameraProvider = ProcessCameraProvider.getInstance(this).get()
        // 전체 화면
        previewView.scaleType = PreviewView.ScaleType.FILL_CENTER
        // 후면 카메라 설정
        val cameraSelector =
            CameraSelector.Builder().requireLensFacing(CameraSelector.LENS_FACING_BACK).build()
        // 화면 비 16:9로 설정
        val resolutionSelector = ResolutionSelector.Builder().setAspectRatioStrategy(
            AspectRatioStrategy.RATIO_16_9_FALLBACK_AUTO_STRATEGY
        ).build()
        // 카메라로 부터 받아온 preview
        val preview = Preview.Builder().setResolutionSelector(resolutionSelector).build()
        // preview 를 화면에 보이기
        preview.setSurfaceProvider(previewView.surfaceProvider)
        // 화면 분석, 분석 중일땐 화면 대기가 아니라 계속 화면 새로 고침 분석이 끝나면 최신 사진을 다시 분석
        val analysis = ImageAnalysis.Builder().setResolutionSelector(resolutionSelector)
            .setBackpressureStrategy(ImageAnalysis.STRATEGY_KEEP_ONLY_LATEST).build()
        // 이미지 분석 메서드
        analysis.setAnalyzer(Executors.newSingleThreadExecutor()) {
            imageProcess(it)
            it.close()
        }
        // 카메라의 수명을 메인 액티비티에 귀속
        processCameraProvider.bindToLifecycle(this, cameraSelector, preview, analysis)
    }

    // 사진 분석
    private fun imageProcess(imageProxy: ImageProxy) {
        // YOLO_NAS_S : 0.41 ~ 0.46 초 소요, YOLO_NAS_S_QAT : 0.50 ~ 0.6 초 소요
        // 양자화 되는 것이 아니라 float 을 받아와서 int 형으로 변환 시키는 거라 오래 걸리는 듯...
        val bitmap = dataProcess.value.imgToBmp(imageProxy)
        val floatBuffer = dataProcess.value.bmpToFloatBuffer(bitmap)
        val inputName = ortSession.inputNames.iterator().next()
        // 모델의 입력 형태 [1 3 640 640] [배치 사이즈, 픽셀, 너비, 높이], 모델마다 다를 수 있음
        val shape = longArrayOf(
            DataProcess.BATCH_SIZE.toLong(),
            DataProcess.PIXEL_SIZE.toLong(),
            DataProcess.INPUT_SIZE.toLong(),
            DataProcess.INPUT_SIZE.toLong()
        )
        val inputTensor = OnnxTensor.createTensor(ortEnvironment, floatBuffer, shape)
        val resultTensor = ortSession.run(Collections.singletonMap(inputName, inputTensor))
        val output1 = (resultTensor.get(0).value as Array<*>)[0] as Array<*> // x, y, 너비, 높이
        val output2 = (resultTensor.get(1).value as Array<*>)[0] as Array<*> // 각 레이블 별 확률
        val results = dataProcess.value.outputToPredict(output1, output2)

        // 화면 표출
        rectView.transformRect(results)
        rectView.invalidate()

    }

    // 모델 불러오기
    private fun load() {
        dataProcess.value.loadModel(assets, filesDir.toString())
        dataProcess.value.loadLabel(assets)

        // 추론 객체
        ortEnvironment = OrtEnvironment.getEnvironment()
        // 모델 객체
        ortSession =
            ortEnvironment.createSession(
                filesDir.absolutePath.toString() + "/" + DataProcess.FILE_NAME
            )

        // 라벨링 배열 전달
        rectView.setClassLabel(dataProcess.value.classes)
    }

    // 권한 확인
    override fun onRequestPermissionsResult(
        requestCode: Int,
        permissions: Array<out String>,
        grantResults: IntArray
    ) {
        if (requestCode == 1) {
            grantResults.forEach {
                if (it != PackageManager.PERMISSION_GRANTED) {
                    Toast.makeText(this, "권한을 허용 하지 않으면 사용할 수 없습니다!", Toast.LENGTH_SHORT).show()
                    finish()
                }
            }
        }
        super.onRequestPermissionsResult(requestCode, permissions, grantResults)
    }

    // 권한 요청
    private fun setPermissions() {
        val permissions = ArrayList<String>()
        permissions.add(android.Manifest.permission.CAMERA)

        permissions.forEach {
            if (ActivityCompat.checkSelfPermission(this, it) != PackageManager.PERMISSION_GRANTED) {
                ActivityCompat.requestPermissions(this, permissions.toTypedArray(), 1)
            }
        }
    }
}
아래는 각종 데이터를 처리할 DataProcess 클래스에 대한 전체 코드이다.
// 데이터 프로세스 클래스

import android.content.res.AssetManager
import android.graphics.Bitmap
import android.graphics.Color
import android.graphics.RectF
import androidx.camera.core.ImageProxy
import java.io.BufferedReader
import java.io.File
import java.io.FileOutputStream
import java.io.InputStreamReader
import java.nio.FloatBuffer
import java.util.PriorityQueue
import kotlin.math.max
import kotlin.math.min

class DataProcess {

    lateinit var classes: Array<String>

    companion object {
        const val BATCH_SIZE = 1
        const val INPUT_SIZE = 640
        const val PIXEL_SIZE = 3
        const val FILE_NAME = "yolo_nas_s.onnx"
        const val LABEL_NAME = "coco.txt"
    }

    // coco label 불러오기
    fun loadLabel(assets: AssetManager) {
        // txt 파일 불러오기
        BufferedReader(InputStreamReader(assets.open(LABEL_NAME))).use { reader ->
            var line: String?
            val classList = ArrayList<String>()
            while (reader.readLine().also { line = it } != null) {
                classList.add(line!!)
            }
            classes = classList.toTypedArray()
        }
    }

    // yolo nas 모델 불러오기
    fun loadModel(assets: AssetManager, filesDir: String) {
        // assets 안에 있는 파일 불러오기
        val outputFile = File("$filesDir/$FILE_NAME")
        assets.open(FILE_NAME).use { inputStream ->
            FileOutputStream(outputFile).use { outputStream ->
                val buffer = ByteArray(4 * 1024)
                var read: Int
                while (inputStream.read(buffer).also { read = it } != -1) {
                    outputStream.write(buffer, 0, read)
                }
            }
        }
    }

    // imageProxy -> bitmap
    fun imgToBmp(imageProxy: ImageProxy): Bitmap {
        val bitmap = imageProxy.toBitmap()
        return Bitmap.createScaledBitmap(bitmap, INPUT_SIZE, INPUT_SIZE, true)
    }

    // bitmap -> floatBuffer
    fun bmpToFloatBuffer(bitmap: Bitmap): FloatBuffer {
        val imageSTD = 255.0f
        val buffer = FloatBuffer.allocate(BATCH_SIZE * PIXEL_SIZE * INPUT_SIZE * INPUT_SIZE)
        buffer.rewind()

        val area = INPUT_SIZE * INPUT_SIZE
        val bitmapData = IntArray(area)     // 한 장의 사진에 대한 픽셀을 담을 배열
        bitmap.getPixels(bitmapData, 0, bitmap.width, 0, 0, bitmap.width, bitmap.height)

        // 배열에서 하나씩 가져와서 buffer에 담기
        for (i in 0 until INPUT_SIZE) {
            for (j in 0 until INPUT_SIZE) {
                val idx = INPUT_SIZE * i + j
                val pixelValue = bitmapData[idx]
                // pixel -> R, G, B 값 추출 & 양자화
                buffer.put(idx, Color.red(pixelValue) / imageSTD)
                buffer.put(idx + area, Color.green(pixelValue) / imageSTD)
                buffer.put(idx + area * 2, Color.blue(pixelValue) / imageSTD)
            }
        }
        buffer.rewind()
        return buffer
    }

    // 2차원 배열 output -> conf 임계값을 넘지 못한 배열들 제거 & nms 처리
    fun outputToPredict(output1: Array<*>, output2: Array<*>): ArrayList<Result> {
        val confidenceThreshold = 0.45f
        val results = ArrayList<Result>()
        val rows = output1.size

        for (i in 0 until rows) {
            // 80개의 라벨들 중 가장 높은 확률을 가진 라벨 및 확률
            val max = (output2[i] as FloatArray).withIndex().maxBy { it.value }
            val maxValue = max.value
            val maxIndex = max.index
            // 확률은 conf 임계값을 넘어야만 한다.
            if (maxValue > confidenceThreshold) {
                // 해당 인덱스의 xywh를 구한다.
                val x1 = (output1[i] as FloatArray)[0]
                val y1 = (output1[i] as FloatArray)[1]
                val x2 = (output1[i] as FloatArray)[2]
                val y2 = (output1[i] as FloatArray)[3]
                // 사각형은 화면 밖을 나갈 수 없으니 넘기면 최대치로 변경
                val rectF = RectF(
                    max(0f, x1), max(0f, y1),
                    min(INPUT_SIZE - 1f, x2), min(INPUT_SIZE - 1f, y2)
                )
                val result = Result(maxIndex, maxValue, rectF)
                results.add(result)
            }
        }
        return nms(results)
    }

    // 비 최대 억제 (nms)
    private fun nms(results: ArrayList<Result>): ArrayList<Result> {
        val list = ArrayList<Result>()

        for (i in classes.indices) {
            // 라벨들 중에서 가장 높은 확률값을 가졌던 라벨 찾기
            val pq = PriorityQueue<Result>(50) { o1, o2 ->
                o1.score.compareTo(o2.score)
            }
            val classResults = results.filter { it.classIndex == i }
            pq.addAll(classResults)

            //NMS 처리
            while (pq.isNotEmpty()) {
                // 큐 안에 속한 최대 확률값을 가진 class 저장
                val detections = pq.toTypedArray()
                val max = detections[0]
                list.add(max)
                pq.clear()

                // 교집합 비율 확인하고 50%넘기면 제거
                for (k in 1 until detections.size) {
                    val detection = detections[k]
                    val rectF = detection.rectF
                    val iouThresh = 0.5f
                    if (boxIOU(max.rectF, rectF) < iouThresh) {
                        pq.add(detection)
                    }
                }
            }
        }
        return list
    }

    // 겹치는 비율 (교집합/합집합)
    private fun boxIOU(a: RectF, b: RectF): Float {
        return boxIntersection(a, b) / boxUnion(a, b)
    }

    // 교집합
    private fun boxIntersection(a: RectF, b: RectF): Float {
        val w = overlap(
            (a.left + a.right) / 2f, a.right - a.left,
            (b.left + b.right) / 2f, b.right - b.left
        )
        val h = overlap(
            (a.top + a.bottom) / 2f, a.bottom - a.top,
            (b.top + b.bottom) / 2f, b.bottom - b.top
        )
        return if (w < 0 || h < 0) 0f else w * h
    }

    // 합칩합
    private fun boxUnion(a: RectF, b: RectF): Float {
        val i = boxIntersection(a, b)
        return (a.right - a.left) * (a.bottom - a.top) + (b.right - b.left) * (b.bottom - b.top) - i
    }

    // 겹치는 길이
    private fun overlap(x1: Float, w1: Float, x2: Float, w2: Float): Float {
        val l1 = x1 - w1 / 2
        val l2 = x2 - w2 / 2
        val left = max(l1, l2)
        val r1 = x1 + w1 / 2
        val r2 = x2 + w2 / 2
        val right = min(r1, r2)
        return right - left
    }
}
아래는 바운딩 박스를 그릴 RectView 클래스이다.
// rectview 클래스

import android.content.Context
import android.graphics.Canvas
import android.graphics.Color
import android.graphics.Paint
import android.graphics.drawable.Drawable
import android.util.AttributeSet
import android.util.Log
import android.view.View
import kotlin.math.round

class RectView(context: Context, attributeSet: AttributeSet) : View(context, attributeSet) {

    private var results: ArrayList<Result>? = null
    private lateinit var classes: Array<String>

    private val textPaint = Paint().apply {
        textSize = 60f
        color = Color.WHITE
    }

    // 라벨들의 배열 가져오기
    fun setClassLabel(classes: Array<String>) {
        this.classes = classes
    }

    // 화면의 크기에 맞게 바운딩 박스 크기 변환
    fun transformRect(results: ArrayList<Result>) {
        // scale 구하기
        val scaleX = width / DataProcess.INPUT_SIZE.toFloat()
        val scaleY = scaleX * 9f / 16f
        val realY = width * 9f / 16f
        val diffY = realY - height

        results.forEach {
            it.rectF.left *= scaleX
            it.rectF.right *= scaleX
            it.rectF.top = it.rectF.top * scaleY - (diffY / 2f)
            it.rectF.bottom = it.rectF.bottom * scaleY - (diffY / 2f)
        }
        this.results = results
    }

    // 그림 그리기
    override fun onDraw(canvas: Canvas?) {
        results?.forEach {
            canvas?.drawRect(it.rectF, findPaint(it.classIndex))
            canvas?.drawText(
                classes[it.classIndex] + ", " + round(it.score * 100) + "%",
                it.rectF.left + 10,
                it.rectF.top + 60,
                textPaint
            )
        }
        super.onDraw(canvas)
    }

    // 임의로 색상 지정
    private fun findPaint(classIndex: Int): Paint {
        val paint = Paint().apply {
            style = Paint.Style.STROKE      // 빈 사각형 그림
            strokeWidth = 10.0f             // 굵기 10
            strokeCap = Paint.Cap.ROUND     // 모서리는 뭉특하게
            strokeJoin = Paint.Join.ROUND   // 주위도 뭉특하게
            strokeMiter = 100f              // 뭉특한 정도
        }

        paint.color = when (classIndex) {
            0, 45, 18, 19, 22, 30, 42, 43, 44, 61, 71, 72 -> Color.WHITE
            1, 3, 14, 25, 37, 38, 79 -> Color.BLUE
            2, 9, 10, 11, 32, 47, 49, 51, 52 -> Color.RED
            5, 23, 46, 48 -> Color.YELLOW
            6, 13, 34, 35, 36, 54, 59, 60, 73, 77, 78 -> Color.GRAY
            7, 24, 26, 27, 28, 62, 64, 65, 66, 67, 68, 69, 74, 75 -> Color.BLACK
            12, 29, 33, 39, 41, 58, 50 -> Color.GREEN
            15, 16, 17, 20, 21, 31, 40, 55, 57, 63 -> Color.DKGRAY
            70, 76 -> Color.LTGRAY
            else -> Color.DKGRAY
        }
        return paint
    }
}
마지막 출력 배열에 대한 결과를 모아놓은 result 클래스이다.
// 데이터 클래스
import android.graphics.RectF

data class Result(val classIndex: Int, val score: Float, val rectF: RectF)
내 첫 번째 글인 YOLO v8 글과 거의 흡사해서 코드에 대한 자세한 내용은 생략했다.
그와 다른 점이라면 YOLO v8과는 출력 배열이 달라서 DataProcess 클래스 속
outputToPredict 메서드가 달라졌다. 그러나 v8 모델과 원리 자체는 크게 다르지 않다.
✔ 3. 출력 확인
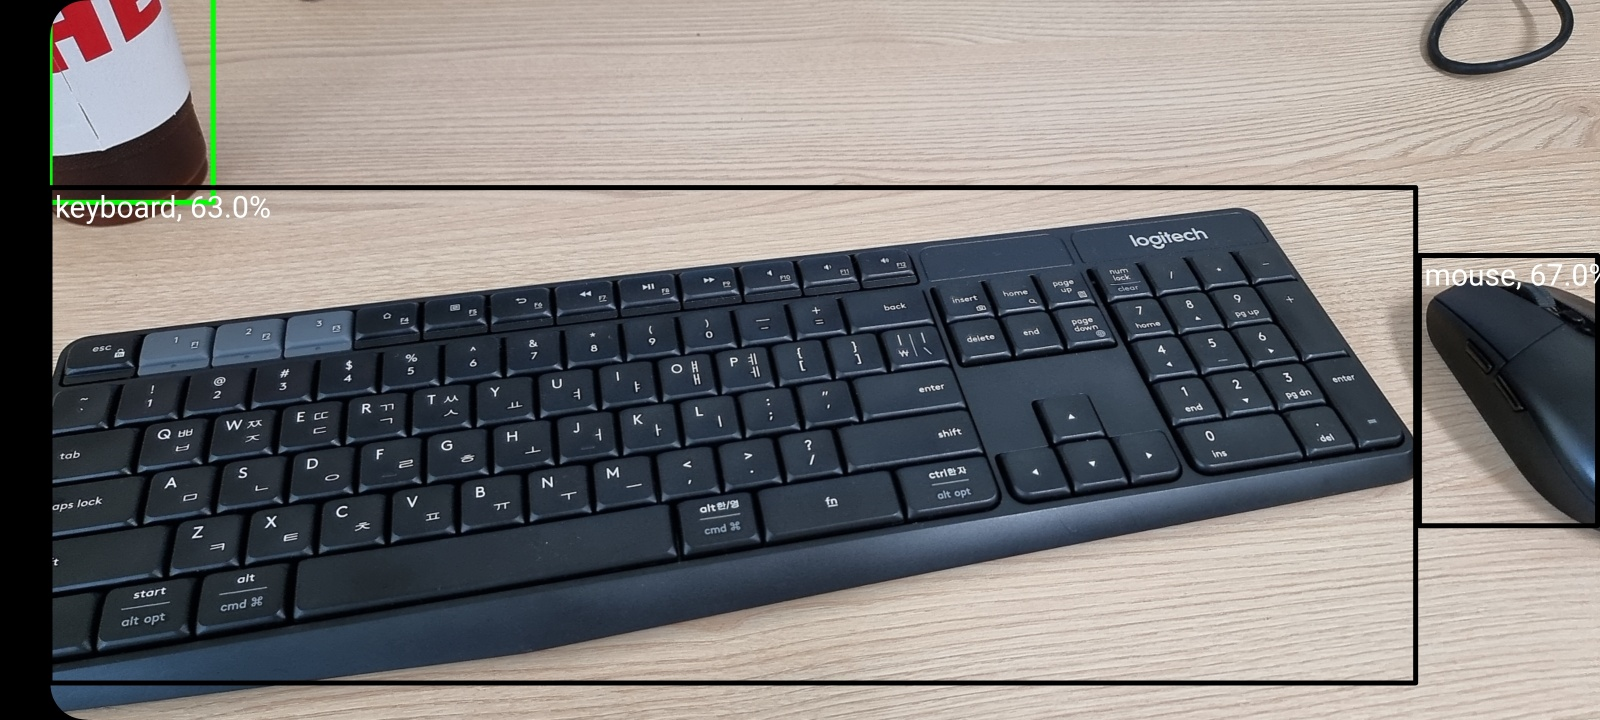
위에는 그 예시 사진이다.
추론 속도는 YOLO v8 small 모델과 비슷하다. s21 ultra 기준 약 0.5초 당 1장 정도가 소요된다.
전체 코드는 위에 있지만, 깃허브에서 다운받아서 사용할 수 있다.
https://github.com/Yurve/YOLO-NAS_Android_coco
compose를 이용한 코드 또한 아래 깃허브를 참고하면 된다.
https://github.com/Yurve/-YOLO-NAS_Android_coco_compose

Thank you for sharing the detailed tutorial, Can you please do a sample for the image segmentation with yolov8?