이미지 업로드
해당 관리자 페이지에는 3가지의 이미지 업로드가 존재한다.
- 배너
- 메뉴얼
- 돌보미 사진
따라서 3번의 경우 백엔드와 협업을 통해 다음 과정으로 업로드한다.
- 관리자가 사진을 cloud storage에 해당 유저 아이디로 업로드한다.
- 백엔드에서 storage의 있는 사진의 용량을 낮추고 firestore에서 파일 이름에 해당하는 아이디를 찾아 imageUrl을 update한다.
3번 외에는 직접 firestore에서 유저를 찾아 imageUrl을 업로드 시켜주어야한다.
먼저 이미지 업로드 함수부터 알아보자
//firebase/storage/index.ts

import { getDownloadURL, ref, uploadBytesResumable } from 'firebase/storage';
import FirebaseConfig from '../firebaseConfig';

//이미지 업로드 (업로드할 이미지,이미지 이름, storage 폴더이름,
	//외부에 진행정도를 전달하는 함수)
const uploadImage = async (imageSrc: File, filename: string, path: string,
		onProgressChange: Function | null) => {
  let downloadURL = '';
  const storageRef = ref(FirebaseConfig.storage, `${path}/${filename}.jpg`);
  const uploadTask = uploadBytesResumable(storageRef, imageSrc);

	//외부에서 해당 이미지 업로드의 진행정도를 알고 싶을 경우
  if (onProgressChange !== null) {
    uploadTask.on(
      'state_changed',
      (snapshot) => {
        const progress = (snapshot.bytesTransferred / snapshot.totalBytes) * 80;
        onProgressChange(progress);
      },
      (error) => {
        console.log(error);
      },
      async () => {
        onProgressChange(90);
      }
    );
  } else await uploadTask;
  downloadURL = await getDownloadURL(uploadTask.snapshot.ref);
	//storage에 업로드된 이미지의 업로드 URL을 반환한다.
  return downloadURL;
};

const storage = {
  uploadImage,
};

export default storage;
배너에서 해당 이미지 업로드 함수를 쓰는 부분을 보자.
//components/bannerAndRegionPage/bannerBoard.tsx
const handleCreate = async (title: string, imageSrc: File) => {
    if (!title ?? !imageSrc) {
      setOpenAddBannerDialog(false);
      return;
    }
    await uploadImage(
      { imageSrc, filename: title, path: STORAGE.banner, onProgressChange: null },
      {
				//해당 부분은 직접 이미지 url을 반영해줘야하기 때문에 진행
        onSuccess: async (downloadUrl) => {
					//이미지를 업로드하고 성공했을 때 기존 배너배열에 추가하여 업데이트
          const addedBanner = { title, url: downloadUrl } as IBanner;
          const newBanner = [...(banner ?? []), addedBanner];
          setOpenAddBannerDialog(false);
          await updateBanner({ banner: newBanner });
        },
      }
    );
  };

//firebase/firestore/index.ts
//커먼 컬렉션의 배너를 수정한다.
const updateBanner = async (banner: IBanner[]) => {
  const docRef = doc(FirebaseConfig.db, COLLECTION.common, 'common');

  await updateDoc(docRef, { banner: [...banner] });
};
3번의 경우 직접 firestore에 반영해주지 않아도 되기 때문에 onSuccess부분이 사라짐
//pages/sitterDetailPage.tsx
const handleSubmit = async () => {
    if (uid === undefined || sitter === null) return;
    setHideProgessBar(null);
    if (imageSrc !== null) {
      await uploadImage({
        imageSrc,
        filename: uid,
        path: STORAGE.sitterImage,
        onProgressChange: setUploadProgess,
      }
			**//,{onSuccess: }//**
			);
	   }
    await updateUser(
      { user: sitter },
      {
        onSuccess: () => {
          setUploadProgess(100);
        },
      }
    );
    setTimeout(() => {
      setHideProgessBar(true);
      setUploadProgess(0);
    }, 2000);
  };
firebase CRUD - reactquery를 겯들인
데이터베이스를 firestore로 활용할 때는 프론트에서 직접 데이터베이스에 접근할 수 있다.
더 이상 데이터 주면서 api를 호출하는 것이 아니라 백엔드의 맛을 약간 느낄 수 있게 되는 것이다!
가장 쉬운 배너를 해체 해보면서 알아보도록 하자.
배너는 IBanner라는 자료형을 사용해서 다루고 있다.
그리고 banner는 CommonRecoil에서 상태를 관리하고 있다.
//app/recoil/commonRecoil.tsx
export interface IBanner {
  title?: string;
  url?: string;
}

export interface ICommon {
  banner?: IBanner[];
  careTerm?: ITerm[];
  reservationTerm?: ITerm[];
  term?: ITerm[];
  manual?: IManual[];
  comment?: string[];
  payType?: string[];
  refuseReason?: string[];
  region?: Object;
}

const commonState = atom<ICommon | null>({
  key: 'commonState',
  default: null,
});
배너 CRUD
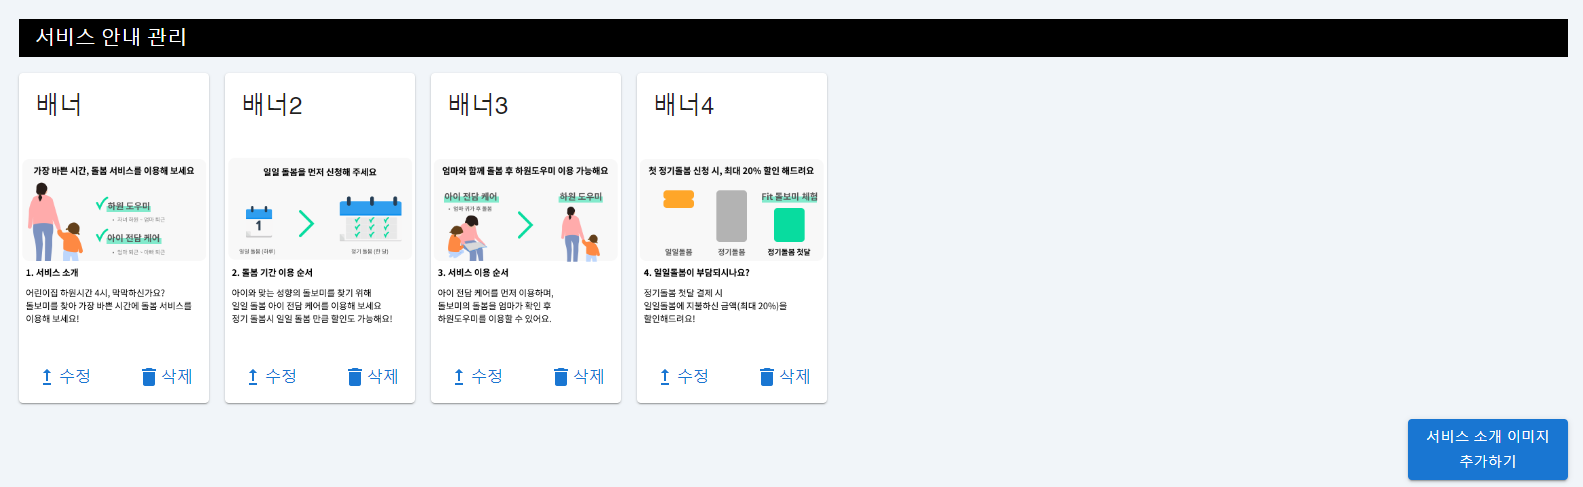
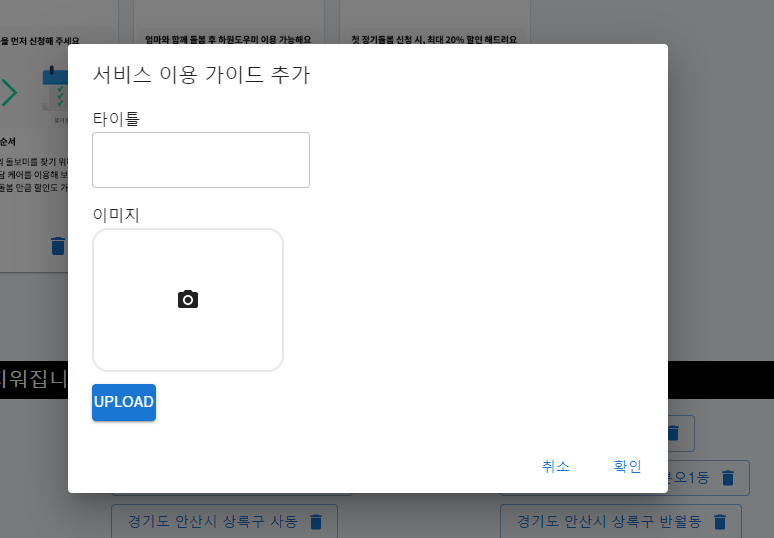
배너 create
우측 하단의 서비스 소개 이미지 추가하기를 클릭하면 AddBannerDialog를 열어 정보를 받고 확인을 누르면 해당 정보를 데이터베이스에 반영한다.
	//Create
  const handleCreate = async (title: string, imageSrc: File) => {
    if (!title ?? !imageSrc) {
      setOpenAddBannerDialog(false);
      return;
    }
    await uploadImage(
      { imageSrc, filename: title, path: STORAGE.banner, onProgressChange: null },
      {
        onSuccess: async (downloadUrl) => {
          const addedBanner = { title, url: downloadUrl } as IBanner;
          const newBanner = [...(banner ?? []), addedBanner];
          setOpenAddBannerDialog(false);
          await updateBanner({ banner: newBanner });
        },
      }
    );
  };
배너 Read
여기서 react Query를 사용해서 서버상태관리를 하게 된다.
만약 데이터베이스에서 banner가 바뀌었는데 실시간으로 화면에서 반영해주지 않는다면 유저는 혼란스러울 것이다. 따라서 banner를 다시 가져와야하는지를 판단해주기 위해 react query를 사용한다.
//components/bannerAndRegionPage/bannerBord.tsx
function BannerBoard() {
	//Read
  const { data: banner } = useQuery(['banner'], firebase.firestore.getBanner, { suspense: true });
																	//얘가 queryKey
}
//app/hooks/useUpdateCommon.tsx
const { mutate: updateBanner } = useMutation({
mutationFn: ({ banner }: { banner: IBanner[] }) => firebase.firestore.updateBanner(banner),
onSettled: () => {
queryClient.invalidateQueries(['banner']);
//해당 queryKey 다시 요청
},
});read할 때 해당 함수는 banner라는 queryKey를 갖는다. 그리고 updateBanner라는 함수는 해당 queryKey를 ‘상하게’ 만든다.
이때 ‘상한’ queryKey는 다시 ‘신선해’지기 위해 다시 서버에 요청을 보내게 되고 그 결과 새로운 banner를 가지고 올 수 있게 된다.
따라서 R를 제외한 CUD에선 해당 queryKey를 ‘상하게’만들어 새로 가져올 수 있도록 해줘야한다.
배너 Update
해당 index의 배너의 이미지를 교체해줌.
	//Update
  const handleUpdate = (index: number) => (e: React.ChangeEvent<HTMLInputElement>) => {
    const newBanner = [...(banner ?? [])];
    const bannerToChange = newBanner[index];
    uploadImage(
      {
        imageSrc: e.target.files![0],
        filename: (banner ?? [])[index].title!,
        path: STORAGE.banner,
        onProgressChange: null,
      },
      {
        onSuccess: async (downloadUrl) => {
          bannerToChange.url = downloadUrl;
          newBanner[index] = bannerToChange;

					//상하게 만듬.
          await updateBanner({ banner: newBanner });
        },
      }
    );
  };
배너 Delete
해당 index의 배너를 삭제함.
@ splice(삭제할 위치, 삭제할 갯수)
	//Delete
  const handleDeleteBanner = (index: number) => async () => {
    const newBanner = banner ?? [];
    newBanner.splice(index, 1);

		//상하게 만듬.
    await updateBanner({ banner: newBanner });
  };