
개요
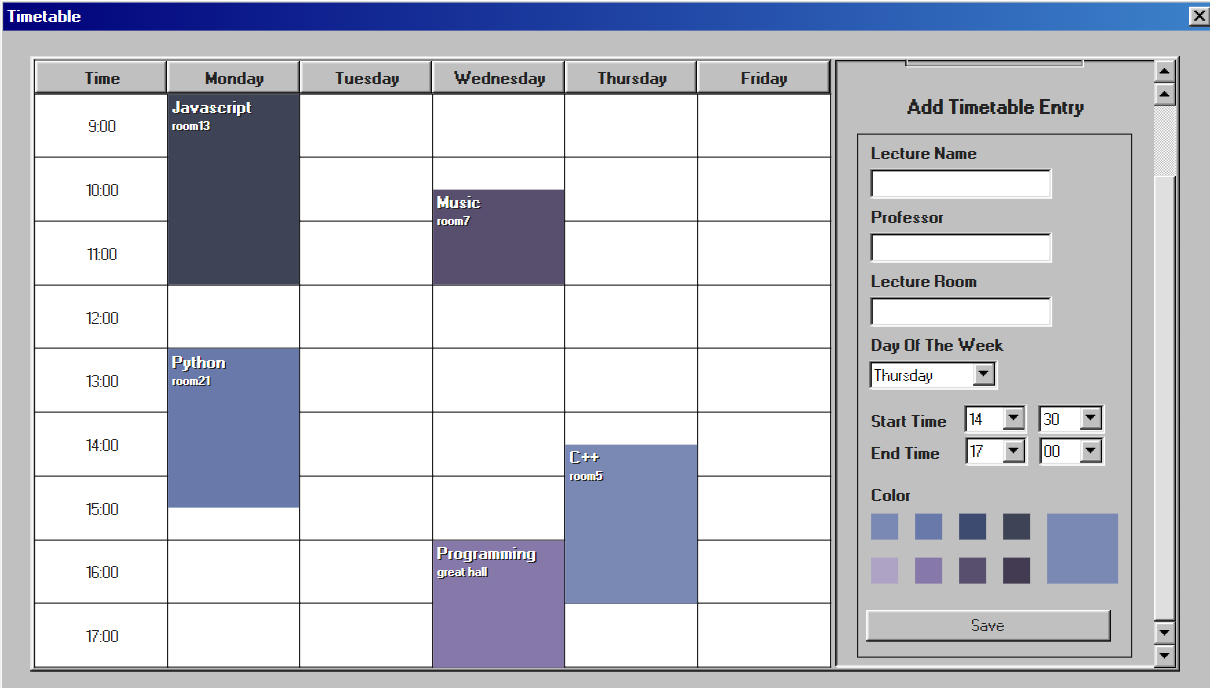
월~금요일, 9시 ~ 18시까지 저장할 수 있는 시간표를 구현했다.
분 단위는 정시(0분), 30분만 추가할 수 있다.
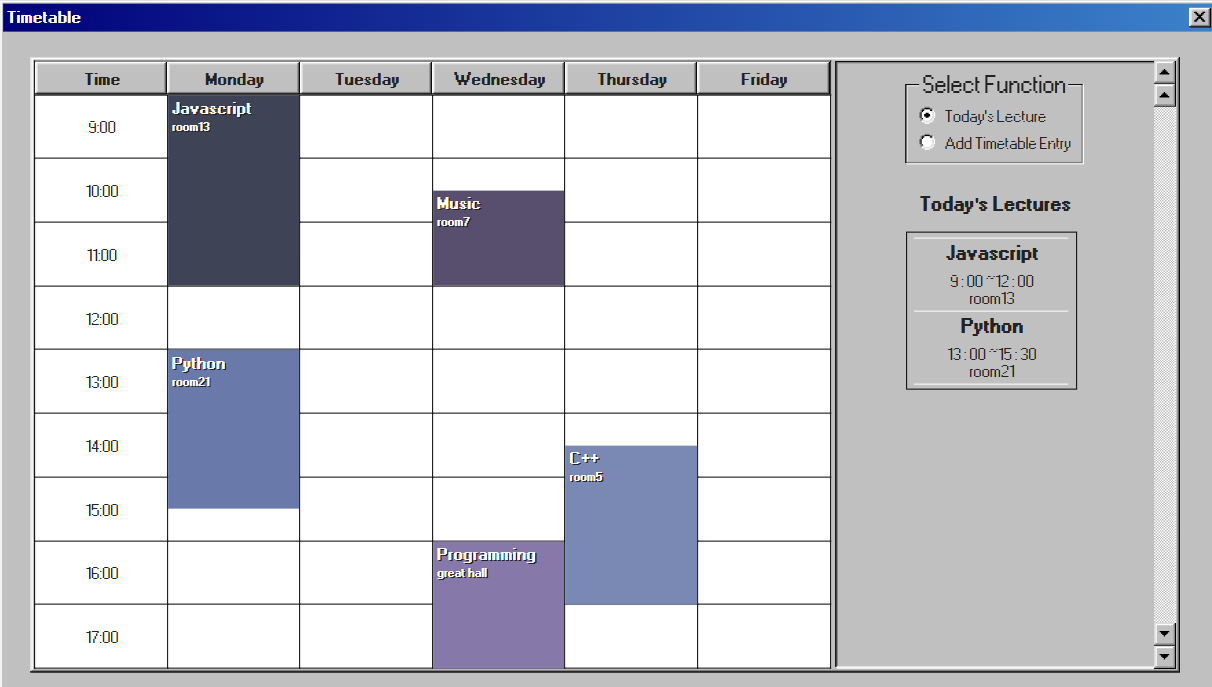
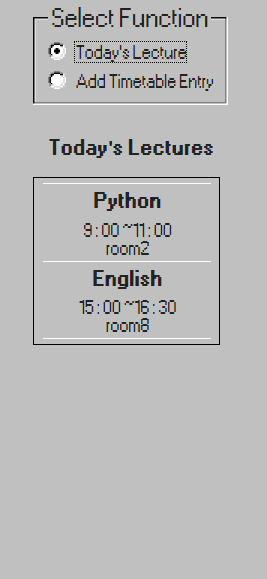
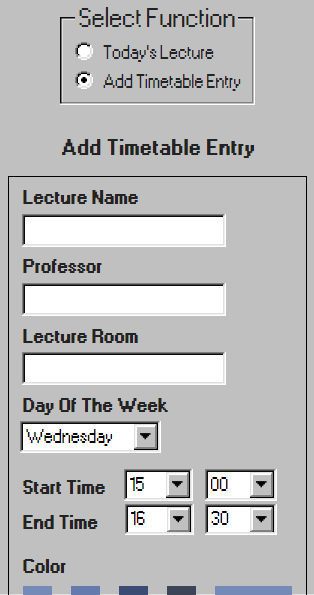
우측 상단에서 사이드바의 기능을 선택할 수 있다.
Today's lecture는 접속한 요일에 해당하는 강의들을 띄워 주고, Add Timetable Entry에서는 새 시간표 엔트리를 추가할 수 있다.
주요 설계
코드가 길어서 전문은 첨부하지 않고 중요한 부분만 작성하기로 했다.
테이블 세팅
시간표 테이블은 평범하게 <table>로 만들었다.
각 시간대를 담당하는 열을 하나씩 만들고, 그 시간에 맞춰 월~금요일 정보를 각 셀의 id로 넣어줬다. 이 id 정보는 이후 테이블 엔트리를 추가할 때 이용된다.
시간표는 오후 6시까지 띄울 예정이므로 hourList가 18에 도달하면 세팅을 끝낸다.
const dayList = ['Monday', 'Tuesday', 'Wednesday', 'Thursday', 'Friday'];
const hourList = [9, 10, 11, 12, 13, 14, 15, 16, 17, 18];

const setTable = () => {
  hourList.forEach((hour) => {
    if (hour === 18) return;

    const row = document.createElement('tr');
    const timeCell = createCell(`${hour}:00`);
    timeCell.classList.add('time-cell');

    const dayCellList = dayList.map((day) =>
      createCell(null, `td-${day}-${hour - 9}`),
    );
    appendCellsToRow(row, [timeCell, ...dayCellList]);

    tableBodyEl.appendChild(row);
  });
};
const createCell = (text, id) => {
const cell = document.createElement('td');
if (text) cell.textContent = text;
if (id) cell.id = id;
return cell;
};
const appendCellsToRow = (row, cellList) => {
cellList.forEach((cell) => row.appendChild(cell));
return row;
};시간표 엔트리 추가
자료구조
let entryIdCounter = 1;

const key = entryIdCounter++;
const newEntryObj = {
    key: key,
    lectureName: inputElements.lectureName.value,
    professor: inputElements.professor.value,
    lectureRoom: inputElements.lectureRoom.value,
    day: inputElements.dayOfWeek.options[inputElements.dayOfWeek.selectedIndex]
      .value,
    startTime: [startHour, startMinute],
    endTime: [endHour, endMinute],
    color: inputElements.color.style.backgroundColor,
  };
시간표 엔트리 정보는 객체로 저장한다.
그리고 이 정보들에 key를 더해 Map에 저장한다.
const timetableMap = new Map();

timetableMap.set(newEntryObj.key, newEntryObj);
key를 entryObj에도 넣고 Map에 삽입할 때도 넣는 이유는 Map에서 요소를 꺼낼 때에도 key가 필요하고, entryObj 객체끼리만 있을 때에도 식별이 필요해서 이중으로 넣어줬다.
지금은 별도의 DB 없이 작업중이라 전역변수에 선언한 key 변수를 1씩 증가시키면서 식별자로 쓰고 있다.
엔트리 생성
엔트리 생성 창에서 저장하기를 누르면, 위처럼 데이터를 가공해서 Map에 저장하고 key를 반환한다. key가 정상적으로 들어온 경우 setTableEntry를 호출해 엔트리 요소를 만든다.
const clickSaveBtn = () => {
  let key;
  try {
    key = addEntryObj();
  } catch (error) {
    alert(error.message);
  }

  if (key !== null && key !== undefined) setTableEntry(key);
};setTableEntry에서는 key를 받아 그에 해당하는 객체를 불러온 뒤, 그 복사본을 createTableEntry에 전달한다.
이후 만약 추가한 엔트리의 요일이 접속한 요일과 같다면 setLectureItem을 호출해서 Today's lecture에도 추가한다. (추후 서술)
const setTableEntry = (key) => {
  const entryObj = getEntryObj(key);
  if (!entryObj) return;

  createTableEntry(key, { ...entryObj });

  if (entryObj.day === today) setLectureItem({ ...entryObj });
};
아래 코드는 진짜 엔트리의 DOM 요소를 만드는 코드이다.
엔트리 요소는 배경이 될 div 요소, 강의 이름과 장소를 서술하는 p 태그들로 이루어진다.
const createTableEntry = (key, entryObj) => {
  const entryObjValues = getEntryObjValues({ ...entryObj });
  const newTableEntry = createTableEntryDiv(key, { ...entryObjValues });

  const lectureNameEl = createLectureNameEl(entryObjValues.lectureName);
  newTableEntry.appendChild(lectureNameEl);

  const lectureRoomEl = createLectureRoomEl(entryObjValues.lectureRoom);
  newTableEntry.appendChild(lectureRoomEl);

  setEntryRemoveListener(lectureNameEl, { ...entryObj });

  return newTableEntry;
};
강의 이름을 누르면 해당 엔트리가 삭제되게끔 했다.
아래 코드는 div 요소를 만드는 코드이다.
const createTableEntryDiv = (key, entryObjValues) => {
const tableEntry = document.createElement('div');
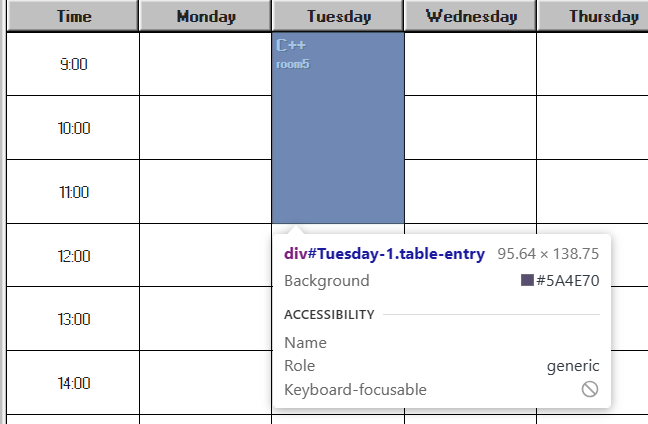
tableEntry.id = `${entryObjValues.day}-${key}`;
tableEntry.classList.add('table-entry');
tableEntry.style.backgroundColor = entryObjValues.color;
setTableEntryPosition(tableEntry, {...entryObjValues});
return tableEntry;
};div요소 제작은 단순하지만, setTableEntryPosition함수 호출이 중요하다.
Position 잡기
엔트리 요소를 시간표 테이블의 어느 부분에 얼마나 붙여야 할지 계산해야 한다.
이를 위해 각 셀의 모서리 위치를 구해보기도 했고, 가상 요소 선택자를 사용해보기도 했지만 모두 실패하고 제일 클래식한 방법을 택했다.
-
먼저 시작 셀을 선택한다. 해당 엔트리의 요일 정보와 시작 시간 정보를 통해 알아낼 수 있다.
-
이후 엔트리가 총 몇 분을 차지하는지 계산한다. x시 xx분이라는 정보를 순수 x분으로 변환한 뒤, 종료 시각에서 시작 시간을 뺀다.
-
엔트리의 좌표는 테이블 요소에 따라 정해지므로
position을absolute로 설정해준다. -
시작 시간이 x시 30분이라면 시작 셀의 절반이 되는 높이로
top을 잡아준다. -
이 시간표는 30분 단위로 시간이 추가되므로 아까 구한 분단위의 총 시간을 30으로 나눠준다. (=
magnification)
따라서 강의의 길이가 30분이면magnification은 1, 60분이면 2, 90분이면 3이 된다. 30분마다 엔트리의 높이를 50% 증가시키기 위해50 * magnification를 적용했다.
const setTableEntryPosition = (tableEntry, entryObjValues) => {
  const startCell = timetableEl.querySelector(
    `#td-${entryObjValues.day}-${entryObjValues.startHour - 9}`,
  );

  const lectureMinutes =
    convertTimeToMinutes(entryObjValues.endHour, entryObjValues.endMinute) -
    convertTimeToMinutes(entryObjValues.startHour, entryObjValues.startMinute);
  const magnification = lectureMinutes / 30;

  tableEntry.style.position = 'absolute';
  tableEntry.style.top = entryObjValues.startMinute === 30 ? '50%' : '0px';
  tableEntry.style.width = '100%';
  tableEntry.style.height = `${50 * magnification + 0.7 * magnification}%`; // 0.7: height correction value

  startCell.appendChild(tableEntry);
};-
그런데 높이가 미묘하게 부족해서 엔트리 하단부가 실제 종료 시간과 맞지 않았다. 이 차이는 엔트리의 높이가 커질수록 더 심해졌다.
처음에는margin이나padding때문인 줄 알고 헤맸다. 진짜 이유는%단위 계산을 할 때 내부적으로px값을 반올림하는 등의 변수가 있어 기대한 높이에 못 미쳤기 때문이었다. 그래서 어쩔 수 없이 높이 보정치를 추가해줬다. (0.7 * magnification) -
마지막으로 완성된 엔트리 요소를
startCell의 자식 요소로 붙여준다. -
참고로
convertTimeToMinutes함수는 다음과 같다.
const convertTimeToMinutes = (hour, minute) => {
  return Number(hour) * 60 + Number(minute);
};
예외 처리
엔트리 입력에 빈 부분이 있는 경우, 올바른 시간을 입력하지 않은 경우, 기존 엔트리와 시간이 겹치는 경우를 예외처리해줬다.
const isValidateInputs = () => {
  const { day, startHour, startMinute, endHour, endMinute } =
    getCurrentInputValues();

  try {
    isInputsEmpty();
    isTimeValid(
      Number(startHour),
      Number(startMinute),
      Number(endHour),
      Number(endMinute),
    );
    isTimeOverlapping(day, startHour, startMinute, endHour, endMinute);
  } catch (error) {
    throw error;
  }
};
const isTimeValid = (startHour, startMinute, endHour, endMinute) => {
const startTime = startHour * 60 + startMinute;
const endTime = endHour * 60 + endMinute;
/* Time can be expressed up to 18:00,
start time must be earlier than end time */
if (
startHour === 18 ||
(endHour === 18 && endMinute === 30) ||
startTime >= endTime
) {
throw new Error('Time selection is incorrect.');
}
};잘못된 시간 입력은 3가지이다. 기본적으로 종료 시간이 시작 시간보다 이른 경우가 있고, 시간표 마감이 18시이므로 시작 시간이 18시인 경우, 종료 시간이 18시 30분인 경우들이다.
이하는 기존 엔트리와 시간이 겹치는지 확인하는 알고리즘이다. 스택오버플로우의 글을 참고했다.
https://stackoverflow.com/questions/13513932/algorithm-to-detect-overlapping-periods
const isTimeOverlapping = (day, startHour, startMinute, endHour, endMinute) => {
  const newStartMinutes = convertTimeToMinutes(startHour, startMinute);
  const newEndMinutes = convertTimeToMinutes(endHour, endMinute);
  let isOverlapping = false;

  timetableMap.forEach((entry) => {
    // Check if the day of the week is same as endtries already exist
    if (entry.day === day) {
      const [existingStartHour, existingStartMinute] = entry.startTime;
      const [existingEndHour, existingEndMinute] = entry.endTime;

      const existingStart = convertTimeToMinutes(
        existingStartHour,
        existingStartMinute,
      );
      const existingEnd = convertTimeToMinutes(
        existingEndHour,
        existingEndMinute,
      );

      if (existingStart < newEndMinutes && newStartMinutes < existingEnd) {
        isOverlapping = true;
      }
    }
  });
이미 존재하는 모든 엔트리를 대상으로 검사하는데, if문을 통해 실제 세부 검사는 같은 요일인 엔트리만을 대상으로 한다.
forEach 대신 filter 함수로 Map 요소를 걸러내도 될 것 같지만 Map -> Array 변환이 필요해서 그냥 for + if문 구조로 작성했다.
엔트리 삭제
강의 이름을 누르면 시간표 테이블에서 해당 엔트리를 삭제하고, 만약 Today's lectures에 있던 항목이라면 거기에서도 삭제해줘야 한다.
const setEntryRemoveListener = (lectureNameEl, entryObj) => {
  lectureNameEl.addEventListener('click', (e) => {
    if (entryObj.day === today) removeTodayLecture({ ...entryObj });

    const tableEntryToRemove = e.target.parentNode;
    const idToRemove = tableEntryToRemove.id;
    const keyToRemove = Number(idToRemove.split('-')[1]);

    timetableMap.delete(keyToRemove);
    tableEntryToRemove.remove();
  });
};idToRemove는 엔트리의 id로 ${요일}-${key} 조합이므로 keyToRemove는 split을 통해 key값만 빼온 것이다.
만약 Today's lectures에 해당하는 항목이면 removeTodayLecture를 실행한다.
그리고 구한 key를 이용해 Map에서 객체를 지우고, 마지막으로 table의 엔트리 요소도 삭제한다.
const removeTodayLecture = (entryObj) => {
  const todayLectureToRemove = lectureItemsEl.querySelector(
    `#${entryObj.day}-${entryObj.lectureName}`,
  );

  todayLectureToRemove.remove();
};lecutreItem의 id는 ${요일}-${강의이름}이므로 이를 참고해 삭제해준다.
오늘의 강의 출력
setTableEntries는 처음에 timetableEl을 만들 때 실행되는 코드로, 맵에 존재하는 모든 요소들을 렌더링한다.
const setTableEntries = () => {
  timetableMap.forEach((_, key) => {
    setTableEntry(key);
  });
};
여기서 호출되는 setTableEntry에서 Today's lecutres를 생성한다.
아까 새 엔트리 객체를 만들 때 현재 요일과 같은 요일을 추가하면 setLectureItem을 호출했었다.
const setTableEntry = (key) => {
  const entryObj = getEntryObj(key);
  if (!entryObj) return;

  createTableEntry(key, { ...entryObj });

  if (entryObj.day === today) setLectureItem({ ...entryObj });
};
const setLectureItem = (entry) => {
const divider = createDivider();
lectureItemsEl.appendChild(divider);
const lectureItemEl = createLectureItemEl(entry);
lectureItemEl.appendChild(divider);
lectureItemsEl.appendChild(lectureItemEl);
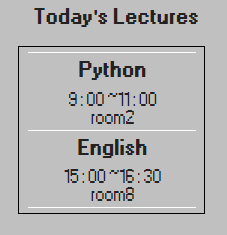
};setLectureItem에서는 lectureItem 요소를 생성하고 그 위에 다른 요소와의 구분을 위한 divider를 달아준다.
divider는 lectureItem의 위에 하나, 아래에 하나 달아준다.
const createLectureItemEl = (entry) => {
  const lectureItemEl = document.createElement('div');
  lectureItemEl.id = `${entry['day']}-${entry['lectureName']}`;
  lectureItemEl.class = 'lecture-item';
  lectureItemEl.innerHTML = getInnerHtmlOfLectureItem();

  lectureItemEl.querySelector('.lecture-item-title').textContent =
    entry['lectureName'];
  lectureItemEl.querySelector('.lecture-item-time').textContent =
    formatTime(entry);
  lectureItemEl.querySelector('.lecture-item-place').textContent =
    entry['lectureRoom'];

  return lectureItemEl;
};createLectureItemEl는 실제 강의 정보가 담긴 div 요소를 생성한다.
엔트리 추가 화면과 오늘의 강의 출력 화면 전환
두 기능은 시간표 요소의 사이드에 넣었고, 라디오 버튼을 통해 선택할 수 있게 했다. 저번에 lifequote 요소를 만들 때 다른 기능을 탭할 때마다 새로 렌더링하게 만들어뒀던 게 후회됐었기에 이번에는 첫 실행 시에 모든 요소를 렌더링하고, hidden 클래스를 토글하는 방식으로 구현했다.
.hidden {
  display: none;
}
const setTimetableElListeners = () => {
const contents = [
{
element: timetableEl.querySelector('#side-content-1'),
myRadioButton: radioButtonList[0],
otherRadioButton: radioButtonList[1],
},
{
element: timetableEl.querySelector('#side-content-2'),
myRadioButton: radioButtonList[1],
otherRadioButton: radioButtonList[0],
},
];
contents.forEach((content) => {
content.myRadioButton.addEventListener('click', () => {
content.element.classList.remove('hidden'); // 보이게
content.otherRadioButton.checked = false;
contents
.filter((con) => con !== content)
.forEach((con) => con.element.classList.add('hidden')); // 다른 요소는 숨기기
});
});아쉬운 점
리팩토링 가능한 요소
- 시간표 창이 작아졌을 때나 30분만 추가해서 엔트리 크기가 작을 때, 장소 텍스트가 그에 맞춰 작아지지 않고 삐져나온다.
Today's lecture는 엔트리를 추가한 순서대로 적용되기 때문에 이른 시간을 먼저 띄우는 정렬 기능이 없다.- 이미 추가된 엔트리의 세부 정보를 수정하는 기능이 없다.
추후 다른 프로젝트에서 개선하고 싶은 요소
-
create-함수와set-함수의 구분이 좀 모호하다. 전자는 순수하게 요소를 만드는 함수, 후자는 제작 함수들을 한꺼번에 호출하거나 리스너를 달아주는 등 어떤 요소의 설정에 필요한 코드를 담당하는 함수라고 생각하고 제작했지만 살짝 모호한 것 같다. -
자료구조를 어렴풋이 생각하기만 했지 실제로 함수끼리, 혹은 백엔드에 데이터를 넘겨주는 상황 고려는 하지 않고 짜서 데이터 가공에 불필요한 요소가 들어갔다. 설계를 잘 해도 변경점이 아예 없을 수는 없겠지만, 객체/자료구조의 초반 설계가 중요함을 느꼈다.
참고
엔트리 시간 겹치는지 확인하는 알고리즘 https://stackoverflow.com/questions/13513932/algorithm-to-detect-overlapping-periods
