useContext + ContextAPI를 공부해보자..
0
시작 전에..
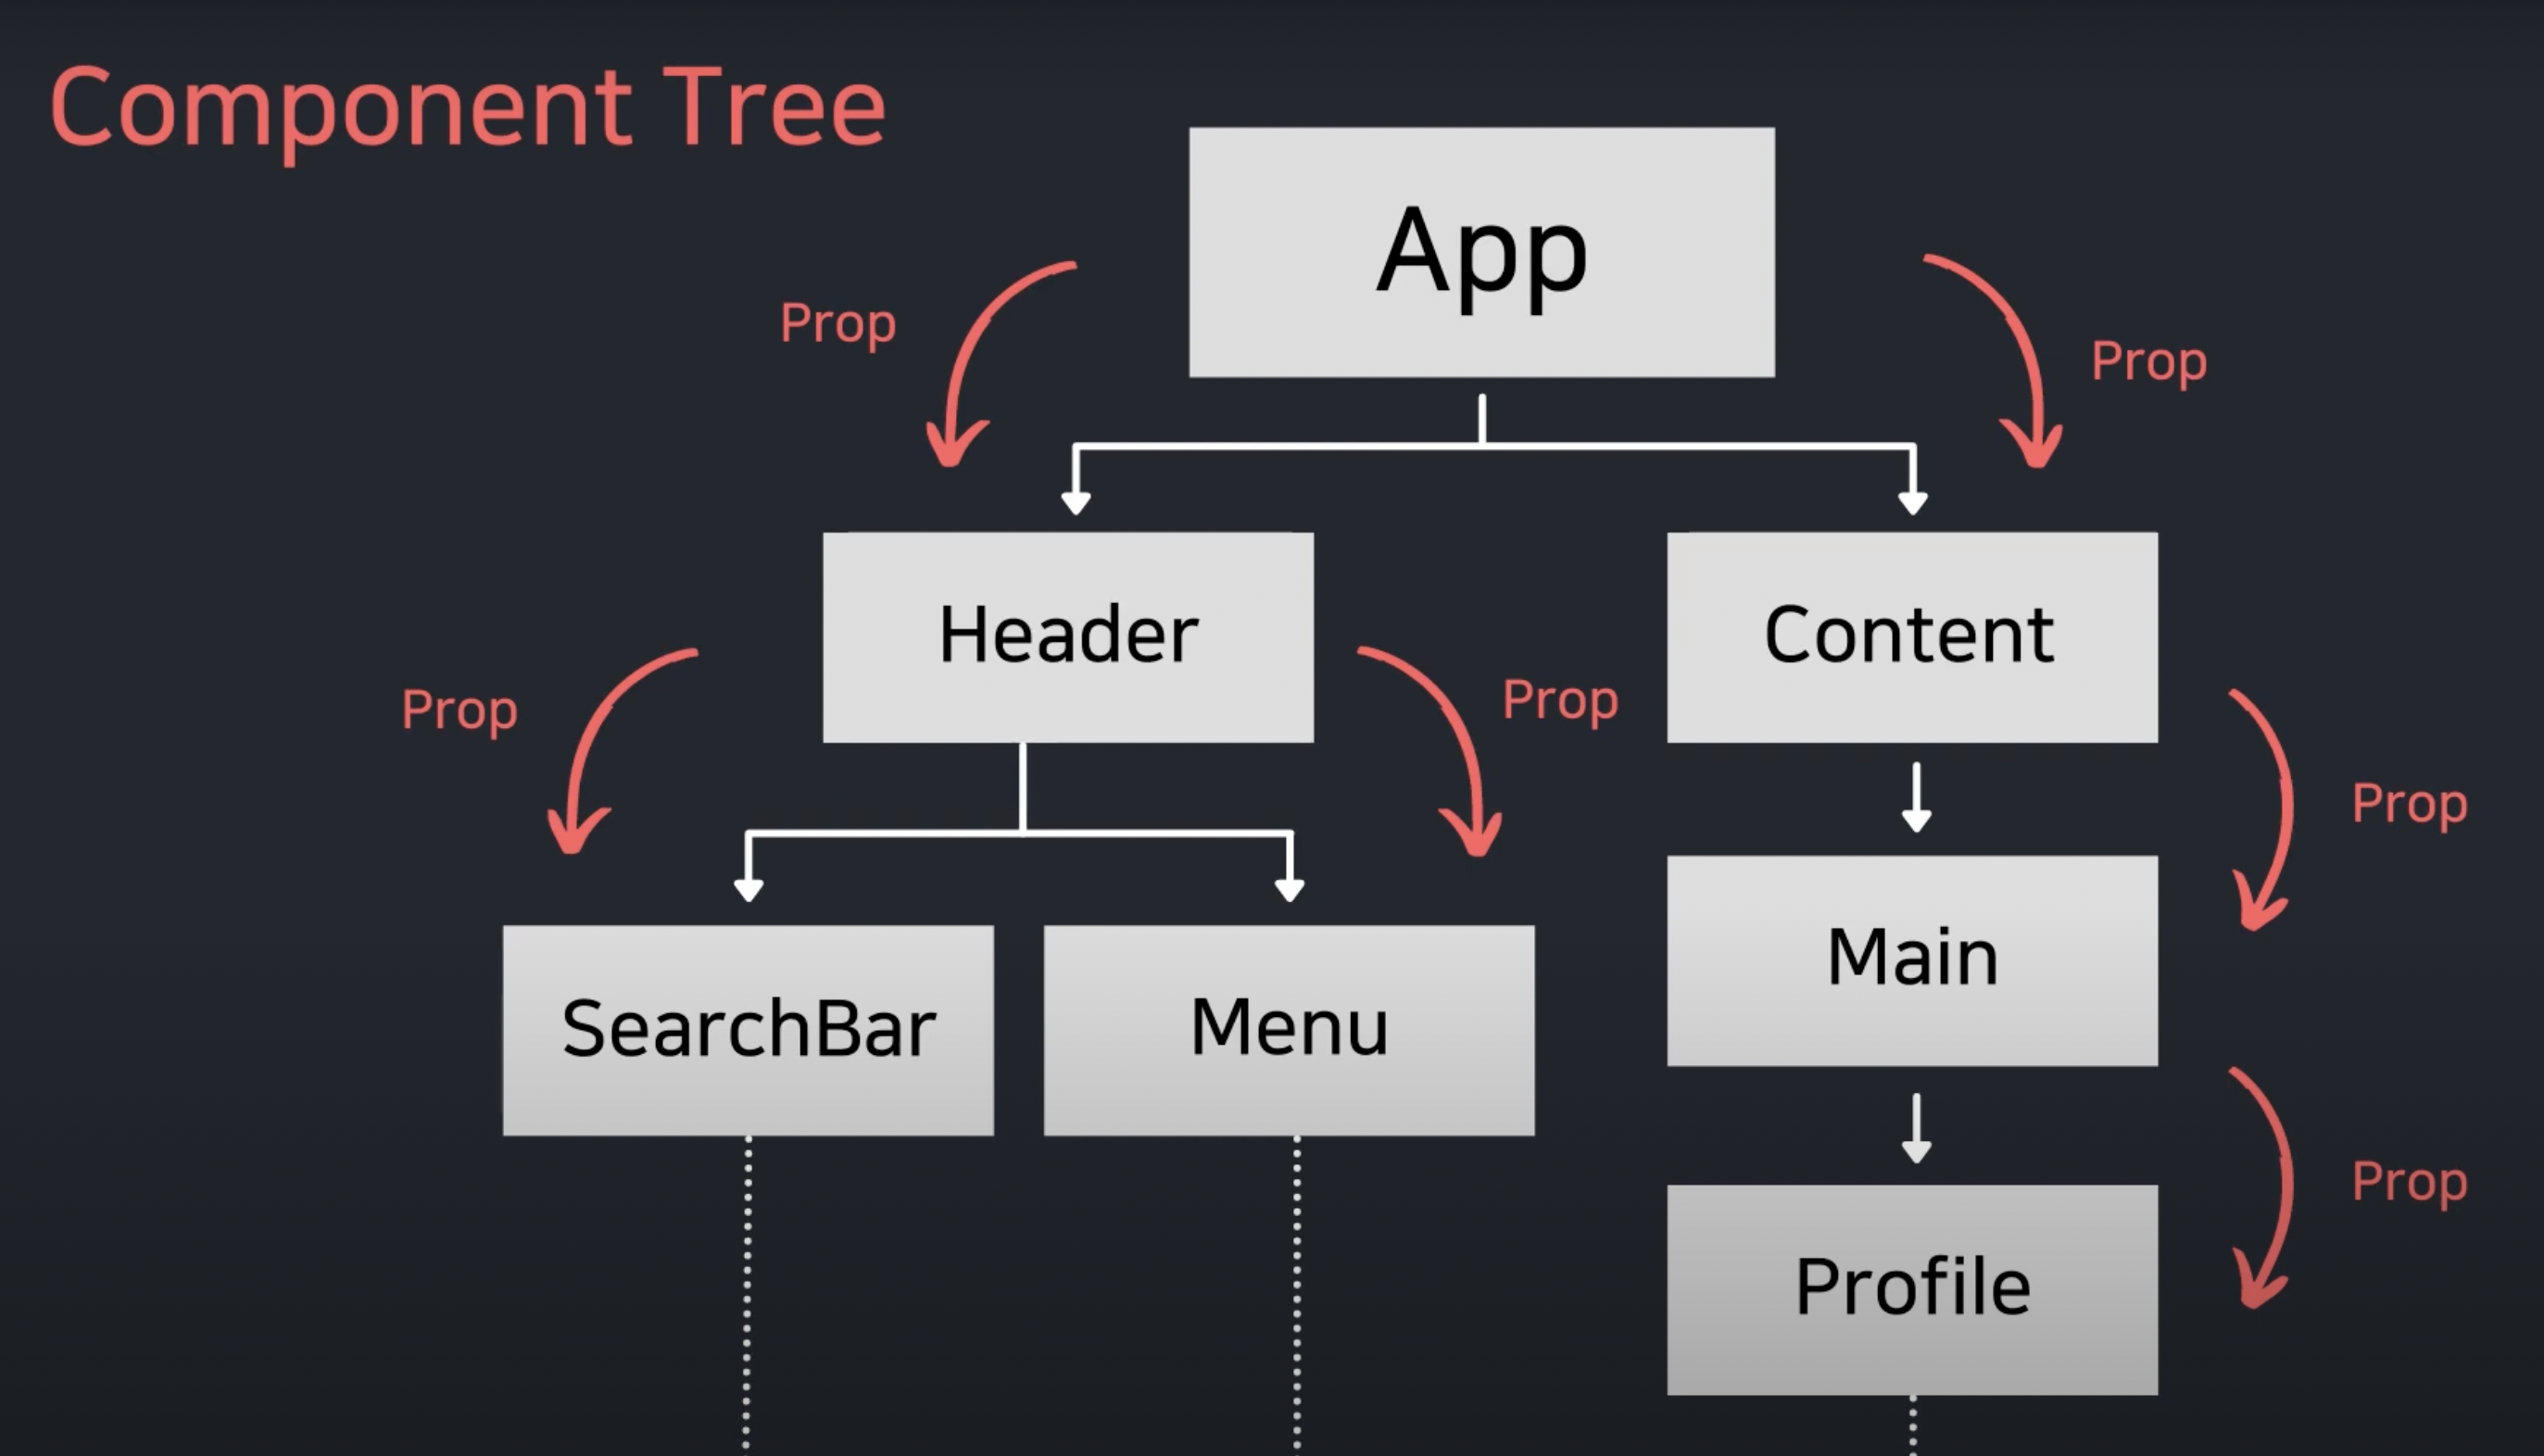
리액트는 여러개의 컴포넌트로 이루어져있다. 최상위의 App컴포넌트에서 트리를 형성하는데, 리액트의 데이터 흐름은 위에서 아래로 즉, 부모컴포넌트에서 자식컴포넌트로 props를 통해 전달이 된다.
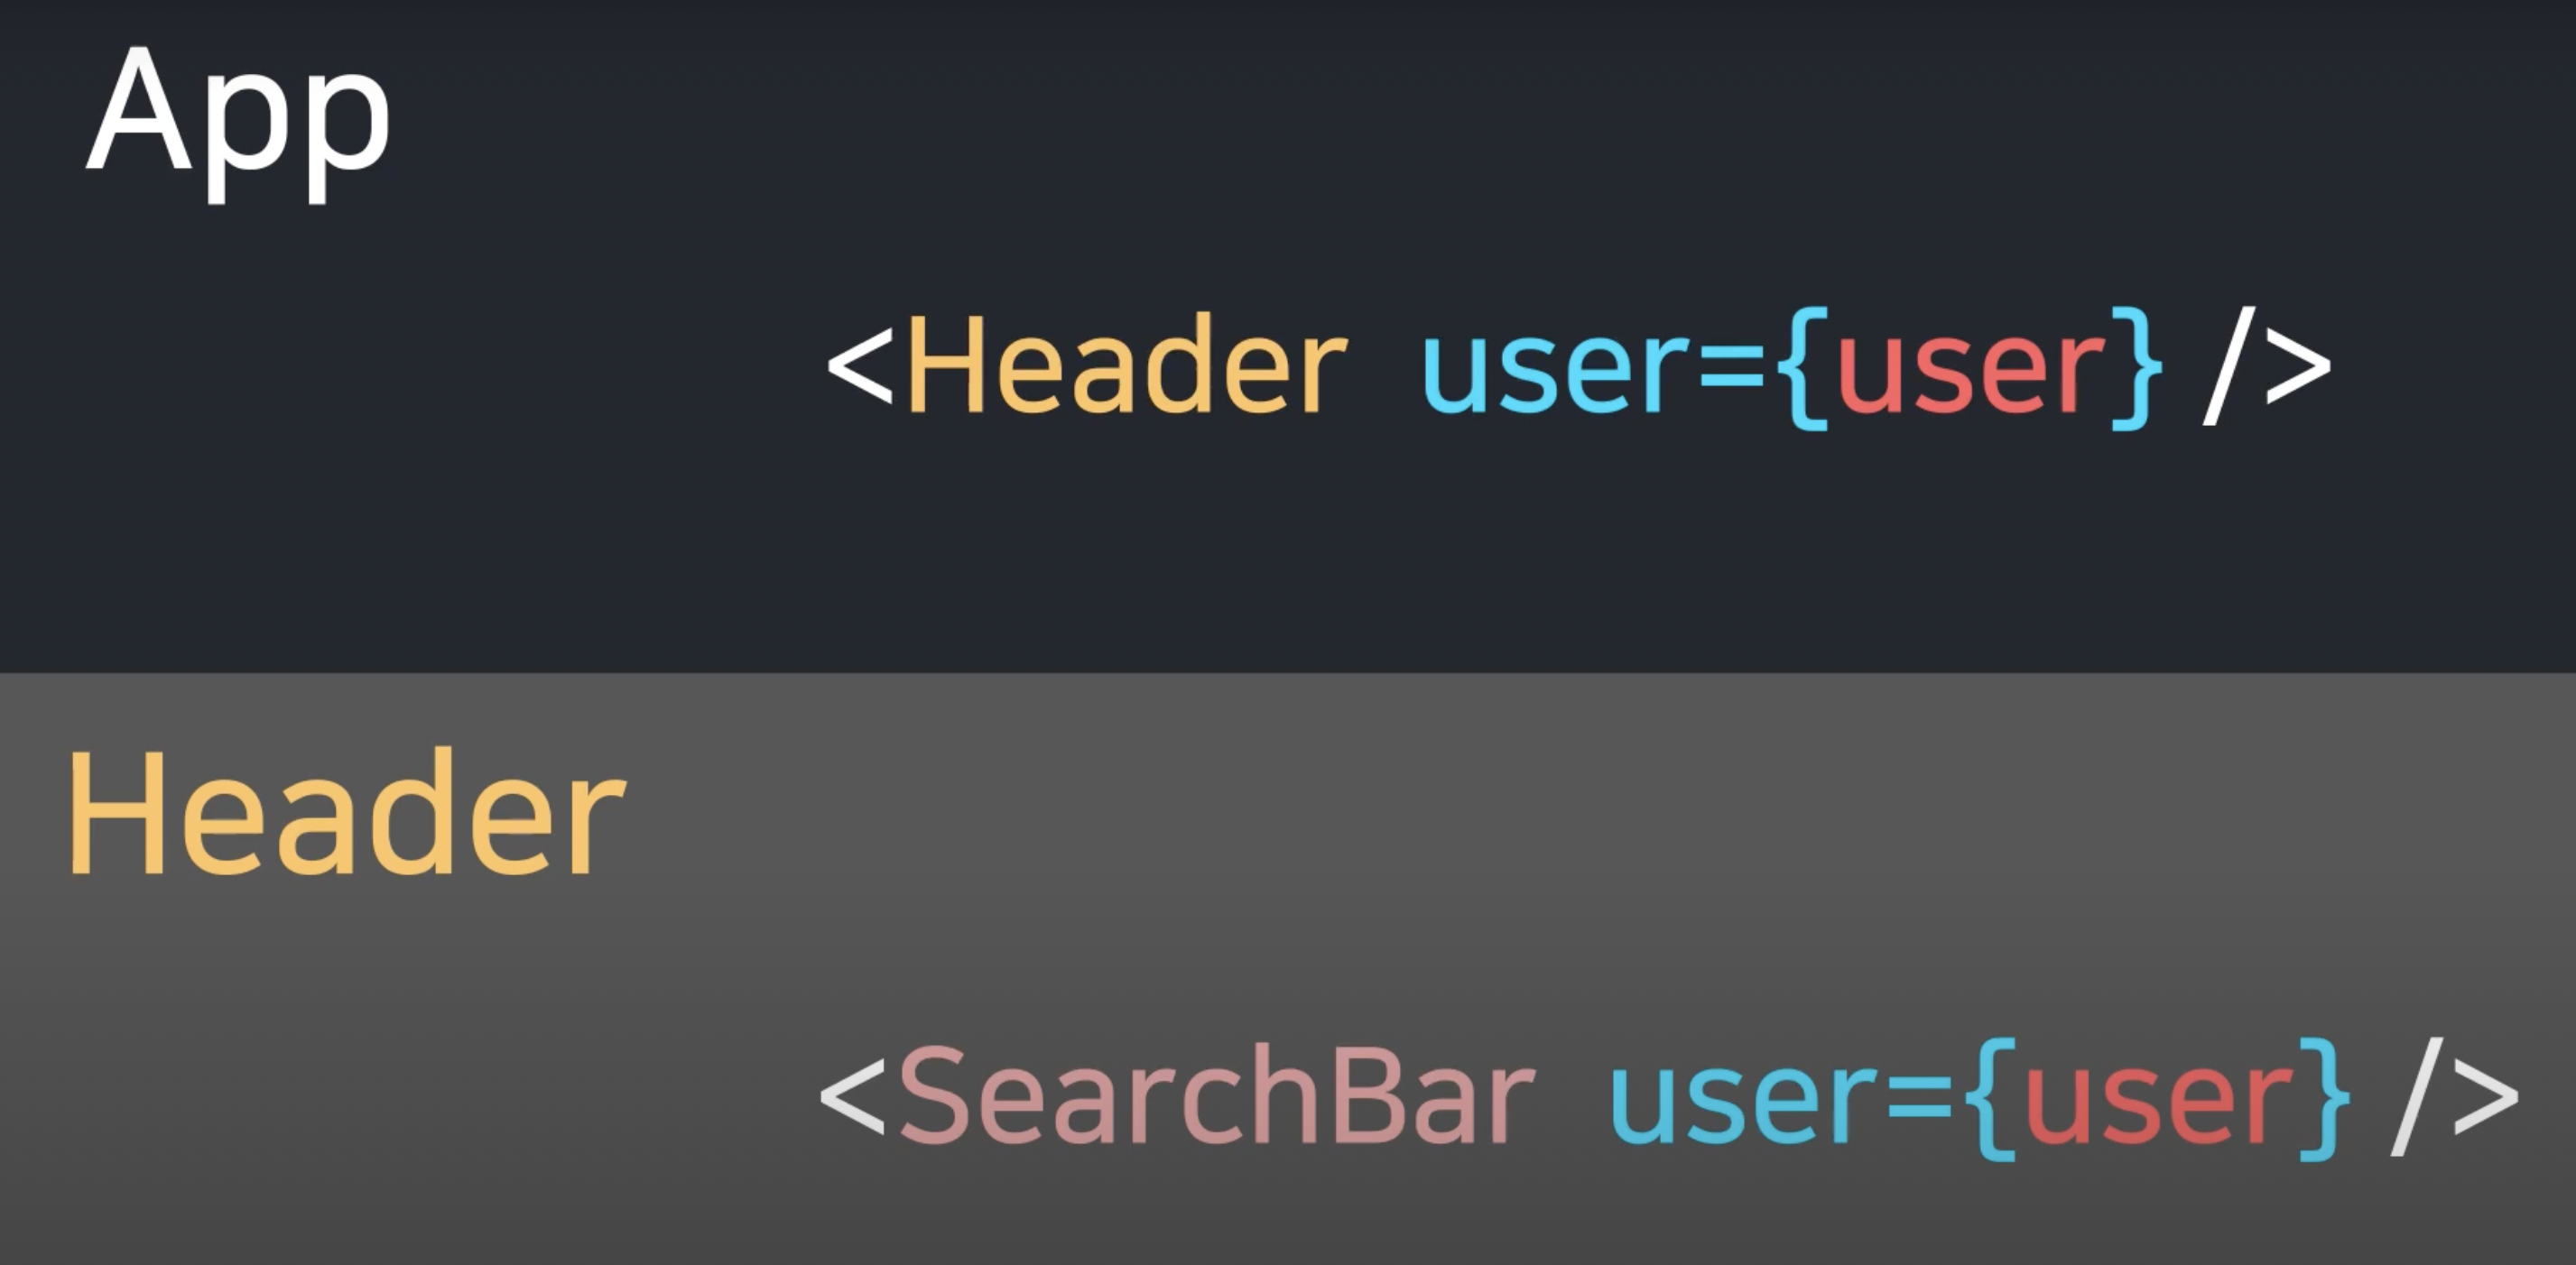
Props를 사용 할 때는, 부모컴포넌트가 자식컴포넌트 태그에 일일히 props를 넣어서 단계별로 전달을 해줘야 한다.
🙋🏻♂️ 이렇게 프로젝트가 커지게 된다면, 컴포넌트도 많아지고 트리도 엄청 깊어지게 된다. 여기서 모든 컴포넌트가 전역적으로 필요한 데이터가 있다고 가정할 때, 이런 전역적인 데이터를 props로 일일히 단계적으로 전달을 해줘야 한다? 개발자들에게는 정말 고통스러운 시간이 될 것이다.
리액트는 이러한 경우에 간편하게 사용 할 수 있는, Context라는 API를 제공해준다.
🙋🏻♂️ 그렇다면 Context만 사용하면 되는거 아닐까?
- Context를 사용하면 컴포넌트를 재사용하기 어려워 질 수 있으므로 꼭 필요할때만 쓰는것이 좋다!
VsCode
그렇다면 예시로 useContext를 사용하여, 다크모드를 구현해보자!!
💡 ThemContext.js
import { createContext } from "react";

export const ThemContext = createContext(null);
💡 index.jsx
import { useState } from "react";
import PageComponent from "../../src/component/PageComponent";
import { ThemContext } from "../../src/context/ThemContext";

export default function UseConextPractixePage() {
  const [isDark, setIsDark] = useState(false);
  return (
    //  ThemContext.Provider로 감싸준 모든 하위 컴포넌트는 props사용 없이 value의 isDark와 setIsDark에 접근 할 수 있게된다
    <ThemContext.Provider value={{ isDark, setIsDark }}>
      <PageComponent />
    </ThemContext.Provider>
  );
}
📍 최상위 컴포넌트에 createContext한 ThemContext를 ThemContextProvider태그로 감싸고, value 값으로 state를 주면, 하위 컴포넌트에서 언제든지 해당 데이터에 접근 할 수 있게 된다.
💡 PageComponent.jsx
import Content from "../../src/component/Content";
import Footer from "../../src/component/Footer";
import Header from "../../src/component/Header";
import styled from "@emotion/styled";
import { useContext, useState } from "react";
import { ThemContext } from "../context/ThemContext";

const Main = styled.div`
  display: flex;
  flex-direction: column;
  height: 100vh;
  width: 100%;
`;

const Button = styled.button`
  position: fixed;
  bottom: 0;
  right: 0;
  margin: 0px 30px 30px 0px; ;
`;

export default function PageComponent() {
  // context 사용법
  const { isDark, setIsDark } = useContext(ThemContext);

  const onClickBtn = () => {
    setIsDark(!isDark);
    console.log(isDark);
  };

  return (
    <Main>
      <Header />
      <Content />
      <Footer />
      <Button onClick={onClickBtn}>DarkMode!</Button>
    </Main>
  );
}
💡 Header.jsx
import styled from "@emotion/styled";
import { useContext } from "react";
import { ThemContext } from "../context/ThemContext";

const Main = styled.div`
  height: 80px;
  width: 100%;
  display: flex;
  justify-content: center;
  align-items: center;
`;

export default function Header() {
  const { isDark } = useContext(ThemContext);
  return (
    <Main
      style={{
        backgroundColor: isDark ? "black" : "gray",
        color: isDark ? "white" : "black",
      }}
    >
      Header
    </Main>
  );
}
💡 Content.jsx
import styled from "@emotion/styled";
import { useContext } from "react";
import { ThemContext } from "../context/ThemContext";

const Main = styled.div`
  flex: 1; // 남은 부분을 전부 채워주는?
  width: 100%;
  display: flex;
  justify-content: center;
  align-items: center;
`;

export default function Content() {
  const { isDark } = useContext(ThemContext);
  return (
    <Main
      style={{
        backgroundColor: isDark ? "gray" : "white",
      }}
    >
      Hi!
    </Main>
  );
}
💡 Footer.jsx
import styled from "@emotion/styled";
import { useContext } from "react";
import { ThemContext } from "../context/ThemContext";

const Main = styled.div`
  height: 80px;
  width: 100%;
  display: flex;
  justify-content: center;
  align-items: center;
`;

export default function Footer() {
  const { isDark } = useContext(ThemContext);
  return (
    <Main
      style={{
        backgroundColor: isDark ? "black" : "gray",
        color: isDark ? "white" : "black",
      }}
    >
      Footer
    </Main>
  );
}
시연영상

개인 이력, 포폴 관리 및 기술 블로그 사이트 👉 https://aimzero-web.vercel.app/
멋지네요!!