학습 목적
- 웹페이지 클론 코딩 과제를 하던 중 SCSS 컴파일을 위한 Webpack이나 Parcel 같은 번들러를 활용하는 선택 요구사항을 충족시키기 위해
- 번들러를 사용하는 목적이 알고 싶어서
- 웹팩이 궁금해서 & VanilaJS 프로젝트를 위해 빌드해보고 싶었다.
웹팩이란?
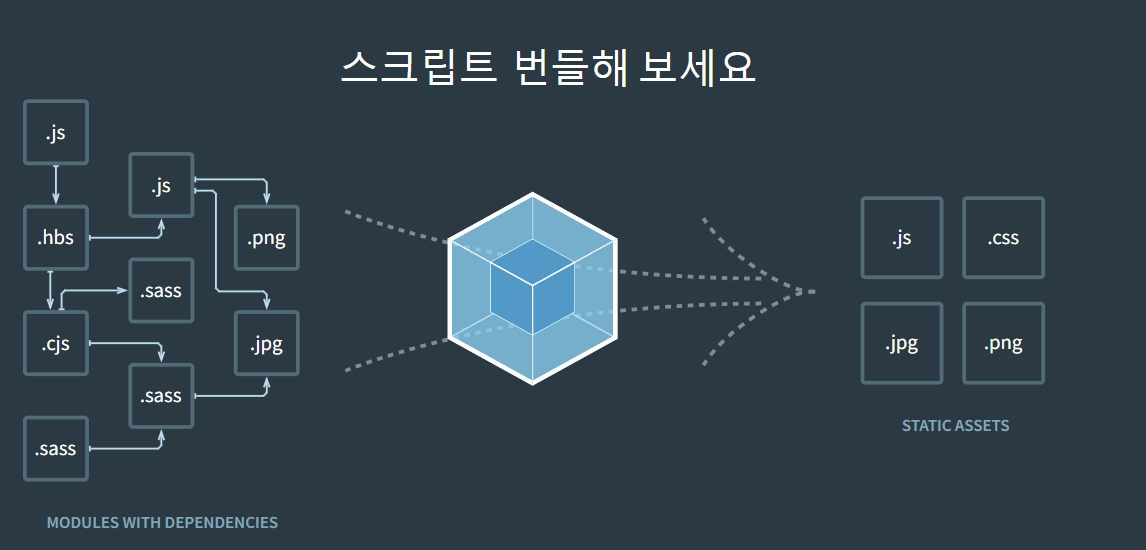
프론트엔드 프레임워크에서 많이 사용되는 모듈 번들러
모듈 번들러:
웹 애플리케이션을 구성하는 자원(HTML, CSS, Javascript, image, font 등)을 모듈로 보고 이들을 단일 Javascript 파일로 묶는데 사용되는 도구모듈: 프로그래밍 관점에서 특정 기능을 갖는 작은 코드 단위
모듈 번들링이란?
웹 애플리케이션을 구성하는 수많은 자원들을 하나의 파일로 병합 해주는 동작을 말한다.
빌드, 번들링, 변환은 전부 같은 의미
웹팩은 왜 사용해야할까?
웹팩의 등장 배경
- 파일 단위 JS 모듈 관리의 필요성
- 웹 개발 작업 자동화 도구
- HTML, CSS, JS, 이미지 압축
- CSS 전처리기 변환
- 웹 애플리케이션의 요구 : 빠른 로딩 속도와 높은 성능
웹팩으로 해결하려는 문제
- 자바스크립트 변수 유효 범위
ES6의 Modules 문법과 웹팩의 모듈 번들링으로 해결 - 브라우저 별 HTTP 요청 숫자의 제약
TCP 스펙에 따라 한번에 보낼 수 있는 HTTP 요청 숫자는 제약되어있지만, 웹팩을 이용해 제약을 피할 수 있음 - 사용하지 않는 코드 관리
- Dynamic Loading & Lazy Loading 미지원
Code Splitting 기능을 이요해 원하는 모듈을 원하는 타이밍에 로딩 가능Dynamic Loading :
메모리에 라이브러리 또는 다른 프로그램을 적재해 필요할때 로딩하는 방식
Lazy Loading :
초기 페이지 로딩 속도를 높이기 위해 현재 필요하지 않은 자원은 나중에 요청
웹팩 시작하기
빈 프로젝트 디렉토리를 생성한 뒤 package.json을 생성한 뒤
웹팩 모듈webpack과 웹팩 커맨드 제공 모듈 webpack-cli 설치하기
$ npm init -y
$ npm -i -D webpack webpack-cli webpack.config.js파일을 생성한 뒤 아래와 같이 작성
// webpack.config.js
const path = require('path');

module.exports = {
    mode: 'none',
    entry: path.resolve(__dirname, 'src/index.js'),
    output: {
        filename: 'index.js',
        path: path.resolve(__dirname, 'dist'),
    },
};
src 디렉토리를 만들어 index.js 파일을 추가하고
// src/index.js
console.log('Hello Webpack!');
index.html 파일을 추가하고
<!--src/index.html-->
<!DOCTYPE html>
<html lang="en">
  <head>
      <meta charset="UTF-8">
      <title>Webpack Test</title>
  </head>
  <body>
      <div id="app"></div>
  </body>
</html>
아래와 같은 디렉토리 구조 만들어 놓기
project
|-src
| └─ index.js
| └─ index.html
|-package.json
└─ webpack.config.jswebpack으로 빌드, 실행 위해 package.json파일의 "scripts" 내용 수정하기
// package.json
"scripts": {
    "build": "webpack",
    "start": "webpack serve --open"
  },
다음으로, HTML 파일 생성을 단순화 하는 HTMLWebpackPlugin을 install
$ npm i html-webpack-plugin -Dwebpack.config.js 파일의 내용을 변경하기
// webpack.config.js
const path = require('path');
var HtmlWebpackPlugin = require('html-webpack-plugin');

module.exports = {
    mode: 'none',
    entry: path.resolve(__dirname, 'src/index.js'),
    output: {
        filename: 'index.js',
        path: path.resolve(__dirname, 'dist'),
    },
    plugins: [
        new HtmlWebpackPlugin({
            filename: 'index.html',
            template: path.resolve(__dirname, 'src/index.html')
        }),
    ],
    devServer: {
        static: {
            directory: path.join(__dirname, 'dist'),
        },
        port: 9000,
        open: true,
        compress: true,
    },
};
터미널에서 빌드하고
$ npm run build 실행시켜보면
$ npm run start아래와 같은 디렉토리 구조를 볼 수 있다.
project
|-dist
| └─ index.js
| └─ index.html
|-src
| └─ index.js
| └─ index.html
|-package.json
└─ webpack.config.js
CSS, Style, Sass Loaders
Loaders :
파일을 가져오거나 Load할 때 파일을 사전처리하는 역할.
여기선 JS 모듈에서 직접 CSS 파일을 가져오는 일을 함
css-loader & style-loader 설치
style-loader: CSS를 <style> 태그로 출력하는 역할
css-loader : JS의 CSS를 해석하고, 모든 의존성 해결
$ npm i style-loader css-loader -Dwebpack.config.js에 module 추가
// webpack.config.js
const path = require('path');
var HtmlWebpackPlugin = require('html-webpack-plugin');

module.exports = {
    mode: 'none',
    entry: path.resolve(__dirname, 'src/index.js'),
    output: {
        filename: 'index.js',
        path: path.resolve(__dirname, 'dist'),
    },
    module: {
        rules: [
            {
                test: /\.css$/,
                use: [
                    'style-loader',
                    'css-loader'
                ]
            }
        ]
    },
    plugins: [
        new HtmlWebpackPlugin({
            filename: 'index.html',
            template: path.resolve(__dirname, 'src/index.html')
        }),
    ],
    devServer: {
        static: {
            directory: path.join(__dirname, 'dist'),
        },
        port: 9000,
        open: true,
        compress: true,
    },
};
CSS 테스트
index.css파일을 생성하고
body {
  background: royalblue;
}index.js파일로 가져오기
var css = require('./index.css');실행하게 되면 배경색이 변경된 것을 볼 수 있다.
sass-loader 설치
sass를 사용하기 위해
$ npm i sass-loader node-sass -Dcss로 작성했던 webpack.config.js 부분을 scss로 수정해보자.
// webpack.config.js
test: /\.scss$/,
use: [
  'style-loader',
  'css-loader',
  'sass-loader'
]app.js에서 css를 scss로 바꿔주고 CSS 파일 확장자도 수정하기
var css = require('./index.scss');scss 문법으로 바꾸는 김에 테스트로 수정
/* app.sass */
body {
  background: royalblue;

  p {
    color: white;
  }
}index.html도 수정하기
<body>
    <div id="app"></div>
    <p> Hi</p>
</body>
실행하게 되면 흰 글씨로 Hi라 적혀있는 화면을 볼 수 있습니다.

추가적인 학습 목표
- 모듈 번들러 중 vite가 있는데 웹팩과 vite의 차이
- 웹팩 dev server
참고
Webpack
Webpack - 1 - 시작하기 / EJS / SASS(SCSS)
Why and How to Use Webpack and Babel with Vanilla JS
웹팩 핸드북
Webpack 설치 및 환경설정


아주 유익한 내용이네요!