Vue.js
질문페이지 스타일링 및 v-html
Getters 사용해서 computed하기
📂 store
- index.js
import Vue from 'vue';
import Vuex from 'vuex';
import mutations from './mutations.js';
import actions from './actions.js';

Vue.use(Vuex);

export const store = new Vuex.Store({
  state: {
    news: [],
    ask: [],
    jobs: [],
    user: {},
    item: [],
  },
  getters:{
    fetchedAsk(state) {
        return state.ask;
    },
    fetchedItem(state) {
      return state.item;
    }
  },
  mutations,
  actions,
});- ItemView.js
<template>
  <div>
    <p>name: {{ fetchedItem.id}}</p>
    <p>title: {{ fetchedItem.title}}</p>
    <p>points: {{ fetchedItem.points}}</p>
    <p>user: {{ fetchedItem.user}}</p>
  </div>
</template>

<script>
import { mapGetters } from 'vuex';

export default {
  computed: {
    ...mapGetters(['fetchedItem']),
  },
  created() {
    console.log(this.$route.params.id);
    const itemId = this.$route.params.id;
    this.$store.dispatch('FETCH_ITEM', itemId);
  }
}
</script>

<style>

</style>
v-html
html 태그를 적용해서 뿌려야할때는 v-html를 써야한다.
vue.js 공식문서
font-awesome
폰드 어썸 공식문서에서 npm으로 패키지 다운 받고 kit 받기 해서 개인 cdn받아 public 폴더에 index.html에 head 부분에 적용함
- ItemView.js
<template>
  <div>
    <section>
    <!-- 질문 상세 정보 -->
    <div class="user-container">
      <div>
        <!-- 사용자 프로필 -->
        <i class="fa-solid fa-user"></i>
      </div>
      <div class="user-description">
        <!-- 사용자 정보 -->
        <router-link :to="`/user/${fetchedItem.user}`">
          {{ fetchedItem.user }}
        </router-link>
        <div class="time">
          {{ fetchedItem.time_ago }}
        </div>
      </div>
    </div>
    <h2>{{ fetchedItem.title }}</h2>
    </section>
    <section>
      <!-- 질문 댓글 -->
      <div v-html="fetchedItem.content">
      </div>
    </section>
  </div>
</template>

<script>
import { mapGetters } from 'vuex';

export default {
  computed: {
    ...mapGetters(['fetchedItem']),
  },
  created() {
    console.log(this.$route.params.id);
    const itemId = this.$route.params.id;
    this.$store.dispatch('FETCH_ITEM', itemId);
  }
}
</script>

<style scoped>
.user-container {
  display: flex;
  align-items: center;
  padding: 0.5rem;
}
.fa-user {
  font-size: 2.5rem;
}
.user-description {
  padding-left: 8px;
}
.time {
  font-size: 0.7rem;
}
</style>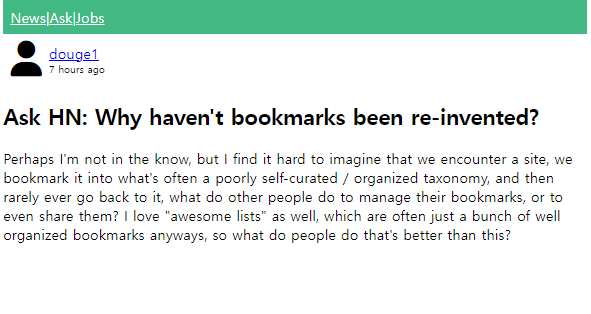
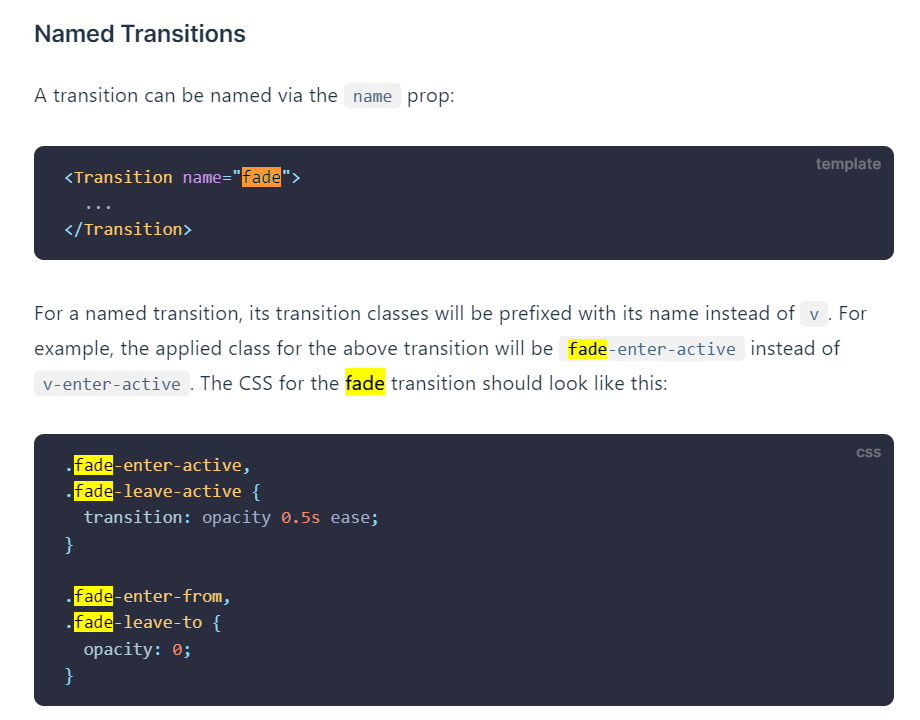
라우터 트랜지션
(router-transition)
- App.vue
<template>
  <div id="app">
    <tool-bar></tool-bar>
    <transition name="page">
      <router-view></router-view>
    </transition>
  </div>
</template>

<script>
import ToolBar from './components/ToolBar.vue';
export default {
  components: {
    ToolBar,
  },
}
</script>

<style>
#app {
  padding: 0;
  margin: 0;
}

/* router Transition */
.page-enter-active,
.page-leave-active {
  transition: opacity 0.5s ease;
}

.page-enter-from,
.page-leave-to {
  opacity: 0;
}
</style>
리팩토링 간단 소개
전체적인 페이지에서 공통적인 부분을 뽑아내는 작업
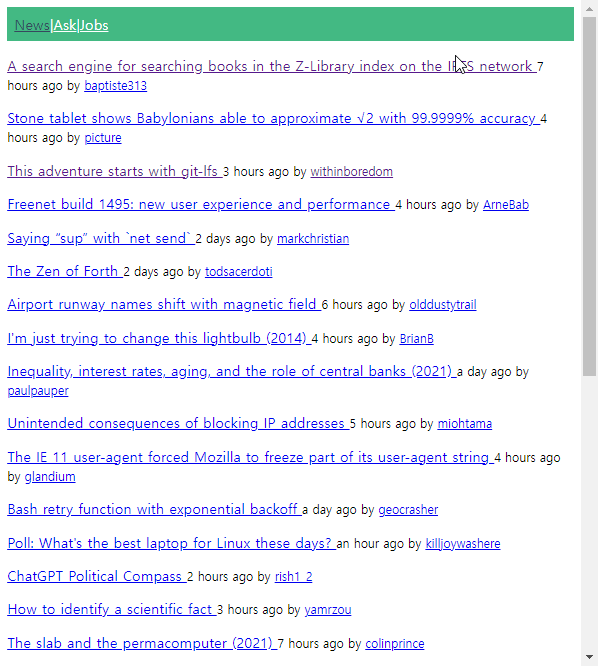
뉴스 리스트 스타일링
리스트 아이템마다 points가 있다
리스트 아이템의 점수를 표시한 것이다.

- NewsView.vue
diplay: flex 후 align-items를 하면 수직 정렬이 된다.
justify-content는 가로 정렬
<template>
  <div>
    <ul class="news-list">
      <li v-for="(item, index) in this.$store.state.news" :key="index" class="post">
        <!-- 포인트 영역 -->
        <div class="points">
          {{ item.points }}
        </div>
        <!-- 기타 정보 영역 -->
        <div>
          <p class="news-title">
            <a v-bind:href="item.url">
              {{ item.title }}
            </a>
          </p>
          <small class="link-text">
            by
            <router-link v-bind:to="`/user/${item.user}`" class="link-text">{{ item.user }}</router-link>
          </small>
        </div>
        <!-- <a v-bind:href="item.url">
          {{ item.title }}
        </a>
      <small>
        {{ item.time_ago }} by
        <router-link v-bind:to="`/user/${item.user}`">{{ item.user }}</router-link>
      </small> -->
      </li>
    </ul>
    <!-- <p v-for="(item, index) in this.$store.state.news" :key="index">
      <a v-bind:href="item.url">
        {{ item.title }}
      </a>
      <small>
        {{ item.time_ago }} by
        <router-link v-bind:to="`/user/${item.user}`">{{ item.user }}</router-link>
      </small>
    </p> -->
  </div>
</template>

<script>
// import { fetchNewsList } from '../api/index.js';

export default {
  created() {
    this.$store.dispatch('FETCH_NEWS');
  },
}
</script>

<style scoped>
.news-list {
  padding: 0;
  margin: 0;
}
.post {
  list-style: none;
  display: flex;
  align-items: center;
  border-bottom: 1px solid #eee;
}
.points {
  width: 80px;
  height: 60px;
  display: flex;
  align-items: center;
  justify-content: center;
  color: #42b883;
}
.news-title {
  margin: 0;

}
.link-text {
  color: #828282;
}
</style>- App.vue
a태그에 대한 style
<template>
  <div id="app">
    <tool-bar></tool-bar>
    <transition name="page">
      <router-view></router-view>
    </transition>
  </div>
</template>

<script>
import ToolBar from './components/ToolBar.vue';
export default {
  components: {
    ToolBar,
  },
}
</script>

<style>
#app {
  padding: 0;
  margin: 0;
}

a {
  color: #34495e;
  text-decoration: none;
}
a.router-link-exact-active {
  text-decoration: underline;
}
a:hover {
  color: #42b883;
  text-decoration: underline;
}

/* router Transition */
.page-enter-active,
.page-leave-active {
  transition: opacity 0.5s ease;
}

.page-enter-from,
.page-leave-to {
  opacity: 0;
}
</style>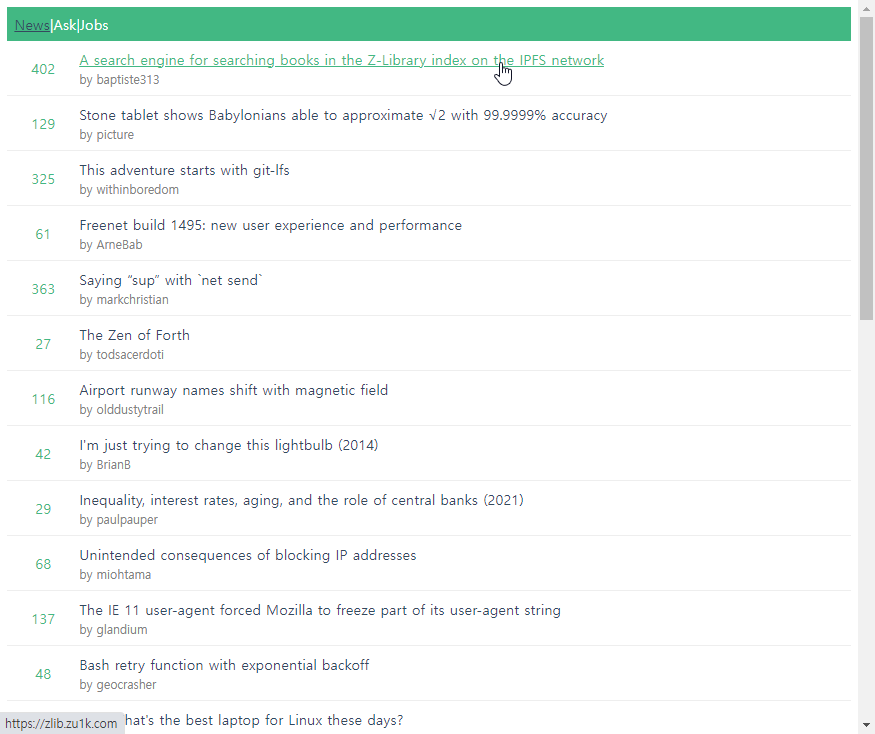
(실습) AskView, JobView 스타일링
- AskView.vue
<template>
  <div>
    <ul class="ask-list">
      <li v-for="(item, index) in fetchedAsk" :key="index" class="post">
        <div class="points">
          {{ item.points }}
        </div>
        <div>
          <p class="ask-title">
            <router-link v-bind:to="`/item/${item.id}`" class="link-text">{{ item.title }}</router-link>
          </p>
          <small class="link-text">
            {{ item.time_ago }} by {{ item.user }}
          </small>
        </div>
      </li>
    </ul>
  </div>
</template>

<script>
import { mapGetters } from 'vuex';
// import { mapState } from 'vuex';

export default {
  computed: {
    // 배열 표기법
    ...mapGetters([
      'fetchedAsk'
    ]),

    // #3
    // ...mapGetters({
    //   fetchedAsk: 'fetchedAsk'
    // }),


    // #2
    // ...mapState({
    //   fetchedAsk: state => state.ask
    // }),

   // #1
   // ask() {
    //   return this.$store.state.ask;
    // }
  },
  created() {
    this.$store.dispatch('FETCH_ASK');
  },
}
</script>

<style>
.ask-list {
  padding: 0;
  margin: 0;
}
.post {
  list-style: none;
  display: flex;
  align-items: center;
  border-bottom: 1px solid #eee;
}
.points {
  width: 80px;
  height: 60px;
  display: flex;
  align-items: center;
  justify-content: center;
  color: #42b883;
}
.ask-title {
  margin: 0;

}
.link-text {
  color: #828282;
}
</style>- JobsView.vue
<template>
  <div>
    <ul class="job-list">
      <li v-for="(job, index) in this.$store.state.jobs" :key="index" class="post">
        <div class="points">
          {{ job.points || 0}}
        </div>
        <div>
          <p class="job-title">
            <a :href="job.url">
              {{ job.title }}
            </a>
            <small class="link-text">
              {{ job.time_ago }} by
              <a :href="job.url">
                {{ job.domain }}
              </a>
            </small>
          </p>
        </div>
      </li>
    </ul>
  </div>
</template>

<script>

export default {
  created() {
    this.$store.dispatch('FETCH_JOBS');
  }
}
</script>

<style>
.job-list {
  padding: 0;
  margin: 0;
}
.post {
  list-style: none;
  display: flex;
  align-items: center;
  border-bottom: 1px solid #eee;
}
.points {
  width: 80px;
  height: 60px;
  display: flex;
  align-items: center;
  justify-content: center;
  color: #42b883;
}
.job-title {
  margin: 0;

}
.link-text {
  color: #828282;
}
</style>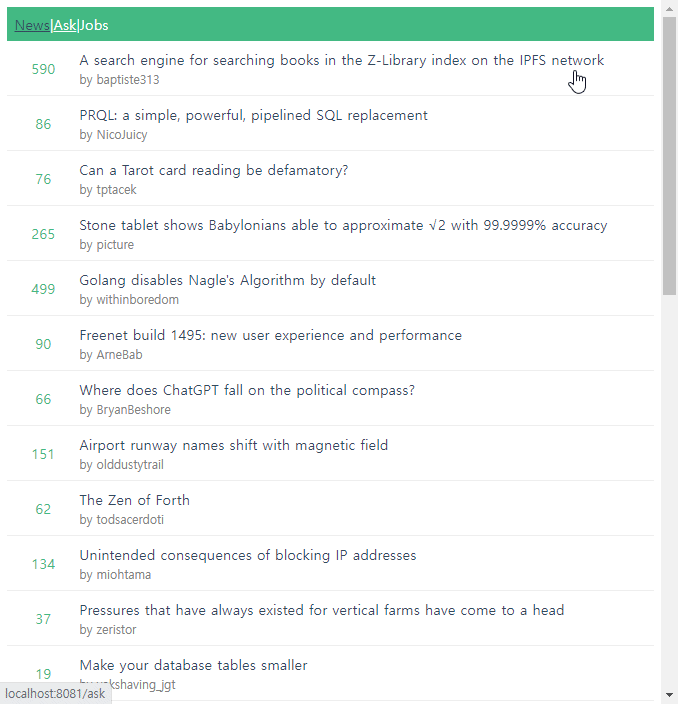
(실습) AskView / JobsView
공통된 부분을 ListItem.vue에 분리했다. 이것을 동일하게 두 페이지에 적용시켜보자
- ListItem.vue
<template>
  <div>
    <ul class="news-list">
      <li v-for="(item, index) in listItems" :key="index" class="post">
        <div class="points">
          {{ item.points || 0}}
        </div>
        <div>
          <p class="news-title">
            <a v-bind:href="item.url">
              {{ item.title }}
            </a>
          </p>
          <small class="link-text">
            by
            <router-link v-bind:to="`/user/${item.user}`" class="link-text">{{ item.user }}</router-link>
          </small>
        </div>
      </li>
    </ul>
  </div>
</template>

<script>
export default {
  created() {
    console.log(this.$route.path === '/news');
    const name = this.$route.name;
    if( name === 'news' ) {
      this.$store.dispatch('FETCH_NEWS');
    } else if( name === 'ask' ) {
      this.$store.dispatch('FETCH_ASK');
    } else if( name === 'jobs' ) {
      this.$store.dispatch('FETCH_JOBS');
      // actionName = 'FETCH_JOBS';
    }
    // this.$route.dispatch.dispatch(actionName);
  },
  computed: {
    // eslint-disable-next-line vue/return-in-computed-property
    listItems() {
      const name = this.$route.name;
      const state = this.$store.state;
      if( name === 'news' ) {
        return state.news;
      } else if( name === 'ask' ) {
        return state.ask;
      } else if( name === 'jobs' ) {
        return state.jobs;
      }
    }
  }
}
</script>

<style scoped>
.news-list {
  padding: 0;
  margin: 0;
}
.post {
  list-style: none;
  display: flex;
  align-items: center;
  border-bottom: 1px solid #eee;
}
.points {
  width: 80px;
  height: 60px;
  display: flex;
  align-items: center;
  justify-content: center;
  color: #42b883;
}
.news-title {
  margin: 0;

}
.link-text {
  color: #828282;
}
</style>- NewView.vue(ask, jobs 동일)
<template>
  <div>
    <list-item></list-item>
  </div>
</template>

<script>
import ListItem from '../components/ListItem.vue';

export default {
  components: {
    ListItem,
  }
}
</script>