
본 게시물에서는 html input 태그로 이미지 파일을 여러 장 추가하고, 양식을 제출하기 전에 미리 이미지를 띄워 preview 할 수 있도록 구현한 것을 정리해 보았다.
구현 전에, 우리가 쓸 요소와 구조가 어떻게 이루어질지 먼저 정리해보자.
먼저 알아가기
<input type="file" /> 에 대해서
타입이 file인 input 태그는 파일을 추가할 수 있는 기능이 들어있다. 이 태그를 사용하면 html에서 기본으로 제공해주는 버튼이 등장한다.

파일 선택 버튼을 클릭하여 파일을 선택하면 파일명이 나온다.

- multiple 속성
만약 한꺼번에 여러 개의 파일을 선택하고 싶다면 input 태그에
multiple 속성을 넣어주면 된다.
<input type="file" multiple />

속성 multiple이 있는 상태에서 파일을 여러 개 추가해주면 파일명이 나열 되는 게 아니고 사진과 같이 파일 n개로 뜬다.
처음엔 multiple 속성이 파일을 스택처럼 여러 개 쌓을 수 있는 속성인 줄 알았다가 나중에서야 아닌 걸 깨달았다...
- accept 속성
<input type="file" multiple accept="image/*" />
어떤 형식의 파일을 받을 것인가를 적는 속성이다.
앞서 콘솔에 찍어본 e.target.file의 요소를 보면 type이라는 key가 있다. value로 내가 추가해준 파일의 형식이 들어오는데 이 value에 들어올 수 있는 값을 적어주는 곳이 바로 accept이다. 이미지 파일의 모든 형식을 받아오겠다면 accept="image/*", jpeg 파일과 jpg 파일만 받겠다면 accept="image/jpeg,image/jpg", pdf만 받겠다면 accept="application/pdf" 이렇게 입력해주면 된다.
- onChange 이벤트
우리가 파일선택 버튼을 클릭한 후 파일을 선택하여 추가하는 행위는 onClick이 아닌 onChange 이벤트에 속한다. 그러므로 preview를 만드는 함수는 onChange 이벤트 안에서 이루어진다.
e.target.files의 타입
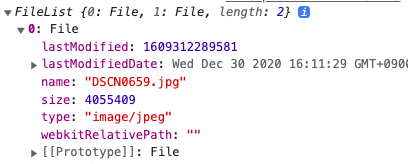
파일 선택을 하면 onChange 이벤트가 발생한다. 여기서 e.target.files을 가져와 보면 FileList 타입의 객체 안에 File 타입의 요소(우리가 선택한 파일)가 나열된다.
우리가 해야 할 것은 이 객체를 배열로 만들어 요소 하나하나를 url로 변환해 주는 것이다.
객체를 배열로 변환하듯이 Array.from 메서드를 사용하여 변환하면 되는데 타입스크립트를 쓴다면 신경을 조금 써줘야 한다. onChange 이벤트에서 가져온 event부터 event.target, event.target.files까지 전부 타입을 지정해주어야 한다.
이 부분은 아래 구현 부분에서 자세히 정리하겠다.
구현
❗️스타일링은 tailwindCSS를 사용하였지만 CSS가 중점이 아니기 때문에 생략.
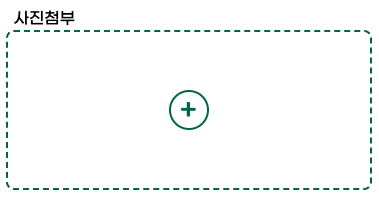
1. 파일 선택 버튼 커스텀하기
<input type='file' /> 태그에 기본으로 붙어있는 파일선택 버튼은 커스텀이 아니기 때문에 따로 새로운 버튼을 만들어주고 새로운 버튼에 클릭 이벤트 발생 시 기존 파일선택 버튼이 눌리도록 함수를 작성해주어야 한다.
- 우선 input 태그 display를 none으로 하여 보이지 않게 해준다.
import React from 'react';

const FileUploader = () => {
  return (
    <form>
      <input className="hidden" type="file" multiple accept="image/*" onChange={handleChang} />
    </form>
   );
}- 내 커스텀 버튼을 만들어준다.
import React from 'react';

const FileUploader = () => {
  return (
    <form>
      <div>
        <label htmlFor="file">사진첨부</label>
        <div>
            +
        </div>
        // hidden input
        <input className="hidden" type="file" multiple accept="image/*" onChange={handleChang} />
      </div>
    </form>
   );
}- useRef 훅을 사용하여 input에 전달하고 새로 만든 버튼을 클릭하여 onClick 이벤트가 발생했을 때 click() 메서드를 실행해준다. ref는 input 태그에 들어가기 때문에
<HTMLInputElement>타입으로 넣어준다.
import React, { useRef } from 'react';

const FileUploader = () => {
  const fileRef = useRef<HTMLInputElement>(null);
  // input click method
  const handleClick = () => {
    fileRef?.current?.click();
  };

  return (
    <form>
      <div>
        <label htmlFor="file">사진첨부</label>
        // onClick 이벤트
        <div onClick={handleClick}>
            +
        </div>
        // ref 전달
        <input ref={fileRef} name="file" className="hidden" type="file" multiple accept="image/*" onChange={handleChang} />
      </div>
    </form>
  );
};
2. 이미지들이 보일 preview 자리 만들기
import React, { useRef } from 'react';

const FileUploader = () => {
...
  return (
    <form>
      <div>
        <label htmlFor="file">사진첨부</label>
        // 이미지 파일
        <div>
          <img src={} width='' height='' alt='' />
        </div>
        ...
      </div>
    </form>
  );
};
3. 이미지 파일들로 이루어진 배열 상태 값 만들기
현재 상태에서는 파일 추가가 안된다. e.target.files는 객체이며 이전 파일들이 남아있는 상태에서 쌓이는 게 아니고 파일선택 버튼을 누를 때마다 선택한 파일들이 초기화되기 때문에 배열에 내가 선택한 이미지 파일들이 stack처럼 쌓일 수 있도록 함수를 만들어줘야 한다.
- useState로 상태 값 만들기
e.target.files의 요소들은 앞서 언급했듯이 File 타입의 객체이기 때문에 이를URL.createObjectURL()메서드로 url로 만들어줘야 한다.URL.createObjectURL()로 만들어진 url은 string타입이 되므로string[]타입의 배열 상태 값을 만들어줘야 한다.
import React, { useRef, useState } from 'react';

const FileUploader = () => {
  const [images, setImages] = useState<string[]>([]);
...
  return (...);
};
4. 이미지 파일을 stack처럼 쌓기 위한 함수 만들기
지금부터 input 태그의 onChange 이벤트(파일을 선택하는 행위)가 발생하면 실행될 함수를 만든다.
보기 쉽게 정리하자면:
- e.target.files객체를 배열로 만든다.
- 배열을
map으로 돌면서URL.createObjectURL()로 파일들을 url을 만든 후 다시 이 url로 이루어진 배열을 만든다. - useState의
setImages()으로 '이전 파일(images) + 새로 추가한 파일(selectedFiles)'을 위해 concat 메서드로 배열을 합쳐준다.
- handleChange
- onChange 이벤트가 발생하면 실행될 handleChange 함수를 만들어준 뒤
e객체를 넘겨주어e.target.files를 가져온다.
  const handleChange = (e: React.ChangeEvent) => {
    const targetFiles = (e.target as HTMLInputElement).files as FileList;
}-
넘겨받은
e객체는 React의ChangeEvent타입에 속한다. -
e.target은 원래
EventTarget & Element타입에 속하지만, 이 타입에는 e.target.files의 files 속성이 존재하지 않기 때문에 files가 존재하는HTMLInputElement타입을as키워드로 지정해준다.
(참고:HTMLInputElement.files MDN & HTMLInputElement MDN) -
파일이 아직 선택되지 않아
e.target.files에 아무것도 없을 때는 null이 되기 때문에 현재e.target.files의 타입은FileList | null이 되어 있을 것이다. 만약 타입이null이라면 나중에e.target.files를 배열로 바꾸지 못하기 때문에 정확히FileList라고 타입을 정해줘야 한다. 이번에도as FileList로 타입을 정해준다.
FileList타입의e.target.files객체를 배열로 만들어 준다.
  const handleChange = (e: React.ChangeEvent) => {
    const targetFiles = (e.target as HTMLInputElement).files as FileList;
    const targetFilesArray = Array.from(targetFiles);
}- Array.from은 iterable 객체 또는 array-like 객체를 배열로 바꿔주는 메서드이다.
(array-like객체는 length와 index를 가진 객체(objects with a length property and indexed elements)를 말하는데 FileList도 이런 array-like객체이다.)
- Array.from 메서드로
FileList를 배열로 만들면 더 이상FileList타입이 아닌File[](File 타입의 요소로 이루어진 배열) 타입이 된다.
- 배열로 만들어진
targetFilesArray를 map으로 돌려 안의File타입의 요소들을 url로 만들어준다.
  const handleChange = (e: React.ChangeEvent) => {
    const targetFiles = (e.target as HTMLInputElement).files as FileList;
    const targetFilesArray = Array.from(targetFiles);
    const selectedFiles: string[] = targetFilesArray.map((file) => {
      return URL.createObjectURL(file);
    });
}-
selectedFiles는 url로 바뀐 요소들이 담긴 배열이기 때문에
string[]타입을 주면 된다. -
URL.createObjectURL({params})여기서{params}자리에 들어가는 타입은Blob | MediaSource이다. 하지만 우리가 위에서 집어넣은 것은File타입인데 어떻게 들어갈 수 있는것인가?
The File interface is based on Blob, inheriting blob functionality and expanding it to support files on the user's system.
-Blob MDN-File타입은Blob타입을 상속받은 타입이기 때문에 Blob타입이 들어가야 하는URL.createObject()메서드에 들어갈 수 있는 것이다.
- 마지막으로 images 상태 값에 이 배열을 합치면 된다.
  const handleChange = (e: React.ChangeEvent) => {
    const targetFiles = (e.target as HTMLInputElement).files as FileList;
    const targetFilesArray = Array.from(targetFiles);
    const selectedFiles: string[] = targetFilesArray.map((file) => {
      return URL.createObjectURL(file);
    });
    // 합체!
    setImages((prev) => prev.concat(selectedFiles));
  }
5. 배열 상태 값(images)을 map으로 돌려 이미지 뿌리기
const FileUploader = () => {
  const [images, setImages] = useState<string[]>([]);
  ...
  const handleChange = () => {...}

  return (
    ...
    <>
      {images.map((url, i) => (
        <div key={url}>
          <input src={url} width='160' height='160' alt={`image${i}`}
        </div>
      ))}
    </>
    ...
  );
}
여기까지 preview를 구현해보았다.
css를 조금만 만진다면 아름다운 자태를 뽐낼 것.
.
.
.
.
.
.
.
+추가로 사진을 지우는 기능은 <img>태그 옆에 삭제 버튼을 만들어준 다음, onClick={() => setImages(images.filter((e) => e !== url))} 클릭 이벤트를 걸어주면 된다. setImages는 상태 값을 바꾸는 함수고, url은 상태 값 images에서 뿌려준 url 요소이다.
url이 삭제하기 위해 선택한 그 사진이고, 그 사진을 제외한 배열을 다시 images 상태 값에 넣겠다는 코드이다.
.
.
.
.
.
.
.
+추가로 가로스크롤 (tailwind)css는:
.scrolling-touch {
  -webkit-overflow-scrolling: touch;
}

.ms-overflow-none {
  -ms-overflow-style: none;
}

.scrollbar-hide {
  -webkit-overflow-scrolling: touch;
  -ms-overflow-style: none;
  scrollbar-width: none;
}
className='overflow-x-scroll overflow-y-hidden whitespace-nowrap scrolling-touch ms-overflow-none scrollbar-hide'
참고


큰 도움이 되었습니다 감사합니다!