👉 Authlib
이전글 👉 Authlib를 이용한 OAuth server 구현 #1
📁 Register Grants
Authlib에서는 다양한 종류의 Authorization Code Grant, Implicit Grant, Resource Owner Password Credentials Grant (= password grant), Refresh Token Grant, Client Credentials Grant, Implicit Grant와 같은 OAuth의 일반적인 grant 방식들을 구현하는 기능을 제공하며, 원하는 인증 방식을 커스텀할 수 있도록 하는 Custom Grant 기능도 제공한다.
✏️ 사용할 grants 생성
✏️ Authorization Code Grant
- Authorization Code
Authorization Code Grant 방식을 사용한다면authorization code에 대한 정보 관리가 필요할 것이다.
authorization code는code(= auth code),redirect uri,response type(code로 고정),scope,client_id등의 정보로 구성되어 있으며, resource에 접근하는데 사용하는Token을 서버로부터 발급 받는데 사용이 된다.
from authlib.integrations.sqla_oauth2 import OAuth2AuthorizationCodeMixin

# [auth code] - code, redirect_uri, response_type, scope, client_id, nonce, auth_time
# 발급 받은 auth code에 대한 정보 저장
class AuthorizationCode(db.Model, OAuth2AuthorizationCodeMixin):
    id = db.Column(db.Integer, primary_key=True)
    user_id = db.Column(
        db.Integer, db.ForeignKey(User.id, ondelete='CASCADE')
    )
    user = db.relationship('User')
Authorization Code Grant는 Authlib에서 제공하는 AuthorizationCodeGrant 클래스 상속을 통한 클래스 생성을 통해 적용할 수 있다.
/oauth/grants.py 👇
from authlib.oauth2.rfc6749 import grants

from app.database import db
from app.models import User, AuthorizationCode, Token


class AuthorizationCodeGrant(grants.AuthorizationCodeGrant):

    def save_authorization_code(self, code, request):
        client = request.client
        auth_code = AuthorizationCode(
            code=code,
            client_id=client.client_id,
            redirect_uri=request.redirect_uri,
            scope=request.scope,
            user_id=request.user.id,
        )
        db.session.add(auth_code)
        db.session.commit()
        return auth_code

    def query_authorization_code(self, code, client):
        item = db.session.query(AuthorizationCode).filter_by(
            code=code, client_id=client.client_id).first()
        if item and not item.is_expired():
            return item

    def delete_authorization_code(self, authorization_code):
        db.session.delete(authorization_code)
        db.session.commit()

    def authenticate_user(self, authorization_code):
        return db.session.query(User).get(authorization_code.user_id)
Authlib의 Authorization Code Grant의 default 인증 방식은 basic, post, none이다.
원하는 방식으로 지정하고 싶다면 Authorization Code Grant 클래스 내부에서 TOKEN_ENDPOINT_AUTH_METHODS라는 config 값을 수정하면 된다.
TOKEN_ENDPOINT_AUTH_METHODS = [
'client_secret_basic',
'client_secret_post'
]
✏️ Resource Owner Password Credentials Grant
Resource Owner Password Credentials Grant 방식은 Authlib에서 제공하는 ResourceOwnerPasswordCredentialsGrant 클래스 상속 받아 구현할 수 있다.
/oauth/grants.py 👇
from authlib.oauth2.rfc6749 import grants

from app.database import db
from app.models import User, AuthorizationCode, Token


class PasswordGrant(grants.ResourceOwnerPasswordCredentialsGrant):

    def authenticate_user(self, username, password):
        user = db.session.query(User).filter_by(email=username).first()
        if user.check_password(password):
            return user
Authlib의 Password Grant의 default 인증 방식은 basic이다.
원하는 방식을 지정하고 싶다면 PasswordGrant 클래스 내에서TOKEN_ENDPOINT_AUTH_METHODS라는 config 값을 수정하면 된다.
TOKEN_ENDPOINT_AUTH_METHODS = [
'client_secret_basic', '
client_secret_post'
]
✏️ Refresh Token Grant
Refresh Token Grant는 Authlib의 RefreshTokenGrant 클래스 상속을 통해 구현한 클래스를 사용해 이용할 수 있다.
/oauth/grants.py 👇
from authlib.oauth2.rfc6749 import grants

from app.database import db
from app.models import User, AuthorizationCode, Token


class RefreshTokenGrant(grants.RefreshTokenGrant):

    def authenticate_refresh_token(self, refresh_token):
        item = db.session.query(Token).filter_by(refresh_token=refresh_token).first()
        # define is_refresh_token_valid by yourself
        # usually, you should check if refresh token is expired and revoked
        if item and item.is_refresh_token_valid():
            return item

    def authenticate_user(self, credential):
        return db.session.query(User).get(credential.user_id)

    def revoke_old_credential(self, credential):
        credential.revoked = True
        db.session.add(credential)
        db.session.commit()
Refresh Token Grant의 default 인증 방식은 basic이 default이다.
다른 방식의 인증 방식을 설정해주고 싶다면, Refresh Token Grant 클래스 내부에서 TOKEN_ENDPOINT_AUTH_METHODS config 값을 수정해주면 된다.
TOKEN_ENDPOINT_AUTH_METHODS = [
'client_secret_basic',
'client_secret_post'
]
Authlib의 Refresh Token Grant은 refresh token을 이용하여 access token을 발급 받을 때 refresh token의 재발급이 이루어지지 않는 것이 default이다.
이 설정값을 바꾸고 싶다면 Refresh Token Grant 클래스 내부에서 INCLUDE_NEW_REFRESH_TOKEN config 값을 True로 설정해주면 된다.
INCLUDE_NEW_REFRESH_TOKEN = True각각의 grant 클래스를 생성했다면, register_grant() 함수를 통해 초기화(flask app과 연결)시켜주면 된다.
__init__.py 👇
oauth_server.register_grant(AuthorizationCodeGrant)
oauth_server.register_grant(PasswordGrant)
oauth_server.register_grant(RefreshTokenGrant)
✏️ 사용하기
✏️ Authorization Code Grant
authorization code를 받아오기 위해서 생성한 authorization endpoint로 요청을 보낸다.
요청을 보낼 때에는,
- client id
- redirect uri : callback 주소
- scope
- respose type : code
를 담아 GET으로 보낸다.
Authlib의 example에서 기본적으로 제공하는 template을 사용했다면 다음과 같은 페이지가 뜬다.
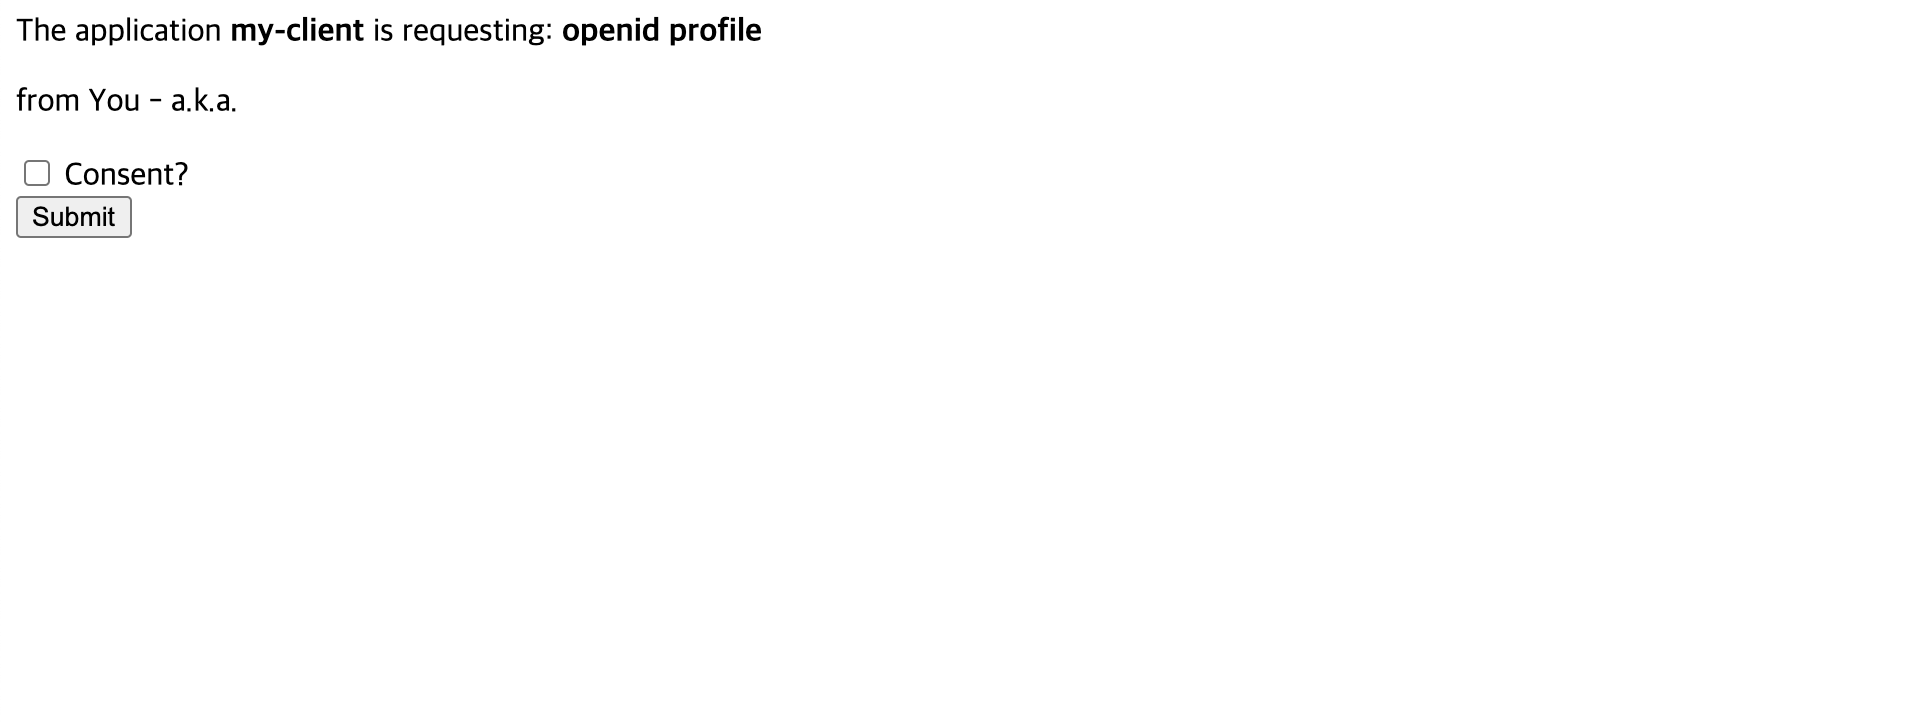
cosent 후 submit 버튼을 누르면,

redirect uri로 보내준 callback 주소로 redirect 되면서 code param 값에 authorization code를 받아오는 것을 확인할 수 있다.
이렇게 받은 authorization code를 이용해서 access token을 받을 수 있다.
access token을 받을 때에는 설정한 token endpoint로
- authorization code
- redirect uri
- client id
- client secret
- grant type : authorization_code
를 form 방식으로 POST 요청을 보낸다.
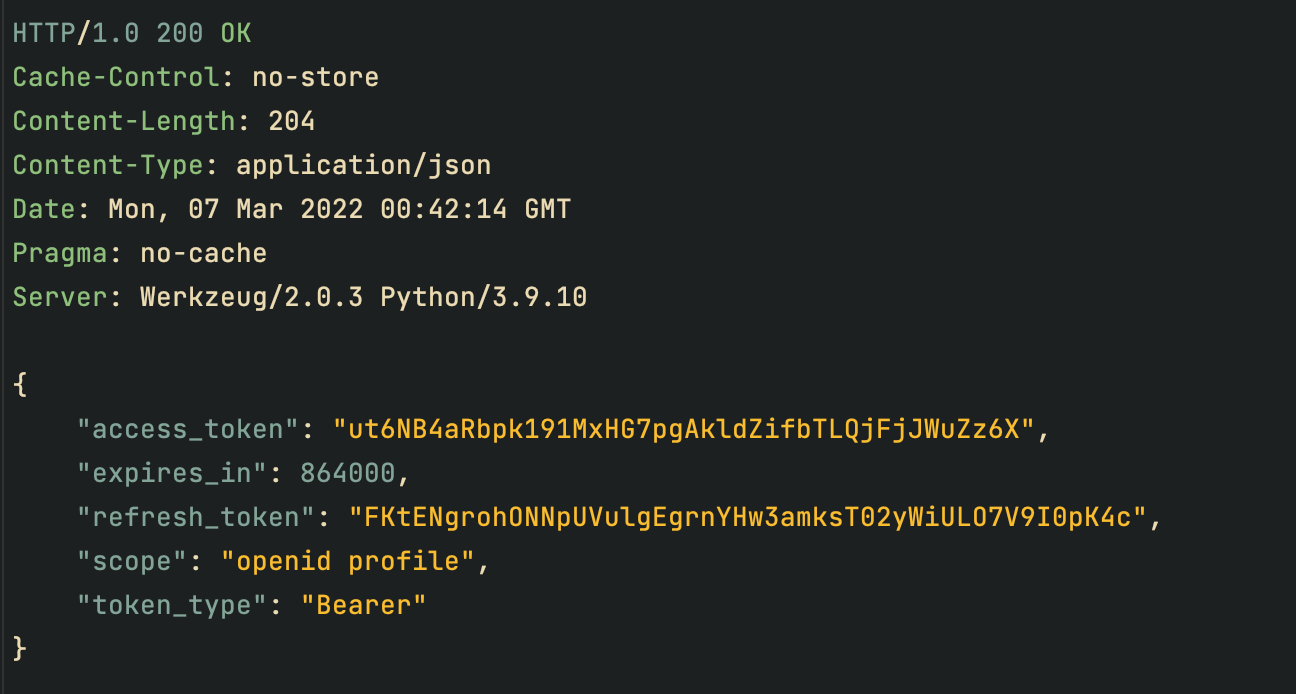
성공적으로 token을 받아오면 다음과 같은 결과를 받을 수 있다.
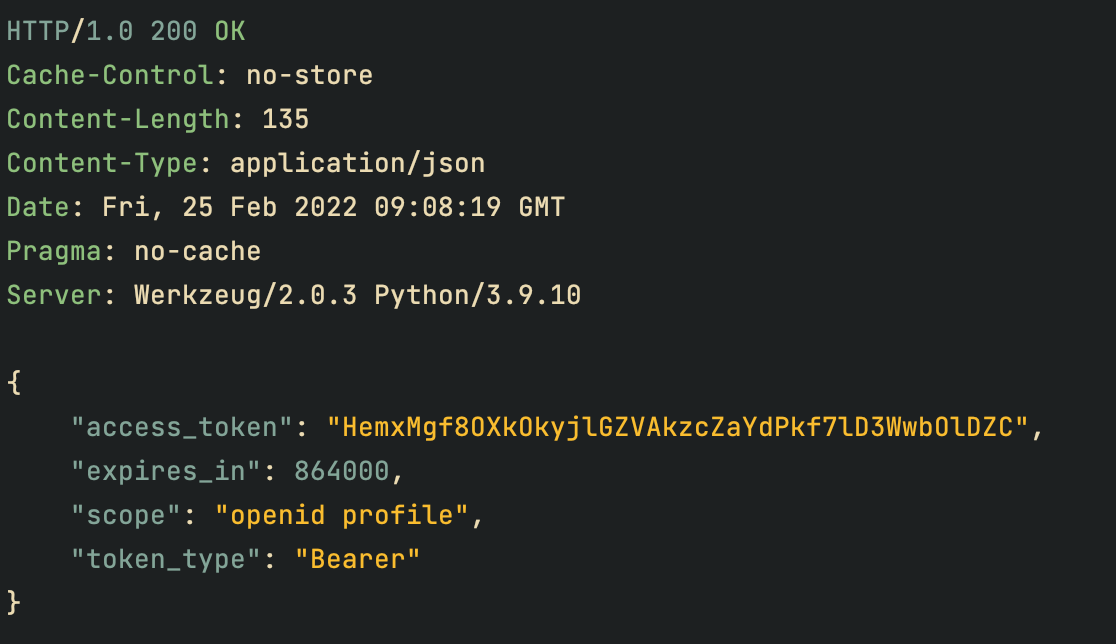
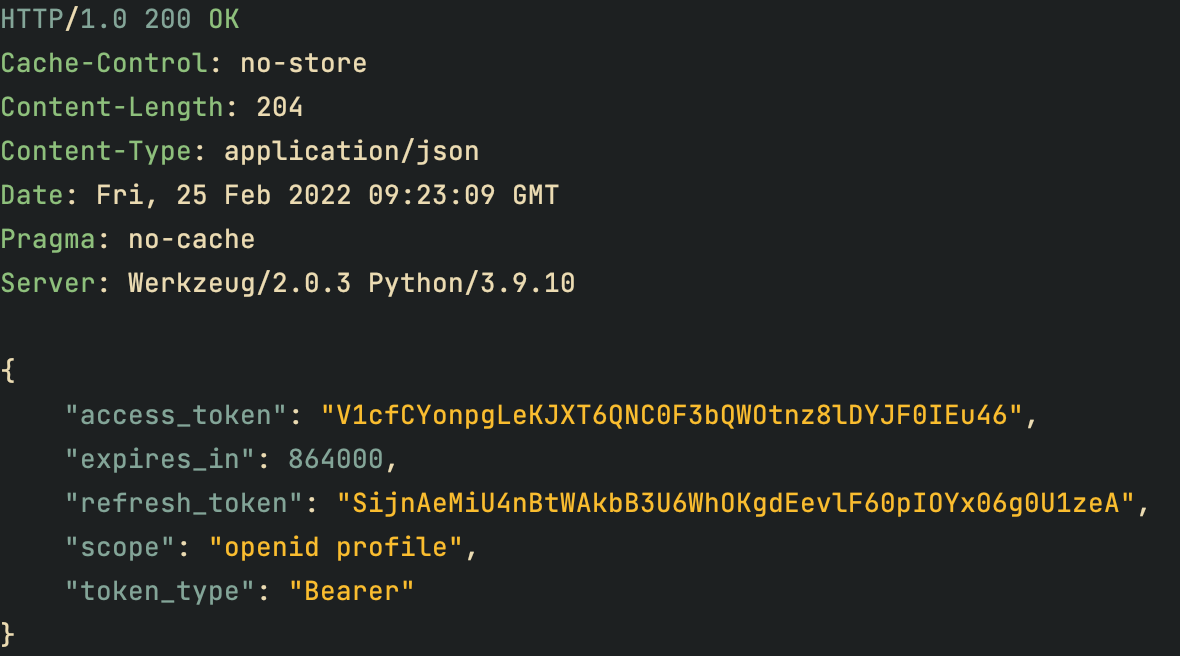
만일 refresh token을 받도록 설정해두었다면 다음과 같은 결과를 받을 수 있을 것이다.
✏️ Password Grant
password grant 방식으로 access token을 받을 때에는 설정한 token endpoint로
- username / password
- client id
- client secret
- grant type : password
- scope
를 form 방식으로 POST 요청을 보내면 된다.
성공적으로 token을 받아오면 다음과 같은 결과를 받을 수 있다.
✏️ Refresh Token Grant
access token이 만료된 경우 access token을 발급 받을 때 같이 받은refresh token 을 이용하여 access token을 재발급 받을 수 있다.
access token을 재발급 받을 때에는 설정한 token endpoint로
- refresh token
- client id
- client secret
- grant type : refresh_token
을 form 방식으로 POST 요청을 보내면 된다.
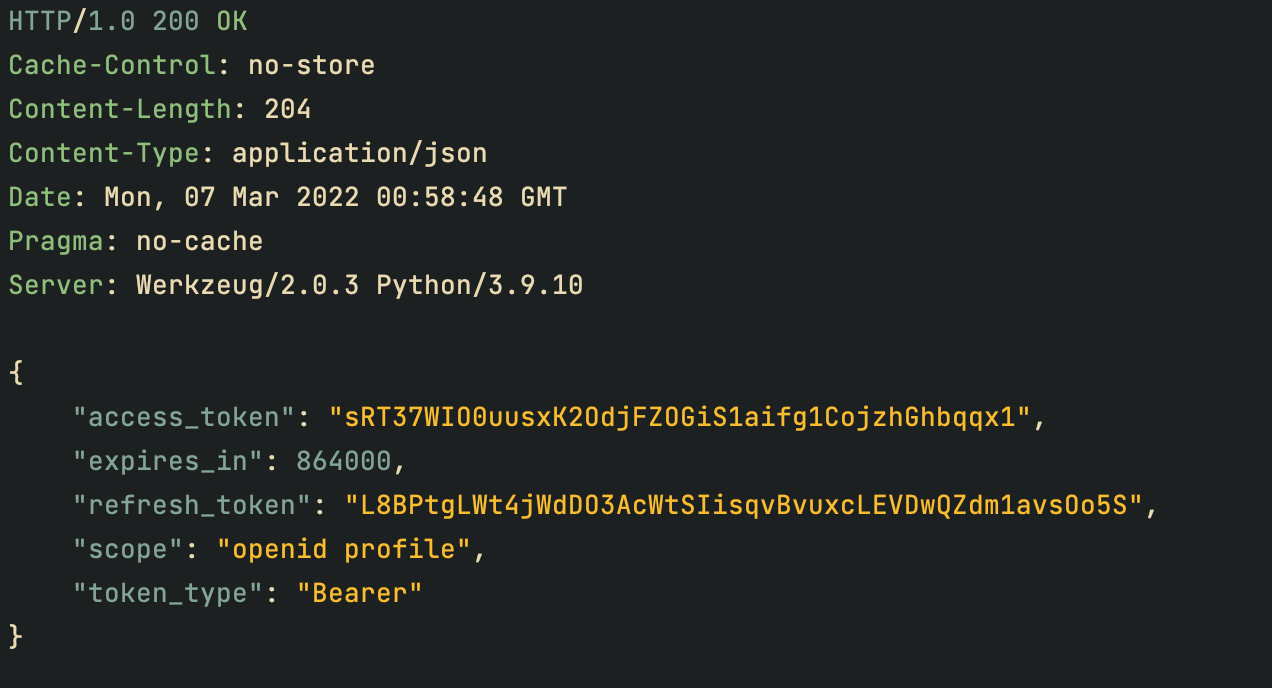
요청이 성공할 경우 다음과 같이 access token을 재발급 받을 수 있다.
📁 Resource Server
access token을 발급 받았다면, 발급 받은 access token 을 이용하여 private resource에 접근할 수 있다.
✏️ resource server 구성
- Bearer token 서버 지정
server가 받는 token는 Bearer 방식으로 전달되어 오기 때문에, server에 Bearer 방식을 사용한 token임을 알려줄 필요가 있다.
Bearer validator는 Authlib에서 BearerTokenValidator를 통해 제공해주고 있다.
사용할 bearer validator class를 만들었다면, validator를 사용할 ResourceProtector 인스턴스를 생성해준다.
/oauth/server.py 👇
from authlib.oauth2.rfc6750 import BearerTokenValidator
from authlib.integrations.flask_oauth2 import ResourceProtector

class MyBearerTokenValidator(BearerTokenValidator):
    def authenticate_token(self, token_string):
        return db.session.query(Token).filter_by(access_token=token_string).first()

require_oauth = ResourceProtector()
생성한 ResourceProctector의 인스턴스와 사용할 Bearer Validator를 연결해주면, token을 받았을 때 oauth server가 받은 token을 bearer 방식으로 처리할 수 있게 된다.
__init__.py 👇
# class 선언 시
require_oauth.register_token_validator(MyBearerTokenValidator())
별도로 class를 선언하지 않고 create_bearer_token_validator() 함수만을 사용해도 bearer validator를 사용 가능하다.
create_bearer_token_validator()을 이용할 때에는 사용할 데이터베이스의 session과 Token model을 연결해준다.
# class 선언하지 않고 사용 시
bearer_cls = create_bearer_token_validator(db_session, Token)
require_oauth.register_token_validator(bearer_cls())- private resource endpoint 지정
특정 권한의 token이 있어야만 접근할 수 있는 페이지임을 설정하기 위해서는 @require_oauth annotation을 사용하면 된다.
@require_oauth를 사용하면 @require_oauth의 parameter 값으로 주어진 scope를 가진 token으로 접근 했을 때에만 해당 resource를 받아올 수 있다.
만일 parameter의 값으로 아무 값도 주지 않거나 None 값으로 지정한다면 protected 되지 않은 resource로서 처리된다.
from authlib.integrations.flask_oauth2 import current_token
from flask import jsonify, Blueprint

from login.oauth.server import require_oauth

api = Blueprint('api', __name__)


@api.route("/me")
# profile 권한이 있는 token을 이용해야 접근이 가능하도록 설정
@require_oauth('profile')
def private_resource():
    user = current_token.user
    return jsonify(id=user.id, email=user.email)

# protected 되지 않은 resource
@require_oauth()
def not_protected_resource():
	return "not protected"

@require_oauth(None)
def not_protected_resource2():
	return "not protected2"
✏️ Token을 이용하여 resource 받아오기
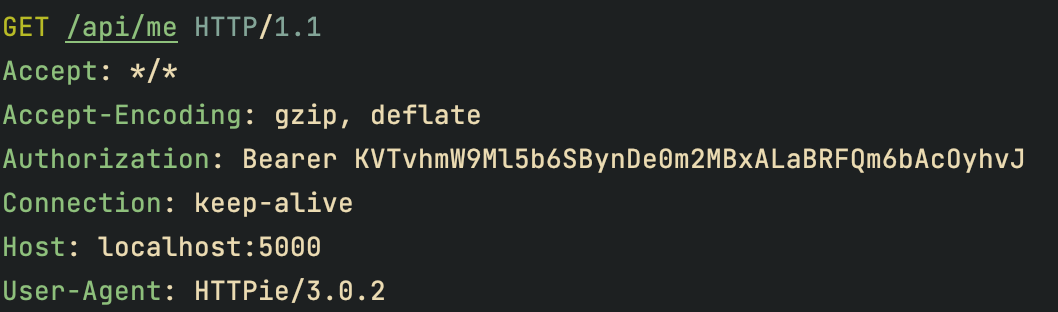
private resource를 얻어오려면 resource를 받을 수 있는 권한을 가진 token을 이용하여 Bearer 방식으로 Authorization header에 값을 담아서 token endpoint에 GET 요청을 보내면 된다.
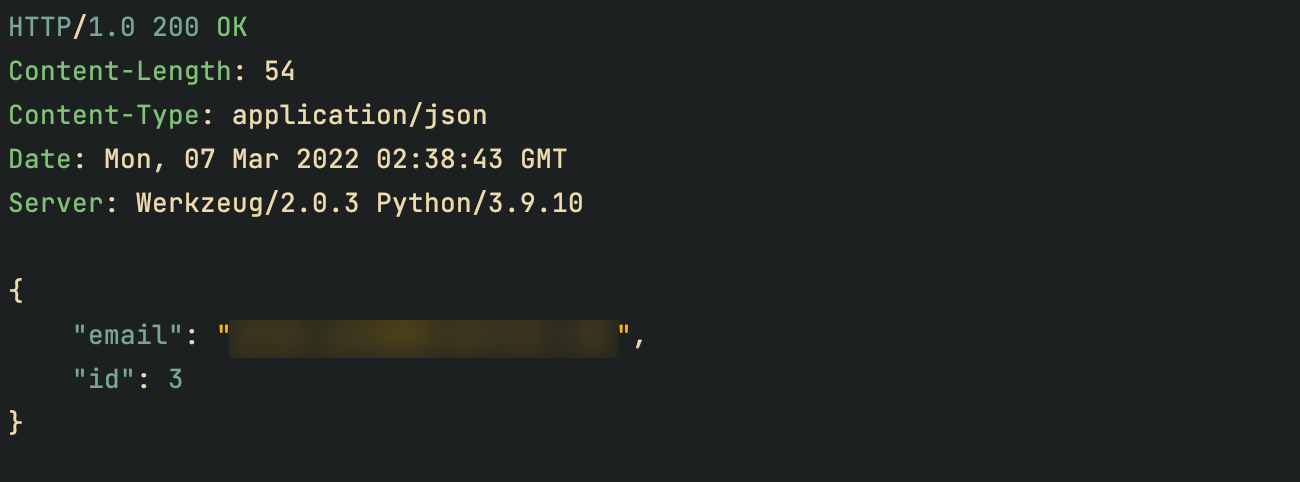
✏️ 성공 응답
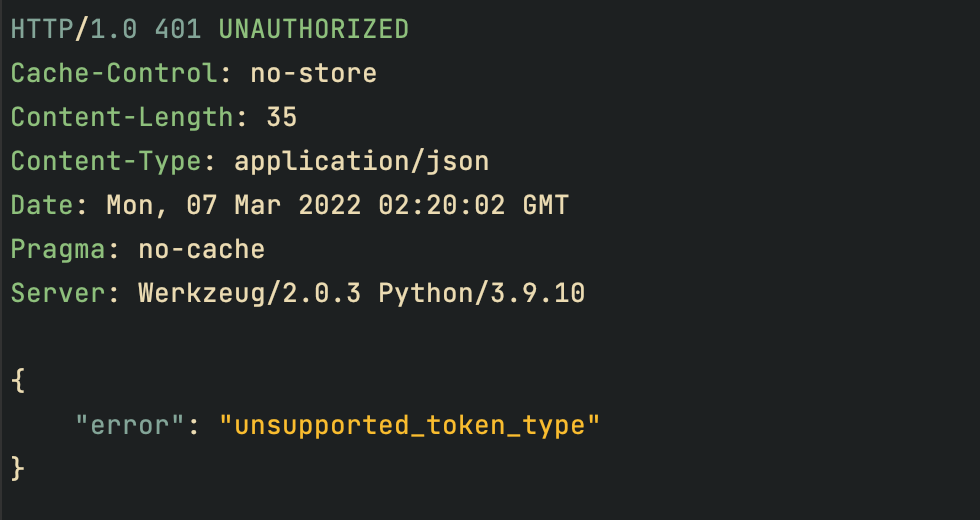
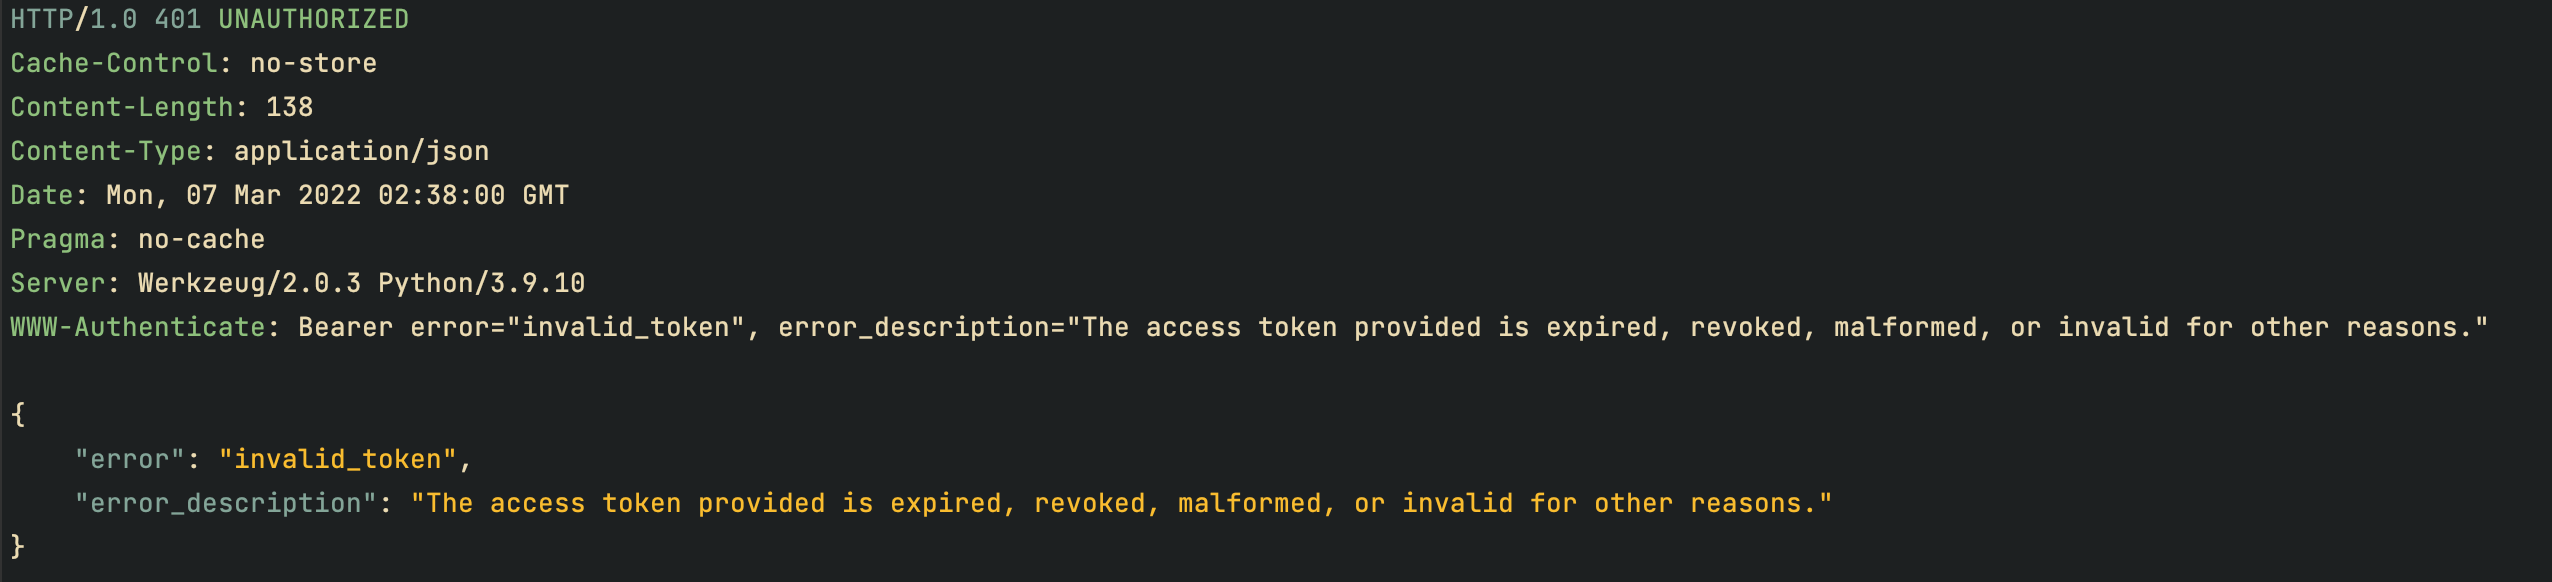
✏️ 에러 응답
- 잘못된 token을 사용한 경우
- Bearer 방식으로 보내지 않을 경우