이전 프로젝트 개선
프로그래머스공부하며 느낀 점
참조한 페이지
예전 프로젝트에서 구현했던 것 설명(달력 날짜 선택)
예전 프로젝트에서 구현한 것인데 다시 돌아보니 고칠 여지가 있어서 새로 고쳐 본 것이다.
목적
오늘 이후 30일간의 날짜들을 달력의 형태로 표시하고, 예약이 있는 날짜와 없는 날짜를 시각적으로 구분하기
구현방법
아래는 구현한 방법을 개념적으로 써둔 것이다.
함수선언 {
예약정보 API요청

날짜정보 가져오기(달과 요일은 0부터 시작함에 주의)

일수를 1씩 늘리고, 이번달의 마지막 날을 넘어서면 일수를 1로 초기화한다.
그리고 일수를 id에 넣는다.

id를 기준으로 예약이 있는 날짜이면, css 속성을 다르게한다.
}
위와같은 방법으로 구현했으며, 단순히 색만 다르게 구분했을때는 칸과 칸사이의 구분이 힘들거나 거리때문에 보기가 너무 안좋았다.
결국 그림자를 만드는 것으로 해결했다.
아래는 해당 함수의 코드와 CSS이다.
async function sitterReservation() {
  const response = await fetch(
    `http://localhost:3000/api/reservations/petsitters/${petsitterId}`,
    {
      method: 'GET',
      headers: {
        'Content-Type': 'application/json',
      },
    },
  );
  const result = await response.json();
  // console.log(result.message);
  setTimeout(() => {
    const date = new Date();

    const currentYear = new Date(date).getFullYear();
    const currentMonth = new Date(date).getMonth() + 1;
    const day = date.getDate();
    const lastDay = new Date(currentYear, currentMonth, 0).getDate();

    // 오늘의 요일을 0(일)~6(토) 으로 반환
    const today = date.getDay();
    let firstDate = today;

    const firstDay = day;
    const finalDay = firstDay + 30;

    const limitDay = date + finalDay;

    let htmlDummy = '';

    for (let i = 0; i < firstDate; i++) {
      htmlDummy += `<div class="noColor"></div>`;
    }

    for (let i = firstDay; i <= finalDay; i++) {
      let i2 = i;
      let month = currentMonth;
      if (i > lastDay) {
        i2 = i - lastDay;
        month = month + 1;
      }
      htmlDummy += `
    <div class="shadedBoxCalendar" id='${i2}'>${month}/${i2}</div>
    `;
    }

    document.querySelector('#sitterReservation').innerHTML = htmlDummy;

    if (response.status === 200) {
      const reservations = result.reservations;
      for (const reservation of reservations) {
        const reservationAt = new Date(reservation.reservationAt);
        const day = reservationAt.getDate();

        const targetElement = document.querySelector(
          `.shadedBoxCalendar[id='${day}'],.shadedBoxCalendarBooked[id='${day}']`,
        );
        targetElement.className = 'shadedBoxCalendarBooked';
      }
    }
  }, 50);
}
:root {
  --shadedBoxWidth: 50px;
  --shadedBoxBoxShadow: 7px 7px 2px 1px rgb(100, 111.5, 111.5);
  --shadedBoxPadding: 20px 0px 20px 0px;
  --shadedBoxFontSize: 20px;
  --shadedBoxText-align: center;
  --shadedBoxText: 10px;
}

.shadedBoxCalendar {
  color: white;
  width: var(--shadedBoxWidth);
  height: var(--shadedBoxWidth);
  line-height: var(--shadedBoxText);
  background-color: rgb(35, 44, 44);
  box-shadow: var(--shadedBoxBoxShadow);
  padding: var(--shadedBoxPadding);
  font-size: var(--shadedBoxFontSize);
  text-align: var(--shadedBoxText-align);
  vertical-align: var(--shadedBoxTextVertical-align);
}

.shadedBoxCalendarBooked {
  color: rgb(165, 179, 179);
  width: var(--shadedBoxWidth);
  height: var(--shadedBoxWidth);
  line-height: var(--shadedBoxText);
  background-color: rgb(165, 179, 179);
  box-shadow: var(--shadedBoxBoxShadow);
  padding: var(--shadedBoxPadding);
  font-size: var(--shadedBoxFontSize);
  text-align: var(--shadedBoxText-align);
  vertical-align: var(--shadedBoxTextVertical-align);
}
CSS의 경우 딱 하나의 값만 다른 두개의 class를 만들어야 하기 때문에 CSS 변수 기능을 사용하였다.
아쉬운 점
두 class의 CSS 스타일을 동시에 바꾸기위해 변수라는 방법을 사용하였는데, 이제와서 생각해보니 더 편하게 구현하는 방법이 있었다.
.shadedBoxCalendar, .shadedBoxCalendarBooked {
  color: white;
  width: 50px;
  height: 50px;
  line-height: 10px;
  background-color: rgb(35, 44, 44);
  box-shadow: 7px 7px 2px 1px rgb(100, 111.5, 111.5);
  padding: 20px 0px 20px 0px;
  font-size: 20px;
  text-align: center;
  vertical-align: middle;
}

.shadedBoxCalendarBooked {
  color: rgb(165, 179, 179);
  background-color: rgb(165, 179, 179);
}
위와같이 구현하면 변수를 사용하지 않아서 복잡하지 않으며, 각각의 class의 별도의 배경색과 글자색을 넣을 수 있다.
프로그래머스
알고리즘적이 아니라 수학적으로 풀어보자
∑n 은 으로 표현할 수 있다.
나의 풀이
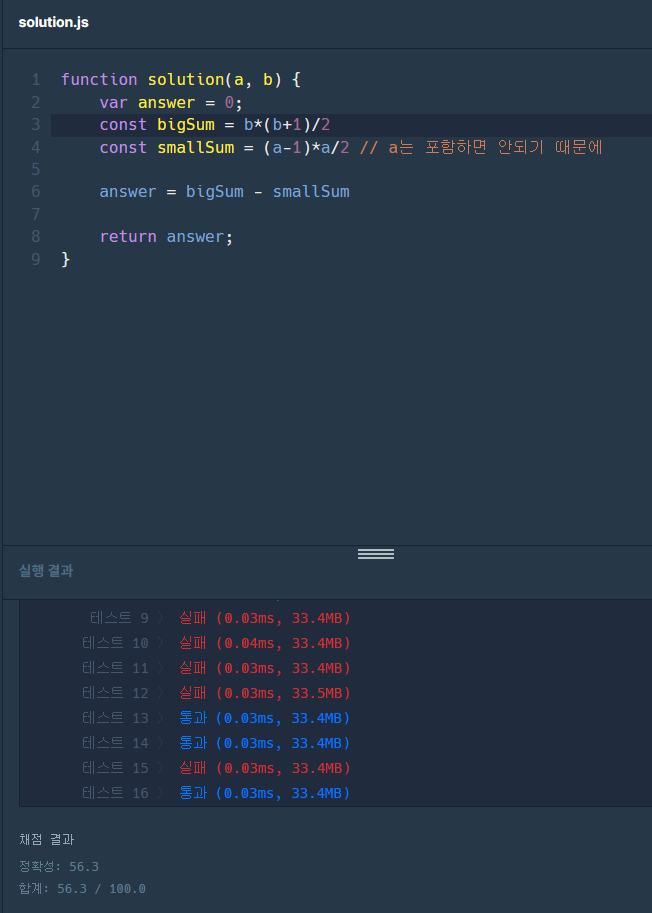
아니 이게 왜 틀리는거야...
a보다 b가 크다는 말이 없었는데 그렇게 생각하고 만들어서 그렇다.
문제 조건을 제대로 보지 않은 것이다.
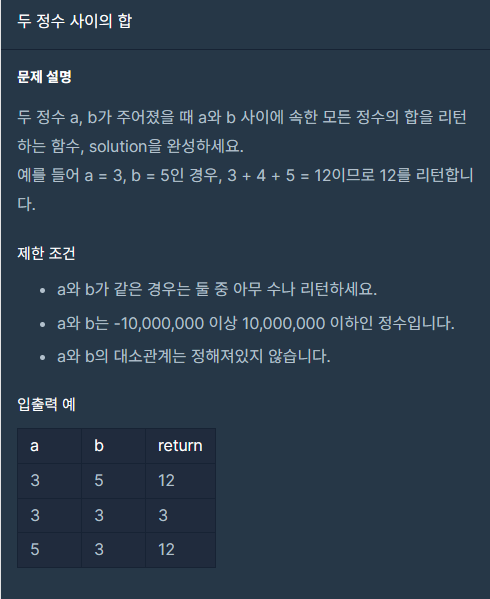
function solution(a, b) {
    var answer = 0;
    var c
    var d

    if ( a === b){
        answer = a
    } else if (a > b) {
        c = a
        d = b
    } else {
        c = b
        d = a
    }

    const bigSum = c*(c+1)/2
    const smallSum = (d-1)*d/2

    answer = bigSum - smallSum

    return answer;
}
다른 사람의 풀이
function adder(a, b){
    var result = 0
    return (a+b) * (Math.abs(a-b)+1) / 2;
}
아... Math.abs는 그렇다 치더라도 공식을 정리한다는걸 생각못했다.
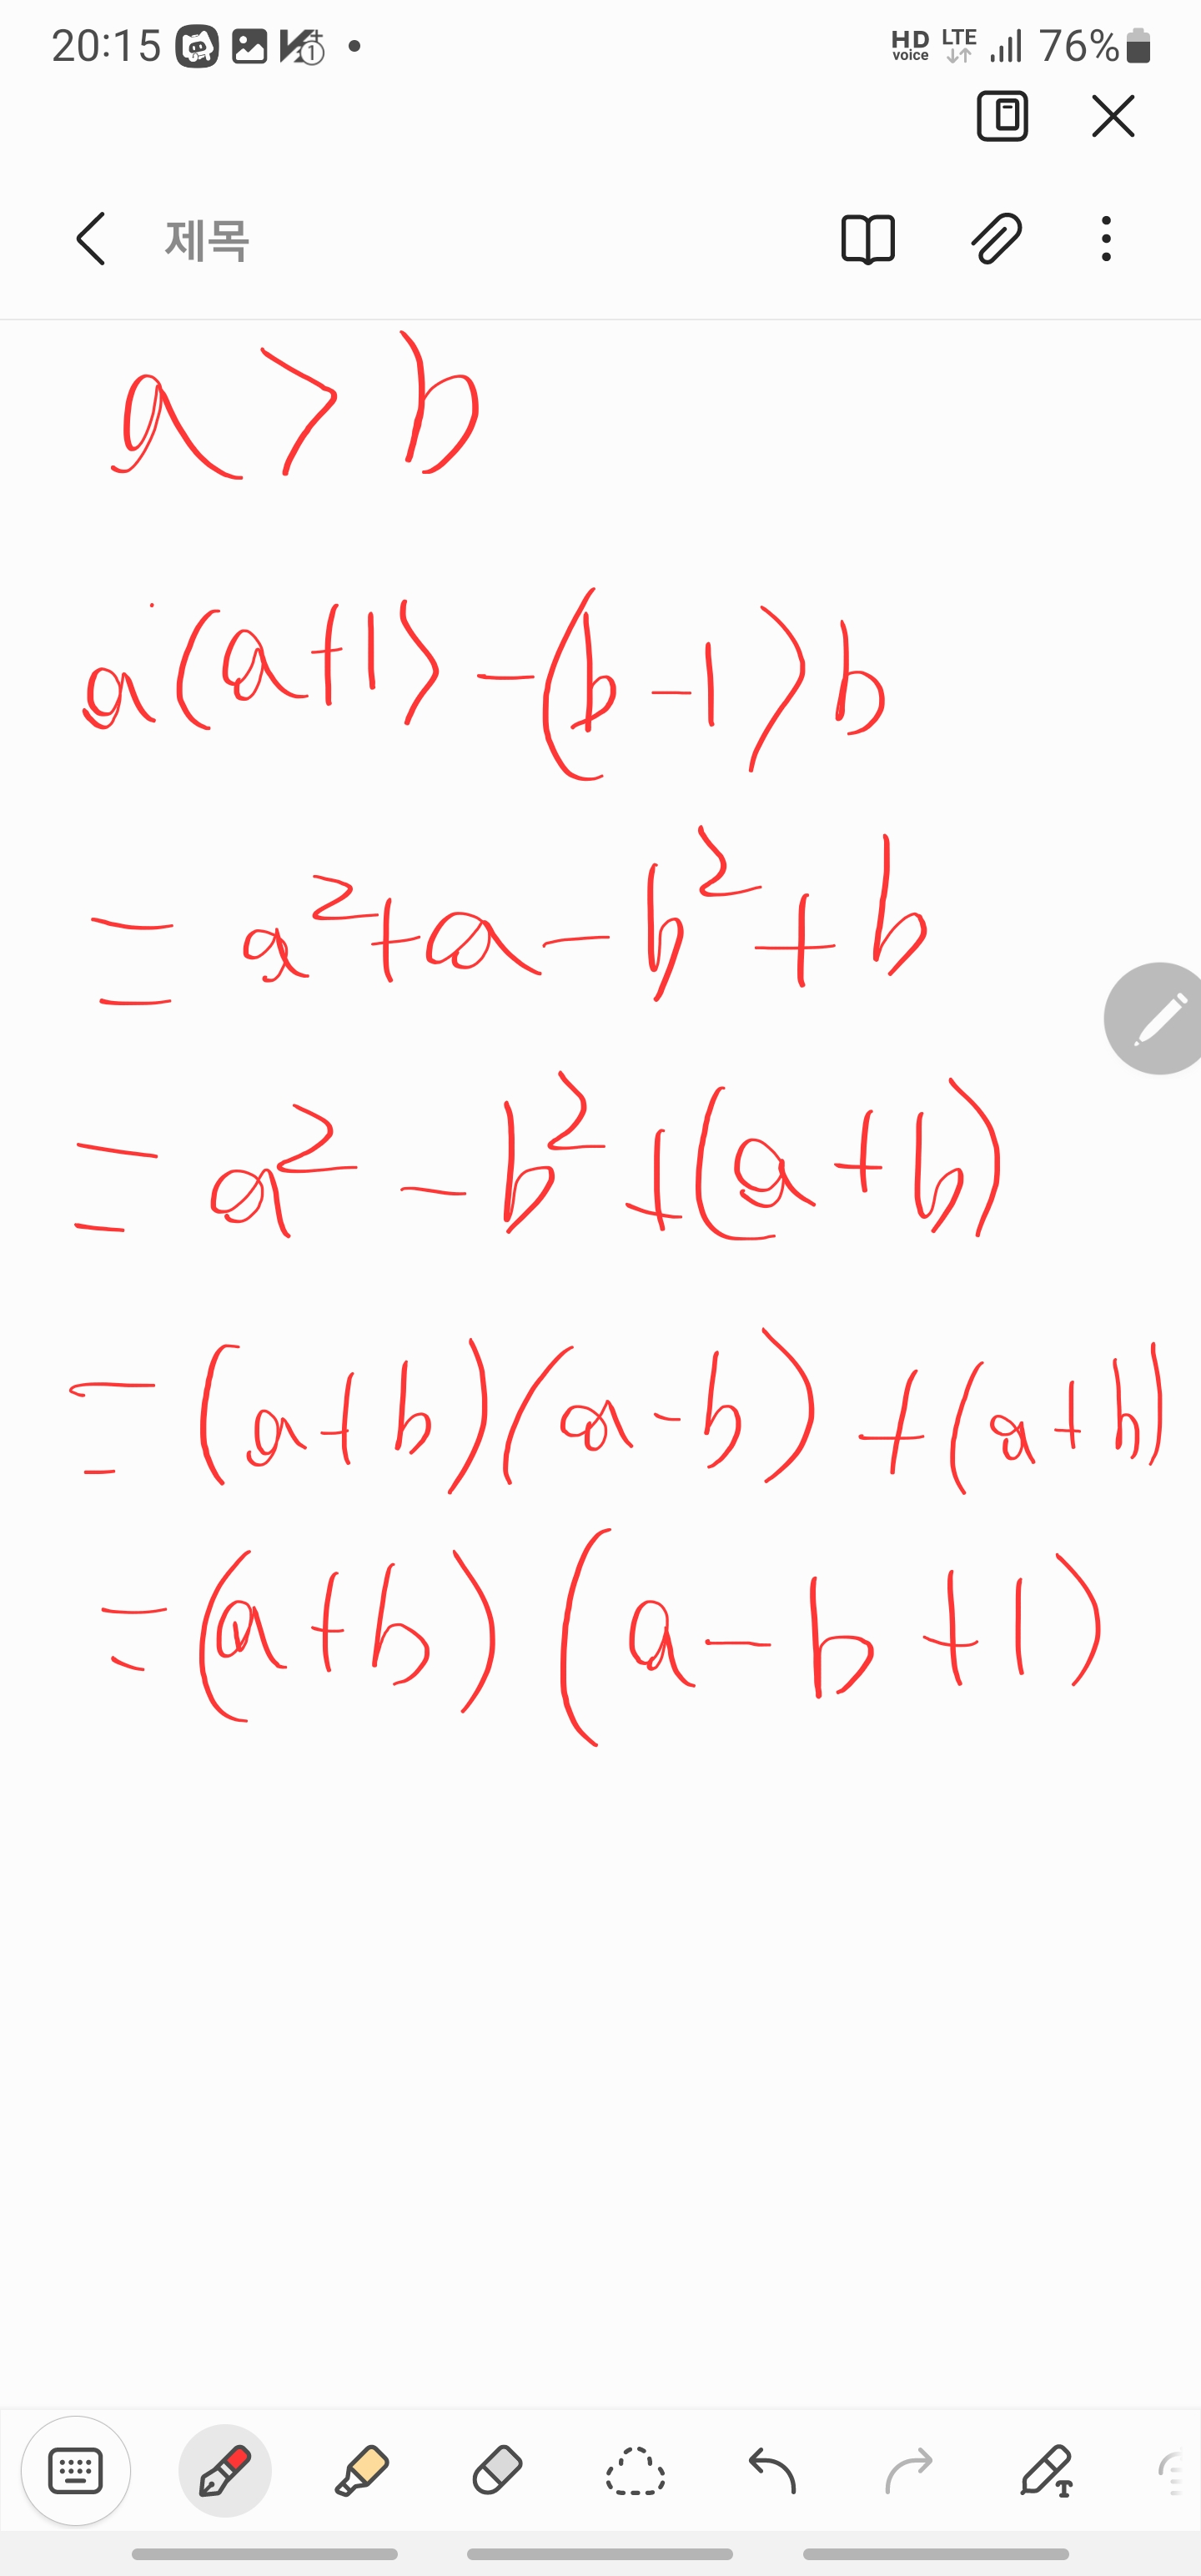
위의 그림에서 a b 중 어느쪽이 더 클지 알 수 없으니 절대값을 취해주고, 2로 나누기만하면된다. 같은경우에는 2/2 와 같은 꼴이고...
좀만 더 수학할걸 그랬다.
공부하며 느낀 점
지금 내가 한 선택이 항상 최선은 아니다.
오늘은 예전에 짜둔 코드가 지금와서 보면 너무 안좋은 경우였다. 항상 더 나은 방법이 있을 수 있음을 염두해두고, 나중에 고쳐야겠다.
왜냐하면 안될때 계속 잡으면 효율만 떨어지기 때문이다.
수학적은 좀 더 확실히
오늘 푼 프로그래머스 문제에서 절대값과 식을 이쁘게 꾸미는 것을 생각해내지 못해서 군더더기 있는 구현을 한 것 같다.
참조한 페이지
[수학 기호] 시그마 Sigma (∑ 합) 문자, 표준편차 기호(σ) 입력 방법; Standard Deviation Letter
Math.abs()