웹 어플리케이션 작동 구조
url 요청이 오면 처리하는 방법을 안내하겠다.
웹어플리케이션은 다음과 같은 로직에 따라 처리하게 된다.
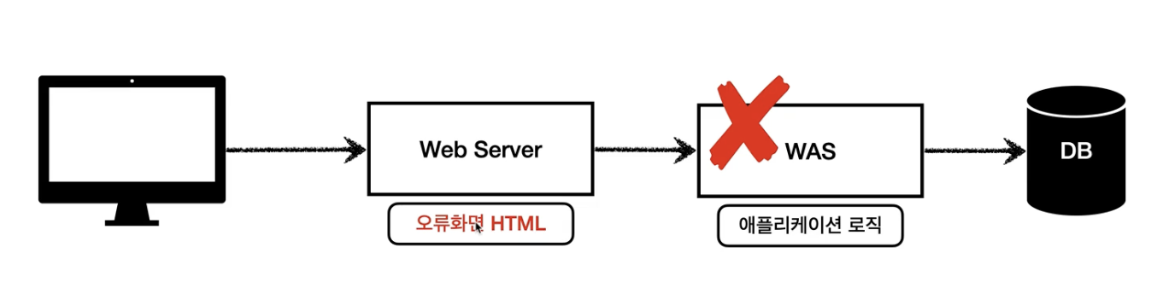
- 정적 서버
- was 서버
- DB
즉, 어플리케이션 단의 로직을 처리하기 위해서는 was 서버가 반드시 필요할 수 밖에 없고 자바 계열의 was 에 대표적인 것은 tomcat 과 wildfly 가 있다.(물론 tomcat 의 경우는 웹서버의 기능도 가능하다. 하지만 해당 포스트에선 tomcat 의 was 기능에 주목하여 설명을 진행한다.)
tomcat was 로직
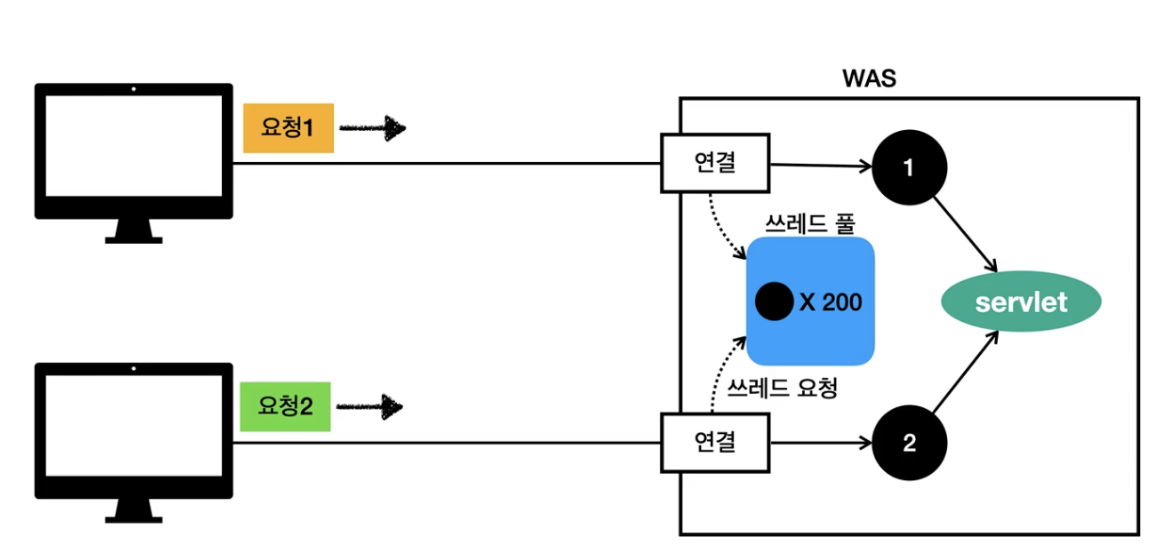
was 로직을 살펴보자 스프링 부트의 경우 tomcat 서버를 내장하고 있다. 톰캣 4.0 버전 이후에는 쓰레드 풀을 가진다. was 로 요청이 오게 되면 was는 Connector 로 서버로 전달된 요청들을 받아 작업 큐에 넣고 쓰레드 풀에 여유가 있는 지 확인한다. 이후 여유가 있는 경우 쓰레드 풀에서 하나의 쓰레드를 반환해주게 된다. 이 쓰레드 내부에서 실행되는 게 서블릿이다.
tomcat 내부 구조 도식도
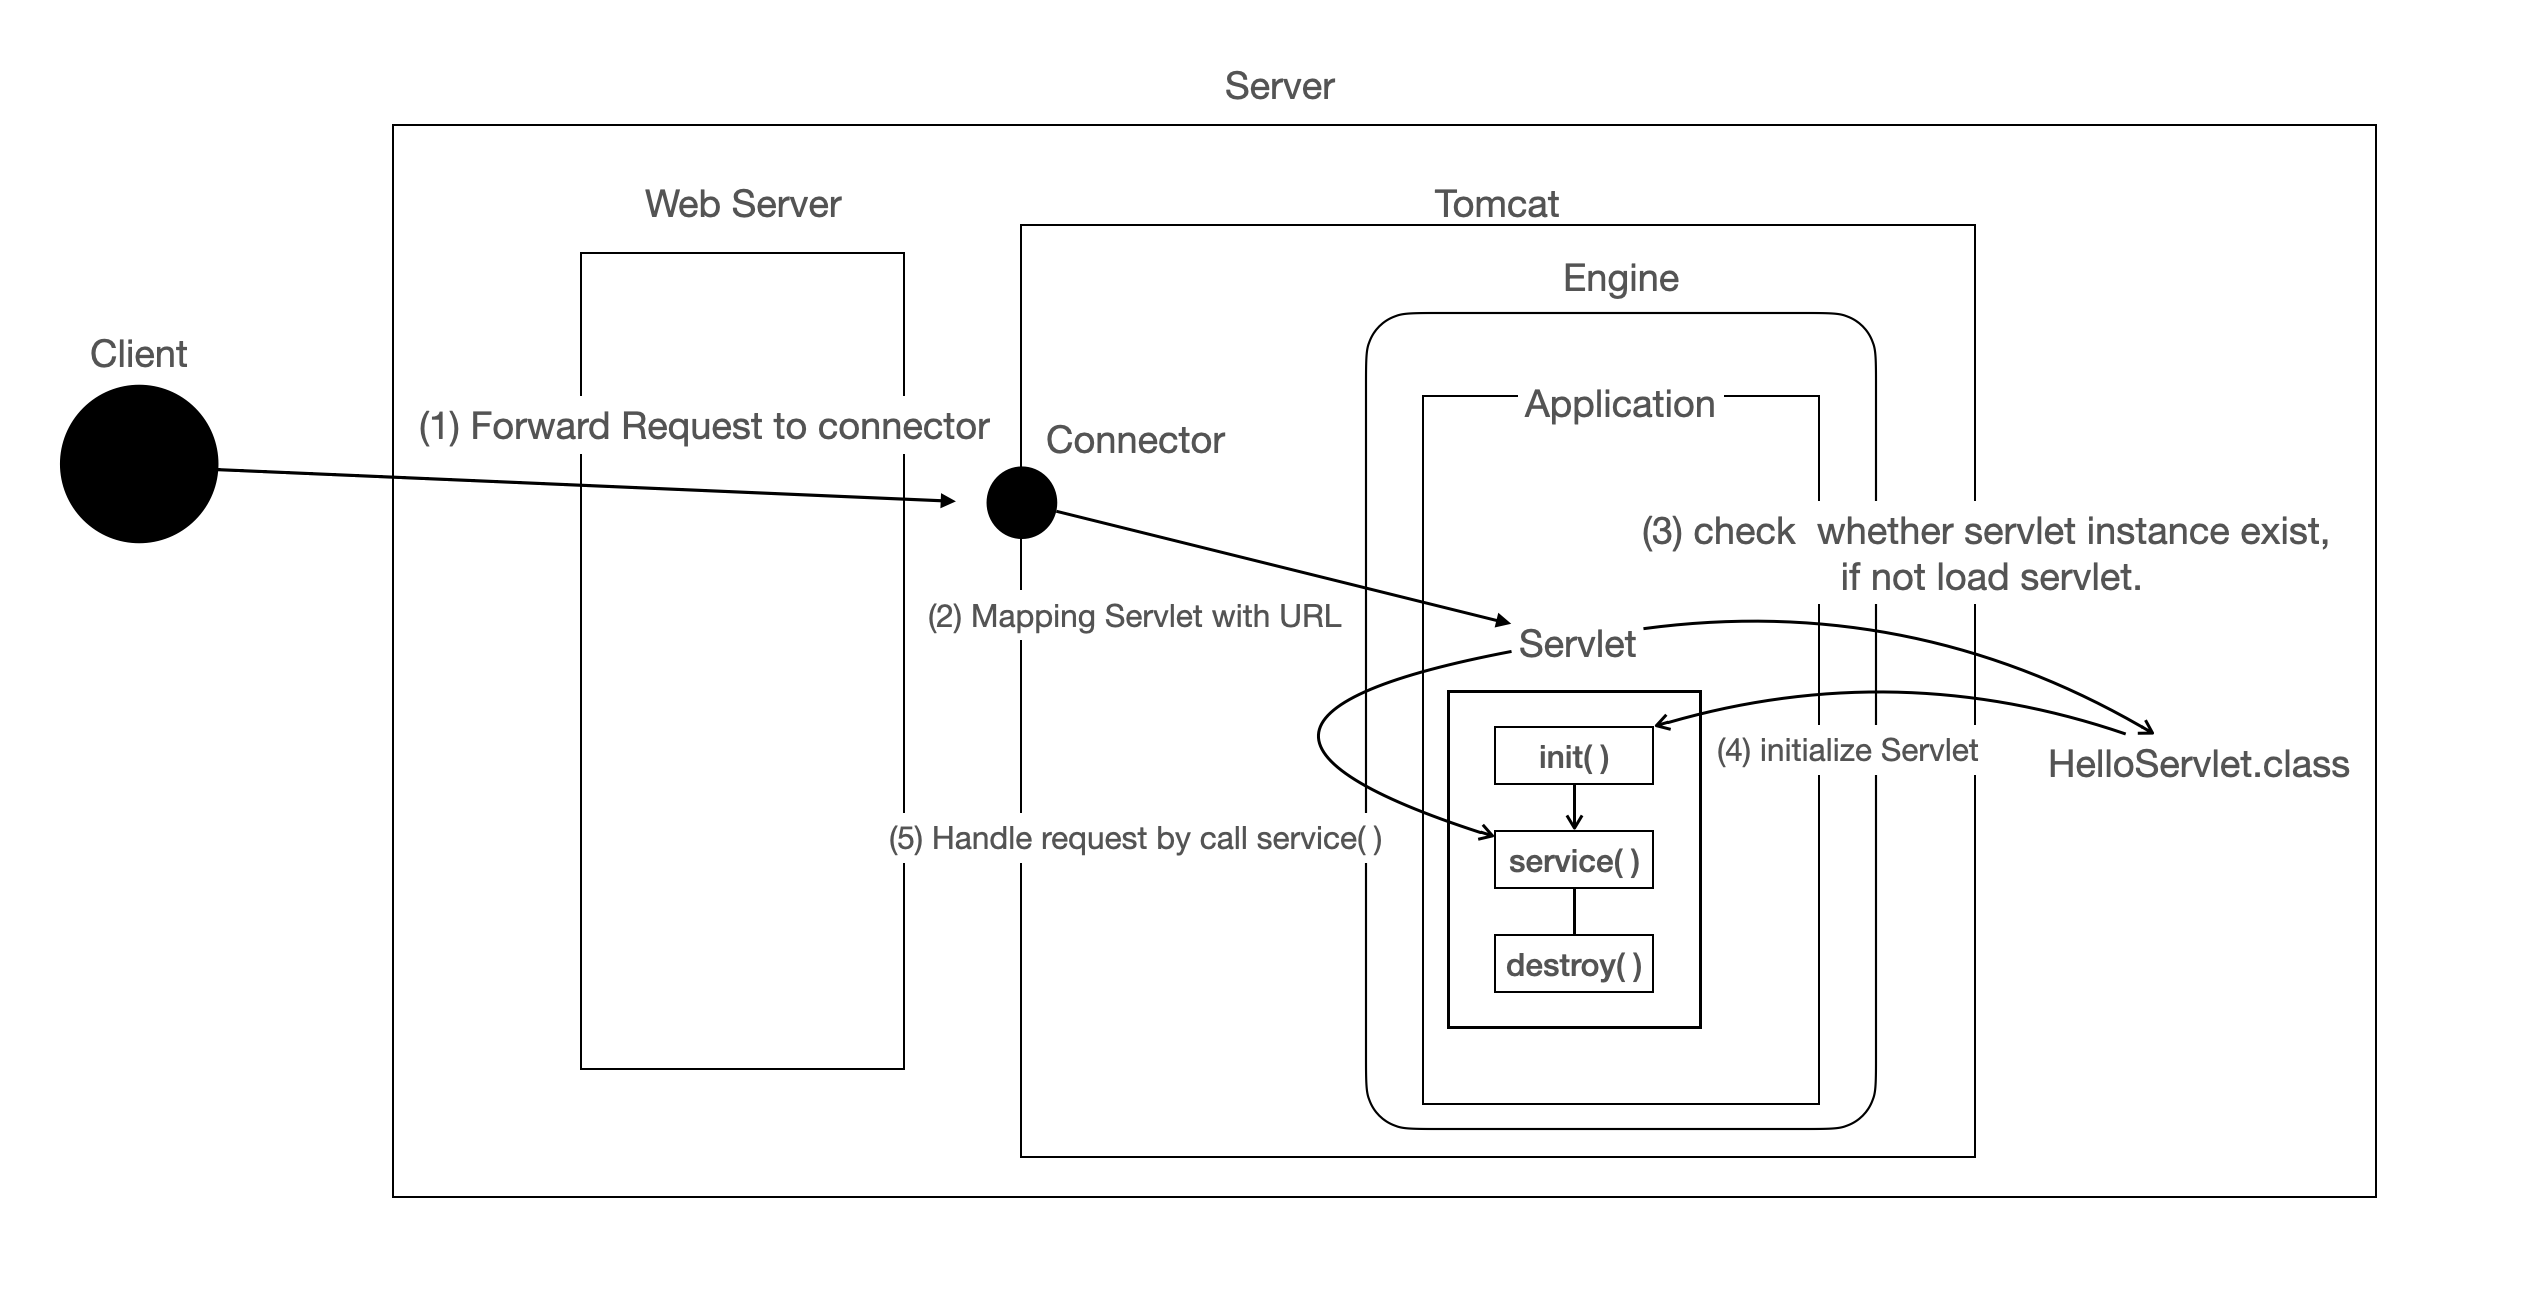
tomcat 의 핵심은 로직 처리를 하기 위한 servlet 을 통한 java programming 이다.
톰캣 관련 참고 url
https://velog.io/@jihoson94/Servlet-Container-%EC%A0%95%EB%A6%AC
spring boot 란?
Spring은 MVC(Model-View-Controller) 패턴을 기반으로 웹 애플리케이션을 구현하도록 설계되어 있습니다. Spring MVC는 이 패턴을 구현한 프레임워크로, 다음과 같은 특징을 가집니다:
Front Controller 패턴: DispatcherServlet이 모든 요청을 중앙에서 처리하는 프론트 컨트롤러 역할을 합니다.
모델, 뷰, 컨트롤러의 분리:
Model: 애플리케이션 데이터를 캡슐화.
View: 모델 데이터를 렌더링하여 HTML 출력을 생성.
Controller: 사용자 요청을 처리하고 모델을 업데이트하며 뷰로 전달.
유연한 구조: HandlerMapping, ViewResolver 등을 통해 요청 처리 및 뷰 해석 과정을 유연하게 구성할 수 있습니다.
어노테이션 기반 설정: @Controller, @RequestMapping 등의 어노테이션을 통해 간편하게 컨트롤러와 요청 매핑을 구성할 수 있습니다.
RESTful 웹 서비스 지원: @RestController, @PathVariable 등을 통해 RESTful 웹 서비스를 쉽게 구현할 수 있습니다.
MVC 처리 과정은 동기로 처리된다.
spring Boot는 이런 스프링 프레임워크를 보다 쉽게 사용할 수 있도록 만든 프레임워크입니다. Spring Boot에서는 개발자가 설정 파일을 작성할 필요 없이, 프로젝트의 설정과 라이브러리 의존성을 자동으로 처리해주는 기능을 제공합니다. 또한, Spring Boot는 실행 가능한 JAR 파일을 만들 수 있습니다.
스프링 부트 실습 관련 url
https://spring.io/guides/gs/serving-web-content
mvc 패턴이란
MVC (모델-뷰-컨트롤러) 는 사용자 인터페이스, 데이터 및 논리 제어를 구현하는데 널리 사용되는 소프트웨어 디자인 패턴이다.
- Model: 애플리케이션 데이터를 캡슐화합니다.
- View: 모델 데이터를 렌더링하여 HTML 출력을 생성합니다.
- Controller: 사용자 요청을 처리하고 모델을 업데이트하며 뷰로 전달합니다
Spring MVC 의 구조는 다음과 같습니다.

스프링 요청 처리 순서
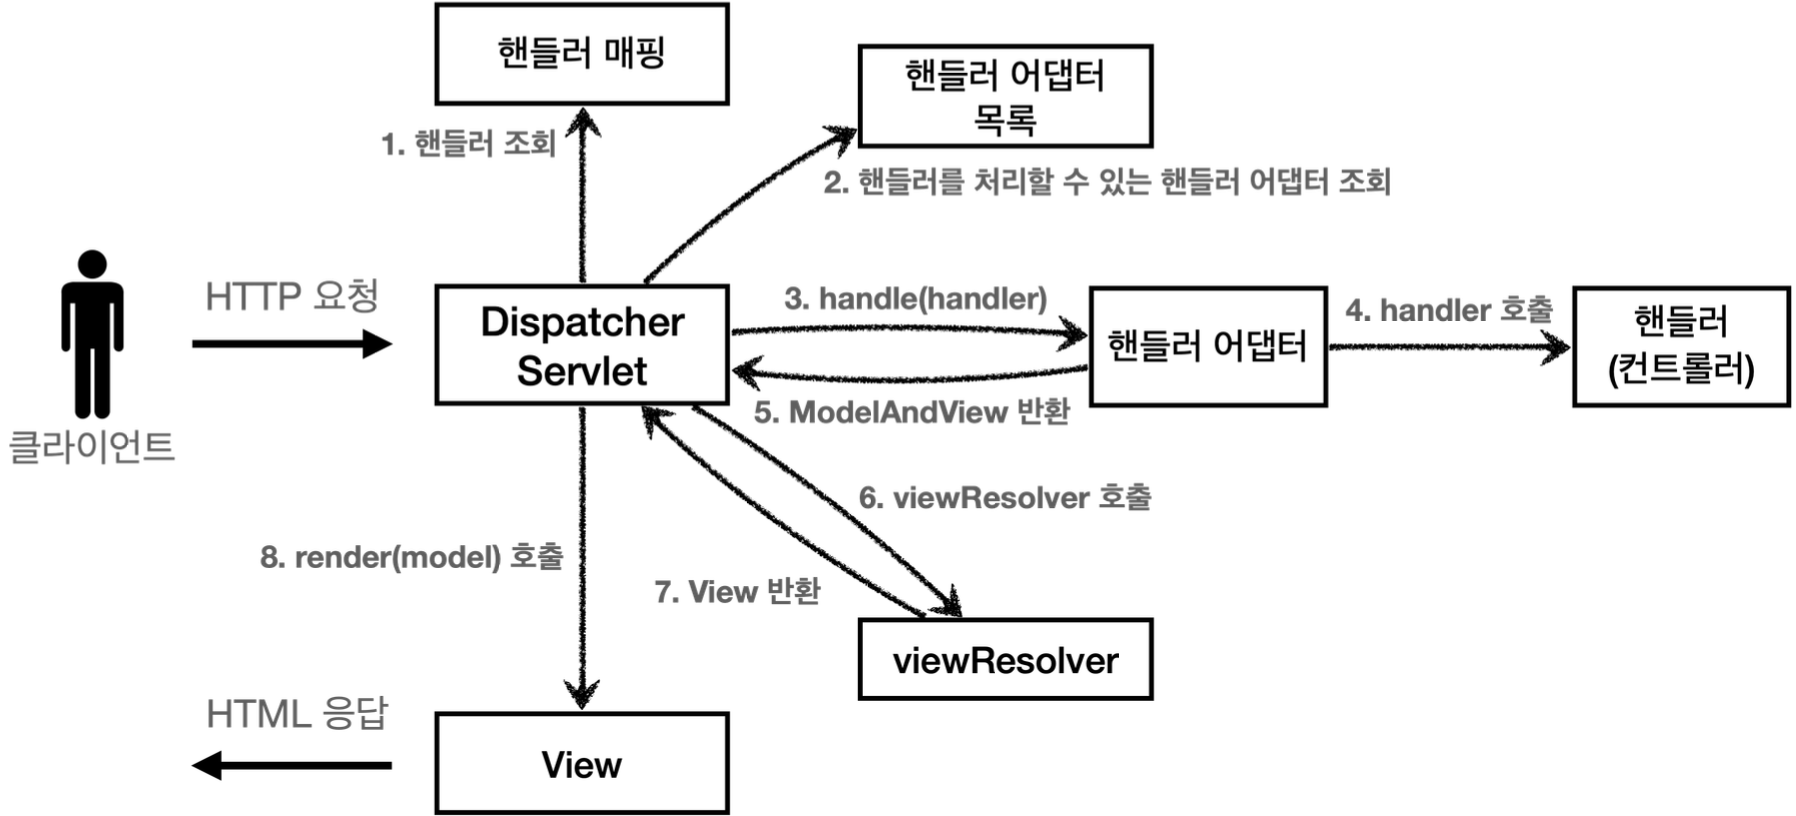
스프링의 처리 순서는 다음과 같습니다.
- front Controller 패턴에 따라 초기 DispatcherServlet 을 쓰레드 풀에서 반환된 쓰레드를 통해서 doDispatch 함수를 통해서 실행해주게 된다.
- 핸들러 매핑을 통해 해당 url 요청에 맞는 핸들러를 찾게 된다. (일반적으로 controller 아래에 requestMappting 으로 만들어진 함수)
- 이후 이 핸들러를 처리할 수 있는 어댑터를 찾게 된다.(Spring 내부에는 RequestMappingHandlerAdapte, AnnotationMethodHandlerAdapter,... 등이 미리 준비되어 있다., 어댑터 패턴을 통해 xml 을 통해 controller 를 정의하거나 어노테이션을 처리하는 로직이나 전부 작동할 수 있도록 로직을 처리한다.)
4.이후 핸들러 어댑터를 이용해서 핸들러를 실행하게 된다. - processDispatchResult 를 통해서 ModelAndView 를 반환하게 된다.
Dispatcher Servlet 코드
Spring 의 dispatch servlet 에서 처음 실행되는 doDispatch 함수는 다음 코드와 같다.
protected void doDispatch(HttpServletRequest request, HttpServletResponse response) throws Exception {
        HttpServletRequest processedRequest = request;
        HandlerExecutionChain mappedHandler = null;
        boolean multipartRequestParsed = false;

        WebAsyncManager asyncManager = WebAsyncUtils.getAsyncManager(request);

        try {
            ModelAndView mv = null;
            Exception dispatchException = null;

            try {
                processedRequest = checkMultipart(request);
                multipartRequestParsed = (processedRequest != request);

                // 1. 핸들러 조회
                mappedHandler = getHandler(processedRequest);
                if (mappedHandler == null) {
                    noHandlerFound(processedRequest, response);
                    return;
                }

                // 2. 핸들러 어댑터 조회-핸들러를 처리할 수 있는 어댑터
                HandlerAdapter ha = getHandlerAdapter(mappedHandler.getHandler());

                // Process last-modified header, if supported by the handler.
                String method = request.getMethod();
                boolean isGet = HttpMethod.GET.matches(method);
                if (isGet || HttpMethod.HEAD.matches(method)) {
                    long lastModified = ha.getLastModified(request, mappedHandler.getHandler());
                    if (new ServletWebRequest(request, response).checkNotModified(lastModified) && isGet) {
                        return;
                    }
                }

                if (!mappedHandler.applyPreHandle(processedRequest, response)) {
                    return;
                }

                // 3. 핸들러 어댑터 실행 -> 4. 핸들러 어댑터를 통해 핸들러 실행 -> 5. ModelAndView 반환
                //    restController 의 경우 mv 는 null 이 반환된다.
                mv = ha.handle(processedRequest, response, mappedHandler.getHandler());

                if (asyncManager.isConcurrentHandlingStarted()) {
                    return;
                }

                applyDefaultViewName(processedRequest, mv);
                mappedHandler.applyPostHandle(processedRequest, response, mv);
            }
            catch (Exception ex) {
                dispatchException = ex;
            }
            catch (Throwable err) {
                // As of 4.3, we're processing Errors thrown from handler methods as well,
                // making them available for @ExceptionHandler methods and other scenarios.
                dispatchException = new ServletException("Handler dispatch failed: " + err, err);
            }

            // 해당 부분을 통해서 ModelAndView 를 반환하게 된다.
            processDispatchResult(processedRequest, response, mappedHandler, mv, dispatchException);
        }
        catch (Exception ex) {
            triggerAfterCompletion(processedRequest, response, mappedHandler, ex);
        }
        catch (Throwable err) {
            triggerAfterCompletion(processedRequest, response, mappedHandler,
                    new ServletException("Handler processing failed: " + err, err));
        }
        finally {
            if (asyncManager.isConcurrentHandlingStarted()) {
                // Instead of postHandle and afterCompletion
                if (mappedHandler != null) {
                    mappedHandler.applyAfterConcurrentHandlingStarted(processedRequest, response);
                }
            }
            else {
                // Clean up any resources used by a multipart request.
                if (multipartRequestParsed) {
                    cleanupMultipart(processedRequest);
                }
            }
        }
    }


  private void processDispatchResult(HttpServletRequest request, HttpServletResponse response, HandlerExecutionChain mappedHandler, ModelAndView mv, Exception exception) throws Exception {
          render(mv, request, response);
  }

  protected void render(ModelAndView mv, HttpServletRequest request, HttpServletResponse response) throws Exception {
    View view;
        String viewName = mv.getViewName();

        //6. 뷰 리졸버를 통해서 뷰 찾기, 7.View 반환
    view = resolveViewName(viewName, mv.getModelInternal(), locale, request);

        // 8. 뷰 렌더링
    view.render(mv.getModelInternal(), request, response);
  }
Spring 으로의 API 요청
spring 으로 API 요청이 오는 경우 기본적으로 spring 기본 처리 로직을 처리하게 된다. 이 post 에서는 mvc 기반의 처리 과정을 통해 api 처리 과정을 소개하고 마무리 하도록 하겠다.
(추후 작성 예정)
참고 자료
김영한 spring mvc 강의 1
https://sihyung92.oopy.io/spring/1 // 쓰레드 풀 관련
https://ksabs.tistory.com/258 // 톰캣 관련
https://memo-the-day.tistory.com/197 // 핸들러 어댑터 관련
https://blog.stackademic.com/unlocking-performance-a-guide-to-boosting-spring-mvc-with-asynchronous-processing-7377231ccbb2 // spring mvc 처리가 동기로 어떻게 되는 지 설명