회사에서 프로젝트 시작 전 진행중인 사이드 프로젝트에서는 다음과 같은 기술 스택을 사용하고 있다.
Next.js, Storybook, Emotion(styled)
디자인 패턴은 Atomic Design 패턴을 사용하고 있다.
컴포넌트를 하나 만들기 위해서는 폴더를 하나 생성하고 3개의 파일을 만들어야 한다.
- [component].tsx
// [component].tsx
import * as S from "./style";

export const Component = () => {
  return <div>Hello Component</div>
}- [component].stories.tsx
// [component].stories.tsx
import { ComponentStory, ComponentMeta } from "@storybook/react";
import { Component } from "./Component";

export default {
	title: "components/Component",
	component: Component,
} as ComponentMeta<typeof Component>;

const Template: ComponentStory<typeof Component> = (args) => <Component {...arg} />;

export const Default = Template.bind({});

Default.args = {};- style.ts
// style.ts
import styled from "emotion/styled"
각각의 파일은 import로 가져와야 하는 것들과 export로 보내야하는 것들, 그리고 공통으로 사용되는 보일러플레이트가 존재한다.
이렇게 매번 생성하는 것보다 간단하게 만들 수 있는 방법을 생각해보다가 이전에 부트캠프에서 같은 팀원중에 한분이 비슷한 Extension을 만들어 주셔서 굉장히 편리하게 사용했던 생각이나서 이번에 한번 만들어보려고 한다.
목표
만들려는 Extension이 어떤 동작을 해야하는지 미리 생각해야 한다. Extension은 상당히 다양한 방법으로 실행시킬 수 있기 때문에 기본적인 동작부터 정의해보려 한다.
- 하위에 컴포넌트 폴더를 추가하고 싶은 폴더를 우클릭하면 Extension을 실행시킬 수 있어야 한다.
- 사용자로부터 컴포넌트 이름을 입력받으면 그 이름으로 파일을 생성한다.
- 파일 내부에 컴포넌트 이름을 사용하는 곳도 사용자의 입력과 동일하게 생성한다.
이러한 목표를 갖고 Extension을 만드는 방법을 찾아 보았다.
기본적으로 참고하기에는 좋은 문서이다.
Extension 만들기
우선 yoman을 설치해서 Extension을 만들 수 있다. 꼭 yoman을 사용해야하는지는 모르겠지만 공식문서에도 알려주는 방법이니 이 방법을 사용한다.
npm install -g yo
npm install -g yo generator-code
필요한 yoman 패키지를 설치해준다.
yo code터미널에서 이 코드를 실행하면 마치 CRA, CNA 처럼 프로젝트 생성을 위해 여러가지 질문을 한다.
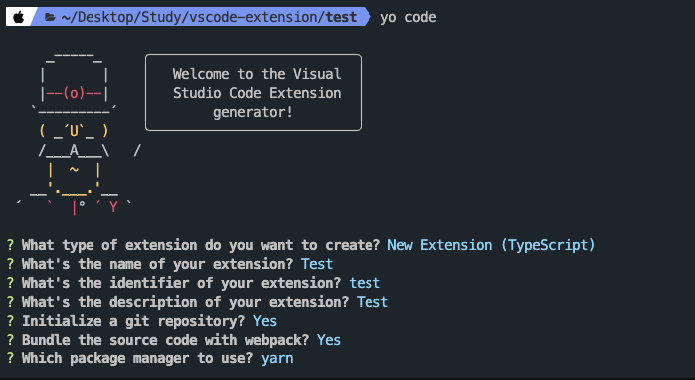
TypeScript 기반으로 만들었고 혹시 몰라 Webpack을 사용한다고 설정했다 모든 설정을 완료하고 나면

만들어진 프로젝트를 바로 열어볼거냐고 묻는다. 바로 열어서 수정해준다.
가장 먼저 package.json 파일을 수정한다.
json파일에서는 version, publisher 등 Extension의 정보를 설정할 수 있고
contributes에서는 command를 추가할 수 있다.
"contributes": {
  "commands": [
    {
      "command": "createComponent",
      "title": "Make Component"
    }
  ],
  "menus": {
    "explorer/context": [
      {
        "command": "createComponent",
        "group": "navigation",
        "when": "explorerResourceIsFolder"
      }
    ]
  }
},
마우스 클릭 시 메뉴가 보여야 함으로 menus를 추가했다
그리고 src 내부에 있는 extension.ts 파일을 수정한다.
import * as vscode from "vscode";

import * as fs from "fs";
import * as path from "path";

import {
  mainTemplate,
  storybookTemplate,
  styleTemplate,
} from "./templates/index";

export function activate(context: vscode.ExtensionContext) {
  let disposable = vscode.commands.registerCommand(
    "createComponent",
    async (uri) => {
      const fp = uri.fsPath;
      const componentName = await vscode.window.showInputBox({
        placeHolder: "Enter Component Name",
        validateInput: (value: string) => {
          if (!value) {
            return "Component Name Can't be Empty!";
          }
          return undefined;
        },
      });

      if (componentName) {
        const folderPath =
          vscode.workspace.workspaceFolders?.[0].uri.fsPath || "";
        const componentPath = path.join(fp, componentName);

        if (!fs.existsSync(componentPath)) {
          fs.mkdirSync(componentPath);

          const indexFilePath = path.join(
            componentPath,
            `${componentName}.tsx`
          );
          const storybookPath = path.join(
            componentPath,
            `${componentName}.stories.tsx`
          );
          const styledPath = path.join(componentPath, `style.ts`);

          fs.writeFileSync(indexFilePath, mainTemplate(componentName));
          fs.writeFileSync(storybookPath, storybookTemplate(componentName));
          fs.writeFileSync(styledPath, styleTemplate(componentName));

          vscode.window.showInformationMessage(`Component Created!`);
        } else {
          vscode.window.showInformationMessage(`Component already Exist`);
        }
      }
      vscode.window.showInformationMessage("Hello VsCode Extension!");
    }
  );

  context.subscriptions.push(disposable);
}

// This method is called when your extension is deactivated
export function deactivate() {}
간단히 설명하자면 createComponent 라는 명령이 실행되면 showInputBox를 사용해서 사용자에게 컴포넌트 이름을 입력받는다. 이름이 있을 경우 fs를 사용해서 폴더를 생성하고 하위에 파일들을 생성한다.
Extension 프로젝트에서 F5를 누르면 디버깅 모드를 실행하는데 새로운 VSCode window가 하나 열리게 된다. 여기서 적용하고 싶은 프로젝트 또는 아무 프로젝트나 하나 Open 하고, 왼쪽 파일 트리에서 마우스 우클릭을 누르면
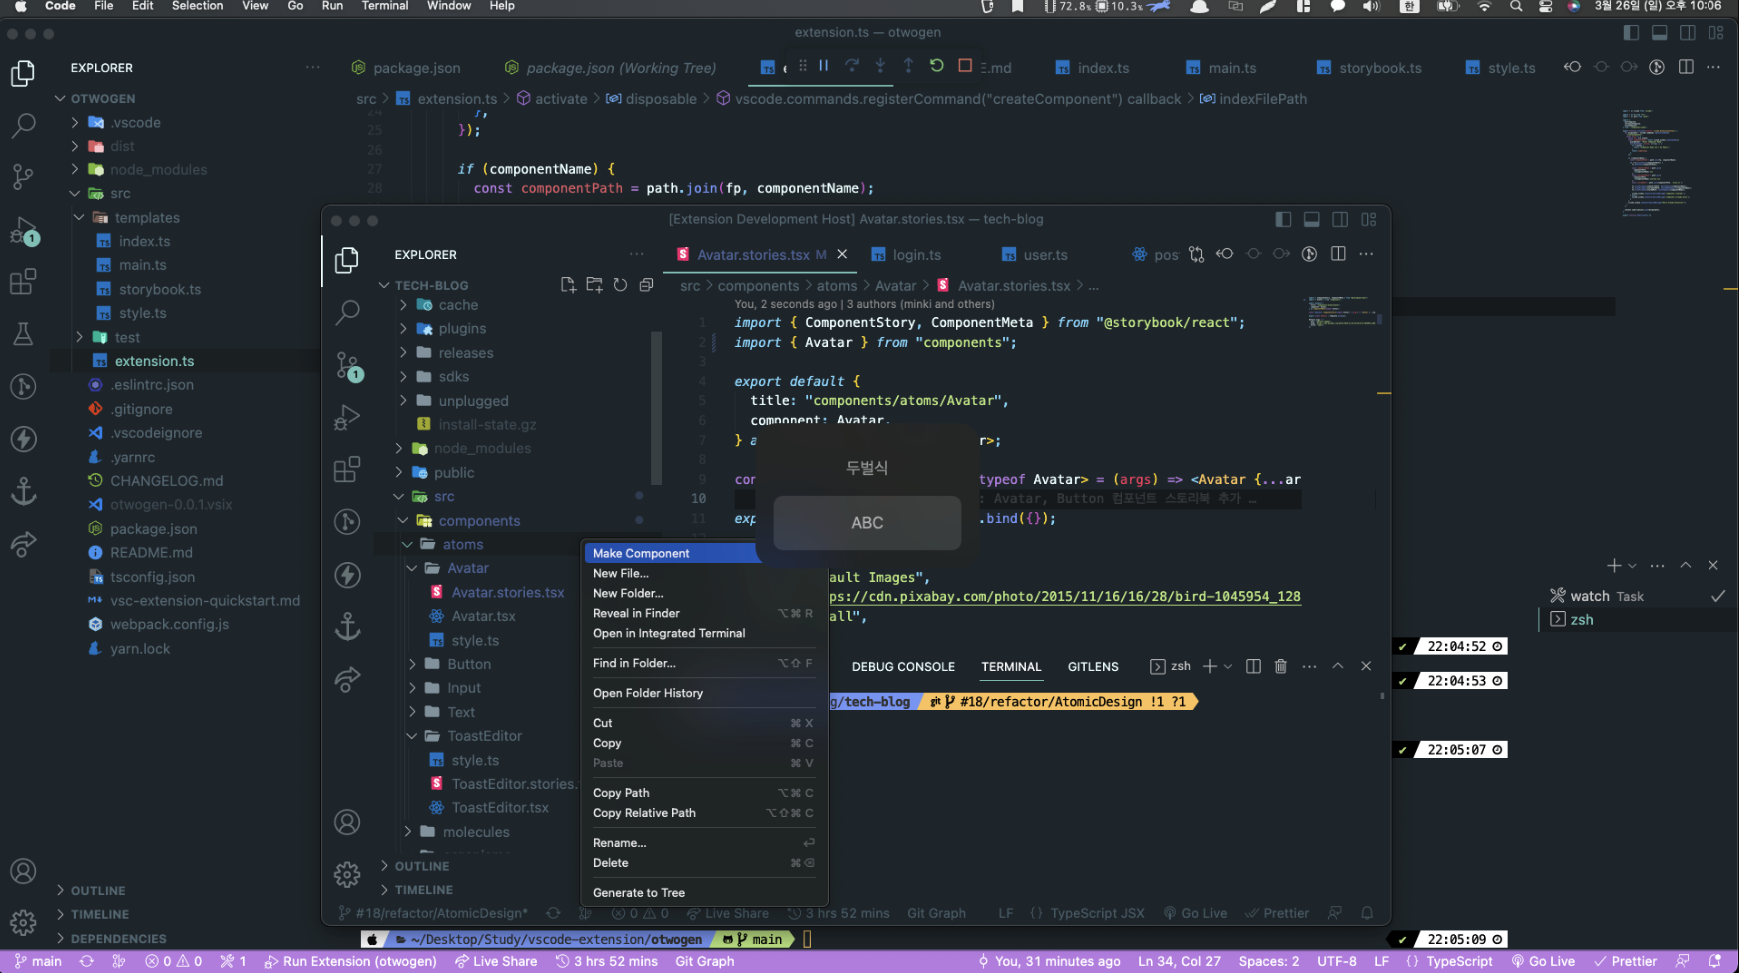
그림 처럼 Make Component 라는 항목이 추가된걸 볼 수 있다.

Divider 라는 이름으로 컴포넌트를 하나 만들면 목표한대로 3개의 파일들이 자동완성 되는 것을 볼 수 있다.
배포하기
이제 만들어진 Extension을 마켓 플레이스에 배포해야 한다.
그러기 위해서
npm install -g vsce패키지를 설치하고
vsce package명령을 실행한다.
이때 만약 package.json 파일에 라이센스를 입력하지 않았거나 git repo 주소가 없을 경우 경고를 보여주는데 입력하고 다시 명령어를 실행해도 되고 그냥 무시하고 넘어가도 상관없다.
완성을 하게 되면
XXX-0.0.1.vsix (XXX는 extension 이름) vsix 파일이 생성되는데 이 파일을 등록할 것이다.
https://marketplace.visualstudio.com/ 이 페이지에서 publish extension을 클릭하고 간단하게 파일 등록한다면 마켓 플레이스에 등록된다.
길게는 하루 정도 까지 소요될 수 있다고 하는데 대충 30분 정도만 지나도 올라오는것 같다
마무리
목표를 이뤘다는 점에서는 매우 만족스럽지만 다양한 menu 사용법이나 명렁어 팔레트를 사용하는 방법에 대해서는 모르는 것이 아직 많고 사이드 프로젝트에서 사용할 수 있는 간단한 extension 이기 때문에 쉽게 만들수 있지 않았나 싶다
또한 Typescript, Webpack 등을 사용한다고는 했으나... 제대로 사용한 것인지는 모르겠다
스토리북을 사용하지 않을 수도 있고, 기본적인 보일러 플레이트가 변경될 수도 있기 때문에 그런쪽에도 대응할 수 있도록 버전을 올려보는것도 좋을것 같다.

안녕하세요, 먼저 좋은 글 잘 읽어보았습니다!
다름이 아니라 저도 비슷하게 반복되는 문제를 해결하고자 작년 9월 확장 프로그램을 만들었습니다. 최근 확장 프로그램을 개선하여 출시 후, 그 과정을 기록하던 중 민기님의 글을 보게 되었는데요, 보일러플레이트나 템플릿의 내용은 상이하지만 아이디어나 진행한 과정이 무척 유사하여 저의 글이나 프로젝트가 민기님의 것을 모방하려는 의도가 전혀 없음을 분명히 하고자 댓글을 남기게 되었습니다.
민기님의 의견이나 추가적인 피드백을 언제든지 환영합니다.
감사합니다! 🙂