웹소켓 프로토콜
http 프로토콜은 클라이언트가 요청해야만 서버가 응답을해주며, 응답하는동시에 연결의 지속성이없다. 이를 단방향통신 이라고 부른다.
웹소켓 프로토콜을 클라이언트와 서버 둘다 요청을 할수있으며, 실시간으로 주고받기떄문에 연결의 지속성이 끊기지않는다. 이를 양방향통신 이라고 부른다.
http vs 웹소켓 의 차이점
http : 단방향
웹소켓 : 양방향 ==> 실시간 채팅
이 웹소켓을 쉽게 사용해줄수있는 라이브러리가 socket.io다.
그리고 원래 mysql을 사용했는데 nosql인 몽고db를 사용해보려고한다. (json형식처럼생겼는데 빠르게뽑기위해서임)
Agenda (할일)
- 백엔드세팅 : 데이터베이스 세팅, 웹소켓 세팅
- 프론트엔드세팅 : 웹소켓 세팅
- 백엔드 프론트엔드 연결 테스트
- 유저로그인
- 메세지 주고받기
1. 백엔드세팅 : 데이터베이스,웹소켓 세팅
설치
npm i express, mongoose, cors dotenv http
express: nodejs에서 서버만들기 (데이터베이스를 express서버위에 올릴거임)
mongoose : 몽고db를 쉽게 사용할 라이브러리
cors: 백-프론트 연결시 문제없게
dotenv: 내가 설정한 환경변수 들고오기
http: http서버를 만들어서 웹소켓 올릴거임
npm i socket.io
socket.io : 웹소켓을 쉽게 사용할 라이브러리
몽고db설치
참고 : https://jie0025.tistory.com/532
Homebrew Tap 등록
brew tap mongodb/brew
brew 업뎃
brew update
몽고DB설치
brew install mongodb-community
Error: No developer tools installed.
Install the Command Line Tools:
xcode-select --install
난 이 에러가 떠서 xcode-select --install로 설치해줬다.
몽고디비 CLI로 작업 가능하게 만들기
brew install mongodb-community-shell
몽고디비 실행
brew services start mongodb-community
http://localhost:27017 들어갔을때 다음과같은 화면이뜨면 실행중인거다.

데이터베이스세팅
데이터베이스세팅은 어떤 데이터베이스를 사용할건지 정하는것이다.
난 1.유저정보(user.js)와 2.메세지정보(chat.js)를 저장할거다.
백엔드에 models폴더안에 user.js와 chat.js를 만든다. 이때 이 models는 어떤 정보를 받을건지 명시해주는거다.
//models > user.js
const mongoose = require("mongoose");

const userSchema = new mongoose.Schema({
  name: { // 유저정보
    type: String,
    required: [true, "User must type name"],
    unique: true,
  },
  token: { // 유저아이디정보
    type: string,
  },
  online: { // 나중에 뭐 온라인했는지 안했는지 이런거 추가
    type: Boolean,
    default: false,
  },
});

module.exports = mongoose.model("User", userSchema);
//models > chat.js
const mongoose = require("mongoose");

const chatSchema = new mongoose.Schema(
  {
    chat: String, // 메세지정보
    user: { // 유저정보 id와 name을 받겠다.
      id: {
        type: mongoose.Schema.ObjectId,
        ref: "User",
      },
      name: String,
    },
  },
  { timestamps: true }
);

module.exports = mongoose.model("Chat", chatSchema);
// 루트에 app.js
const express = require("express");
const cors = require("cors");
const app = express();
const mongoose = require("mongoose");
require("dotenv").config();
mongoose
.connect(process.env.DB, {
useNewUrlParser: true,
useUnifiedTopology: true,
})
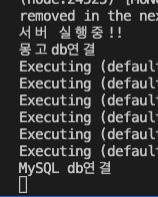
.then(() => console.log("몽고db연결"));
db.sequelize
.sync()
.then(() => {
console.log("MySQL db연결");
})
.catch(console.error);
app.use(cors({ origin: true, credentials: true }));
app.listen(3065, () => {
console.log("서버 실행중!!");
});
//.env
PORT=5001
DB=mongodb://localhost:27017/kakao-talk
npm run dev 실행시 콘솔에 찍은게 잘 나오면 데이터베이스연결끝!
웹소켓세팅
http를통해 서버를만들고 웹소켓과 express로만든서버도 올릴거다.
//루트에 index.js
const { createServer } = require("http");
const app = require("./app");
const { Server } = require("socket.io");
require("dotenv").config();

const httpServer = createServer(app); // http위에 express로만든 app얹는다.
const io = new Server(httpServer, {
  cors: {
    origin: "http://localhost:3000",
  },
}); // 웹소켓서버를 만들어서 httpServer얹는다.

require("./utils/io")(io);
httpServer.listen(process.env.PORT, () => {
  console.log("server listening on port", process.env.PORT);
}); // 서버를 켜놓는다.
// utils > io.js
module.exports = function (io) {
  // io 관련된 모든일~~~ 말하는함수 emit(), 듣는함수 on()
  io.on("connection", async (socket) => {
    console.log("client is connected", socket.id);
  });
};
2.프론트엔드세팅 : 웹소켓 세팅
프론트에 웹소켓설치
npm i socket.io-client
// server.js
import { io } from 'socket.io-client';

const socket = io('http://localhost:5001'); // 백엔드주소로 연결하는 소켓을만든다.

export default socket;
// app.js
import socket from './server';

socket.on('connect', () => console.log('connect'));
이렇게 socket을 app에 import까지하면 웹소켓세팅 끝!
3.백엔드 프론트엔드 연결 테스트
연결
이제 localhost:3000 프론트페이지를 새로고침하면 백엔드터미널에 socket.id가 뜬다.

종료
연결이 된것을 확인했으니 연결이 닫히는것도 확인해보자.
socket.on("disconnect",() => 를 추가한후 프론트페이지를 닫아보면 연결이 끊기는것을 확인할수있다.
// 백엔드 io.js
module.exports = function (io) {
  // io 관련된 모든일~~~ 말하는함수 emit(), 듣는함수 on()
  io.on("connection", async (socket) => {
    console.log("client is connected", socket.id);

    // 이부분을 추가하여 연결이 끊기는것을 확인해보자
    socket.on("disconnect", async () => {
      console.log("user is disconnected");
    });
  });
};

4.유저로그인
로그인은 그냥 간단하게 prompt로 이름만 적으면 로그인되게 구현해보고 나중에 고칠예정이다.
// 백엔드 io.js
module.exports = function (io) {
  // io 관련된 모든일~~~ 말하는함수 emit(), 듣는함수 on()
  io.on("connection", async (socket) => {
    console.log("client is connected", socket.id);

    / ******** 이부분추가!!!
    socket.on("login", async (userName, cb) => {
      console.log("backend", userName);
      // 유저정보를 저장
      try {
        const user = await userController.saveUser(userName, socket.id);
        cb({ ok: true, data: user });
      } catch (err) {
        cb({ ok: false, error: err.message });
      }
    });

    socket.on("disconnect", async () => {
      console.log("user is disconnected");
    });
  });
};
// 백엔드 controllers > user.controller.js
const User = require("../models/user");
const userController = {};

userController.saveUser = async (userName, socketId) => {
  // 1. 이미 있는 유저인지 확인
  let user = await User.findOne({ name: userName });
  // 2. 없다면 새로 유저정보 만들기
  if (!user) {
    user = new User({
      name: userName,
      token: socketId,
      online: true,
    });
  }
  // 3. 이미 있는 유저면 연결정보 token값만 바꿔주자
  user.token = socketId;
  user.online = true;

  // user를 저장하고 리턴
  await user.save();
  return user;
};

module.exports = userController;
프론트에서 user의 이름을 입력하면 response된 값을 날리면 안되니 setUser에 저장한다.
// 프론트 app.js
const [user, setUser] = useState(null);
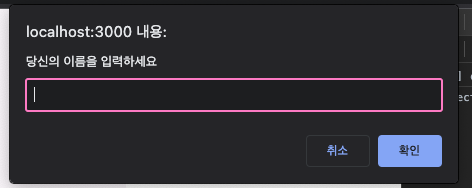
const askUserName = () => {
const userName = prompt('당신의 이름을 입력하세요');
// .emit(대화의제목,보낼내용,콜백함수(앞에처리가잘되었으면 response받는다))
socket.emit('login', userName, (res: any) => {
console.log('res', res);
if (res?.ok) {
setUser(res.data);
}
});
};
useEffect(() => {
askUserName();
}, []);다 만들어준 후, localhost:3000 프론트페이지를 새로고침하면 propmpt창으로 이름을 입력하라고나오고, 입력하면 console에 user의 정보가 담긴다.
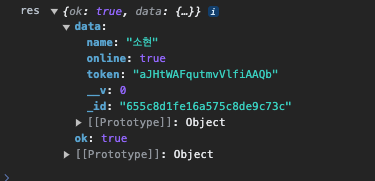
data 데이터의 정보를 살펴보자면 다음과 같다.
name: 유저이름
online: 백엔드에서 true로 보냄
token: 백엔드에 찍힌 soket.id와 같다.(client is connected 소켓id)
5.메세지 주고받기
프론트에서 메세지보내기 -> 서버에서 메세지받기 -> 서버가 해당소켓을 타는 모든 유저에게 메세지보내기 -> 프론트의 메세지리스트에 메세지보낸거 확인하기
1.프론트에서 메세지보내기, 듣기
1) 메세지를 입력한다.
2) 서버에 메세지를 보낸다.
이후 3)으로 넘어가지않고 서버에서 작업해준다음 3)진행한다._
3) 서버에서 메세지를 가져온다.
// chatContainer
const [message, setMessage] = useState(''); // 내가 입력한 메세지
const [messageList, setMessageList] = useState([]); // 메세지들의 리스트

console.log('messagelist', messageList);

useEffect(() => { // 3) 서버에서 메세지를 가져와 메세지리스트에 붙임
  socket.on('message', (message) => {
    setMessageList((prev) => prev.concat(message));
  });
}, []);

const sendMessage = (e: any) => {
  e.preventDefault(); // form onsubmit시 웹페이지를 새로고침하므로 막아줌

  socket.emit('sendMessage', message, (res: any) => { // 2) 서버에 메세지보내기
    console.log('sendMessage res', res);
  });
  setMessage('');
};

const onChangeInput = (e: React.ChangeEvent<HTMLInputElement>) => {// 1) 메세지입력
    setMessage(e.target.value);
  };
2.서버에서 메세지보내기
1) 프론트에서 보낸 메세지를 듣는 함수 생성
2) 유저 찾기
3) 프론트에서 보낸 메세지 저장
4) 서버가 새로운 메세지를 모두에게 알려야함
// io.js
// 1) 프론트에서 보낸 메세지를 듣는 함수 생성
socket.on("sendMessage", async (message, cb) => {
  try {
    // 2) 유저찾기 socket.id로 + 밑에 user.controller.js에 유저체크하는함수추가
    const user = await userController.checkUser(socket.id);
    // 3) 메세지 저장 + 밑에 chat.controller.js에 메세지저장하는함수추가
    const newMessage = await chatController.saveChat(message, user);
    // 4) 서버가 새로운메세지를 모두에게 알려야함
    io.emit("message", newMessage);

    cb({ ok: true });
  } catch (err) {
    cb({ ok: false, error: err.message });
  }
});
// user.controller.js 에 유저가있는지없는지 체크하는 함수 추카
userController.checkUser = async (socketId) => {
  const user = await User.findOne({ token: socketId });
  if (!user) throw new Error("user not found");
  return user;
};
// chat.controller.js 메세지를 저장하는 함수 추가
const Chat = require("../models/chat");

const chatController = {};

chatController.saveChat = async (message, user) => {
  const newMessage = new Chat({
    chat: message,
    user: {
      id: user._id,
      name: user.name,
    },
  });
  await newMessage.save();
  return newMessage;
};

module.exports = chatController;
테스트하는법
localhost:3000을 두개 연다. 어차피 새로고침하면 socket.id가 다르므로 두명이 로그인한것처럼 테스트를 할수있다.
한쪽 브라우저에서 채팅을 친다음 콘솔창을 확인한다.
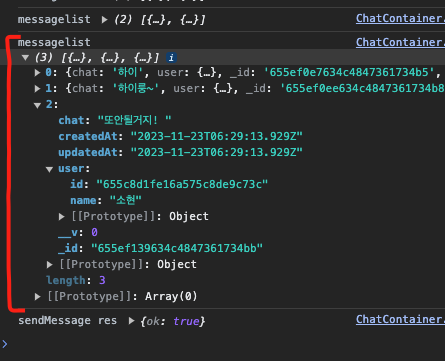
콘솔창에 잘 출력된다!
이제 주고받는걸 확인했으면 본인이 만든 UI에 넣어주면된다.
나는 이런식으로 작업했다.
ChatContainer안에 로직을써주고, 그 안에 MessageContainer(메세지창) InputField(인풋창)이 있다.
MessageContainer에서 적절하게 보여주면되는데, system에서 보내는 메세지와유저를 백엔드에서 추가하고 message.user.name이 시스템,나,나머지(상대방)에 대해 ui를 다르게 보여줬다.
// 1) 백엔드 io.js 에 시스템에서 보내는 메세지 추가
 socket.on("login", async (userName, cb) => {
   // 유저정보를 저장
   try {
     const user = await userController.saveUser(userName, socket.id);
     // <-- 여기부터
     const welcomeMessage = {
       chat: `${userName} is joined to this room`,
       user: { id: null, name: "system" },
     };
     io.emit("message", welcomeMessage);
     // 여기까지 추가 -->
     cb({ ok: true, data: user });
   } catch (err) {
     cb({ ok: false, error: err.message });
   }
 });
// 2) 프론트 ChatContainer.tsx 의 return에 메세지창추가
return (
    <>
      <MessageContainer messageList={messageList} user={user} /> // 이거추가!
      <InputField
        message={message}
        onSubmit={sendMessage}
        onChange={onChangeInput}
      />
    </>
  );
// 3) MessageContainer UI 배치
import { User } from '@typess/user';

import React from 'react';
import styled from 'styled-components';

interface MessageContainerProps {
  messageList: any;
  user: User;
}

const MessageContainer: React.FC<MessageContainerProps> = ({
  messageList,
  user,
}) => {
  return (
    <>
      {messageList.map((message: any, index: number) => {
        return (
          <Container key={message._id} className="message-container">
            {message.user.name === 'system' ? (
              <div className="systemMessageWrapper">
                <p className="message">{message.chat}</p>
              </div>
            ) : message.user.name === user.name ? (
              <div className="myMessageWrapper">
                <div className="message">{message.chat}</div>
              </div>
            ) : (
              <div className="yourMessageWrapper">
                <img
                  src="/images/chat/profile-no.jpg"
                  className="profileImg"
                  style={
                    (index === 0
                      ? { visibility: 'visible' }
                      : messageList[index - 1].user.name === user.name) ||
                    messageList[index - 1].user.name === 'system'
                      ? { visibility: 'visible' }
                      : { visibility: 'hidden' }
                  }
                />
                <div className="message">{message.chat}</div>
              </div>
            )}
          </Container>
        );
      })}
    </>
  );
};
const Container = styled.div`
  .systemMessageWrapper {
    display: flex;
    justify-content: center;
    align-items: center;
    margin-bottom: 8px;
    .message {
      background-color: #55667758;
      border-radius: 100px;
      text-align: center;
      color: white;
      padding: 4px 14px;
      font-size: 14px;
    }
  }
  .myMessageWrapper {
    display: flex;
    justify-content: flex-end;
    margin-bottom: 5px;
    .message {
      background-color: ${({ theme }) => theme.colors.primaryColor};
      border-radius: 8px;
      padding: 8px;
      max-width: 200px;
      font-size: 16px;
    }
  }
  .yourMessageWrapper {
    display: flex;
    justify-content: flex-start;
    align-items: center;
    .profileImg {
      width: 38px;
      height: 38px;
      border-radius: 100px;
      margin-right: 10px;
    }
    .message {
      background-color: ${({ theme }) => theme.colors.white};
      border-radius: 8px;
      padding: 8px;
      max-width: 200px;
      font-size: 16px;
    }
  }
`;

export default MessageContainer;
후기 🫠
채팅창 구현하는거 보기만했을때는 막막해보였는데 역시 직접 해보니깐 나도 되는구나..! 하면서 신기하고 기특했다 내자신.
처음시작할떄는 웹소켓 몽고디비 이런거 모르고 했었는데 지금은 그나마 좀 알게된거같고,
이걸로 끝나는게 아니라 디벨롭해서 로그인 메인에붙이고 리덕스로 로그인관리도하고 유저정보도 좀 더 추가할 예정이다.
채팅구현하고싶어서 이거저거 찾아보다가 마침 유투브에 올라와있길래 무료강의를 보고 한것이다.
이때까지 강의는 유료를 선호하는 편이였는데 무료도 정말 좋은 강의가 있다는것을 깨달았다. 요즘은 정말 지식습득 인프라가 잘되어있어서 나도 더 열심히 알아야겠다는생각이다.