문서 목적
해당 문서는 PrestoDB에 대해 정리하고, Single machine 테스트한 내용에 대해 작성된 문서이다.
Single machine(coordinator, workers in one machine)은 테스트 과정에서만 사용하기를 권장한다.
PrestoDB란
Presto is a distributed SQL query engine designed to query large data sets distributed over one or more heterogeneous data sources.
- presto 공식 문서
Presto는 Facebook에서 개발한 분산 SQL 쿼리 엔진으로, 2013년 Apache 라이선스로 공개되었다.
Related
trino
- Presto의 초기 멤버들이 Facebook을 나와 만든 PrestoSQL 프로젝트로 Trino로 리브랜딩 됨
Athena
Amazon에서 Presto를 기반으로 시작해 자체 개발한 서버리스 상품
- S3에 있는 Data source(e.g. orc, parquet, csv etc)에 대해 RDBMS와 동일하게 Ansi SQL을 사용하게 할 수 있음
- Glue crawler를 통해 Data source의 meta data를 자동 생성하도록 하면 편하게 질의 가능
- Glue 크롤링을 하는 시간 동안에는 Table not exists 또는 중복 등의 오류가 발생할 수 있다.
Presto Architecture

출처 : https://www.tutorialspoint.com/apache_presto/apache_presto_architecture.htm
| Server Type | Description |
|---|---|
| Client |
|
| Coordinator |
|
| Connector |
|
| Worker |
더 자세한 내용은 Presto 공식 Docs 참조 : https://prestodb.io/docs/current/overview/concepts.htmlPresto 작동 방식
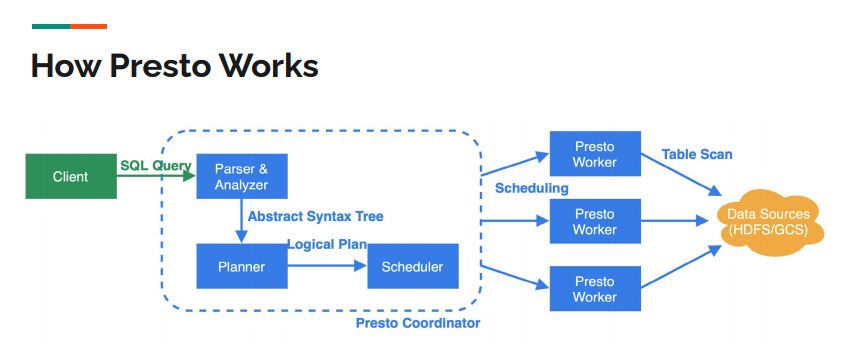
- Client에서 Coordinator로 쿼리 보냄
- Coordinator에서 쿼리를 분석하여 플랜 작성
- Worker가 작업할 수 있게 Task를 줌
- Worker는 받은 Task를 기반으로 데이터 소스 접근
- 결과를 Coordinator에게 주는 작업 없이 Client로 보냄
Local Marchine에서 Single 구성
이하 내용은 모두 Docker에서 실행할 것이며, Presto 버전은 아래와 같다.
- Presto version 0.276.1
- Ubuntu 20.04
- Java : OpenJDK 11
Install
-
presto
$ wget https://repo1.maven.org/maven2/com/facebook/presto/presto-server/0.276.1/presto-server-0.276.1.tar.gz -
docker
$ docker pull ubuntu $ docker run -d -it \ --name presto_test \ -p 8080:8080 \ -p 8081:8081 \ -p 8082:8082 \ ubuntu:latest $ docker ps CONTAINER ID IMAGE COMMAND CREATED STATUS PORTS NAMES c97e1a3145e3 ubuntu:latest "bash" 8 seconds ago Up 7 seconds 0.0.0.0:8080-8082->8080-8082/tcp presto_test -
Java install
$ sudo apt-get update && sudo apt-get upgrade $ apt-get install openjdk-11-jdk -y $ java --version openjdk 11.0.16 2022-07-19 OpenJDK Runtime Environment (build 11.0.16+8-post-Ubuntu-0ubuntu122.04) OpenJDK 64-Bit Server VM (build 11.0.16+8-post-Ubuntu-0ubuntu122.04, mixed mode, sharing) -
python3 install
$ wget https://repo.anaconda.com/miniconda/Miniconda3-py37_4.12.0-Linux-x86_64.sh $ chmod +x Miniconda3-py37_4.12.0-Linux-x86_64.sh $ ./Miniconda3-py37_4.12.0-Linux-x86_64.sh -
optional docker ubuntu setting
$ apt-get install wget -y
$ apt-get install tree -y
$ apt-get install vim -y
$ apt-get install mysql-server -y
Presto download
$ mkdir presto_test

$ cd presto_test

$ wget https://repo1.maven.org/maven2/com/facebook/presto/presto-server/0.276.1/presto-server-0.276.1.tar.gz

# 압축 해제
$ tar -xvzf presto-server-0.276.1.tar.gz

$  tree -L 1 ./presto-server-0.276.1
./presto-server-0.276.1
|-- NOTICE
|-- README.txt
|-- bin
|-- lib
`-- plugin

# data directory 생성(공식 문서 상 presto 설치 디렉토리 밖에 만드는 것 권장)
$ mkdir data

# presto 설치 디렉토리 안에 etc 디렉토리 생성
$ mkdir -p ./presto-server-0.276.1/etc
Presto configuration
etc 디렉토리 밑에 아래와 같이 구성
node.properties
- 각 노드에 관련된 구성이 포함되어 있음
- node는 Presto의 단일 인스턴스
minimal
node.environment=production
node.id=ffffffff-ffff-ffff-ffff-ffffffffffff
node.data-dir=~/presto_test/datanode.environment: 환경의 이름으로, cluster의 모든 presto node는 동일한 환경 이름을 가져야 함node.id: Presto에 대한 고유 식별자로, 모든 node에 대해 고유해야 함. 재부팅과 업그레이드 동안에도 일관성 유지 필요.node.data-dir: data directory의 위치로, 로그 및 기타 데이터를 여기에 저장
jvm.config
JVM을 시작하는 데 사용되는 명령줄 옵션 목록이 포함
-server
-Xmx16G
-XX:+UseG1GC
-XX:G1HeapRegionSize=32M
-XX:+UseGCOverheadLimit
-XX:+ExplicitGCInvokesConcurrent
-XX:+HeapDumpOnOutOfMemoryError
-XX:+ExitOnOutOfMemoryError
-Djdk.attach.allowAttachSelf=true
config.properties
Presto 서버에 대한 구성이 포함
테스트 목적으로 서버 1대에서 coordinator와 worker역할을 모두 수행하도록 설정
coordinator=true
node-scheduler.include-coordinator=false
http-server.http.port=8080
query.max-memory=50GB
query.max-memory-per-node=1GB
discovery-server.enabled=true
discovery.uri=http://example.net:8080resource-manager: coordinator, worker의 데이터를 집계하고 cluster뷰 구성coordinator: 해당 인스턴스가 coordinator 역할을 하도록 허용node-scheduler.include-coordinator: coordinator에 대한 일정 작업 허용http-server.http.port: HTTP서버 포트를 지정query.max-memory: 쿼리가 사용할 수 있는 최대 분산 메모리 양query.max-memory-per-node: 쿼리가 한 시스템에서 사용할 수 있는 최대 사용자 메모리 양discovery-server.enabled: Discovery 서비스(클러스터의 모든 노드를 찾음)discovery-uri: 검색 서버에 대한 uriconcurrency-threshold-to-enable-resource-group-refres: default 1.0, 실행 중인 쿼리가 구성된 제한에 도달하면 지정된 리소스 그룹에서 더 많은 쿼리가 실행되도록 허용하기 전에 리소스 그룹 업데이틀르 기다리는 조정자.resource-group-runtimeinfo-refresh-interval: default 100ms, 리소스 그룹 사용량에 대한 주기적 폴링 간격 조정
log.properties
최소 로그 수준 설정
DEBUG, INFO, WARN 및 ERROR로 구분
com.facebook.presto=INFOCatalog
# pwd : ~/presto_test/presto-server-0.276.1/etc
$ mkdir catalog
MySQL catalog
# mysql.properties(catalog name이 앞으로 가게)
connector.name=mysql
connection-url=jdbc:mysql://localhost:3306
connection-user=root
connection-password=password
Presto run
$ cd ~/presto_test/presto-server-0.276.1
# foreground
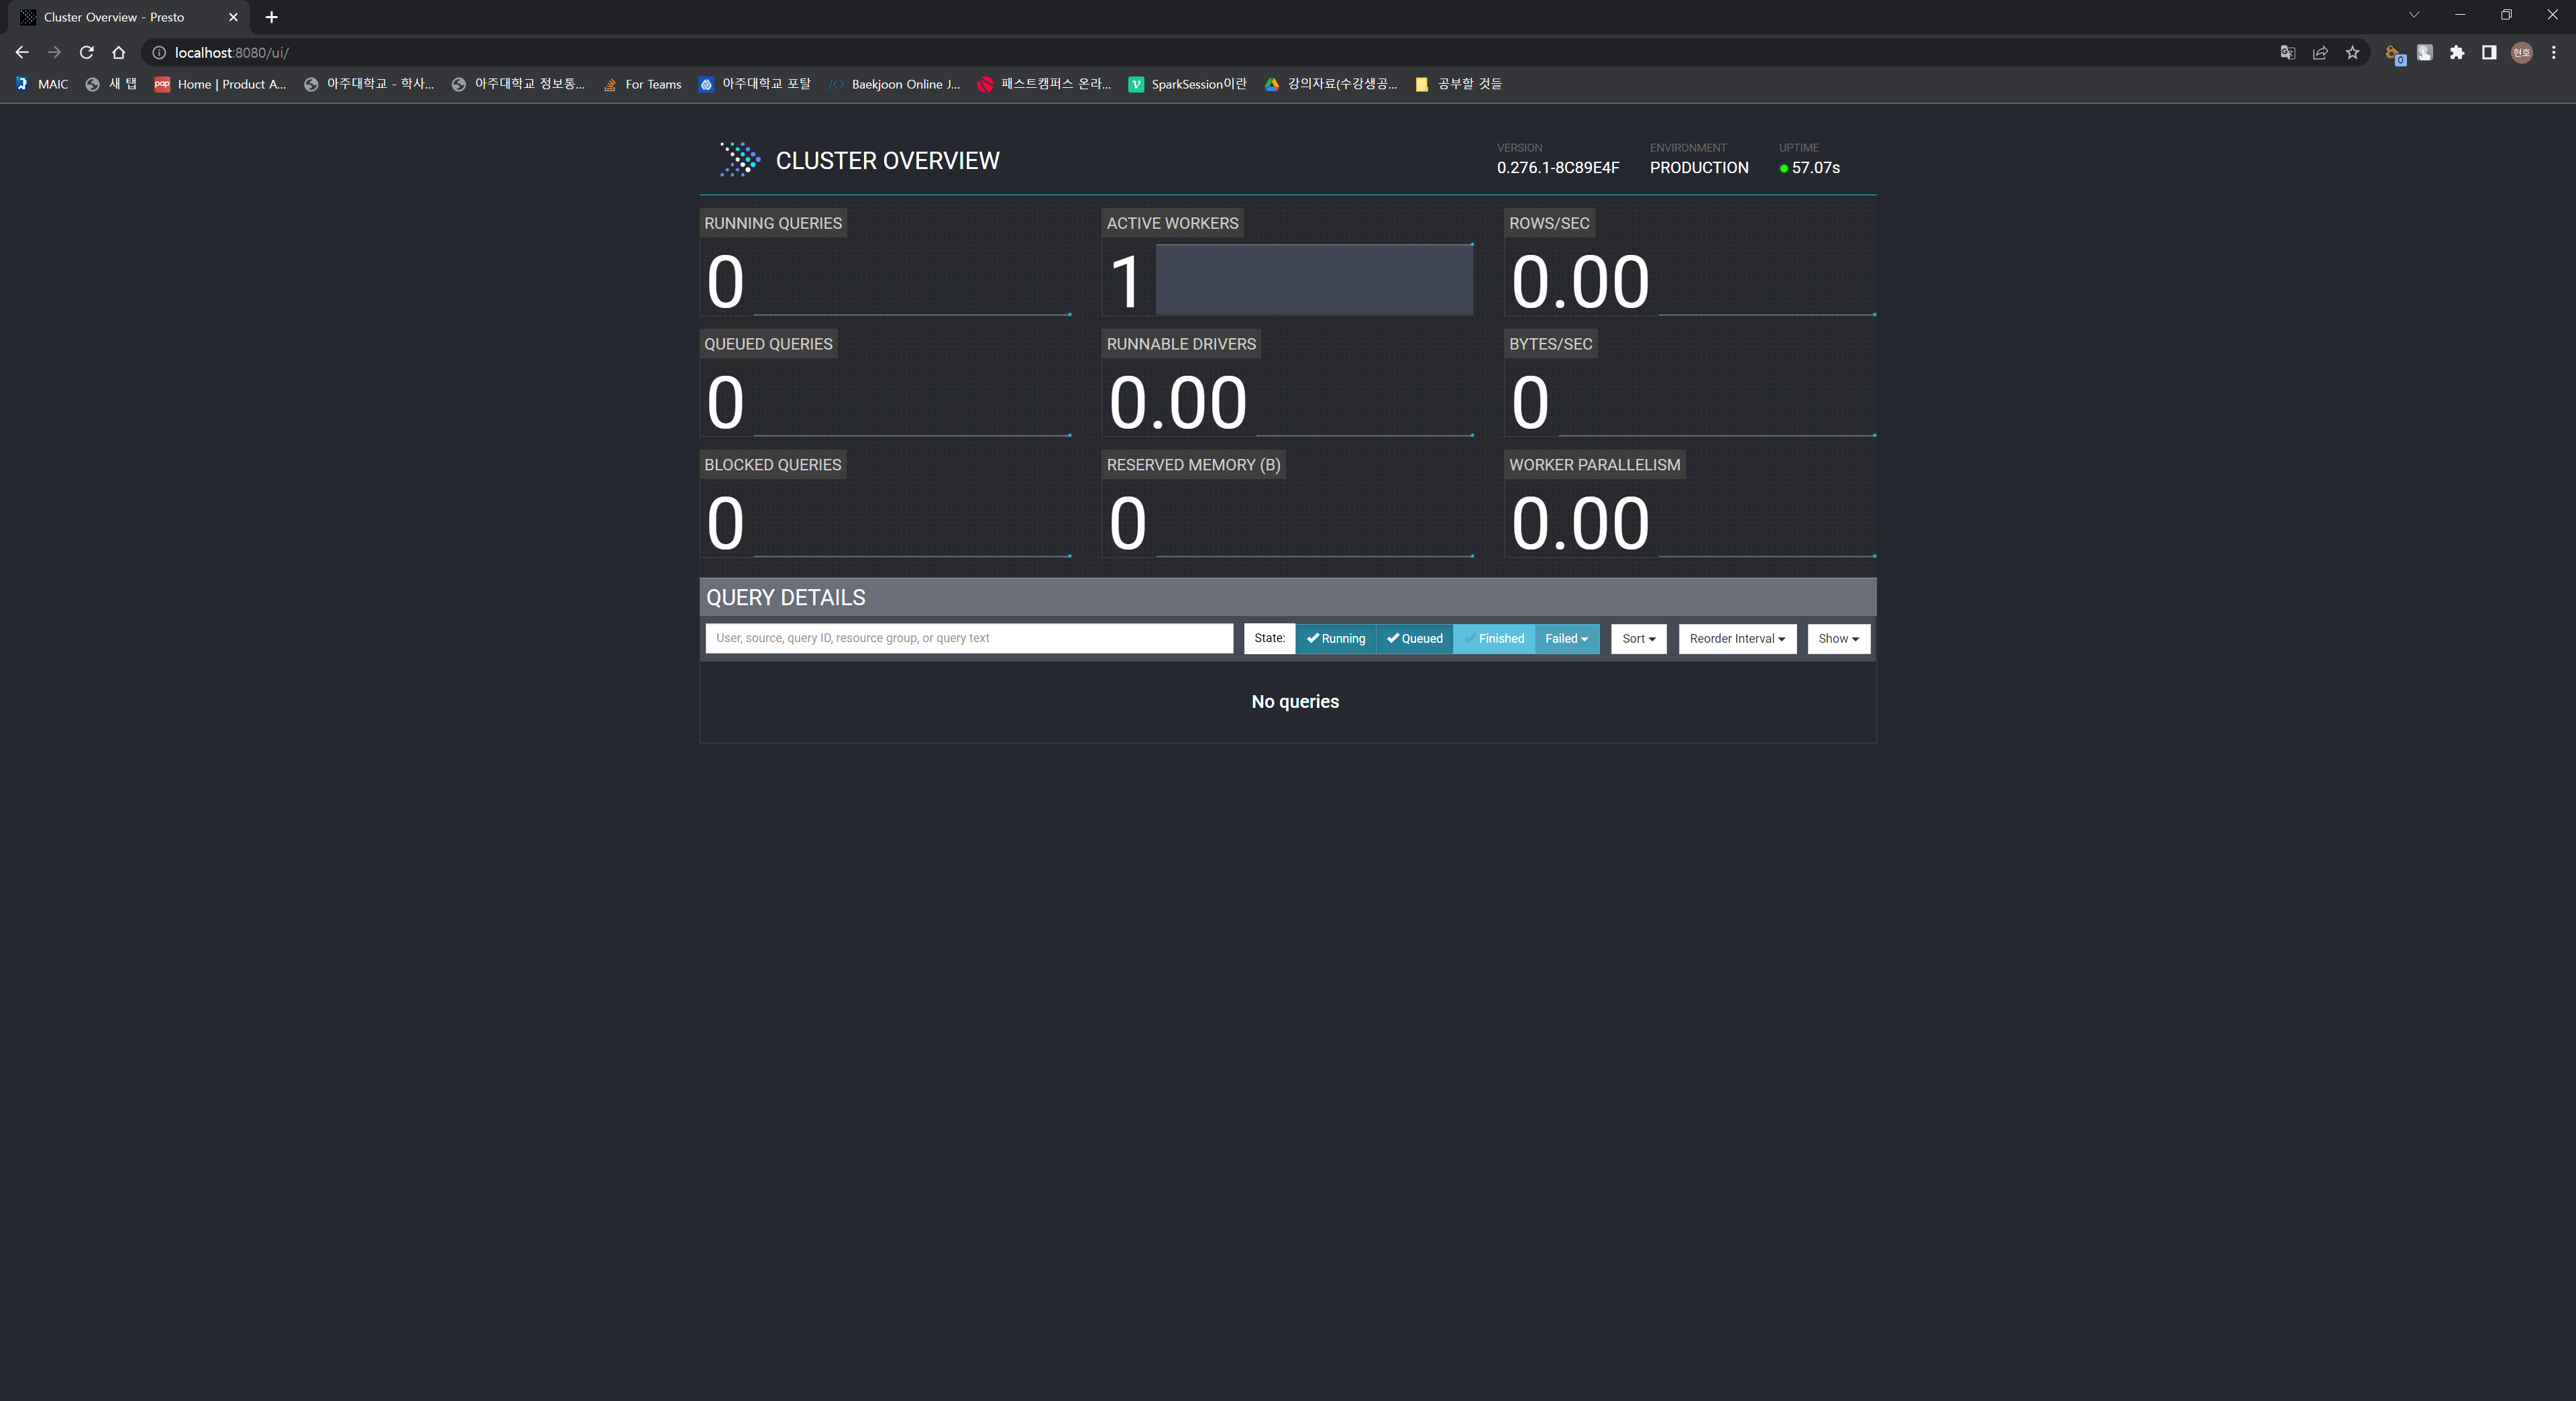
./bin/launcher runUI
Presto Web UI를 통해 아래와 같은 정보를 확인할 수 있다.
- Active workers 개수와 Query 실행에 대한 기본적인 통계정보
- Query Details 에서 실행된 각각의 query를 확인 가능
- Query Details의 query 항목에서 오른쪽 Query_ID 링크를 선택하면, Query 실행과 관련된 상제한 정보를 확인 가능
Presto CLI
$ mv presto-cli-0.276.1-executable.jar presto-cli
$ chmod +x ./presto-cli
$ ./presto-cli --server localhost:8080 --catalog mysql
출처