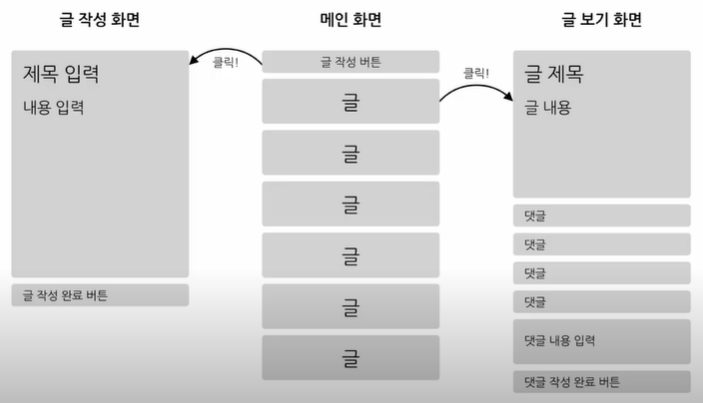
미니 블로그 기획하기
기능 목록
- 글 목록 보기
- 글 보기
- 댓글 보기
- 글 작성
- 댓글 작성
화면 디자인
프로젝트 시작
npx create-react-app soju-mini-project
필요한 패키지 설치
- react-router-dom v6
- styled-components v5
npm install --save react-router-dom styled-components
기능별 컴포넌트
- 글 목록 보기
- PostList, PostListItem
- 글 보기
- Post
- 댓글 보기
- CommentList, CommentListItem
- 글 작성
- PostWrite
- 댓글 작성
- CommentWrite
폴더 구조
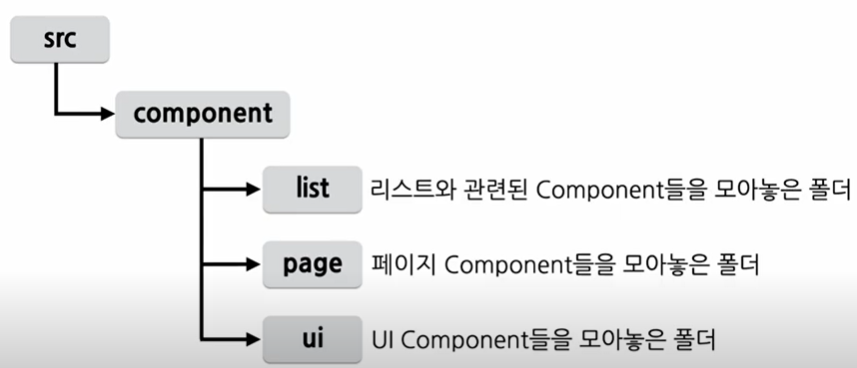
UI Component
Bottom up 방식으로 작은 컴포넌트부터 구현!
Button 컴포넌트
재사용성을 위해 기본 제공 요소지만 컴포넌트로 생성
import React from "react";
import styled from "styled-components";

const StyledButton = styled.button`
    padding: 8px 16px;
    font-size: 16px;
    border-width: 1px;
    border-radius: 8px;
    cursor: pointer;
`;

function Button(props) {
    const { title, onClick } = props;

    return <StyledButton onClick={onClick}>{title || "button"}</StyledButton>;
}

export default Button;
TextInput 컴포넌트
import React from "react";
import styled from "styled-components";

const StyledTextarea = styled.textarea`
    width: calc(100% - 32px);
    ${(props) =>
        props.height &&
        `
        height: ${props.height}px;
    `}
    padding: 16px;
    font-size: 16px;
    line-height: 20px;
`;

function TextInput(props) {
    const { height, value, onChange } = props;

    return <StyledTextarea height={height} value={value} onChange={onChange} />;
}

export default TextInput;
List Component 구현하기
PostListItem Component
import React from "react";
import styled from "styled-components";

const Wrapper = styled.div`
    width: calc(100% - 32px);
    padding: 16px;
    display: flex;
    flex-direction: column;
    align-items: flex-start;
    justify-content: center;
    border: 1px solid grey;
    border-radius: 8px;
    cursor: pointer;
    background: white;
    :hover {
        background: lightgrey;
    }
`;

const TitleText = styled.p`
    font-size: 20px;
    font-weight: 500;
`;

function PostListItem(props) {
    const { post, onClick } = props;

    return (
        <Wrapper onClick={onClick}>
            <TitleText>{post.title}</TitleText>
        </Wrapper>
    );
}

export default PostListItem;
PostList Component
map 함수를 사용하여 전달받은 갯수만큼 요소 생성
import React from "react";
import styled from "styled-components";
import PostListItem from "./PostListItem";

const Wrapper = styled.div`
    display: flex;
    flex-direction: column;
    align-items: flex-start;
    justify-content: center;

    & > * {
        :not(:last-child) {
            margin-bottom: 16px;
        }
    }
`;

function PostList(props) {
    const { posts, onClickItem } = props;

    return (
        <Wrapper>
            {posts.map((post, index) => {
                return (
                    <PostListItem
                        key={post.id}
                        post={post}
                        onClick={() => {
                            onClickItem(post);
                        }}
                    />
                );
            })}
        </Wrapper>
    );
}

export default PostList;
CommentListItem Component
스타일의 차이만 있지 PostListItem과 거의 동일함! 클릭 이벤트를 처리해주지 않아도 되어 onClick 이벤트가 없다.
import React from "react";
import styled from "styled-components";

const Wrapper = styled.div`
    width: calc(100% - 32px);
    padding: 8px 16px;
    display: flex;
    flex-direction: column;
    align-items: flex-start;
    justify-content: center;
    border: 1px solid grey;
    border-radius: 8px;
    cursor: pointer;
    background: white;
    :hover {
        background: lightgrey;
    }
`;

const ContentText = styled.p`
    font-size: 16px;
    white-space: pre-wrap;
`;

function CommentListItem(props) {
    const { comment } = props;

    return (
        <Wrapper>
            <ContentText>{comment.content}</ContentText>
        </Wrapper>
    );
}

export default CommentListItem;
CommentList Component
역시 map 함수를 사용하여 리스트의 갯수만큼 렌더링
import React from "react";
import styled from "styled-components";
import CommentListItem from "./CommentListItem";

const Wrapper = styled.div`
    display: flex;
    flex-direction: column;
    align-items: flex-start;
    justify-content: center;

    & > * {
        :not(:last-child) {
            margin-bottom: 16px;
        }
    }
`;

function CommentList(props) {
    const { comments } = props;

    return (
        <Wrapper>
            {comments.map((comment, index) => {
                return <CommentListItem key={comment.id} comment={comment} />;
            })}
        </Wrapper>
    );
}

export default CommentList;
가짜 데이터 만들기
백엔드 부분을 대신할 수 있는 가짜 데이터 json으로 저장!
Page Component 구현
MainPage Component
사용자가 접속했을 때 가장 처음 보게 될 페이지. 글 작성 버튼과 글 목록을 볼 수 있어야 함. 클릭 시 다른 곳으로 이동할 수 있는 React-router-dom의 navigate Hook을 사용
import React from "react";
import { useNavigate } from "react-router-dom";
import styled from "styled-components";
import PostList from "../list/PostList";
import Button from "../ui/Button";
import data from '../../data.json';

const Wrapper = styled.div`
    padding: 16px;
    width: calc(100% - 32px);
    display: flex;
    flex-direction: column;
    align-items: center;
    justify-content: center;
`;

const Container = styled.div`
    width: 100%;
    max-width: 720px;

    & > * {
        :not(:last-child) {
            margin-bottom: 16px;
        }
    }
`;

function MainPage(props) {
    const navigate = useNavigate();

    return (
        <Wrapper>
            <Container>
                <Button
                    title="글 작성하기"
                    onClick={() => {
                        navigate("/post-write");
                    }}
                />

                <PostList
                    posts={data}
                    onClickItem={(item) => {
                        navigate(`/post/${item.id}`);
                    }}
                />
            </Container>
        </Wrapper>
    );
}

export default MainPage;
PostWritePage Component
이미 만들어진 component를 조립하여 생성
글의 제목, 글의 내용을 위한 state를 각각 갖고 있다!
import React, { useState } from "react";
import { useNavigate } from "react-router-dom";
import styled from "styled-components";
import TextInput from "../ui/TextInput";
import Button from "../ui/Button";

const Wrapper = styled.div`
    padding: 16px;
    width: calc(100% - 32px);
    display: flex;
    flex-direction: column;
    align-items: center;
    justify-content: center;
`;

const Container = styled.div`
    width: 100%;
    max-width: 720px;

    & > * {
        :not(:last-child) {
            margin-bottom: 16px;
        }
    }
`;

function PostWritePage(props) {
    const navigate = useNavigate();

    const [title, setTitle] = useState("");
    const [content, setContent] = useState("");

    return (
        <Wrapper>
            <Container>
                <TextInput
                    height={20}
                    value={title}
                    onChange={(event) => {
                        setTitle(event.target.value);
                    }}
                />

                <TextInput
                    height={480}
                    value={content}
                    onChange={(event) => {
                        setContent(event.target.value);
                    }}
                />

                <Button
                    title="글 작성하기"
                    onClick={() => {
                        navigate("/");
                    }}
                />
            </Container>
        </Wrapper>
    );
}

export default PostWritePage;
PostViewPage Component
글을 볼 수 있어야 하므로 글, 댓글, 댓글 작성 기능이 필요.
props를 이용하여 전체 데이터에서 띄워줘야 하는 글의 id를 찾아 렌더링.
import React, { useState } from "react";
import { useNavigate, useParams } from "react-router-dom";
import styled from "styled-components";
import CommentList from "../list/CommentList";
import TextInput from "../ui/TextInput";
import Button from "../ui/Button";
import data from "../../data.json";

const Wrapper = styled.div`
    padding: 16px;
    width: calc(100% - 32px);
    display: flex;
    flex-direction: column;
    align-items: center;
    justify-content: center;
`;

const Container = styled.div`
    width: 100%;
    max-width: 720px;

    & > * {
        :not(:last-child) {
            margin-bottom: 16px;
        }
    }
`;

const PostContainer = styled.div`
    padding: 8px 16px;
    border: 1px solid grey;
    border-radius: 8px;
`;

const TitleText = styled.p`
    font-size: 28px;
    font-weight: 500;
`;

const ContentText = styled.p`
    font-size: 20px;
    line-height: 32px;
    white-space: pre-wrap;
`;

const CommentLabel = styled.p`
    font-size: 16px;
    font-weight: 500;
`;

function PostViewPage(props) {
    const navigate = useNavigate();
    const { postId } = useParams();

    const post = data.find((item) => {
        return item.id == postId;
    });

    const [comment, setComment] = useState("");

    return (
        <Wrapper>
            <Container>
                <Button
                    title="뒤로 가기"
                    onClick={() => {
                        navigate("/");
                    }}
                />
                <PostContainer>
                    <TitleText>{post.title}</TitleText>
                    <ContentText>{post.content}</ContentText>
                </PostContainer>

                <CommentLabel>댓글</CommentLabel>
                <CommentList comments={post.comments} />

                <TextInput
                    height={40}
                    value={comment}
                    onChange={(event) => {
                        setComment(event.target.value);
                    }}
                />
                <Button
                    title="댓글 작성하기"
                    onClick={() => {
                        navigate("/");
                    }}
                />
            </Container>
        </Wrapper>
    );
}

export default PostViewPage;
각 페이지별 경로 구성하기
<BrowserRouter>
            <Routes>
                <Route index element={<MainPage />} />
                <Route path="post-write" element={<PostWritePage />} />
                <Route path="post/:postId" element={<PostViewPage />} />
            </Routes>
</BrowserRouter>- BrowserRouter : 가장 바깥 쪽에서 라우팅 감싸는 역할
- Routes : 각각의 경로(Route)를 감싸는 역할
- Route : 실제 이동할 경로(path)와 띄워줄 페이지(element)를 가지고 있는 요소. 주소창에 입력한 "~~~/main" 등
/뒤에 등장한 요소가 path로 들어간다.
페이지간 이동 : useNavigate()
function sampleNavigate(props) {
  	const navigate = useNavigate();
  	const moveToMain = () => {
      	navigate("/");
    }
    return ( ... );
 }
App.js (실제 라우팅 구성)
가장 처음 렌더링되는 컴포넌트!
경로에 :를 사용하면 동적 데이터를 넣어서 useParams() Hook을 사용하여 데이터를 가져올 수 있다
import React from "react";
import {
    BrowserRouter,
    Routes,
    Route
} from "react-router-dom";
import styled from "styled-components";
// Pages
import MainPage from './component/page/MainPage';
import PostWritePage from './component/page/PostWritePage';
import PostViewPage from './component/page/PostViewPage';

const MainTitleText = styled.p`
    font-size: 24px;
    font-weight: bold;
    text-align: center;
`;

function App(props) {
    return (
        <BrowserRouter>
            <MainTitleText>미니 블로그</MainTitleText>
            <Routes>
                <Route index element={<MainPage />} />
                <Route path="post-write" element={<PostWritePage />} />
                <Route path="post/:postId" element={<PostViewPage />} />
            </Routes>
        </BrowserRouter>
    );
}

export default App;
index.js
처음으로 렌더링할 페이지(컴포넌트) 지정이 가능하다. 기본값으로는 App 컴포넌트가 들어가 있다!
프로젝트 시작
npm start 기능을 사용하여 프로젝트를 시작하면 미니 블로그가 완성된 것을 볼 수 있다!

함께 일하고 싶은 개발자가 되기 위해 노력합니다. 코딩테스트 관련 공부 및 이야기는 티스토리에도 업로드되어 있습니다.