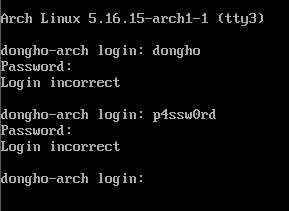
좀 더 구체적인 사례를 들면, sudo는 pw를 잘못 입력하면 try again 이라는 메시지와 함께 pw를 다시 입력할 기회를 주지만, linux 로그인에 사용되는 getty/agetty는 id부터 다시 입력하도록 한다. 아무 생각 없이 제대로된 비밀번호를 다시 입력한다면 콘솔에 그대로 노출될 수 있다.

다시 성공적으로 로그인을 했어도 방금전 일은 로그에 남게 된다. 아무리 /var/log/btmp의 permission이 root:utmp 라지만 내 비밀번호가 어딘가 로그에 평문으로 남겨진다니 찝찝하지 않을 수 없는 일이다.
lastb is the same as last, except that by default it shows a log of the /var/log/btmp file, which contains all the bad login attempts.
man 1 last를 참고했다. man 5 utmp에는 "Warning: utmp must not be writable by the user class "other", because many system programs (foolishly) depend on its integrity. You risk faked system logfiles and modifications of system files if you leave utmp writable to any user other than the owner and group owner of the file." 라곤 하지만 악의적인 목적으로 수정하려는 것도 아니니까 /var/log/btmp를 찾아 특정 라인을 수정하면 되지 않을까? 싶어 열어보면..
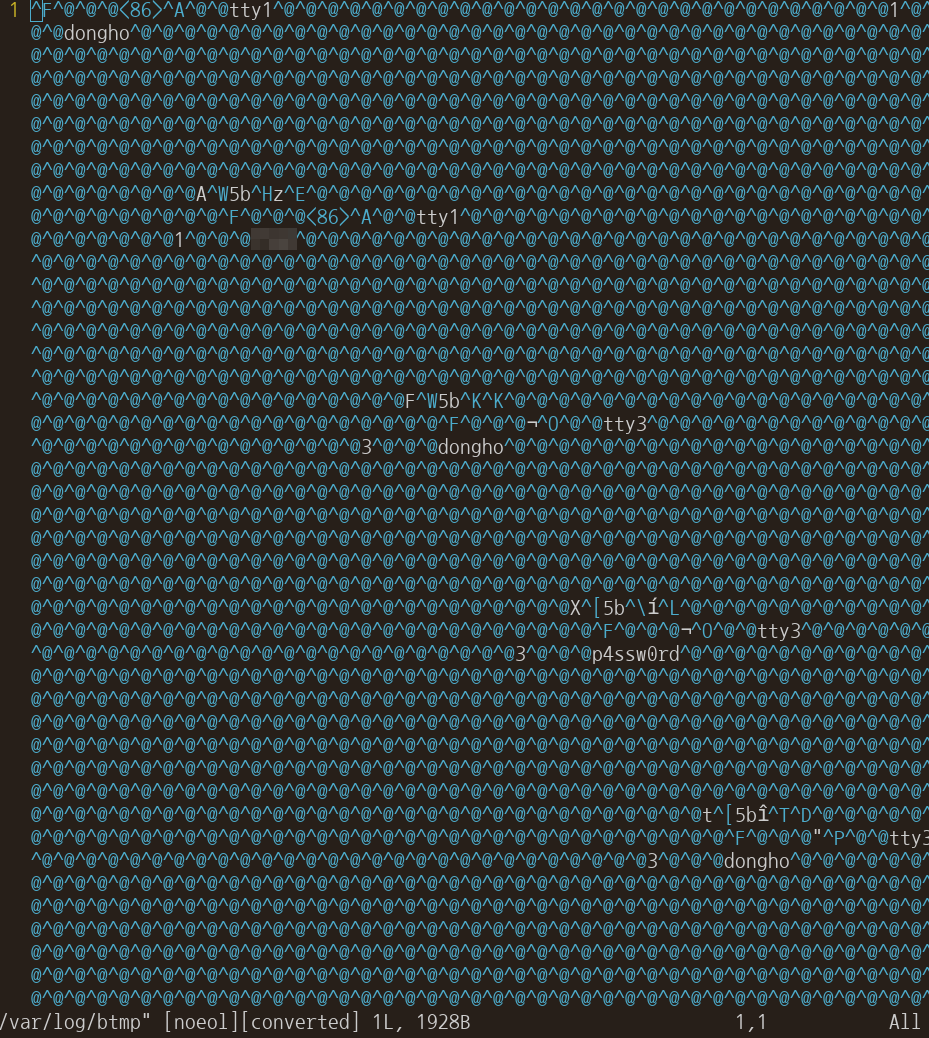
아무래도 직접 수정하긴 어려울것 같아.. 구글링 해봤지만 "그거 그렇게 하는거 아닌데ㅋㅋ" "그냥 다 지우면 되는거 아님?"와 같은 질문과 답변들만 있었다. 그나마 wtmp의 경우 man page에 structure가 나와있지만 btmp는 그런게 없어 lastb의 소스를 참고하기로 했다.
lastb는 util-linux에 포함되어 있으며 소스는 여기에서 찾아볼 수 있다.
이 소스는 lastb 말고 last도 같이 구현되어 있다. 내가 원하는 lastb의 구현을 찾기위해 끝에서부터 거슬러 올라가면..
-
fprintf(out, _(" -f, --file <file> use a specific file instead of %s\n"), ctl->lastb ? _PATH_BTMP : _PATH_WTMP);ctl->lastb가 last와 lastb를 구분짓는 플래그로 보인다. -
process_wtmp_file 함수에서 ctl->lastb가 참일 때,
list(ctl, &ut, ut.ut_tv.tv_sec, R_NORMAL);하는 것을 볼 수 있다. -
static int list(const struct last_control *ctl, struct utmpx *p, time_t logout_time, int what)의 주석이 Show one line of information on screen 인걸 보면 잘 찾아온 것 같다.
그런데 가만 보면 lastb일때 호출하는 list 함수가 struct utmpx를 인자로 받는것을 보니 btmp, wtmp, utmp 모두 utmp 포맷과 동일하지 않을까란 생각이 들었다. 다시 위로 돌아가서 man 5 utmp로 struct utmp를 보면 아래와 같다.
#define UT_LINESIZE      32
#define UT_NAMESIZE      32
#define UT_HOSTSIZE     256

struct exit_status {              /* Type for ut_exit, below */
    short int e_termination;      /* Process termination status */
    short int e_exit;             /* Process exit status */
};

struct utmp {
    short   ut_type;              /* Type of record */
    pid_t   ut_pid;               /* PID of login process */
    char    ut_line[UT_LINESIZE]; /* Device name of tty - "/dev/" */
    char    ut_id[4];             /* Terminal name suffix,
                                     or inittab(5) ID */
    char    ut_user[UT_NAMESIZE]; /* Username */
    char    ut_host[UT_HOSTSIZE]; /* Hostname for remote login, or
                                     kernel version for run-level
                                     messages */
    struct  exit_status ut_exit;  /* Exit status of a process
                                     marked as DEAD_PROCESS; not
                                     used by Linux init(1) */
    /* The ut_session and ut_tv fields must be the same size when
       compiled 32- and 64-bit.  This allows data files and shared
       memory to be shared between 32- and 64-bit applications. */
#if __WORDSIZE == 64 && defined __WORDSIZE_COMPAT32
    int32_t ut_session;           /* Session ID (getsid(2)),
                                     used for windowing */
    struct {
        int32_t tv_sec;           /* Seconds */
        int32_t tv_usec;          /* Microseconds */
    } ut_tv;                      /* Time entry was made */
#else
     long   ut_session;           /* Session ID */
     struct timeval ut_tv;        /* Time entry was made */
#endif

    int32_t ut_addr_v6[4];        /* Internet address of remote
                                     host; IPv4 address uses
                                     just ut_addr_v6[0] */
    char __unused[20];            /* Reserved for future use */
};
참고로 pid_t는 /usr/include/bits/typesizes.h 아래에 signed 32bit integer이고, timeval은 아래와 같다.
struct timeval
{
#ifdef __USE_TIME_BITS64
  __time64_t tv_sec;		/* Seconds.  */
  __suseconds64_t tv_usec;	/* Microseconds.  */
#else
  __time_t tv_sec;		/* Seconds.  */
  __suseconds_t tv_usec;	/* Microseconds.  */
#endif
};
grep -Rwn __time64_t /usr/include/bits/과 같은 방식으로, 각 타입의 크기를 따라가 보면..
1. /usr/include/bits/types.h:
223:__STD_TYPE __TIME64_T_TYPE __time64_t;
2. /usr/include/bits/time64.h:
30:# define __TIME64_T_TYPE __TIME_T_TYPE
33:# define __TIME64_T_TYPE __SQUAD_TYPE
3. /usr/include/bits/typesizes.h:
64:#define __TIME_T_TYPE __SYSCALL_SLONG_TYPE
4. /usr/include/bits/typesizes.h:
31:# define __SYSCALL_SLONG_TYPE __SQUAD_TYPE
34:# define __SYSCALL_SLONG_TYPE __SLONGWORD_TYPE
5. /usr/include/bits/types.h:
116:# define __SQUAD_TYPE __int64_t
128:# define __SQUAD_TYPE long int
6. /usr/include/bits/types.h:
44:typedef signed long int __int64_t;
7. /usr/include/bits/types.h:
113:#define __SLONGWORD_TYPE long int
8. /usr/include/bits/types.h:
162:__STD_TYPE __SUSECONDS_T_TYPE __suseconds_t; /* Signed count of microseconds. */
9. /usr/include/bits/typesizes.h:
66:#define __SUSECONDS_T_TYPE __SYSCALL_SLONG_TYPE
10. /usr/include/bits/types.h:
163:__STD_TYPE __SUSECONDS64_T_TYPE __suseconds64_t;
11. /usr/include/bits/typesizes.h:
67:#define __SUSECONDS64_T_TYPE __SQUAD_TYPE
12. /usr/include/bits/types.h:
160:__STD_TYPE __TIME_T_TYPE __time_t; /* Seconds since the Epoch. */
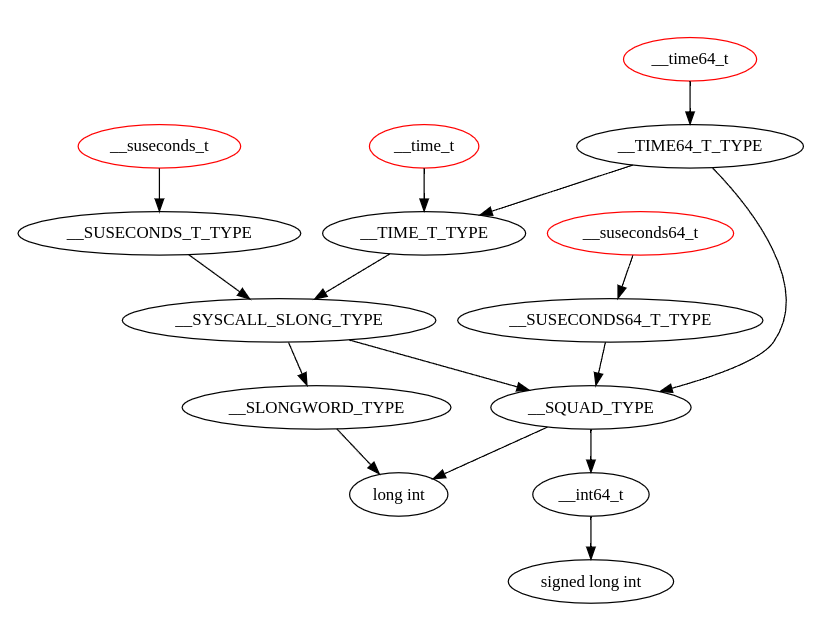
플래그에 따라 정의가 달라지긴 하지만, 결국엔 (signed) long int로 보면 될것 같다. 환경마다 다르다는데 내 환경에서 gcc -dM -E - </dev/null | grep LONG으로 확인한 크기는 8 byte 였다.
본론으로 돌아와서, utmp 구조체의 offset별 정의는 다음과 같이 이해해 볼 수 있겠다:
- 0~1 | short | ut_type | Type of record
- 2~5 | int | ut_pid | PID of login process
- 6~37 | char[32] | ut_line | Device name of tty - "/dev/"
- 38~41 | char[4] | ut_id | Terminal name suffix, or inittab(5) ID
- 42~73 | char[32] | ut_user | Username
- 74~329 | char[256] | ut_host | Hostname for remote login, or kernel version for run-level messages
- 330~331 | short | e_termination | Process termination status
- 332~333 | short | e_exit | Process exit status
- 334~337 | int | ut_session | Session ID (getsid(2)), used for windowing
- 338~341 | int | tv_sec | Seconds
- 342~345 | int | tv_usec | Microseconds
- 346~361 | int[4] | ut_addr_v6 | Internet address of remote host; IPv4 address uses just ut_addr_v6[0]
- 362~381 | char[20] | __unused | Reserved for future use
(ut_session 부터는 __WORDSIZE_COMPAT32와 __WORDSIZE 값에 따라 다르니 참고)
이제 이를 python으로 파싱하기 위해 struct 모듈을 활용해보면..
xtmp = namedtuple('xtmp', ('ut_type', 'ut_pid', 'ut_line',
                           'ut_id', 'ut_user', 'ut_host',
                           'e_termination', 'e_exit', 'ut_session',
                           'tv_sec', 'tv_usec', 'ut_addr_v6')
                 )

xtmp_format = 'hi32s4s32s256shhiii16s20x'
xtmp_size = struct.calcsize(xtmp_format)

for offset in range(0, len(raw_btmp), xtmp_size):
    records = struct.unpack(xtmp_format, raw_btmp[offset:offset+xtmp_size])

    btmp = xtmp._make(_.strip(b'\00') if type(_) == bytes else _ for _ in records)

    print(f'offset: {offset} ~ {offset+xtmp_size}')
    print(btmp)
    print()
출력은 아래와 같다.
offset: 0 ~ 384
xtmp(ut_type=6, ut_pid=390, ut_line=b'tty1', ut_id=b'1', ut_user=b'dongho', ut_host=b'', e_termination=0, e_exit=0, ut_session=0, tv_sec=1647646529, tv_usec=358920, ut_addr_v6=b'')

offset: 384 ~ 768
xtmp(ut_type=6, ut_pid=390, ut_line=b'tty1', ut_id=b'1', ut_user=b'*****', ut_host=b'', e_termination=0, e_exit=0, ut_session=0, tv_sec=1647646534, tv_usec=2827, ut_addr_v6=b'')

offset: 768 ~ 1152
xtmp(ut_type=6, ut_pid=4012, ut_line=b'tty3', ut_id=b'3', ut_user=b'dongho', ut_host=b'', e_termination=0, e_exit=0, ut_session=0, tv_sec=1647647576, tv_usec=847132, ut_addr_v6=b'')

offset: 1152 ~ 1536
xtmp(ut_type=6, ut_pid=4012, ut_line=b'tty3', ut_id=b'3', ut_user=b'p4ssw0rd', ut_host=b'', e_termination=0, e_exit=0, ut_session=0, tv_sec=1647647604, tv_usec=267502, ut_addr_v6=b'')

offset: 1536 ~ 1920
xtmp(ut_type=6, ut_pid=4130, ut_line=b'tty3', ut_id=b'3', ut_user=b'dongho', ut_host=b'', e_termination=0, e_exit=0, ut_session=0, tv_sec=1647647936, tv_usec=629563, ut_addr_v6=b'')
내가 했던 실수는 *로 가려놓았다. 여튼 384 ~ 768 이 부분만 지우면 내가 한 실수를 로그에서 지울 수 있을것이다.
with open('btmp_new', 'wb') as f:
    f.write(raw_btmp[0:384] + raw_btmp[768:1920])
로 문제가 되는 부분만 빼고 새로 만든 뒤 백업한 원래 btmp와 교체했다.
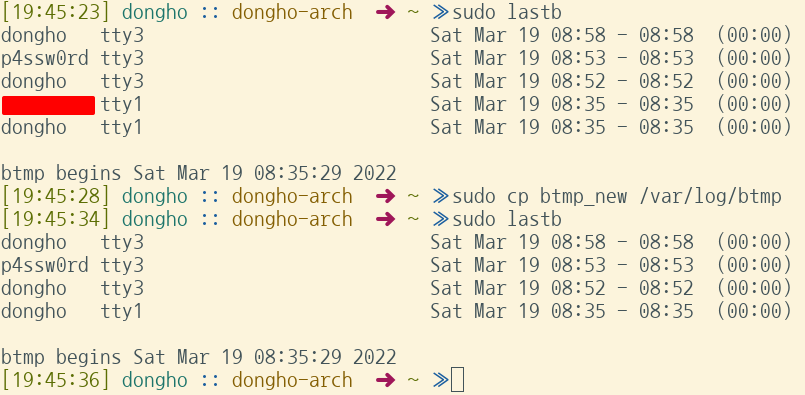
원하는대로 되었다. 원래 오늘 systems performance 2장을 마저 정리하려 했는데 로그인 한번 잘못했다가 이런글을 쓰게 되었다. 사실 예전에도 종종 이런 실수를 하곤 했는데 이번 기회에 정리해서 든든하다. utmp나 wtmp도 똑같은 구조를 따를것으로 보이며 lastlog만 따로 파싱하면 되겠다.