Spring 추가 강의
Spring의 DI와 AOP
Spring DI 흉내내기
변경에 유리한 코드
코드 변경 시 변경해야 할 부분을 최소화하여 오타 등의 실수나 테스트에 대한 부담을 줄이는것을 지향한다.
- Main1 -
class Car {
}

class SportsCar extends Car {
};

class Truck extends Car {
};
class Engine {}

public class Main1 {
    public static void main(String[] args) throws Exception {
        Car car = (Car)getObject("car");
        Engine engine = (Engine) getObject("engine");

        System.out.println("car = " + car);
        System.out.println("engine = " + engine);
    }
    static Object getObject(String key) throws Exception {
        // config.txt를 읽어서 Properties에 저장
        Properties p = new Properties();
        p.load(new FileReader("config.txt"));

        // 클래스의 객체를 얻은 후
        Class clazz = Class.forName(p.getProperty(key));

        return clazz.newInstance();   // 객체를 생성해서 반환
    }
    static Car getCar() throws Exception {
        // config.txt를 읽어서 Properties에 저장
        Properties p = new Properties();
        p.load(new FileReader("config.txt"));

        // 클래스의 객체를 얻은 후
        Class clazz = Class.forName(p.getProperty("car"));

        return (Car) clazz.newInstance();   // 객체를 생성해서 반환
    }
}
- config.txt -
car=com.fastcampus.ch3.diCopy1.SportsCar
engine=com.fastcampus.ch3.diCopy1.Engine
객체 컨테이너(ApplicationContext) 만들기
- Main2 -
class Car { }
class SportsCar extends Car { };
class Truck extends Car { };
class Engine {}

class AppContext{
    Map map;    // 객체 저장소

    AppContext(){
            try {
            Properties p = new Properties();
            p.load(new FileReader("config.txt"));

            // properties에 저장된 내용을 map에 저장
            map = new HashMap(p);

            // 반복문으로 클래스 이름을 얻어 객체를 생성한 후 다시 map에 저장
            for (Object key : map.keySet()){
            Class clazz = Class.forName((String)map.get(key));
            map.put(key, clazz.newInstance());
            }
        } catch (Exception e) {
            e.printStackTrace();
        }
    }

    Object getBean(String key){
        return map.get(key);
    }
}

public class Main2 {
    public static void main(String[] args) throws Exception {
        AppContext ac = new AppContext();
        Car car = (Car) ac.getBean("car");
        Engine engine = (Engine) ac.getBean("engine");

        System.out.println("car = " + car);
        System.out.println("engine = " + engine);
    }
}
- config.txt -
car=com.fastcampus.ch3.diCopy2.Truck
engine=com.fastcampus.ch3.diCopy2.Engine
=> 상단의 Main1예제와 동일하지만 하드코딩 부분을 완전히 없애고 config.txt파일의 내용으로만 값을 읽어 동작하도록 수정한 것.
객체 컨테이너를 만들어 읽어온 값을 컨테이너에 넣어 동작하도록 함.
Truck과 SportsCar 중 수정할 값이 있다면 config.txt의 내부값만 수정하면 됨.
@Component Scanning
자동 객체 등록하기
객체 클래스에 @Component 어노테이션을 붙여주면 자동으로 등록해줌.
@Component class Car { }
@Component class SportsCar extends Car { };
@Component class Truck extends Car { };
@Component class Engine {}
객체찾기 - by Name, by Type
map에 등록한 key로 찾는것이 이름으로 찾는것이며, 타입으로 객체를 찾을 수도 있다.
AppContext ac = new AppContext();
Car car = (Car) ac.getBean("Car");	// 이름("id")으로 찾기
Car car2 = (Car) ac.getBean(Car.class);	// 타입으로 찾기
Object getBean(String id) { // 이름으로 찾기
return map.get(id);
}Object getBean(String id) { // 타입으로 찾기
for(Object obj : map.values()){
if (clazz.isInstance(obj)) // obj Instanceof clazz
return obj;
}
return null;
}객체 자동등록하기
@Autowired
@Autowired는 객체를 type으로 찾아 자동으로 등록해주는 어노테이션이다.
@Resource
@Autowired처럼 객체를 자동으로 등록해주는 어노테이션으로, 객체를 name으로 찾는다.
타입의 첫문자를 소문자로 바꾼 이름을 기본으로 객체를 찾음.
@Component class Car {
    @Autowired Engine engine;
    @Autowired Door door;

    @Override
    public String toString() {
        return "Car{" +
                "engine=" + engine +
                ", door=" + door +
                '}';
    }
}
@Component class SportsCar extends Car { }
@Component class Truck extends Car { }
@Component class Engine {}
@Component class Door {}

class AppContext{
    Map map;    // 객체 저장소

    AppContext(){
        map = new HashMap();
        doComponentScan();
        doAutowired();
    }

    private void doAutowired() {
        // map에 저장된 객체의 iv(인스턴스 변수)중에 @Autowired가 붙어 있으면
        // map에서 iv의 타입에 맞는 객체를 찾아서 연결(객체의 주소를 iv에 저장)
        try {
            for (Object bean : map.values()){
                for (Field fld : bean.getClass().getDeclaredFields()){
                    if (fld.getAnnotation(Autowired.class)!=null)   // byType
                        fld.set(bean, getBean(fld.getName()));  // car.engine = obj;
                }
            }
        } catch (IllegalAccessException e) {
            e.printStackTrace();
        }
    }

    private void doComponentScan(){
        try {
            ClassLoader classLoader = AppContext.class.getClassLoader();
            ClassPath classPath = ClassPath.from(classLoader);

            Set<ClassPath.ClassInfo> set = classPath.getTopLevelClasses("com.fastcampus.ch3.diCopy4");

            for (ClassPath.ClassInfo classInfo : set){
                Class clazz = classInfo.load();
                Component component = (Component)clazz.getAnnotation(Component.class);
                if (component != null){
                    String id = StringUtils.uncapitalize(classInfo.getSimpleName());
                    map.put(id, clazz.newInstance());
                }
            }
        } catch (Exception e) {
            e.printStackTrace();
        }
    }

    Object getBean(String key){
        return map.get(key);
    }   // 객체검색시 byName
    Object getBean(Class clazz) {   // 객체검색시 byType
        for (Object obj : map.values()) {
            if (clazz.isInstance(obj))
                return obj;
        }
        return null;
    }
}

public class Main4 {
    public static void main(String[] args) throws Exception {
        AppContext ac = new AppContext();
        Car car = (Car) ac.getBean("car");  // byName으로 객체검색
        Car car2 = (Car) ac.getBean(Car.class); // byType으로 객체검색
        Engine engine = (Engine) ac.getBean("engine");
        Door door = (Door) ac.getBean(Door.class);

        System.out.println("car = " + car);
        System.out.println("engine = " + engine);
        System.out.println("door = " + door);

    }
}
Spring DI 활용하기
@Autowired는 타입으로 먼저 검색, 여러개면 이름으로 검색.
@Qualifier(이름) 은 검색한 내역을 이름으로 구별하는 어노테이션.
위의 둘의 대신으로 한번에 이름으로 찾는 어노테이션은 @Resource(name="이름")임.
@Autowired를 많이 쓰는 이유는 이름은 추후 바뀔 수 있으나 타입이 바뀌는일은 흔하지 않으며, 이름입력시 오타 등의 문제가 발생하는 것을 막기 위해서.
같은 타입의 객체가 하나가 아닐 경우 타입으로 찾도록 하면 에러가 발생함.
- config.xml -
<?xml version="1.0" encoding="UTF-8"?>
<beans xmlns="http://www.springframework.org/schema/beans"
       xmlns:context="http://www.springframework.org/schema/context"
       xmlns:xsi="http://www.w3.org/2001/XMLSchema-instance"
       xsi:schemaLocation="http://www.springframework.org/schema/beans http://www.springframework.org/schema/beans/spring-beans.xsd">
    <context:component-scan base-package="com.fastcampus.ch3">
        <context:exclude-filter type="regex" expression="com.fastcampus.ch3.diCopy*.*"/>
    </context:component-scan>
    <context:annotation-config/>
</beans>
- SpringDiTest -
@Component("engine") class Engine {}
@Component class SuperEngine extends Engine {}
@Component class TurboEngine extends Engine {}
@Component class Door {}
@Component
class Car {
    @Value("red") String color;
    @Value("100") int oil;
    @Autowired
    Engine engine;  // byType - @Autowired는 타입으로 먼저 검색, 여러개면 이름으로 검색
    @Autowired
    Door[] doors;

    public void setColor(String color) {
        this.color = color;
    }

    public void setOil(int oil) {
        this.oil = oil;
    }

    public void setEngine(Engine engine) {
        this.engine = engine;
    }

    public void setDoors(Door[] doors) {
        this.doors = doors;
    }

    @Override
    public String toString() {
        return "Car{" +
                "color='" + color + '\'' +
                ", oil=" + oil +
                ", engine=" + engine +
                ", doors=" + Arrays.toString(doors) +
                '}';
    }
}

public class SpringDiTest {
    public static void main(String[] args) {
        ApplicationContext ac = new GenericXmlApplicationContext("config.xml");
        Car car = (Car) ac.getBean("car");

//        Engine engine = (Engine) ac.getBean("engine");    // byName
//        Engine engine = (Engine) ac.getBean("superEngine");  // byType   => 동일한 타입의 객체가 여러 개일 경우 이름으로 찾도록 해야 함
//
//        Door door = (Door) ac.getBean("door");

//        car.setColor("red");
//        car.setOil(100);
//        car.setEngine(engine);
//        car.setDoors(new Door[]{ac.getBean("door", Door.class),(Door)ac.getBean("door")});

        System.out.println("car = " + car);
    }
}
bean 이란
Spring에서의 Bean : 단순함, 독립적, Spring container가 관리.
Bean : Spring Container가 관리하는 객체.
Spring Container : Bean 저장소, Bean을 저장 및 관리(생성, 소멸, 연결)
IoC와 DI
IoC
제어의 역전.(Inversion of Control)
제어의 흐름을 전통적인 방식과 다르게 뒤바꾸는 것.
전통적인 방식 : 사용자 코드가 Framework 코드를 호출
Car car = new Car();
car.turboDrive();
void turboDrive() {
engine = new TurboEngine();
engine.start();
...
}IoC : Framework가 사용자 코드를 호출
Car car = new Car();
car.drive(new SuperEngine());
void Drive(Engine engine) {
engine.start();
...
}=> 위 두가지는 변하지 않는 것과 변하는 것을 분리하여 수정한 코드.(수정한 것이 IoC)
DI
의존성 주입.
사용할 객체를 외부에서 주입받는 것.
library와 framework
library : 기능을 제공
framework : 기능에 더해 프로그래밍 패턴과 형식까지 제공
@Autowired
- 인스턴스 변수(iv), setter, 참조형 매개변수를 가진 생성자, 메서드에 사용.
- 참고로 생성자의
@Autowired는 생략이 가능함(자동으로 등록해줌).
- Spring container에서 타입으로 bean을 검색해서 참조 변수에 자동 주입(DI).
- 검색된 bean이 n개 이면, 그 중 참조 변수와 이름이 일치하는 것을 주입.
- 주입 대상이 변수일 때, 검색된 bean이 1개가 아니면 예외 발생.
- 주입 대상이 배열일 때, 검색된 bean이 n개라도 예외가 발생하지 않음.
참고 : @Autowired(required=false)일 때, 주입할 bean을 못찾아도 예외가 발생하지 않음.
@Resource
- Spring container에서 타입으로 bean을 검색하는
@Autowired와는 달리@Resource는 이름으로 검색하여 참조 변수에 자동 주입(DI)함.
일하는 이름의 bean이 없으면 예외가 발생함.
class Car {
	@Resource(name="superEngine")
    Engine engine;
}
class Car {
@Autowired
@Qualifier("superEngine")
Engine engine;
}class Car {
// @Resource(name="engine") // 이름 생략가능
@Resource
Engine engine;
}@Component
<component-scan>으로 @Component가 클래스를 자동 검색해서 bean으로 등록.
@Controller, @Service, @Repository, @ControllerAdvice의 메타 어노테이션.
메타 어노테이션 : 어노테이션을 만드는 어노테이션
워크밴치 사용법과 SQL기초
DB는 MySQL8.0 사용.
현재 실무에서는 mariaDB 사용중이므로 나중에 동일한 작업을 mariaDB로도 사용할 수 있도록 실습해볼것.
MySQL Workbench에서는 기본적으로 where절을 안줬을때 실행을 막아주어 테이블의 데이터를 한번에 삭제하거나 수정하는 실수를 막아줌.
기본옵션으로 막아주곤 있지만 초보가 자주 하는 실수이므로 주의하여 SQL문을 작성하자.
JUnit을 이용한 DB 연결 테스트
JUnit framework를 이용하면 테스트를 한번에 진행할 수 있으며 어디서 오류가 발생했는지도 쉽게 알 수 있다.
이러한 테스트 자동화를 활용한 개발방법을 TDD, 즉 테스트 주도 개발이라 칭한다.
CREATE SCHEMA `springbasic` DEFAULT CHARACTER SET utf8 ;

CREATE TABLE `springbasic`.`user_info` (
  `id` VARCHAR(30) NOT NULL,
  `pwd` VARCHAR(50) NULL,
  `name` VARCHAR(30) NULL,
  `email` VARCHAR(30) NULL,
  `birth` DATE NULL,
  `sns` VARCHAR(30) NULL,
  `reg_date` DATETIME NULL,
  PRIMARY KEY (`id`))
ENGINE = InnoDB
DEFAULT CHARACTER SET = utf8;
- root-context.xml -
참고로 파일을 찾기 어려우면 인텔리제이에서 shift 두 번 클릭으로 쉽게 찾을 수 있다.
DB shcema이름과 id, password는 자신에게 맞도록 변경하여 사용.
<?xml version="1.0" encoding="UTF-8"?>
<beans xmlns="http://www.springframework.org/schema/beans"
xmlns:xsi="http://www.w3.org/2001/XMLSchema-instance"
xsi:schemaLocation="http://www.springframework.org/schema/beans https://www.springframework.org/schema/beans/spring-beans.xsd">
<!-- Root Context: defines shared resources visible to all other web components -->
<bean id="dataSource" class="org.springframework.jdbc.datasource.DriverManagerDataSource">
<property name="driverClassName" value="com.mysql.jdbc.Driver"></property>
<property name="url" value="jdbc:mysql://localhost:3306/springbasic?useUnicode=true&characterEncoding=utf8"></property>
<property name="username" value="asdf"></property>
<property name="password" value="1234"></property>
</bean>
</beans>@RunWith(SpringJUnit4ClassRunner.class)
@ContextConfiguration(locations = {"file:src/main/webapp/WEB-INF/spring/**/root-context.xml"})
public class DBConnectionTest2Test {
@Autowired
DataSource ds;
@Test
public void insertUserTest() throws Exception {
User user = new User("ccc", "1234", "abcd", "ccc@gmail.com", new Date(), "fb", new Date());
deleteAll();
int rowCnt = insertUser(user);
assertTrue(rowCnt == 1);
}
@Test
public void deleteUserTest() throws Exception {
deleteAll();
int rowCnt = deleteUser("asdf");
assertTrue(rowCnt == 0);
User user = new User("ccc", "1234", "abcd", "ccc@gmail.com", new Date(), "fb", new Date());
rowCnt = insertUser(user);
assertTrue(rowCnt == 1);
rowCnt = deleteUser(user.getId());
assertTrue(rowCnt==1);
assertTrue(selectUser(user.getId())==null);
}
@Test
public void updateUser() throws Exception{
User user = new User( "ccc", "1111", "ddd", "ddd@naver.com", new Date(), "instargrem", new Date());
int rowCnt = updateUser(user);
assertTrue(rowCnt==1);
}
// 매개변수로 받은 사용자 정보로 user_info 테이블을 update하는 메서드
public int updateUser(User user) throws Exception{
Connection conn = ds.getConnection();
String sql = "update springbasic.user_info set pwd = ?, name =?, email=?, birth=?, sns=?, reg_date=now() where id= ? ";
PreparedStatement pstmt = conn.prepareStatement(sql);
pstmt.setString(1, user.getPwd());
pstmt.setString(2, user.getName());
pstmt.setString(3, user.getEmail());
pstmt.setDate(4, new java.sql.Date(user.getBirth().getDate()));
pstmt.setString(5, user.getSns());
pstmt.setString(6, user.getId());
int rowCnt = pstmt.executeUpdate();
return rowCnt;
}
public int deleteUser(String id) throws Exception {
Connection conn = ds.getConnection();
String sql = "delete from springbasic.user_info where id= ? ";
PreparedStatement pstmt = conn.prepareStatement(sql); // SQL Injection공격, 성능향상
pstmt.setString(1, id);
return pstmt.executeUpdate();
}
@Test
public void selectUserTest() throws Exception {
deleteAll();
User user = new User("asdf", "1234", "abc", "aaaa@aaa.com", new Date(), "fb", new Date());
int rowCnt = insertUser(user);
User user2 = selectUser("asdf");
assertTrue(user.getId().equals("asdf"));
}
private User selectUser(String id) throws Exception {
Connection conn = ds.getConnection();
String sql = "select * from user_info where id= ? ";
PreparedStatement pstmt = conn.prepareStatement(sql); // SQL Injection공격, 성능향상
pstmt.setString(1, id);
ResultSet rs = pstmt.executeQuery(); // select
if (rs.next()) {
User user = new User();
user.setId(rs.getString(1));
user.setPwd(rs.getString(2));
user.setName(rs.getString(3));
user.setEmail(rs.getString(4));
user.setBirth(new Date(rs.getDate(5).getTime()));
user.setSns(rs.getString(6));
user.setReg_date(new Date(rs.getTimestamp(7).getTime()));
return user;
}
return null;
}
private void deleteAll() throws Exception {
Connection conn = ds.getConnection();
String sql = "delete from springbasic.user_info";
PreparedStatement pstmt = conn.prepareStatement(sql);
pstmt.executeUpdate();
}
public int insertUser(User user) throws Exception {
Connection conn = ds.getConnection();
String sql = "insert into springbasic.user_info values (?,?,?,?,?,?, now())";
// "'bbb', '1234', 'smith', 'bbb@gmail.com', '2023-01-01', 'facebook', now());";
PreparedStatement pstmt = conn.prepareStatement(sql); // PSTMT 장점: sql Injection공격에 강함, 성능 향상
pstmt.setString(1, user.getId());
pstmt.setString(2, user.getPwd());
pstmt.setString(3, user.getName());
pstmt.setString(4, user.getEmail());
pstmt.setDate(5, new java.sql.Date(user.getBirth().getDate()));
pstmt.setString(6, user.getSns());
int rowCnt = pstmt.executeUpdate();
return rowCnt;
}
@Test
public void main() throws Exception {
// ApplicationContext ac = new GenericXmlApplicationContext("file:src/main/webapp/WEB-INF/spring/**/root-context.xml");
// DataSource ds = ac.getBean(DataSource.class);
Connection conn = ds.getConnection(); // 데이터베이스의 연결을 얻는다.
System.out.println("conn = " + conn);
assertTrue(conn != null); // 괄호 안의 조건식이 true면 테스트 성공, 아니면 실패
}
}
실행 후 사진의 표시한 부분에서 @Test 목록 중 성공한 테스트 갯수를 확인할 수 있다.
DAO의 작성과 적용
DAO
데이터(Data)에 접근(Access)하기 위한 객체(Object)
Database에 저장된 데이터에 읽기, 쓰기, 삭제, 변경(CRUD) 작업을 수행.
DB테이블당 하나의 DAO를 작성한다.
계층(layer)의 분리
controller에서 직접 DB에 접근할 수도 있지만 각 기능마다 똑같은 작업이 필요한 경우 코드의 중복이 일어나게 되므로 이를 막기위해 계층을 분리해주기 위해 DAO를 사용한다.
또한 DB의 변경이 일어날 경우 계층을 분리해두면 DAO만 변경하면 되므로 코드의 변경에도 유리하다.
원래라면 Connection객체 사용 시 작업이 끝나면 close(rs, pstmt, conn);와 같이 객체를 닫아주는 작업이 필요한데 close()를 호출하다가 에러가 발생할 수 있어 예외처리가 필요하다.
하지만 모든 연결마다 예외처리로 try-catch를 만들어주면 가독성에 좋지 않으므로 jdk7부터 지원되는 try-with-resources를 사용한다.
참고링크 - Try-with-resources를 이용한 자원해제 처리
참고링크 - [Java] try-with-resources란?
Transaction
더 이상 나눌 수 없는 작업의 단위. (예 - insert, update, select)
계좌이체의 경우 출금과 입금이 하나의 Tx로 묶어야 함.
=> 출금과 입금이 모두 성공하지 않을 시 rollback.
Transaction의 속성 (ACID)
- 원자성(Atomicity) : 나눌 수 없는 하나의 작업으로 다뤄져야 한다.
- 일관성(Consistency) : Tx 수행 전과 후가 일관된 상태를 유지해야 한다.
- 고립성(Isolation) : 각 Tx는 독립적으로 수행되어야 한다.
- 영속성(Durabilty) : 성공한 Tx의 결과는 유지되어야 한다.
=> 이때 고립성은 너무 높아도 낮아도 문제가 될 수 있어 주의가 필요함.
커밋과 롤백
- 커밋(commit) : 작업 내용을 DB에 영구적으로 저장
- 롤백(rollback) : 최근 변경사항을 취소 (마지막 커밋으로 복귀)
Transaction의 Isolation level
- READ UNCOMMITED : 커밋되지 않은 데이터도 읽기 가능
- READ COMMITED : 커밋된 데이터만 읽기 가능
- REPEATABLE READ : Tx의 시작 후 다른 Tx의 변경은 무시됨 (default)
- SERIALIZABLE : 한번에 하나의 Tx만 독립적으로 수행
AOP (Aspect-Oriented Programming)
관점 지향 프로그래밍 (Aspect-Oriented Programming)
DI와 함께 Spring의 핵심 개념.
부가 기능(advice)을 동적으로(=실행중에) 추가해주는 기술.
메서드의 시작 또는 끝에 자동으로 코드(advice)를 추가.
=> 예 - Logging, Transaction, Security 등
| 용어 | 설명 |
|---|---|
| target | advice가 추가될 객체 |
| advice | target에 동적으로 추가될 부가기능(코드) |
| join point | advice가 추가될 대상(메서드) |
| pointcut | join point들을 정의한 패턴 |
| proxy | target에 advice가 동적으로 추가되어 생성된 객체 |
| weaving | target에 advice를 추가해서 proxy를 생성하는 것 |
Advice의 설정은 XML과 어노테이션 두 가지 방법으로 가능.
예제
각 메서드의 내용을 출력하되 메서드의 이름이 a로 시작하는 경우에만 출력문의 앞뒤로 문구를 추가로 넣어주는 예제.
이 경우 반복코드의 분리에 해당된다.
수정 전
class MyClass {
void aaa() {
System.out.println("[before]{");
System.out.println("aaa() is called");
System.out.println("}[after]");
}
void aaa2() {
System.out.println("[before]{");
System.out.println("aaa2() is called");
System.out.println("}[after]");
}
void bbb() {
System.out.println("[before]{");
System.out.println("bbb() is called");
System.out.println("}[after]");
}
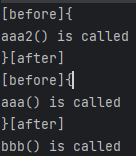
}수정 후
public class AopMain {
    public static void main(String[] args) throws Exception {
        MyAdvice myAdvice = new MyAdvice();
        Class myClass = Class.forName("com.fastcampus.ch3.aop.MyClass");
        Object obj = myClass.newInstance();

        // myClass에 들어있는 메서드들을 for문으로 모두 실행함
        for (Method m : myClass.getDeclaredMethods()) {
            myAdvice.invoke(m, obj, null);
        }
    }
}
class MyAdvice {
    Pattern p = Pattern.compile("a.*"); // 메서드 이름이 a로 시작하는 메서드만 선택

    boolean matches(Method m) {
        Matcher matcher = p.matcher(m.getName());
        return matcher.matches();
    }

    void invoke(Method m, Object obj, Object... args) throws Exception {
        if (matches(m)) {
            System.out.println("[before]{");
        }

        m.invoke(obj, args);        // aaa(), aaa2(), bbb() 호출
        if (matches(m)) {
            System.out.println("}[after]");
        }
    }
}
class MyClass {
    void aaa() {
        System.out.println("aaa() is called");
    }
    void aaa2() {
        System.out.println("aaa2() is called");
    }
    void bbb() {
        System.out.println("bbb() is called");
    }
}
서비스 계층의 분리와 @Transactional
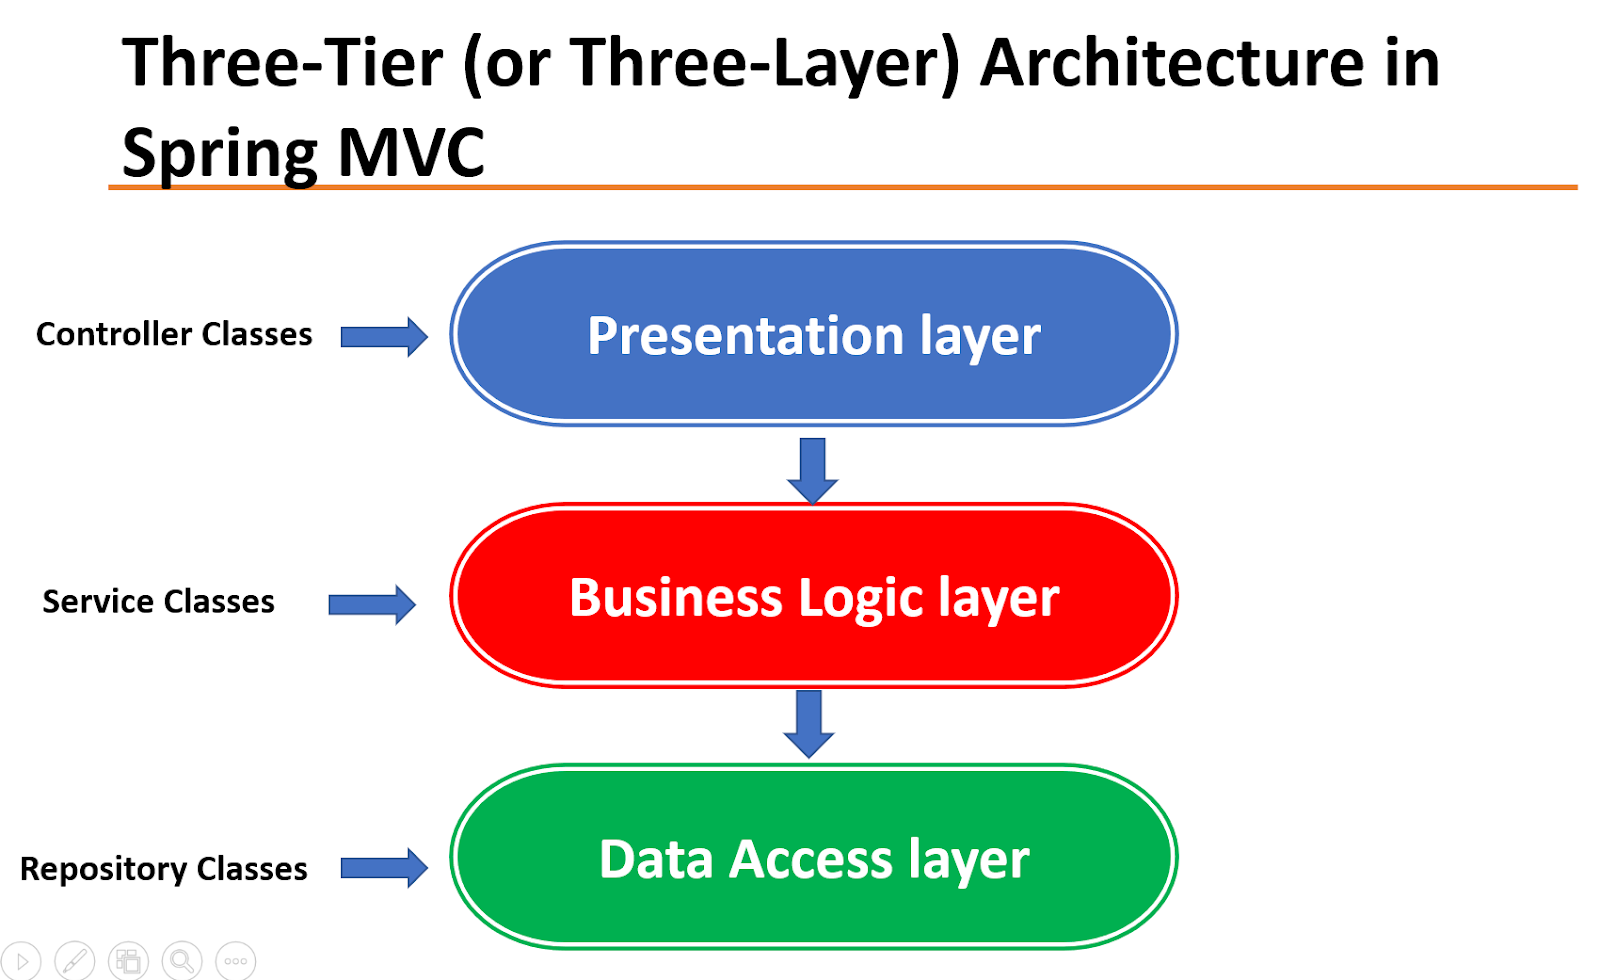
Controller와 Dao사이에 Service계층을 만들어 비즈니스 로직을 처리하도록 설계.
만약 service계층없이 바로 Controller와 Dao를 연결시킨다면 비즈니스 로직이 변경될때마다 controller를 계속 변경해주어야 하나, service계층을 만들어주면 dao와 controller의 변경없이 처리가 가능함.
=> 비즈니스 로직을 처리할때 service계층에서 Transaction을 처리하는것을 권장함.
@TransactionManager
DAO의 각 메서드는 개별 Connection을 사용함.
TransactionManager는 같은 Tx내에서 같은 Connection을 사용할 수 있게 관리하는 역할을 함.
예를 들어 deleteUser()를 두 번 보내는 경우 이 동작을 하나씩 다룬다면 하나의 동작이 실패해도 rollback이 불가능하므로 두 번의 동작을 합쳐서 Tx로 다루어야함.
이럴때 Tx에 맞게 Connection을 관리하는것이 필요함.
@Transactional
AOP를 이용한 핵심 기능과 부가 기능의 분리에 사용.
@Transactional은 클래스나 인터페이스에도 붙일 수 있음.
7주차 수강후기
Java는 기본적으로 한번 쭉 훑은 적이 있어서 듣고 정리하기 편했는데 Spring은 아는게 없다는걸 깨달았다.
코드를 보면 대충 무슨 연습을 해보는중이구나 하는건 알아보겠는데 정확히 무엇을 위해 이렇게 짰으며 왜 이 방법을 선택했는지, 이 행에서 구체적으로 어떤 과정을 거치는지는 전혀 모르겠다.
