
자바 스프링 프레임워크(renew ver.) - 신입 프로그래머를 위한 강좌
스프링 프로젝트 생성
스프링 컨테이너
의존객체와 자동주입
01. 프로젝트 생성
스프링에서의 객체 → 빈 (Bean)
스프링에서 객체를 생성하고 조립하는 것이 컨테이너로, 컨테이너를 통해 생성된 객체를 빈이라고 한다.
스프링에서의 가장 핵심은 스프링 컨테이너라 할 수 있다.
코딩 > 컴파일 > 빌드 > 배포
이 중 빌드에 해당하는 역할을 하는 도구 중 하나가 메이븐(maven)이다.
이클립스에서 스프링 프로젝트를 만들 때 메이븐 프로젝트로 생성한다.
신규 maven 프로젝트 생성
spring 프로젝트를 새로 생성하려면 IntelliJ에서 New Project > Maven Archetype을 선택하여 아래와 같이 작성한다.
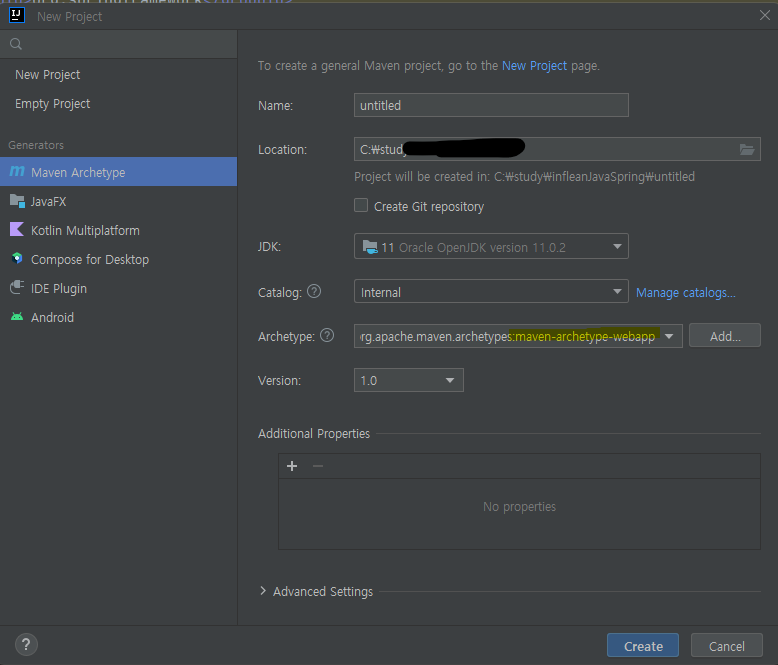
name: 프로젝트 이름
location: 프로젝트 저장 경로
jdk: 사용할 jdk
archetype: maven-archetype-webapp (메이븐에서 만들어둔 프로젝트 구조 템플릿)
생성 후 pom.xml을 수정하여 필요한 디펜던시를 다운받는다.
강의는 spring4, maven-compiler-plugin 3.1버전을 사용하지만 나는 jdk11, spring 5.2.5, maven-compiler-plugin 3.9.0 버전을 사용하였다.
이 부분의 버전을 맞추는 것이 처음이라 생각보다 오랜 시간이 소모되었다.
메이븐 설치도 처음에는 의무인줄 알았으나 진행해보니 우선 프로젝트 생성 후 pom.xml에서 추가해주면 큰 문제는 없는 것 같다.
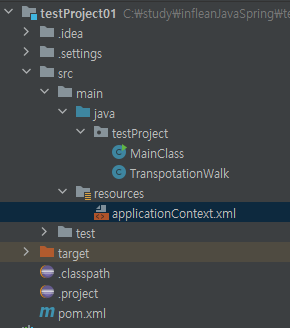
스프링 폴더 구조
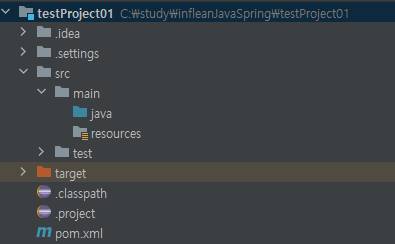
- java 폴더에는 프로그램에 필요한 순수 자바 코드들이 들어간다.
- resources 폴더에는 자바 코드 외 프로젝트에 필요한 파일들이 들어간다.
프로그램 실행 시 메이븐이 위 구조를 바탕으로 빌드를 진행하기 때문에 반드시 패키징 규칙을 따라야 프로그램의 정상적인 실행이 가능하다.
pom.xml이란?
pom.xml은 메이븐 설정파일로, 메이븐은 라이브러리를 연결해주고 빌드를 위한 플랫폼이다.
외부의 메인 라이브러리에 있는 모듈을 pom.xml에 명시해두면 자동으로 다운로드받아 관리해주는 역할을 한다.
- pom.xml -
<project xmlns="http://maven.apache.org/POM/4.0.0" xmlns:xsi="http://www.w3.org/2001/XMLSchema-instance"
         xsi:schemaLocation="http://maven.apache.org/POM/4.0.0 https://maven.apache.org/xsd/maven-4.0.0.xsd">
    <modelVersion>4.0.0</modelVersion>
    <groupId>spring5</groupId>
    <artifactId>testProject01</artifactId>
    <version>0.0.1-SNAPSHOT</version>

    <properties>
        <maven.compiler.source>11</maven.compiler.source>
        <maven.compiler.target>11</maven.compiler.target>
        <spring.framework.version>5.2.5.RELEASE</spring.framework.version>
        <java.version>11</java.version>
    </properties>

    <dependencies>
        <dependency>
            <groupId>org.springframework</groupId>
            <artifactId>spring-webmvc</artifactId>
            <version>${spring.framework.version}</version>
        </dependency>

    </dependencies>

    <build>
        <plugins>
            <plugin>
                <artifactId>maven-compiler-plugin</artifactId>
                <version>3.9.0</version>
                <configuration>
                    <source>${java.version}</source>
                    <target>${java.version}</target>
                    <encoding>utf-8</encoding>
                </configuration>
            </plugin>
        </plugins>
    </build>

</project>
xml로 빈 등록하기
- 스프링은 스프링 컨테이너를 이용해 객체를 관리하는데, 이때 스프링에서 객체를 빈(Bean)이라고 부른다.
- 스프링 컨테이너에 빈을 등록하면 new키워드를 통해 직접 생성하지 않아도 스프링 컨테이너에 등록된 빈을 가져와 사용하는 구조를 띄게 된다.
- 하나의 빈을 공유하여 사용하는데, 이를
싱글톤방식이라 한다. - 스프링은 기본적으로 싱글톤 방식으로 객체를 관리한다.
- 하나의 빈을 공유하여 사용하는데, 이를
- applicationContext.xml -
<?xml version="1.0" encoding="UTF-8"?>
<beans xmlns="http://www.springframework.org/schema/beans"
       xmlns:xsi="http://www.w3.org/2001/XMLSchema-instance"
       xsi:schemaLocation="http://www.springframework.org/schema/beans
http://www.springframework.org/schema/beans/spring-beans.xsd">
    <bean id="tWalk" class="testProject.TranspotationWalk" />

</beans>
→ 위의 코드에서 <bean id="tWalk" class="testProject.TranspotationWalk" />를 제외한 부분은 bean을 등록하는 대부분의 xml파일에서 동일하게 쓰이므로 오타방지를 위해 복사하여 사용하면 된다.
이제 xml에 작성된 bean을 이용해 간단한 메서드를 돌려 빈 등록이 제대로 되었는지 확인해보자.
- TranspotationWalk -
public class TranspotationWalk {
    public void move(){
        System.out.println("도보로 이동합니다.");
    }
}
- MainClass -
public class MainClass {
    public static void main(String[] args) {
        // 스프링을 사용하지 않은 순수 자바의 new키워드를 이용한 객체생성
//        TranspotationWalk transpotationWalk = new TranspotationWalk();
//        transpotationWalk.move();

        GenericXmlApplicationContext ctx = new GenericXmlApplicationContext("classpath:applicationContext.xml");
        TranspotationWalk tWalk = ctx.getBean("tWalk", TranspotationWalk.class);
        tWalk.move();
        ctx.close();
    }
}
→ 위 코드를 실행시키면 아래와 같은 과정을 거친다.
1) GenericXmlApplicationContext 를 이용해 스프링 컨테이너를 생성하여 applicationContext.xml 파일의 내용을 통해 빈을 생성 및 등록(메모리에 로드)한다.
2) 스프링 컨테이너에서 tWalk라는 이름의 TranspotationWalk.class 클래스 유형의 빈을 찾아 tWalk라는 객체를 생성한다.
3) tWalk객체의 move() 메서드를 실행한다.
4) 사용이 끝난 ctx 스프링 컨테이너 객체를 종료한다.
main클래스에서 주석처리해둔 부분을 실행해본 후 다시 아래의 spring을 이용한 코드를 실행해보자.

똑같은 결과가 나옴을 확인할 수 있다.
03. 의존 객체
DI (Dependency Injection)
- 스프링의 핵심 기능 중 하나로, 의존 주입을 뜻한다.
- 프로그래밍의 방법 중 하나이며 스프링에서만 사용하는 개념은 아니다. OOP 언어라면 스프링 외 다른 언어에서도 사용된다.
DI란?
- 어떤 물건에 배터리가 일체형으로 붙어있다면 해당 물건은 배터리에 의존적이라고 할 수 있다.
이때 배터리를 교체하려면 물건 자체를 교체해야하는 종속성이 생긴다. - 객체를 독립화 시켜서 프로그램의 확장과 유지보수를 용이하게 할 때
의존 객체 주입 방법
1) 생성자를 이용한 의존 객체 주입
public StudentRegisterService(StudentDao studentDao) {
this.studentDao = studentDao;
}
public StudentModifyService(StudentDao studentDao) {
this.studentDao = studentDao;
}
public StudentDeleteService(StudentDao studentDao) {
this.studentDao = studentDao;
}
public StudentSelectService(StudentDao studentDao) {
this.studentDao = studentDao;
}
public StudentAllSelectService(StudentDao studentDao) {
this.studentDao = studentDao;
}
↑자바 코드에서 생성자를 이용하여 객체 주입, ↓xml에서 생성자를 이용하여 객체 주입
<bean id="studentDao" class="ems.member.dao.StudentDao" ></bean>
<bean id="registerService" class="ems.member.service.StudentRegisterService">
<constructor-arg ref="studentDao" ></constructor-arg>
</bean>
<bean id="modifyService" class="ems.member.service.StudentModifyService">
<constructor-arg ref="studentDao" ></constructor-arg>
</bean>
<bean id="deleteService" class="ems.member.service.StudentDeleteService">
<constructor-arg ref="studentDao" ></constructor-arg>
</bean>
<bean id="selectService" class="ems.member.service.StudentSelectService">
<constructor-arg ref="studentDao" ></constructor-arg>
</bean>
<bean id="allSelectService" class="ems.member.service.StudentAllSelectService">
<constructor-arg ref="studentDao" ></constructor-arg>
</bean>
2) setter를 이용한 의존 객체 주입
public String getJdbcUrl() {
	return jdbcUrl;
}
public void setJdbcUrl(String jdbcUrl) {
	this.jdbcUrl = jdbcUrl;
}
public String getUserId() {
	return userId;
}
public void setUserId(String userId) {
	this.userId = userId;
}
public String getUserPw() {
	return userPw;
}
public void setUserPw(String userPw) {
	this.userPw = userPw;
}<bean id="dataBaseConnectionInfoDev" class="ems.member.DataBaseConnectionInfo">
<property name="jdbcUrl" value="jdbc:oracle:thin:@localhost:1521:xe" />
<property name="userId" value="scott" />
<property name="userPw" value="tiger" />
</bean스프링 설정 파일 분리
applicationContext.xml파일을 n개로 분리하여 설정파일을 만들 수 있다.
보통은 목적(기능)에 따른 설정마다 파일을 분리하여 설정한다.
예)
- appCtx1.xml : dao와 service객체 bean 등록 설정
- appCtx2.xml : database에 관련된 설정
- appCtx3.xml : infomation service에 관련된 설정
String[] appCtxs = {"classpath:appCtx1.xml", "classpath:appCtx2.xml", "classpath:appCtx3.xml"};
		GenericXmlApplicationContext ctx =
				new GenericXmlApplicationContext(appCtxs);
→ 위 예제에서의 설정파일이 3개이므로 문자열 배열을 이용해 스프링 컨테이너를 만들어주었다.
혹은 하나의 설정파일A에 다른 2개의 설정파일을 import한 후 GenericXmlApplicationContext로 설정파일A를 등록하는 형식으로 사용할 수는 있으나, 보편적으로 사용되는 방법은 아니다.
Bean의 범위
스프링 컨테이너에서 생성된 빈(Bean) 객체의 경우 동일한 타입에 대해서는 기본적으로 하나의 객체만 생성된다.
즉, getBean()메서드로 호출 시 타입이 동일하다면 어디서 몇 번을 호출해도 동일한 객체가 반환된다.
=> 이를 싱글톤 이라 한다.
참고로 싱글톤 범위와 반대되는 개념은 프로토타입(prototype) 범위이다.
스프링 컨테이너는 기본적으로 싱글톤 범위를 사용하므로 프로토타입의 경우 개발자가 scope속성을 명시하여 프로토타입임으로 설정해야 한다.
의존 객체 자동 주입
- 스프링 설정 파일에서 다른 객체를 의존할 때
<constructor-org>또는<property>태그로 의존 대상을 명시하지 않아도 스프링 컨테이너가 자동으로 의존 대상 객체를 찾아서 필요한 객체에 주입해주는 기능. @Autowired,@Resource어노테이션을 이용한다.
1) @Autowired
@Autowired가 붙어있을때 타입이 일치하는 객체를 자동으로 주입한다.
A에서 b객체에 의존해야할 때 b객체에 @Autowired를 붙여두면 A에 자동으로 b객체를 주입한다.
예제1. xml에서 생성자를 이용한 기존의 의존 객체 주입
- WordRegisterService -
public class WordRegisterService {

	private WordDao wordDao;

	public WordRegisterService(WordDao wordDao) {
		this.wordDao = wordDao;
	}
	// 이하생략
}
- WordSearchService -
public class WordSearchService {

	private WordDao wordDao;

	public WordSearchService(WordDao wordDao) {
		this.wordDao = wordDao;
	}
    // 이하생략
}
- appCtx.xml -
<?xml version="1.0" encoding="UTF-8"?>
<beans xmlns="http://www.springframework.org/schema/beans"
	xmlns:xsi="http://www.w3.org/2001/XMLSchema-instance"
	xsi:schemaLocation="http://www.springframework.org/schema/beans
 		http://www.springframework.org/schema/beans/spring-beans.xsd">

	<bean id="wordDao" class="com.word.dao.WordDao" />

	<bean id="registerService" class="com.word.service.WordRegisterService">
		<constructor-arg ref="wordDao" />
	</bean>

	<bean id="searchService" class="com.word.service.WordSearchService">
		<constructor-arg ref="wordDao" />
	</bean>

</beans>
위의 예제에서 설정파일의 <constructor-arg>태그 대신 @Autowired어노테이션을 이용하도록 수정한다.
- WordRegisterService -
public class WordRegisterService {

	private WordDao wordDao;
	@Autowired
	public WordRegisterService(WordDao wordDao) {
		this.wordDao = wordDao;
	}
	// 이하생략
}
- WordSearchService -
public class WordSearchService {

	private WordDao wordDao;
	@Autowired
	public WordSearchService(WordDao wordDao) {
		this.wordDao = wordDao;
	}
    // 이하생략
}
- appCtx.xml -
<?xml version="1.0" encoding="UTF-8"?>
<beans xmlns="http://www.springframework.org/schema/beans"
	   xmlns:context="http://www.springframework.org/schema/context"
	   xmlns:xsi="http://www.w3.org/2001/XMLSchema-instance"
	   xsi:schemaLocation="http://www.springframework.org/schema/beans
 		http://www.springframework.org/schema/beans/spring-beans.xsd
 		http://www.springframework.org/schema/context
 		http://www.springframework.org/schema/context/spring-context.xsd">

	<context:annotation-config />

	<bean id="wordDao" class="com.word.dao.WordDao" />
	<bean id="registerService" class="com.word.service.WordRegisterService"/>
	<bean id="searchService" class="com.word.service.WordSearchService"/>

</beans>
보통은 어노테이션을 통해 설정해주는편이다.
단, 생성자에 @Autowired를 붙일때는 괜찮지만 프로퍼티, 메서드에 @Autowired를 붙일때는 반드시 기본생성자를 만들어주어야 한다.
2) @Resource
@Autowired와 비슷하지만 @Autowired가 스프링 컨테이너에 만들어진 객체 중 데이터 타입으로 알맞는 객체를 찾는다면 @Resource는 객체의 이름을 통해 알맞은 객체를 찾아 자동으로 주입한다.
생성자, 프로퍼티, 메서드에 모두 사용할 수 있는 @Autowired와는 달리 @Resource는 생성자에는 사용할 수 없고 프로퍼티와 메서드에만 사용할 수 있다.
의존객체 선택
동일한 객체가 2개 이상인 경우 스프링 컨테이너는 자동 주입 대상 객체를 판단하지 못해 Exception을 발생시킨다.
이때 어떤 객체를 자동 주입해야하는지 명시하기 위해 @Qualifier를 사용한다.
- appCtx.xml -
// 생략
	<bean id="wordDao1" class="com.word.dao.WordDao">
    	<qualifier value="usedDao"/>
    </bean>
    <bean id="wordDao2" class="com.word.dao.WordDao" />
    <bean id="wordDao3" class="com.word.dao.WordDao" />

	<bean id="registerService" class="com.word.service.WordRegisterService"/>
	<bean id="searchService" class="com.word.service.WordSearchService"/>
- WordRegisterService -
public class WordRegisterService {
	@Autowired
    @Qualifier("usedDao")
	private WordDao wordDao;
	@Autowired
	public WordRegisterService(WordDao wordDao) {
		this.wordDao = wordDao;
	}
	// 이하생략
}
- WordSearchService -
public class WordSearchService {

	private WordDao wordDao;
	@Autowired
	public WordSearchService(WordDao wordDao) {
		this.wordDao = wordDao;
	}
    // 이하생략
}
→ 혹은 객체가 여러개 있더라도 bean의 id와 주입할 객체의 이름이 같을 경우 자동으로 주입이 되나 그리 권장하는 방법은 아니다.
@Inject
@Autowired와 거의 동일하지만 빈 객체를 필수로 등록하지 않는 것을 허용하는 required=false 속성을 지원하지 않는다는 차이점이 있다.
보통은 해당 속성을 사용할 일이 없기때문에 @Autowired를 사용한다.
한번도 생각해보지 않았던 문제.
나는 스프링 프로젝트를 생성해서 초기세팅을 해본 적이 없다...
놀랍게도 이것은 실화다...
강의를 따라하는게 문제가 아니라 이 부분부터가 문제였다.
🔗참고자료
