몽고디비의 특징 중 하나는 자바스크립트 문법을 사용한다는 것이다.
- 노드도 자바스크립트를 사용하므로 데이터베이스마저 몽고디비를 사용한다면 자바스크립트만 사용해 웹 애플리케이션을 만들 수 있는 것이다.
- 하나의 언어만 사용하면 되므로 생산성도 매우 높다.
하지만 몽고디비는 흔히 사용하는 RDBMS가 아니라 특색이 뚜렷한
NoSQL이므로 특징을 잘 알고 사용해야 한다.
8.1 NoSQL vs SQL
MySQL은 SQL을 사용하는 대표적인 데이터베이스이다.
반면에 SQL을 사용하지 않는, NoSQL(Not only SQL)이라고 부르는 데이터베이스도 있다. 몽고디비는 NoSQL의 대표 주자이다.
SQL과 NoSQL의 차이점
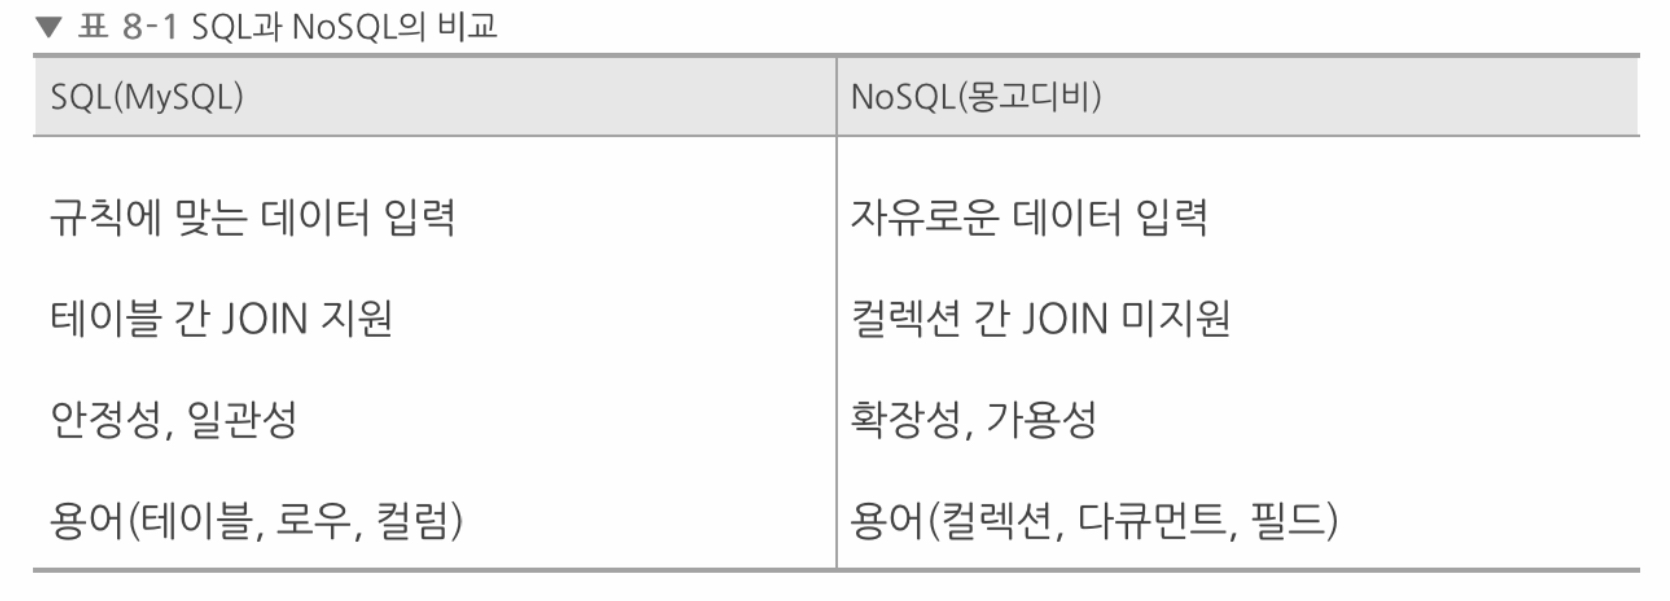
애플리케이션을 만들 때 꼭 한 가지 데이터베이스만 사용해야 하는 것은 아니다. 많은 기업이 SQL과 NoSQL을 동시에 사용하고 있다. SQL과 MySQL은 각각 특징이 다르므로 알맞은 곳에 사용하면 된다.
예를 들어 항공사 예약 시스템의 경우 비행기 표에 관한 정보가 모든 항공사에 일관성 있게 전달되어야 하므로 예약 처리 부분의 데이터베이스는 MySQL을 사용한다.
대신 핵심 기능 외의 빅데이터, 메시징, 세션 관리 등에서는 확장성과 가용성을 위해 몽고디비를 사용할 수도 있다.
8.2 몽고디비 설치하기(Mac)
Homebrew를 이용해 설치
brew tap mongodb/brew
brew install mongodb-community
brew install mongosh
몽고디비 실행
brew services start mongodb-community몽고디비 프롬프트에 접속
(프롬프트가 test> 로 바뀌면 접속 성공)
mongosh접속 후 관리자 계정 추가
use admin
db.createUser({user : '이름', pwd: '비밀번호', roles: ['root']})
몽고디비가 인증을 사용하도록 설정
brew services stop mongodb-community
vim /opt/homebrew/etc/mongod.conf
다음 두 줄을 추가
(A를 눌러 입력 모드로 전환해 입력 후, Esc를 눌러 명령어 모드에서 :wq! 로 저장.)
security:
  authorization: enabled
다시 몽고디비 실행 후 접속
brew services start mongodb-community
mongosh -u 아이디 -p 비밀번호
8.3 컴퍼스 설치하기(Mac)
몽고디비는 관리 도구로 컴퍼스를 제공한다.
컴퍼스를 사용하면 GUI를 통해 데이터를 시각적으로 관리할 수 있어 편리하다.
하지만 필수적인 것은 아니며 콘솔로도 같은 작업을 할 수 있다.
Homebrew로 설치
brew install --cask mongodb-compass-community8.4 데이터베이스 및 컬렉션 생성하기
데이터베이스를 만드는 명령어 use 데이터베이스명
use nodejs데이터베이스 목록 확인하는 명령어 show dbs
(데이터를 최소 한 개 이상 넣어야 목록에 표시된다.)
show dbs현재 사용 중인 데이터베이스를 확인하는 명령어 db
db컬렉션을 따로 생성할 필요는 없다. 다큐먼트를 넣는 순간 컬렉션도 자동으로 생성되기 때문이다.
하지만 다음과 같이 직접 컬렉션을 생성하는 명령어가 있다.
db.createCollection('users')생성한 컬렉션 목록 확인
show collenctions8.5 CRUD 작업하기
8.5.1 Create
컬렉션에 칼럼을 정의하지 않아도 되므로 컬렉션에는 아무 데이터나 넣을 수 있다.
이러한 자유로움이 몽고디비의 장점이지만, 무엇이 들어올지 모른다는 단점도 있다.
기본적으로 몽고디비는 자바스크립트 문법을 사용하므로 자바스크립트의 자료형을 따르지만, 추가로 몇 가지 자료형이 더 있다.
db.컬렉션명.insertOne(다큐먼트) 로 다큐먼트를 생성할 수 있다.
8.5.2 Read
컬렉션 내의 모든 다큐먼트를 조회 : db.컬렉션명.find({})
컬렉션 내의 특정 필드를 조회 : db.컬렉션명.find({}, {id: 0, name :1})
8.5.3 Update
$set 이라는 연산자는 어떤 필드를 수정할지 정하는 연산자다.
db.컬렉션명.updateOne({수정할 다큐먼트 지정},{$set:{수정할 내용}})
8.5.3 Delete
db.컬렉션명.deleteOne({삭제할 다큐먼트 지정})
8.6 몽구스 사용하기
MySQL에 시퀄라이즈가 있다면 몽고디비에서는 몽구스가 있다.
몽구스는 시퀄라이즈와 달리 ODM(Object Document Mapping)이라고 불린다. 몽고디비는 릴레이션이 아니라 다큐먼트를 사용하므로 ORM이 아니라 ODM입니다.
몽고디비는 테이블이 없어서 자유롭게 데이터를 넣을 수 있지만, 때로는 불편함을 초래한다. 실수로 잘못된 자료형의 데이터를 넣을 수도 있기 때문이다. 몽구스는 몽고디비에 데이터를 넣기 전에 노드 서버 단에서 데이터를 한 번 필터링하는 역할을 한다.
몽구스에 필요한 패키지 설치
npm i express morgan nunjucks mongoose
npm i-D nodemon
8.6.1 몽고디비 연결하기
몽고디비는 주소를 사용해 연결한다.
주소 형식은 mongodb://[username:password@]host[:port][/database][?options]] 이다.
- username과 password에 몽고지비 계정 이름과 비밀번호를 넣는다.
- host가 localhost, port가 27017, 계정이 있는 database가 admin이므로 주소는 다음과 같이 된다.
mongodb://이름:비밀번호@localhost:27017/admin
schemas/index.js
const mongoose = require('mongoose');

const connect = () => {
  if (process.env.NODE_ENV !== 'production') {
    mongoose.set('debug', true);
  }
  mongoose.connect('mongodb://root:nodejsbook@localhost:27017/admin', {
    dbName: 'nodejs',
    useNewUrlParser: true,
  }).then(() => {
    console.log("몽고디비 연결 성공");
  }).catch((err) => {
    console.error("몽고디비 연결 에러", err);
  });
};

mongoose.connection.on('error', (error) => {
  console.error('몽고디비 연결 에러', error);
});
mongoose.connection.on('disconnected', () => {
  console.error('몽고디비 연결이 끊겼습니다. 연결을 재시도합니다.');
  connect();
});

module.exports = connect;
app.js
const express = require('express');
const path = require('path');
const morgan = require('morgan');
const nunjucks = require('nunjucks');

const connect = require('./schemas'); // schemas/index.js와 연결
const indexRouter = require('./routes/index');
const usersRouter = require('./routes/users');
const commentsRouter = require('./routes/comments');

const app = express();
app.set('port', process.env.PORT || 3002);
app.set('view engine', 'html');
nunjucks.configure('views', {
  express: app,
  watch: true,
});
connect();

app.use(morgan('dev'));
app.use(express.static(path.join(__dirname, 'public')));
app.use(express.json());
app.use(express.urlencoded({ extended: false }));

app.use('/', indexRouter);
app.use('/users', usersRouter);
app.use('/comments', commentsRouter);

app.use((req, res, next) => {
  const error =  new Error(`${req.method} ${req.url} 라우터가 없습니다.`);
  error.status = 404;
  next(error);
});

app.use((err, req, res, next) => {
  res.locals.message = err.message;
  res.locals.error = process.env.NODE_ENV !== 'production' ? err : {};
  res.status(err.status || 500);
  res.render('error');
});

app.listen(app.get('port'), () => {
  console.log(app.get('port'), '번 포트에서 대기 중');
});
8.6.2 스키마 정의하기
시퀄라이즈에서 테이블을 만들었던 것처럼 몽구스 스키마를 만들어보기.
schemas/user.js
const mongoose = require('mongoose');

const { Schema } = mongoose;
const userSchema = new Schema({
  name: {
    type: String,
    required: true,
    unique: true,
  },
  age: {
    type: Number,
    required: true,
  },
  married: {
    type: Boolean,
    required: true,
  },
  comment: String,
  createdAt: {
    type: Date,
    default: Date.now,
  },
});

module.exports = mongoose.model('User', userSchema);